jhdesigns
-
Posts
35 -
Joined
-
Last visited
-
 U1F𐒱332 reacted to a post in a topic:
Select Same > Font
U1F𐒱332 reacted to a post in a topic:
Select Same > Font
-
 PaoloT reacted to a post in a topic:
Select Same > Font
PaoloT reacted to a post in a topic:
Select Same > Font
-
jhdesigns reacted to a post in a topic:
Option to rasterize at 2X?
-
Option to rasterize at 2X?
jhdesigns replied to jhdesigns's topic in Feedback for the Affinity V2 Suite of Products
Here’s just one example of when I needed to rasterize and the issue it solves for. There are many more: I use a photograph of some dancers on a stage with a solid black backdrop in a post card mailer and there is snow falling on a portion of the background. Client wants snow falling on the entire background. While I could stamp it out, it’s more efficient in this case to copy portions of the existing snow, and paste all over the background, rotating, editing and resizing the various layers for some randomness. I also need to extend the image on both sides. The sides of the stage floor in the photo have a very uniform color gradient, so I use a frequent hack where I copy the original image, crop it so I just have a chunk of the stage floor and background on each side, and then scale those horizontally to fill the screen, with a slight Gaussian blur added to hide any stretched pixels. I put some black (same color as background) vector shapes with a flat horizontal line to make it so that where the stage and background meet have a clean line since I applied the blur, and because in the original photo the line is not perfectly straight. Everything looks great in Designer. I export to PDF and everything also looks great in Apple Preview. My client opens in Acrobat and sees subtle, lighter colored lines around all of the layers that compose this image - the sections of snow I cut out, the border between the cropped sections of stage, the original photo, and the vector shapes. But if I group it all and rasterize it before export, these lines disappear in Acrobat. Now the client decides they want that image cropped tighter, so I have to keep a duplicate of the original group because if I scale the rasterized image up it loses resolution, whereas if It was rasterized at a configurable multiple, I’d have room to scale without loss, and my file size would be much smaller because the original image I used was super high resolution. Something else I may have wanted to do had the floor needed touch ups is to stamp parts of the stage in Photo from the original photo to the extended portions, then maybe also use some Inpainting. But I can’t do this detailed work at 2X without resizing the canvas, changing the resolution, or creating a new file or artboard at that size unless I want to be dragging the image around since it’s larger than the viewable area. With rasterization at a multiple, I can do everything in context and with more detail. Then I save on overall file size because the original photo is 10x bigger than the canvas and now at 2x it’s a fraction the original file size. There are, of course, alternative workflows that are closer to design best practices but my work requires some shortcuts for efficiency. I have to operate with very thin margins since I contract for ad agencies that also have margins to preserve and I am often rushed. Any and all efficiencies are in play so long as the end result meets expectations. -
Option to rasterize at 2X?
jhdesigns replied to jhdesigns's topic in Feedback for the Affinity V2 Suite of Products
Additionally, if they're rasterized at a multiple, you could do more detailed edits on raster images after they are rasterized should touchups be needed. -
Option to rasterize at 2X?
jhdesigns replied to jhdesigns's topic in Feedback for the Affinity V2 Suite of Products
Sorry, I had tested this right before I posted but must have accidentally missed the target and clicked rasterize and trim (guess I've done this a few times). Even without that issue though it would still be very useful to be able to rasterize at a multiple. This could be a simple setting in the preferences and doesn't seem that complex to implement. Another use for this is that you could cut document file size considerably while still retaining flexibility for scaling larger on rasterized images should there be revisions that require layout adjustments, and you wouldn't have to do this scale up, rasterize, scale down on every single image. I have a huge archive of client files and some are quite large in file size because they contain high resolution images. After a certain point, I don't need original resolution anymore, but I might need the extra flexibility of being able to scale a little larger without loss if someone asks for an update to an old file. -
Option to rasterize at 2X?
jhdesigns replied to jhdesigns's topic in Feedback for the Affinity V2 Suite of Products
Designer for Desktop trims to artboard with normal "rasterize" instead of "rasterize and trim." It will not do this with a basic canvas. I need to use artboards all the time. There are scenarios where multi-layered images need to be rasterized for proper output. For example, I've gotten antialiasing artifacts on PDFs, which are asked for for print, on images that are composed of multiple layers in a group. Rasterizing solves this. Describing every use case is way too time consuming and complex but I do need to do this on a fairly regular basis. -
Option to rasterize at 2X?
jhdesigns replied to jhdesigns's topic in Feedback for the Affinity V2 Suite of Products
I disagree. This represents an efficiency when layout adjustments are needed late in the revisions process. It's tedious to scale every image down, then double the size again to rasterize, then scale down again. The other problem with this is if that if you're using an artboard and the image goes off canvas because it's large when scaled up, Affinity will trim the rasterized image to the artboard. It's also better to have document resolution set to actual output values while working. That way when I'm in pixel persona I can see what it's actually going to look like when exported. -
It would be useful if there was a setting so that when images were rasterized, it could be at a higher resolution than the document resolution at the size they are currently rendered (2X, 3X, 4X). So, for example, if I set rasterization preferences to 2X, I could still scale that image to twice its dimensions without resolution loss after rasterization.
-
ai-2021 reacted to a post in a topic:
Select Same > Font
-
Kaze reacted to a post in a topic:
Select Same > Font
-
colorsHaveChangedAgain reacted to a post in a topic:
Select Same > Font
-
garrettm30 reacted to a post in a topic:
Select Same > Font
-
Problem with selection tool in Designer
jhdesigns replied to jhdesigns's topic in Desktop Questions (macOS and Windows)
Ah, derp! Thanks, not sure how I missed that @Murfee -
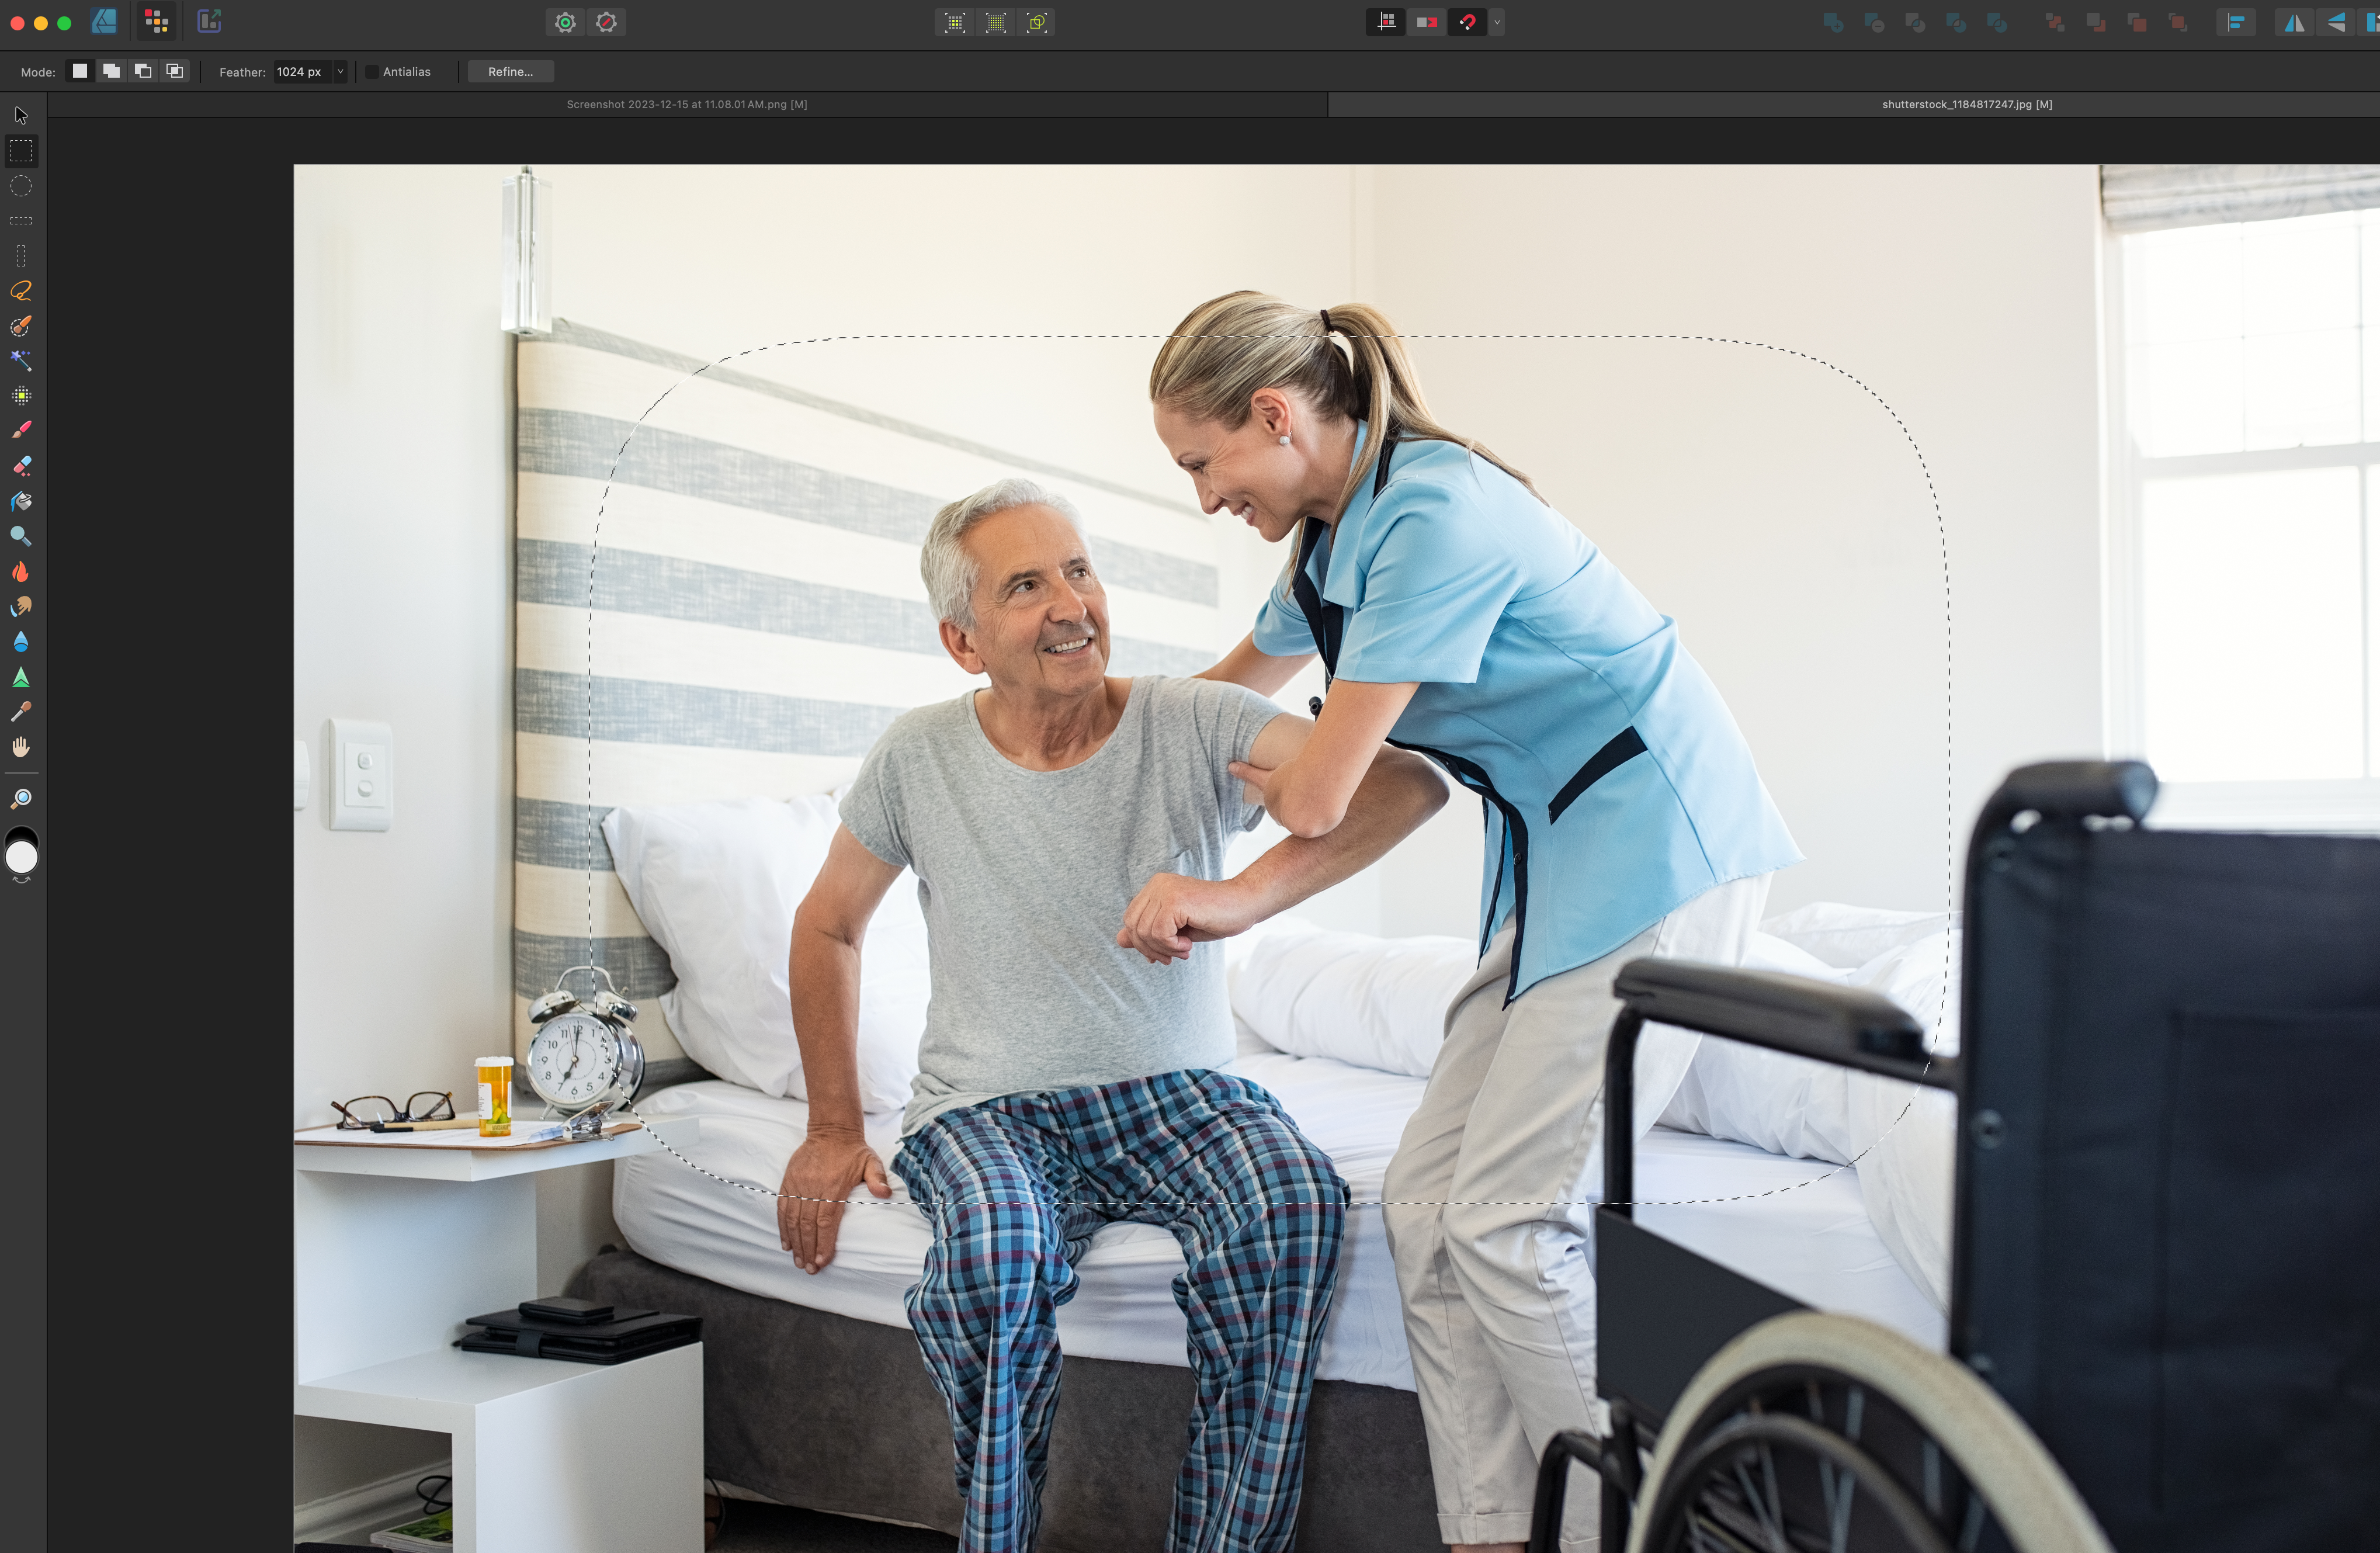
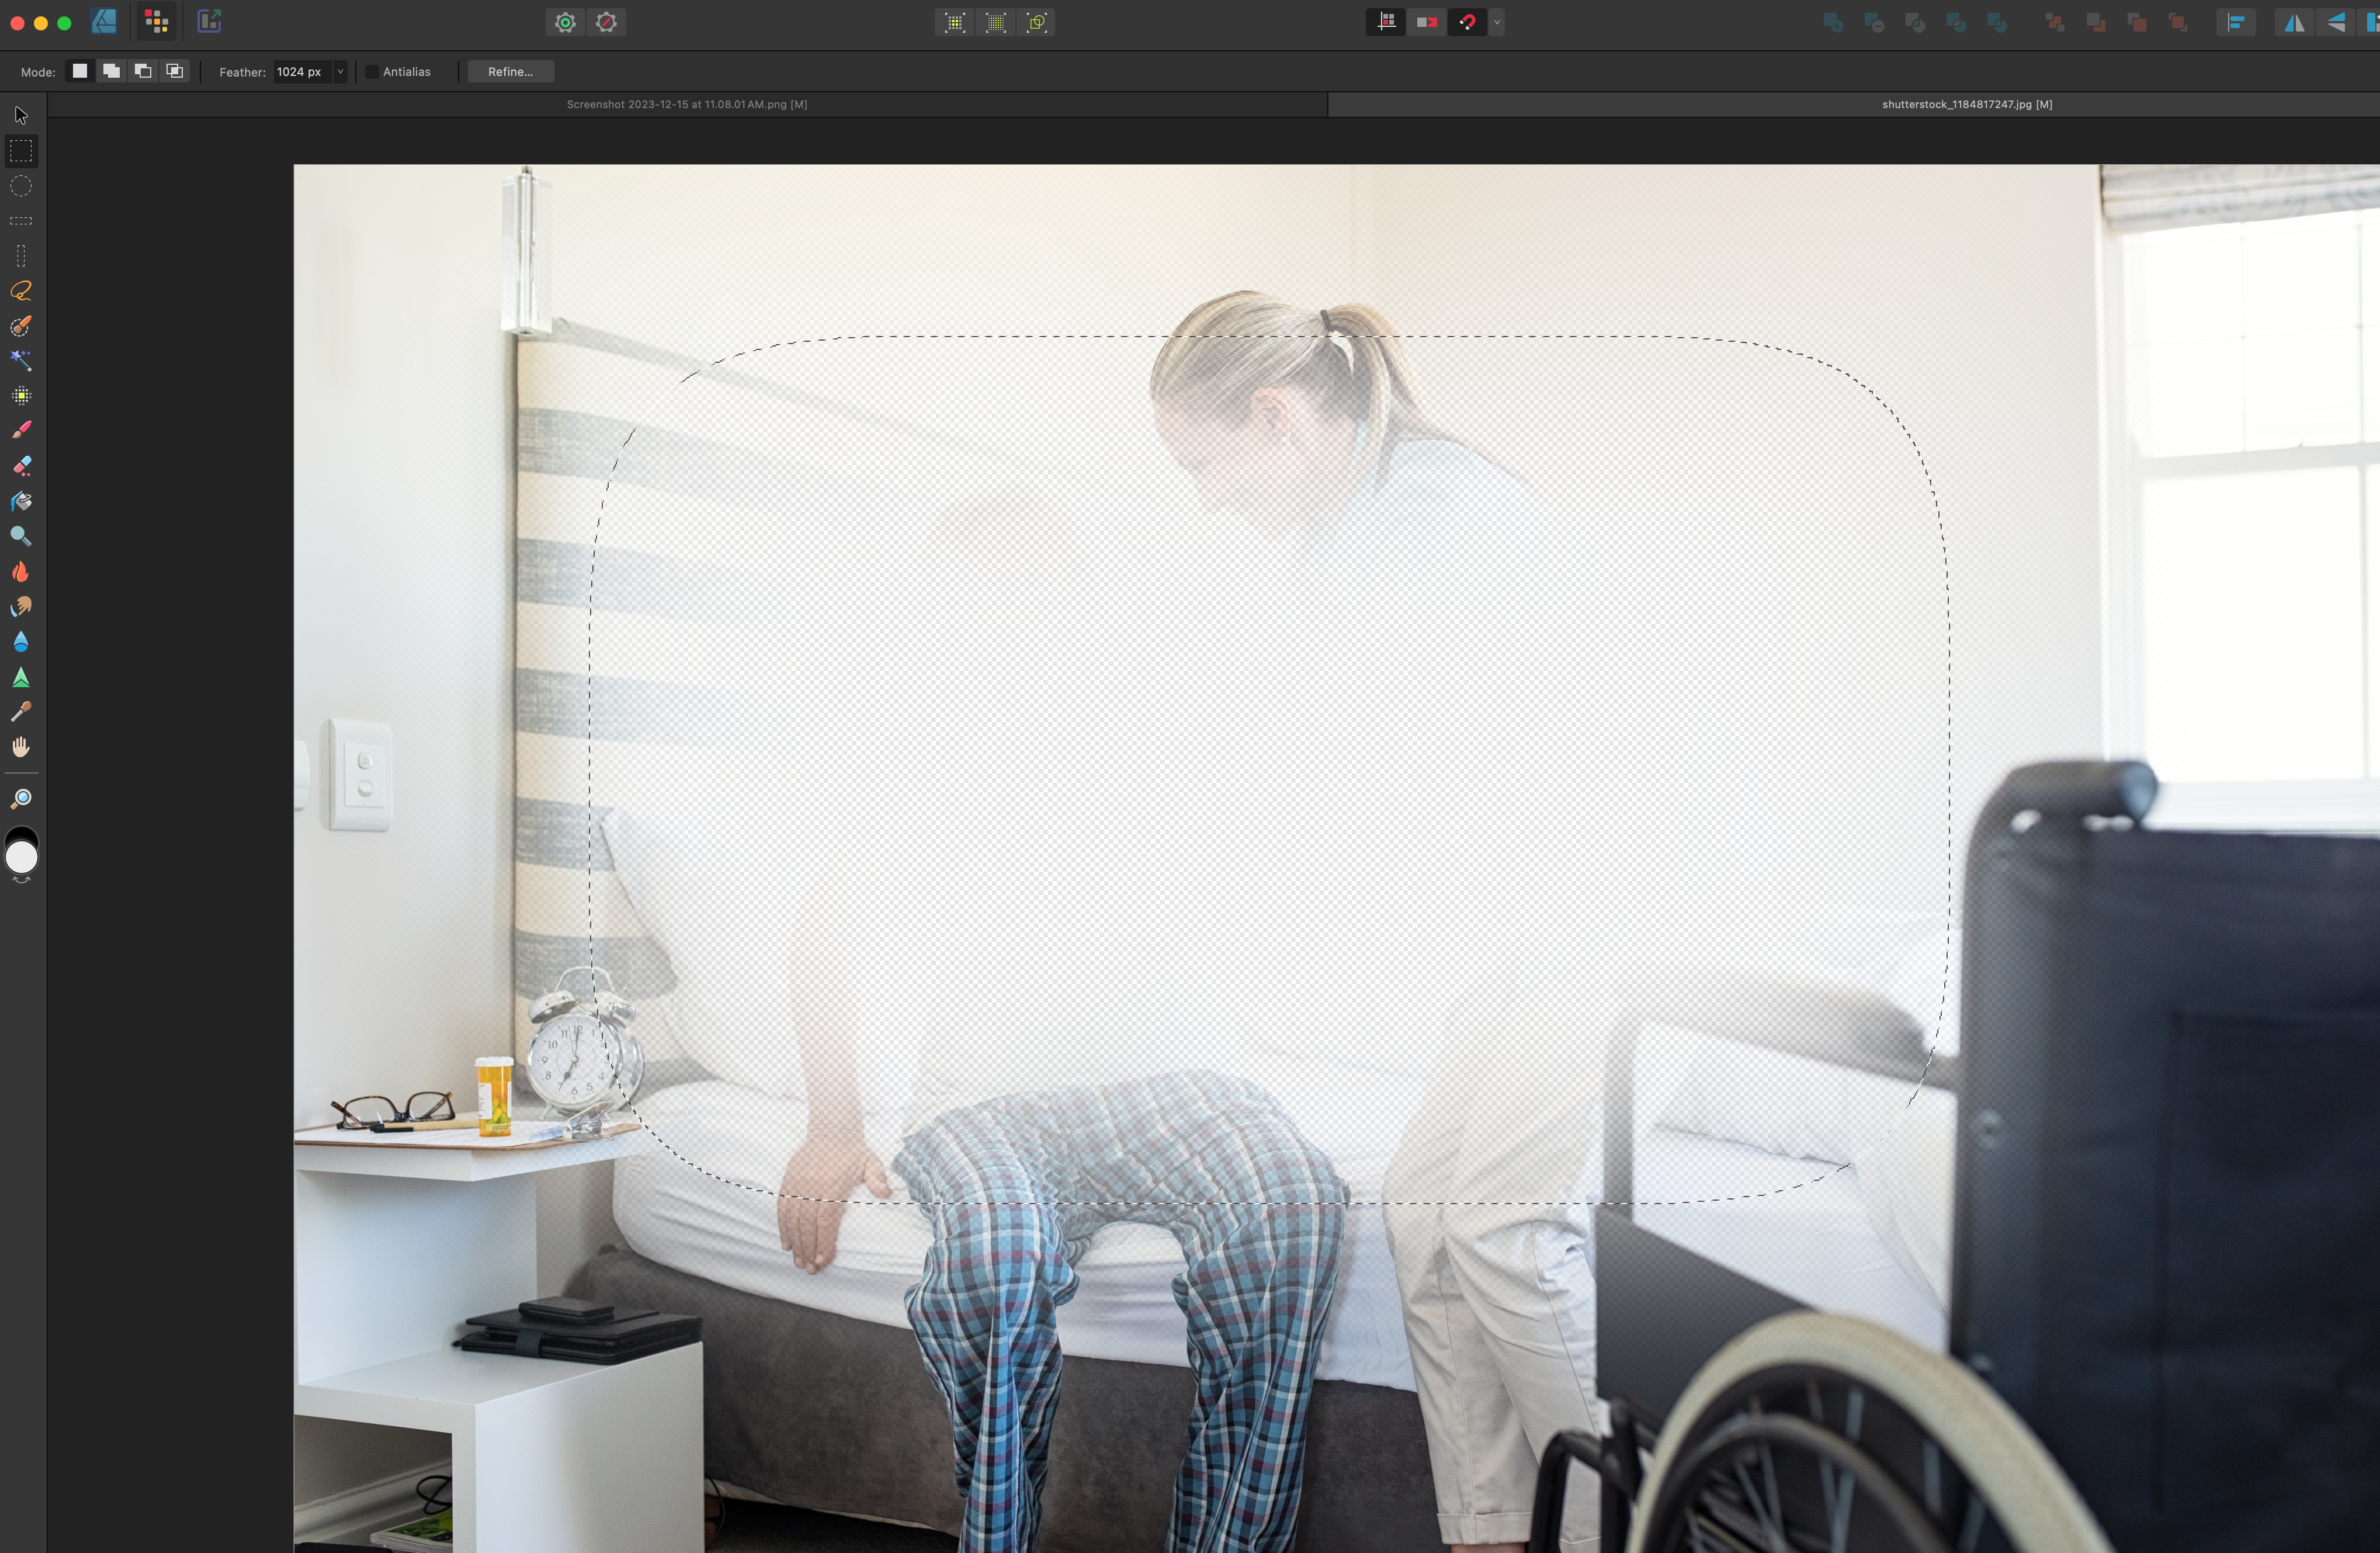
Before I report this as a bug, I want to make sure I'm not doing something wrong or haven't selected some setting without knowing. In Designer 2.3.0, when I use the box selection tool in pixel persona it adds a huge amount of feathering. The corners become rounded and it fades from opaque to transparency. This is before refining the selection. It didn't used to do this, and it's not doing it in Photo either. I tried restarting the app and my machine. Below you can see what it looks like when I simply open an image, click and drag with the box selection tool, and then use the cut command. Anyone know how to resolve this?

-
Ad Morris reacted to a post in a topic:
Select Same > Font
-
True, in certain scenarios it would probably be too complex to get accurate values, and maybe in those scenarios the option is not available, but for many scenarios where adjustment layers would be used on vector art it doesn't seem like it should be and it would be a huge efficiency... where there could be a simple change of value. If they're flat colors, for example, it's the equivalent of using the eye dropper tool on each object and then applying the color. If they are gradients, it could grab the colors as the eye dropper would from the coordinates of each stop and apply those values to the stops. The only time I have needed this is when I'm working with simple color adjustments like HSL and Recolor. I don't really use complex curves on vector art. Use case: I paste a vector illustration into a larger piece and decide, hmmm, I need to up the saturation on this to better match the piece. So my option is to increase the saturation on every color separately by using select same> fill which could take forever depending on the complexity of the piece, or I apply an adjustment to the group, in which case it's rasterized on export, which is not ideal. Another use case: I want to adapt a vector piece that has various orange tones so that those tones become various purple tones to better match a client's brand. I apply the HSL adjustment layer to achieve this effect, but now, again, I can't export as vector. So if the artwork contains adjustment layers where this is impossible, the option could just be greyed out on right click. If it is possible, it could be available. Heck, it doesn't even have to technically be adjustment layers. It could just be the ability to use sliders for the same values that are in the color chooser window like hue, saturation, lightness (although recolor would be nice to have too) but it would apply them to each item in the group independently relative to their original value, and where there are gradients, to each stop independently. That would still be an enormous efficiency for making adjustments to the whole piece that provide accurate color values and retain vector objects on export. I'm guessing this would be less problematic to implement as well.
-
It would be amazing if there was a quick way to convert adjustment layers to actual colors on vector objects. For example, say I apply a recolor adjustment to a vector group. The function would apply the actual color values I’m seeing (as if they were all simultaneously grabbed and applied with the eye dropper) to each vector object within the group while removing the adjustment layer. This would allow the use of adjustment layers for group adjustments while still maintaining the ability to retain vectors on export. It would also make the numerical color values accurate so they could be used elsewhere without having to use the eye dropper tool on every color. I have needed this feature on multiple occasions.
-
jhdesigns reacted to a post in a topic:
Stock EPS Vectors opening incorrectly
-
Each of those squares you see highlighted is a raster image. If you zoom in, they are pixelated. The only vectors are squares applied as masks to slice the image up. If this were opened in Illustrator, everything would be vector and correctly separated into layers. I am in vector mode and this is V 2.1. Loads of people have this issue in the Affinity groups I'm in on Facebook. It does not seem to occur on super simple vectors. I'd usually be safe downloading something like icons. But if there are certain effects applied it will open like this, which is usually the case with anything of complexity that contains gradients, transparency, blending, etc.
-
Many stock vector images made in Illustrator and found on stock image sites like Shutterstock do not open correctly in Designer. It could be as high as 50% of them so purchasing is always a risk. They load as masked square slices and are rasterized. This is usually due to various Illustrator effects and methods applied that Affinity can’t read. I saw that this topic had been raised before and the reply was basically that nothing could be done about this. However, Photopea, an online tool, can open them fine, and then you can download as SVG, which will then open correctly in Designer. So they seemed to have figured it out. While I am super happy to have found this workaround, I think a lot of professionals see this as a significant hindrance to adopting Affinity because they haven’t found a solution, and it seems like if Photopea can do it, Serif should be able to also. And for anyone who thinks a real designer wouldn’t use stock, it can really help keep client projects on budget. It’s a matter of efficiency in certain scenarios to borrow from and alter stock designs. Therefore, I hope fixing this is made a priority. In the meantime, I will rely on Photopea, and hopefully this post will help others who have been frustrated with this issue for years.
-
Gripsholm Lion reacted to a post in a topic:
Select Same > Font
-
Bryan Rieger reacted to a post in a topic:
Select Same > Font
-
It would be great if you could add fonts to the select>same menu. This would allow global changes to font styles. Thanks!
-
jhdesigns reacted to a post in a topic:
Designer - Free transform tool (perspective distort)
-
jhdesigns reacted to a post in a topic:
Designer - Free transform tool (perspective distort)
-
Designer1234 reacted to a post in a topic:
Designer - Free transform tool (perspective distort)
-
jhdesigns reacted to a post in a topic:
Payment being declined across all credit cards
-
jhdesigns reacted to a post in a topic:
Payment being declined across all credit cards
-
Both of my credit cards and my debit card are in perfectly good standing but they're all being declined (or so your site says) in your store on both Safari and Chrome. Seems like a bug. I even did the two-step verification with a number sent to my phone. I was finally able to use Paypal to purchase. I'm in the US and tried both Safari and Chrome on Mac OS Big Sur.
-
My proposed idea is how it used to work on Fireworks. It was very handy.