David in Яuislip
-
Posts
1,642 -
Joined
-
Last visited
Everything posted by David in Яuislip
-

Alter colour on image
David in Яuislip replied to pioneer's topic in Desktop Questions (macOS and Windows)
It's a montage. Mr Red Circle and the two chaps in front weren't there, zoom in and there are lots of giveaways not least the non existent shadows -
Alter colour on image
David in Яuislip replied to pioneer's topic in Desktop Questions (macOS and Windows)
I sampled a reddish colour in the guy's face then sampled a browner spot from the guy two to the right So I changed #B66762 to #A86957 by a procedural texture R-14/255 G+2/255 B-11/255 It looked too green so I tried R-14/255 G-4/255 B-11/255 If that looks ok try the overlay in the zip, it's a neutral grey modified with that procedural texture. Place it over the face with the blend mode set to soft light. All very subjective of course. Can't upload the picture here so that's zipped as well NewSkinColourOverlay.zip NewSkinColour.zip -
I don't see any fisheye, a little barrel but overall the correction is pretty good. If excellent is required then use PhotoLab or Capture One. The attached file, zipped to prevent forum mangling, has the PL image with red straight 1px lines on the left and right, if you do the equivalent on my image above then you can see the difference but most people wouldn't see it. The other image shows parallax correction, I don't know how to do that in Photo IMG_0410.zip
-
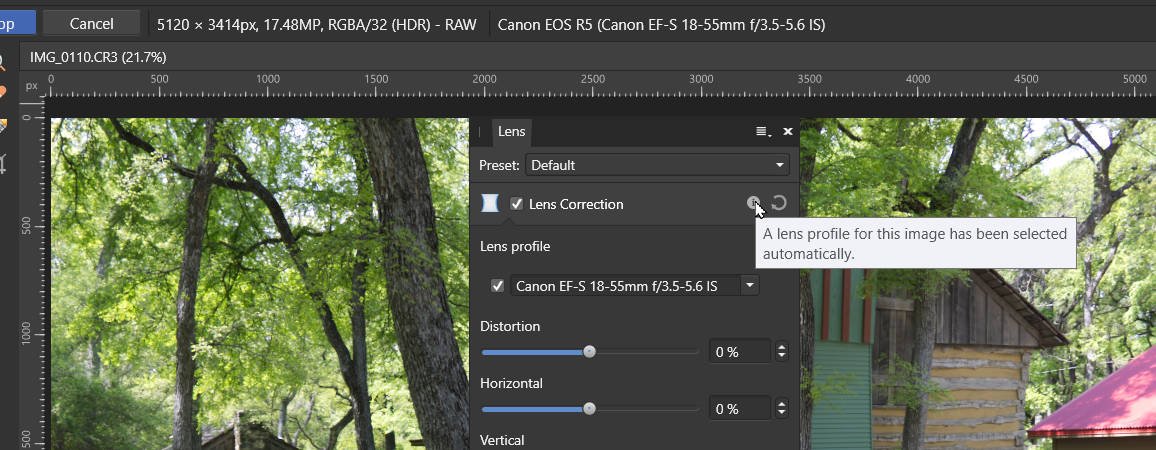
You can use Adobe LensProfiles, .lcp files, in the Photo lens profile folder although the results are poor in my experience. Photo does not work with Adobe CameraProfiles .dcp files
-
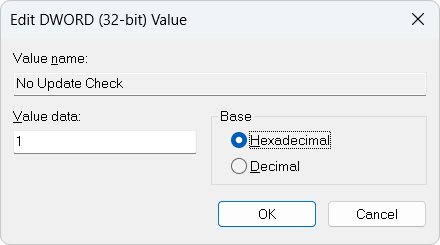
On V1 there is a registry entry under HKEY_LOCAL_MACHINE\SOFTWARE\Serif\Affinity\Photo\1 "No Update Check"=dword:00000000 I changed the value to 1 and that stopped it. If you're confident with editing the registry you could look for the equivalent in V2

-
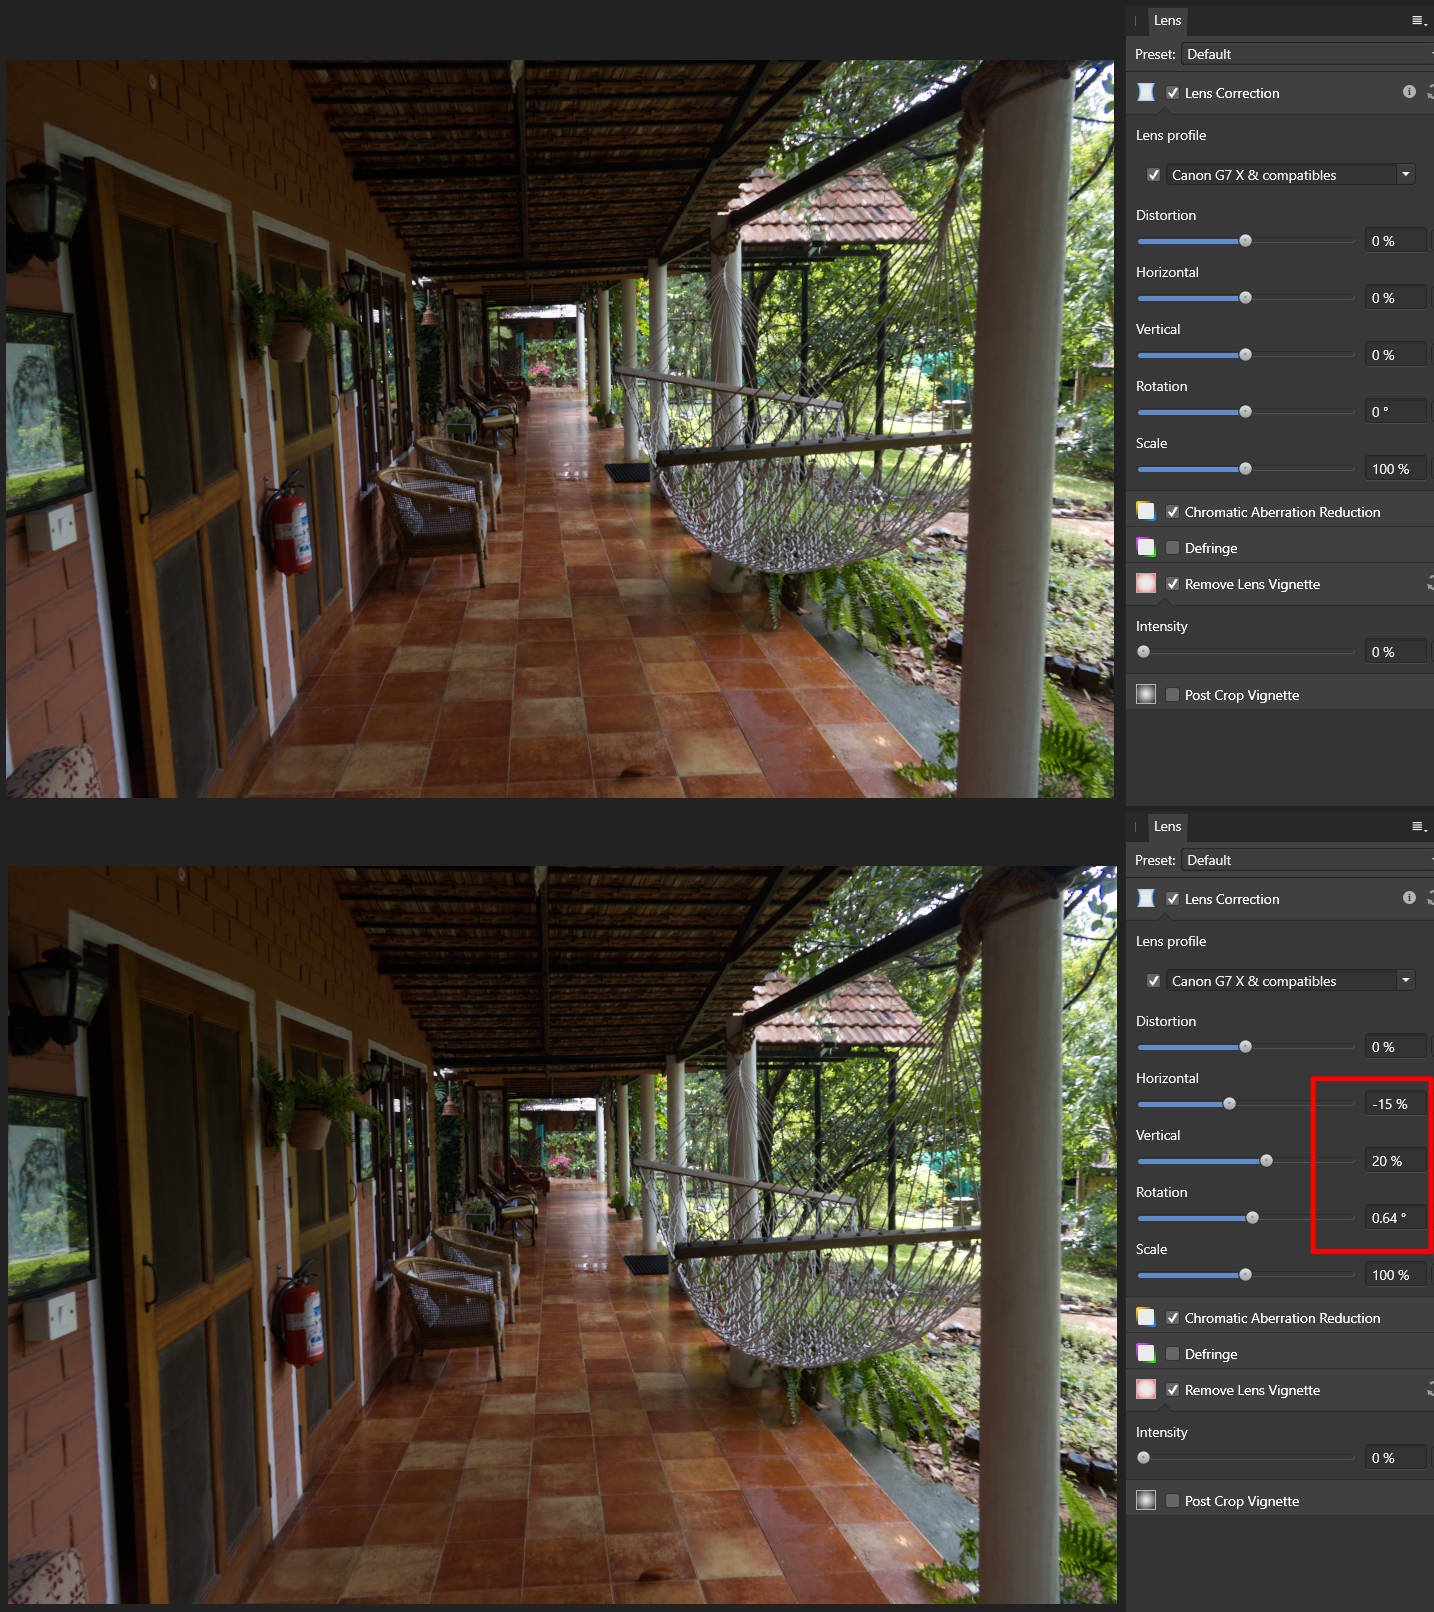
V1 users can add the attached xml to the lens profile folder and it'll auto apply the correction Basic correction on the top image, additional correction below using the sliders Camera added to lensfun Oct 27, 2022 V1.10.6 lens-correction-data.dat file created 28/11/22 CanonG7-III.xml
-
There are a couple of issues with Photo and Canon files, it can be incorrect interpretation of the metadata hence not applying any lens correction or misunderstanding the lensfun data. Without knowing the body & lens you're using it's impossible to advise further, not all CR3 files are equal. carl123 mentioned posting a problem file shortly after your initial post, that's the way forward
-
I always thought a ligature was a tourniquet, quelle surprise As I understand it, ligatures as a default are on, exporting to pdf subsetting fonts is the default Surely most folk, bearing in mind that this is a low cost program that attracts non-professionals, won't understand or want to get involved in this stuff so ligatures as a default should be off then clever people that want them can turn them on and know enough to embed the complete font? I had a quick play using Calibri which seems to be one of the worst culprits. It's trivial to turn off the ligatures in the base style as long as one is aware.
-
copy past from clipboard issue
David in Яuislip replied to yggdr4s17's topic in Desktop Questions (macOS and Windows)
Thanks, I'd already read that and some other gibberish but I'm none the wiser. Maybe again after more coffee -
copy past from clipboard issue
David in Яuislip replied to yggdr4s17's topic in Desktop Questions (macOS and Windows)
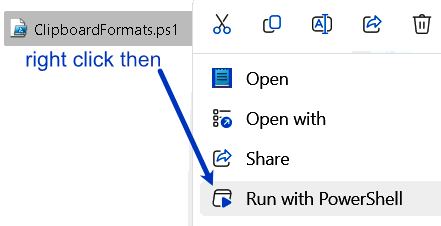
haha, story of my life No idea what EnterpriseDataProtectionId means, other than that it looks like text Hopefully a clever person will be along to explain You could try pasting to Irfanview, that's very good for all sorts of formats Incidentally, .ps1 files can be run from Explorer with a right click thus:
-
copy past from clipboard issue
David in Яuislip replied to yggdr4s17's topic in Desktop Questions (macOS and Windows)
If you have your template on the clipboard and run this Powershell script then it will display the clipboard formats and copy them to the clipboard overwriting your template. Paste that into a reply to this post and someone should recognise whether it is valid for Affinity or not eg copying a bitmap from Photo produces Portable Document Format PNG DeviceIndependentBitmap Serif Persona Nodes System.Drawing.Bitmap Bitmap Format17 copying text from a text editor produces System.String UnicodeText Text Locale OEMText Use at your own risk, no responsibility accepted if your clocks all go forward one hour ClipboardFormats.ps1 -
I have just spent some time playing with 11 files, 65500 on the long side x about 43000 on the other, various sizes from 56MB to 110 I cannot get imagemagick to process them in a batch, it chokes on the 4th file and gets <ctrl>C and a bad word Photo took 40s for the OK to appear then 4m 47s to process = 29.7s each Irfanview took 2m 21s = 12.8s each or 2m 34s including sharpen and set dpi to 120 = 14s each I think we have a winner but it's only for windows
-
I didn't think of that, you win
-
Flying a bit blind without a screenshot but why not duplicate the object and use it to clip the png file?
-
But that does very different correction here compared with the IS lens which was used in your case On V1 the lens data is in C:\Program Files\Affinity\Photo\Resources\lens-correction-data.dat which is some sort of binary gibberish Additional profiles can be placed in C:\ProgramData\Affinity\Photo\1.0\LensProfiles These can include lensfun xml files produced after the Photo version was released, which will supplement the builtins, or modified files which will supersede the builtins. Adobe lcp's can also be used but don't work well in my experience So yeah, there's a problem with EF-S lenses on full frame bodies which can be fixed by changing the crop factor from 1.6 to 1 as I've done in the two xml's I've posted in this thread
-
If I had to wait an hour for the OK button to appear I'd look for another approach. Unless you are applying some special effects via macros I cannot think of anything that could not be achieved with imagemagick without that ridiculous wait, apart from converting to .afphoto files of course. What exactly does your batch job do?
-
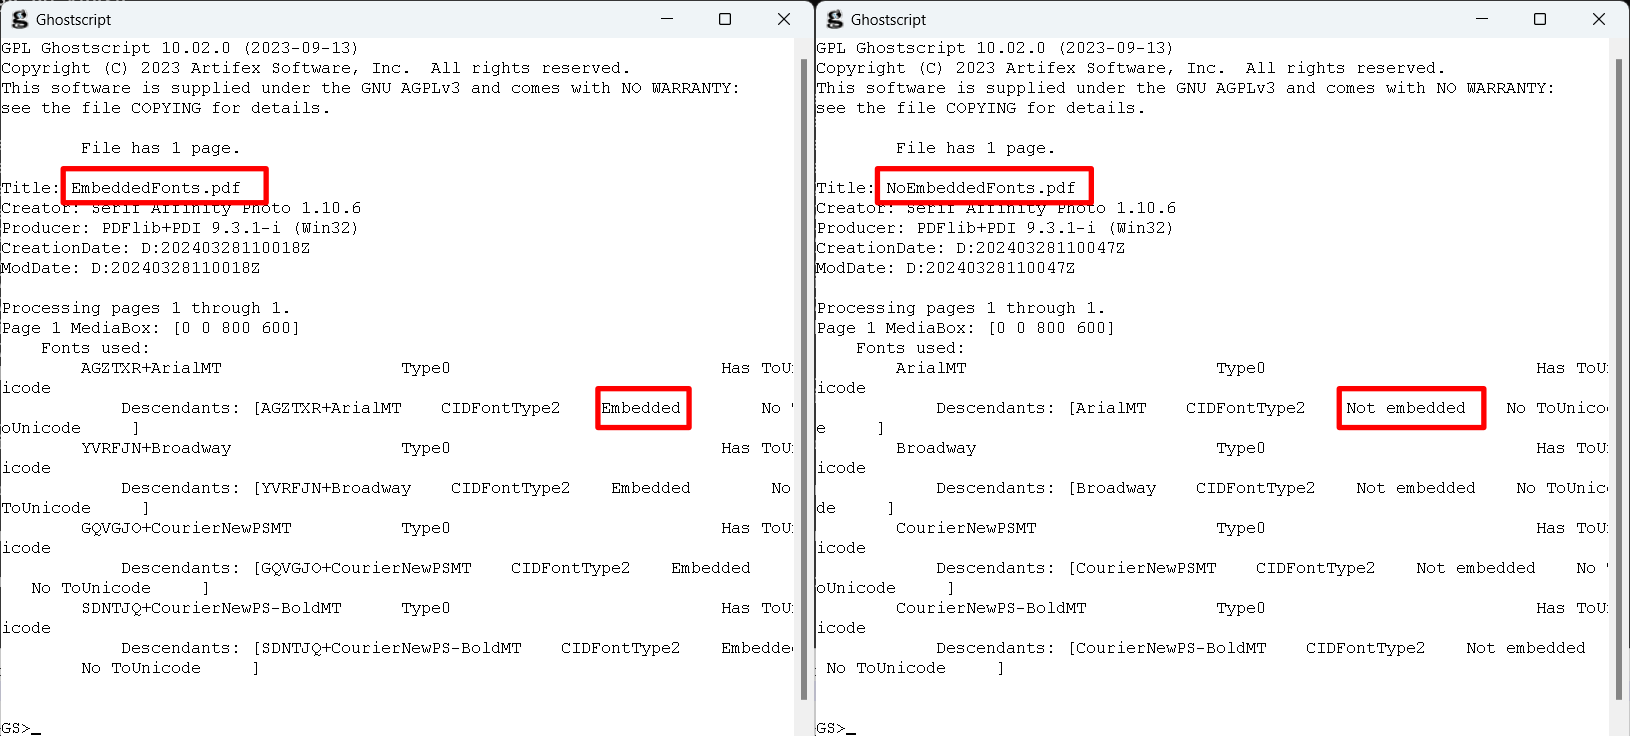
ghostscript eg gswin64 -dPDFINFO EmbeddedFonts.pdf will produce this output on screen, haven't worked out how to write it to file
-
I believe that's the final piece of the jigsaw, expect the issue to be fixed in the next β
-
Nah, it's not that clever
-
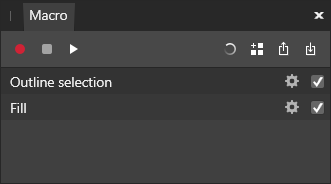
Start with the Help. It might be a bit cryptic on first read but keep at it The Macro panel handles .afmacro files containing a single macro The Library panel handles .afmacros files containing multiple macros I keep the Library panel available next to the Histogram/Colour/Brushes. If I need a Macro panel, I click on the Library then right click on any macro and choose Edit You need a Macro panel open, click the Import icon on the right. Once it's imported click the Add to Library icon As stated above, you can't choose inside/centre/outside, to achieve that you'd need three macros
-
Same fix as for the earlier one. I've used the lensfun data but changed the crop factor to 1. The vignette no longer occurs. Something weird about EF-S lenses in lensfun, they're APS-C lenses but need the crop=1 not 1.6. Hope it's of use CanonEF-S18-55.xml
-
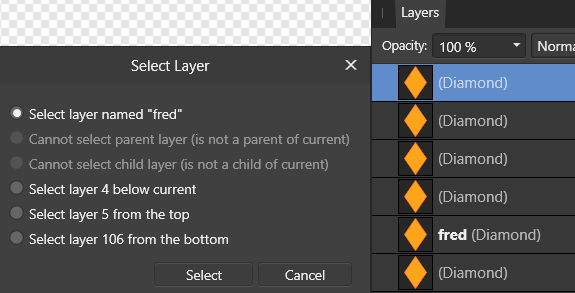
I know nothing about symbols but linked layers in Photo are pretty limited. You can change colours and dimensions but if you need to change a square into a circle or replace it with text you're goosed What does work is to use a macro to duplicate the top layer, create groups of the layers below and place the duplicate in the groups Macros with lots of layers have been a pain to get going but I think I know the secret which I shall divulge for a small fee When you select another layer when recording a macro you get various options but whatever you choose the macro records the position from the bottom So if you record a macro using 110 layers and select 5th from the top, the macro will store 106 even if it's called fred If you now run the macro using 25 layers it will look for the 106th from the bottom but settle on 25 Then run the macro using 130 layers it will look for the 106th from the bottom and you won't get higher The top layer can also be a group which can contain a full sized rectangle with opacity set to zero, this is useful if you want all the slices to be the same size as the canvas What I did was Create 110 layers Start recording Select top Go down 1 Group Go up 1 Duplicate Go down 1 Arrange/Move inside Select group parent layer Move to back Select top layer Stop recording Then run the macro as many times as necessary, even 110 doesn't take long, and you can finally delete the first layer, go into the export persona, select all layers, create slices and go for a pint
-
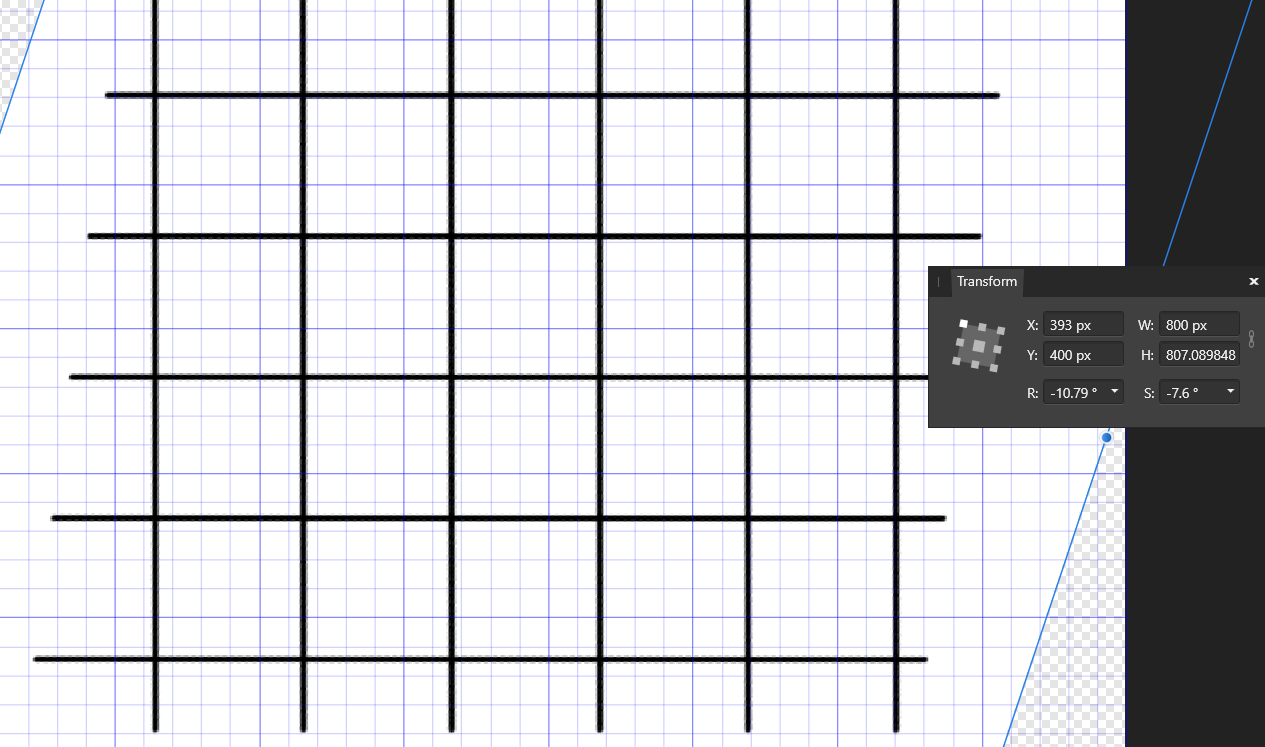
Photo: Straightening Blueprints
David in Яuislip replied to JimSlade's topic in Desktop Questions (macOS and Windows)
Original mesh, skewed and rotated Fix the rotation with the crop tool as GarryP says Switch the grid on and unskew the vertical lines with S in the transform panel
-
Cor, there's no pleasing some people CalibriUlineItalic18ptBlue-FrameText72dpi.afmacro
-
Not a thing I've ever noticed before, the default font data must be held in the afphoto file You can use an asset of dummy text but this will scale depending on the document resolutions so 16pt text asset created in a 300dpi document will increase to 300/72x16=66.7pt if used in a 72dpi document Or record a macro although this is still subject to the scaling as above Select art text tool --Don't click in the document or type any text Start recording Set font colour font bold/italic/size/font family --in that order, if you do colour last it won't stick Stop recording Save to library Open a new document with the same dpi used to create the macro Run the macro Use art text tool and it should have reset the default Example attached CourierBold24ptGreen-72dpi.afmacro