Search the Community
Showing results for tags 'Opacity'.
-
 Can you set the opacity to change based on tablet pressure?
 -
Hi all, Any chance of adding a few little features to the brush tool? I do use the brush tool quite a bit, and in photoshop there are options like brush cycle with shortcut keys(<>). It would be great to see it in photo/designer. Maybe even add a feature where you rotate brushes with a shortcut key instead of having to make lots of versions of the same brush? Or an brush opacity change option that is similar to the hardness and size change options? (ctl+opt+mouse direction) It makes work flows super easy versus going to sliders to change options. Thanks, Hillhouse
-
 Hello everyone! Do you know if there is a way to record changes made to brushes? It would be nice to be able to just click on a macro to set, for example, 120px, 25% opaque, 100% flow, 50% hardness. Best wishes, Shu
 -
 Hello, I am photoshop user and I bought affinity photo for windows and it's great :-) I wanted to create leaf texture for Unreal engine with opacity mask stored in alpha channel. Do you have any idea how to move black& white mask to alpha channel end export it as .png or .tga?
 -
 Some small problems I had with the "Layers"-Window. 1. Keyboard Input I had a line drawn in the Pixel Persona Cutted a piece out of it Then I had selected one part and it's layer in the "Layers"-Window then press a number on the keyboard multiple times in a row do this with different numbers again and again It will automatically adjust the "Opacity %". But in a strange way. I would for example expect it to cycle through up to 100% and start over again like this: 1 = 1% 11 = 11% 111 = 100% 1111 = 1% 11111 = 11% ... But sometimes it is like this: 1 = 10% 11 = 10% 111 = 11% 1111 = 10% sometimes: 1 = 10 % 11 = 10% 111 = 10% 1111 = 10% 11111 = 11% and so on. As I don't currently know what value is behind the control I only can explain the behavior. 2. Repaint issue Additionally it had a repiant problem while doing this, some areas keptl ight gray. 3. Long and short Layer-Names I had created a long line for a layer name and then I thougt: Would it be good if the short layer names would always follow and so be shown when scrolling to the right and only the longer names would scroll. But I don't know if that makes sense. untitled.afdesign
-
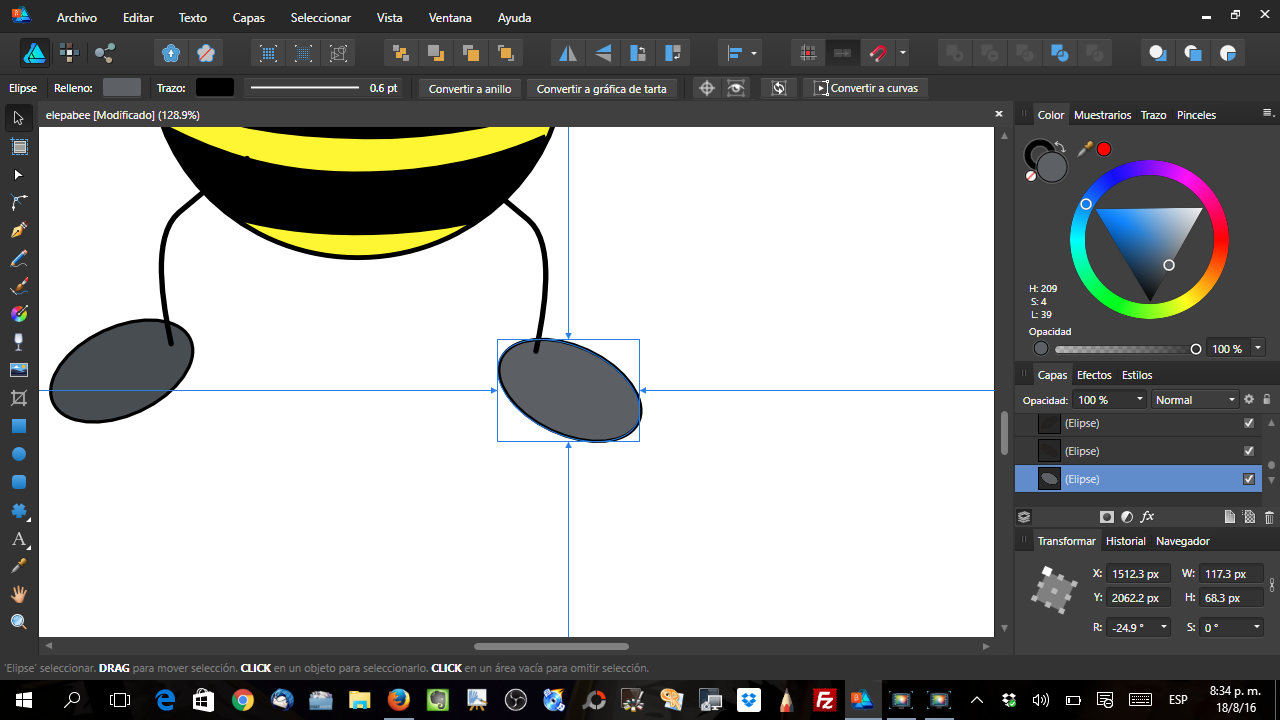
Hi when I change the opacity down and take it back to 100% never its a real 100% the number say it, but the illustration show other thing. Look at the 100% at the layer panel and the color selector and look the oval shape I can see througt it, the oval shows the line under it no matter its at 100% opacity.
-
 Why are opacity under the colour tab and opacity under the layer tab not synchronized?
-
For example if you create one square first and down his opacity to 30% at the layer panel, then you create another form and switch back to the first square and modify the opacity to get 100% again some time works good but some times after do this kind of operation change two or three times between then and change the opacity to 100 % doesn't work, always get a < 100 value like 93% or 80%
-
Not sure if this is a known bug or, if it is in some strange way, expected behavior. Here's an easy way to replicate issue: Create new document. Add a vector of any shape Add a text of any choosing (preferably large font) Move them close, but don't overlap Make both black Compare Now, make another vector of any shape, make it white and large enough to overlap or cover both black items Move white shape to very bottom, with two black shapes on top Select both black shapes, change the opacity to 54% (any % will do, 54% is just what i was working with) Compare You will notice, the text is now lighter than the vector where the white box sits underneath, yet both are 54% black. Converting text to curves does not fix it. I've also attached an example. John Affinity Designer 1.4.2 Beta 4, Mac
-
 Hi all, Is it just me or... is there no way to enable pen pressure opacity to pixel brushes? Slightly baffled if it isn't supported so I suspect it's me being thick :)
 -
 I enclose a file. 1) I have two green spot 2) Both spots are in a layer group (this group is 50% oppacité) 3) When merges the two slaps inside the folder, visually, the color green decreases. WHY ??? I think this is not a bug? Color_Change.afphoto
 -
 Query - and a possible feature request if I'm right about this - something I noticed when using the Vector Brush Tool in Af.Designer with daub brushes at low opacity (c.10%) to build up the depth of colour gradually with multiple strokes. 1. If I make say 7 overlayed distinct strokes at 10% opacity, raising the brush between each one, then I get (presumably) 70% opacity where they overlay each other. 2. If on the other hand I make 7 strokes without raising the brush - in fact one stroke but with roughly 180 degree changes of direction back and forth over the same area - then I only get 10% opacity. Where the same stroke crosses back over itself there is no increase in opacity as of course there would be if this was a real paint brush. I can see that the constant opacity would be essential if you were filling in a shape and wanted uniform colour despite overlapping / overlaying but it would be useful to have the option of building up opacity where a single stroke passes back over itself as it would in reality. It would also reduce the number of strokes recorded in the Layers which rapidly build up to frightening levels if I do a lot of choppy, ‘expressive’ brushwork. Is there any way to build up opacity by running one vector brush stroke back and forth over itself ? I had thought this option might already be available within the “More” options brush control panel or could be modified by changing the Blend Mode but if it is already there I haven’t been able to find it. You might be thinking “Why is this fool using vector brushes at all when this sounds like something he ought to be doing in Pixel Persona (or indeed in Af.Photo if he had any sense) ?”. Well, because I generally prefer to stick with pure vector work where possible. (Note : Pixel brushes seem to work in the same way - i.e. no increase in opacity where the same stroke crosses back over itself.) Perhaps this “build-up opacity when re-crossing self” behaviour could be available as an an option ? Pretty minor I know and not really worth the trouble unless it’s something you could do easily. [if I haven't missed this feature then please shift this topic to the Feature Requests section.]
- 1 reply
-
- 1
-

-
- vector brush
- opacity
- (and 1 more)
-
 Hello all! I am a new, excited user of Affinity photo. From the moment I realized what it was and the potential it had, I was excited to try it out in hopes of being able to ditch photoshop. The other night I started to do a retouch, the way I would normally do so in Photoshop, and I quickly ran into an issue with Affinity Photo: There is no way for me to control the opacity setting of the clone stamp tool or brush tool, with a wacom tablet. It allows me to control the sensitivity for the flow setting, but I *need* to be able to do the same with opacity, or else my retouch becomes sloppy and my workflow is slowed down. So far that is the only thing keeping me from making the switch completely. Everything else I have tried with Affinity is incredible, but that one little thing won't allow for me to ever be able to use Affinity the way I would need to in order to say goodbye to Adobe forever. Any chance of this being added down the pipeline? Thanks!
 -
 I've noticed some strangeness when importing my *.ai files in Affinity Designer. You can do this test to see what I am seeing: 1. In Illustrator, sketch a rectangle and color it 100% K (in a CMYK file), then make it 60% transparent. 2. Save a PDF compatible *.ai file. 3. Open your *.ai file in AD. 4. Note inside "Layer 1" you have "(Group)" and inside that you have "(Curve)" 5. Note the "Opacity" slider in the "Color" tab is set to 100%. 6. With "Layer 1" selected in the Layers palette, decrease that "Opacity" slider (the one OUTSIDE the Layers palette) to say 50% and you can see your object lighten but the "Opacity" slider snaps back to 100%. Do that again when you have "(Group)" selected and the same thing happens. But do that when you have "(Curve)" selected and your chosen value sticks! Strange. Very strange. 7. Note that you can also change the separate "Opacity" slider that resides inside the Layers palette. And only "(Group)" shows 50% (the value you set in Photoshop), while "Layers 1" and "(Curve)" show 100%. All this is very confusing to me. First of all, why not just import than single object as a single object? Why create two objects "(Group)" and "(Curve)"? Next, what is different about the Opacity slider in the Color tab, which sits just millimeters away from the separate Opacity slider inside the Layers palette? Sorry if my questions are confusing but I myself am confused. Thanks.
 -
 There are any shortcuts for brushes available? I want to change witdth, flow, opacity and hardness without moving to the top toolbar. best wishes Marco
 -
 The question is - why image fill opacity in Affinity look so? In Adobe Illustrator 50% opacity looks normal, in Affinity 50% opacity looks like something color adjustment? See attach.
-
 Hi Affinity Forum, is there a way to cut or hide the shadow of an object, when it has a decreased opacity? When I assign an outer shadow effect to an object with a hight offset, I can see the shadow behind the object. Additionally, how would you approach the same problem when the shadow of an object bleeds into the borders of another object with low opacity? Thanks. Stefan
 -
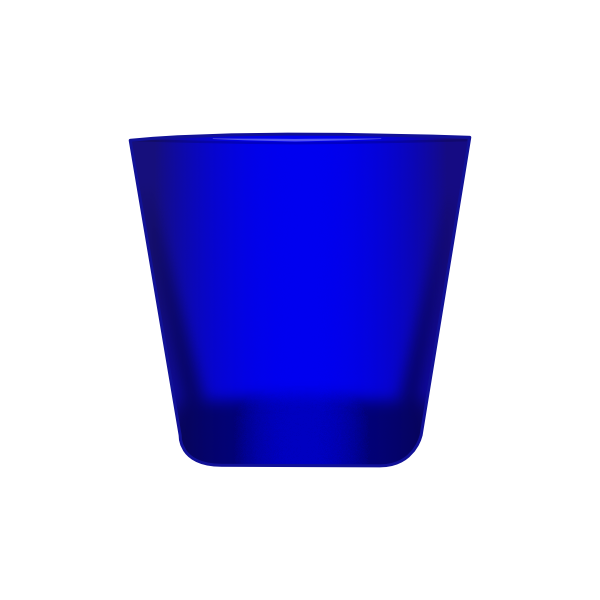
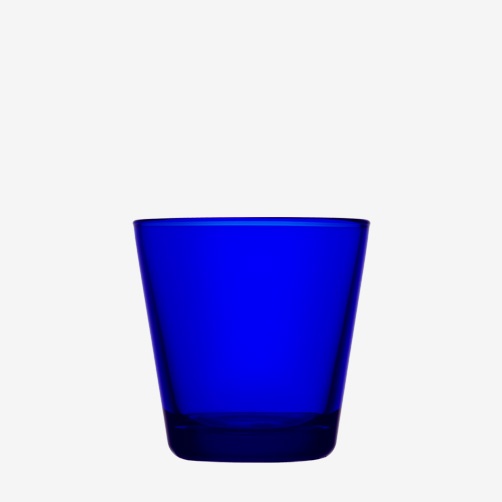
I've been focusing on shaing and coloring techniques in Affinity Designer lately. With this Blue Cobalt Shot Glass, I used gaussian blur, layer blending modes (Color Burn and Average) and opacity to acheive the effect that I was looking for. What methods would you use? UPDATE 3/15/2015 Thank you for all of the great input. I'm including the following to this post: The original image I used for inspiration My .afdesign file so you can see the layers Further Explanation (What I was trying to acheive) My goal was to make this illustration as "real" as possible. I've been expirementing with Gaussian blur, gradients, blending modes and opacity to acheive realistic highlights and shading. blue_cobalt_glass_RE.afdesign