gdavis
-
Posts
15 -
Joined
-
Last visited
Everything posted by gdavis
-
.aphoto file size from a .jpg photo
gdavis replied to Claudio60's topic in [ARCHIVE] Photo beta on Windows threads
Actually, I just found another post that mentioned that an unedited JPEG will save the original data to the afphoto file so the file size stays small. But of course once you edit it, it would have to re-compress which is not desirable so the file size goes up. Perfectly reasonable. -
.aphoto file size from a .jpg photo
gdavis replied to Claudio60's topic in [ARCHIVE] Photo beta on Windows threads
Actually, the smaller file size of 1.6 doesn't sound right. It sounds like that file is still storing the JPEG compressed image, but once you start working with the file you don't want it to JPEG compress your working data. I just tried opening a JPEG in 1.6 and saved it and yes, the afphoto file size was about the same. Then I simply right-clicked the background layer and selected rasterize then re-saved it. This new file was about 4M which is the expected size for the uncompressed image. To me this is reasonable behavior. You shouldn't expect afphoto files to be as small as the JPEG file because of the compression. As long as two working files (not just saved JPEGs) aren't drastically different between 1.6 and 1.7, I don't think there's a problem. -
File Sizes in Photo for Windows - 1.7.0 (split)
gdavis replied to Pandorum's topic in V1 Bugs found on Windows
I sure hope this can be fixed, the 1.6.x file sizes were already tough to swallow. I'll be watching this with interest before downloading the new version. -
Finding the correct spot in the history panel can be a bit cumbersome. Delete and add new layer isn't too bad. Photoshop has Edit->Clear. I was in the habit of doing Ctrl-A then Edit-Clear to clear a layer and found I missed this capability when I switched to AP. I ended up creating a macro, though now I can't quite remember what I actually put in the macro. edit: oh duh - Ctrl-A to select everything in the layer, then hit the backspace key to clear it. So my macro has select all, delete (backspace key), deselect.
-
Pano mushroom top
gdavis replied to gdavis's topic in Pre-V2 Archive of Desktop Questions (macOS and Windows)
Thank you both for checking this out. This feedback is leading me to the conclusion that something is wrong with my images / procedure. I tried manually lining up 1 and 10, and when I line up Mars, everything else is way out of whack. Maybe I bumped the zoom or something. I had actually intended to use 50mm initially, but when I got there it just seemed too narrow a FOV and didn't want to have to do that many photos. I'd seen people doing 360 with wider lenses and fewer shots so I didn't think it would be a problem. I guess I'll have to try again with an easier landscape until I get this figured out. -
Pano mushroom top
gdavis replied to gdavis's topic in Pre-V2 Archive of Desktop Questions (macOS and Windows)
Thanks for the reply, John. This thought occurred to me also, I just can't figure out how this would be a sensible or useful way to handle it. I tried the same thing with the same results. I think the top row and bottom row, when stitched separately, are scaled differently so they can't be merged back together. I'm afraid this will suffer the same problem as doing the two rows first. I went left-right for the bottom row and right-left for the top row, so the pairs would be 1/10, 2/9, 3/8, 4/7, 5/6. Ya, thought about that too, but seems tricky to warp it just right to exactly "correct" the flaw. And compressing it before merging to compensate for the stretching that will be applied is going to degrade the image quality and defeat the purpose of multiple images. At this point, I'm not really looking for a way to kludge together a half way decent result. More looking for an answer like - this is normal because the algorithm used is just not applicable for what I'm trying to do and I need to use another program - or - they'll add algorithm options in the future that will work - or - it's not functioning as intended and it needs to be fixed - or - You're doing it totally wrong, here's how to do it - or - something like that. If AP just doesn't support doing what I'm trying to do and I need another program or my approach is wrong, I can accept that, I was just having a go at it with what I have on hand and was puzzled by the result. -
This is not true. When you export a tiff, there is a check box in the dialog to enable saving Affinity layers. It is true that other programs won't see the layers and will only show the final composite image, but the information is still there when you open the tiff up in AP. As a long term format, I don't think anything will work for the layer information. That's going to be specific to the application, so you will always need a program that knows the AP specific information whether the file format is tiff or afphoto. But with tiff at least you'll be able to read the final image with other programs. I've recently started using tiff as my working file format to make it easier to manage the round trip back to Capture 1. So far I have not encountered any drawbacks but I'm curious to see if anyone from Affinity has anything more to say about it.
-
I realize this is an old post, but for anyone who might be interested, the steps outlined by MartinsRibeiro are exactly what Frequency Separation is, and presumably the same steps that the AP Frequency Separation filter is actually doing for you behind the scenes (there is more than one way to achieve the same result, but essentially the same). When you blur the first copy of the image, you're effectively applying a "low pass filter" which removes the high frequency components (the "details") and leaves the low frequency components (the "colors"). When you subtract that blurred version of the image from the second copy, the low frequency components are removed from the second copy, leaving only the high frequency components. This is equivalent to applying a high pass filter that is the exact inverse of the low pass filter used in the previous step. So now you have two layers which contain the low frequencies in one layer and the high frequencies in the other layer. These two frequency ranges have been "separated" out from one layer into two layers. Setting the blend mode of the top (high frequency) layer to linear light then adds the two ranges of frequencies back together, re-creating the original image.
-
My thoughts: Don't look for a problem to a solution. Look over the image and decide what you think it needs, then decide on how you want to accomplish that. Practice pre-visualization. Plan ahead, even before you take the photo. It's not all about the editing - lighting, exposure and composition have a huge impact on what can be achieved with the editing. Obviously practice is a big part of it. I think of the software as a tool box. You start out learning the basic tools and expand as you gain more experience. It's an ever evolving process, techniques will change as you grow, tools improve, and even with changing trends. There are many ways to accomplish the same goal. Don't feel like you need to know all the tools. You might even say developing a "pattern" is a good thing. Another way to put it might be developing your own style. Just don't close your mind to learning new things. Even many accomplished professionals will only use a limited set of tools which they are familiar with, but they've used them so much they've become very good with those tools. That's more important than knowing how to use all the tools. You'll often hear them say something to the effect of, "this is how I do it because this is what I'm comfortable with, it's OK if you prefer another method." What's important is getting the end result you're after. When I come across a problem I don't know how to solve, I'll start searching for suggestions and tutorials. Often I won't find anything that exactly fits my problem, but there will be things that give me ideas to try. When I'm relaxing, I also sometimes like to just peruse through various tutorials, anything that looks interesting. Sometimes I come across a something I can apply to my photos. Also, look through similar types of work from other photographers for inspiration and ideas. I've never believed in trying to exactly reproduce someone else's work, but I will pick elements to try out and see if I can incorporate them into my own work with my own interpretation. As an example, I once happened upon a tutorial on how to create the look from the movie Sin City. I wasn't looking for it, but it sounded interesting. I went through the steps which didn't really work well with my photos, but I learned some things that I have adapted to my style and have continued to use over the many years since.
-
Looks similar to the issue I'm having (5x2), but even more pronounced. I haven't gotten any feedback yet other than a request for the individual images; maybe Monday.
-
Affinity does seem to produce a harsher result than photoshop. Increasing the spacing may help soften it a bit, but it still shows some banding in 8 bit mode. Maybe photoshop is applying dithering or something that Affinity doesn't, but even in photoshop I had trouble with subtle gradations so I started using 16 bit mode. In Affinity, 16 bit mode provides a great improvement as well. Oh, and you don't have wet edges enabled, do you?
-
Pano mushroom top
gdavis replied to gdavis's topic in Pre-V2 Archive of Desktop Questions (macOS and Windows)
Here are the individual images. stack1.tiff stack2.tiff stack3.tiff stack4.tiff stack5.tiff stack6.tiff stack7.tiff stack8.tiff stack9.tiff stack10.tiff -
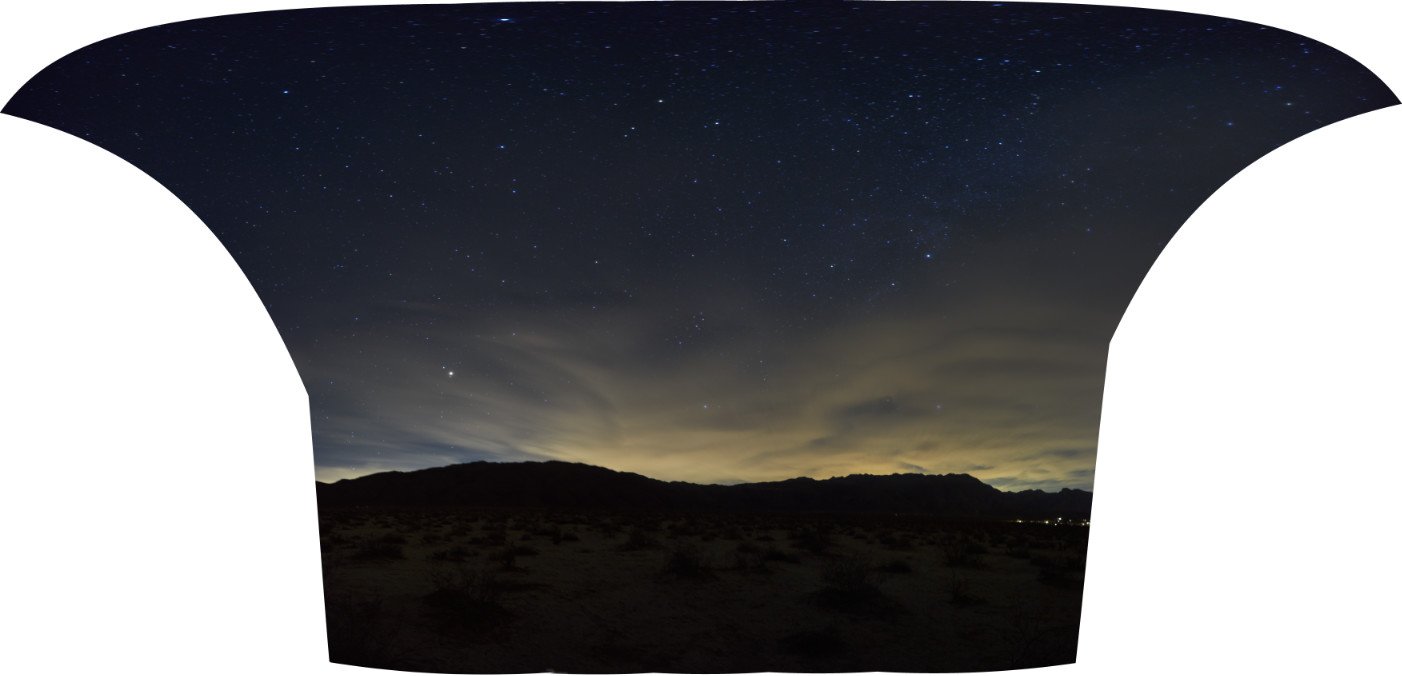
My first attempt at star photography. Not a very good night for it but at least I got something to experiment with. Any idea why the top of my panorama gets stretched out like this? Is this normal? There are two rows of shots, but even if I just take the top row it stretches out the same. Full frame camera with 24 mm lens on a nodal ninja tripod bracket in portrait orientation.

-
Panorama
gdavis replied to debbru's topic in Pre-V2 Archive of Desktop Questions (macOS and Windows)
These 3 images do not make up a suitable panorama set. All images should use the same focal length (and other settings) and simply be panned. Your third image looks like a zoomed out version of the first image, not another pan, and will not stitch properly. If you take just the first two images you should get a decent stitch. Click the icon on the left to select the history step that you want to apply with the undo brush. Or did you mean the ones on the right? That's the new alternate futures feature: “Alternate futures” for document history have been added. Traditionally, if you roll back the undo history then do something else all your changes after that point are lost. Photo will now display a small branch icon in the history tab when you do this. Pressing that button will cycle between all the different “futures” after that history entry - meaning you will never lose work you have done. -
I'm dying for a hue range slider.