firstdefence
-
Posts
11,460 -
Joined
-
Last visited
Everything posted by firstdefence
-

Changes to EPS Export
firstdefence replied to DonC123's topic in Affinity on Desktop Questions (macOS and Windows)
Isn't v2.4.0 going to have DXF export: -
Changes to EPS Export
firstdefence replied to DonC123's topic in Affinity on Desktop Questions (macOS and Windows)
Just tried on Mac with the MOI Cad trial and eps imports ok from Affinity Designer 2.3.0 It was a straight EPS (for Export)
-
JPEG odd behaviour
firstdefence replied to travelshooter's topic in Affinity on Desktop Questions (macOS and Windows)
Any chance you could upload a jpeg that hangs when uploading to the server, maybe we can try the same to see if we run into a similar situation. -
File corrupted
firstdefence replied to R.M. Archer's topic in Affinity on Desktop Questions (macOS and Windows)
Welcome to the forum @R.M. Archer There is a workaround that MAY work but chances are it will not, copy the file to the local hard drive first don't try this from an external device. Workaround... Create a new publisher document Go to Document > Add pages from file... look for your corrupted document and select it. If you get the option to add pages, select all pages and add them to the new document. Don't ever save to USB, Cloud or Network, save to local drive first and copy that file to the afore mentioned options, Affinity seems to dislike external devices to save to, it can be a gamble sometimes and more often than not everything is ok but why take that chance. -
Working with 360 degree
firstdefence replied to Peter Mican's topic in Affinity on Desktop Questions (macOS and Windows)
Now Peter, you know 369º = 9º and prune mistakes are definitely not something I want lol I'm going to start saying this just to laugh at the expressions on peoples faces lol! -
Working with 360 degree
firstdefence replied to Peter Mican's topic in Affinity on Desktop Questions (macOS and Windows)
How do you find the centre of the monitor and does it come with a 3M adhesive pad -
Glad to help @Luscious Tuba
-
Working with 360 degree
firstdefence replied to Peter Mican's topic in Affinity on Desktop Questions (macOS and Windows)
I'm with @Peter Mican why complicate something, isn't the best policy to end up at the lowest common denominator, isn't it good to give people a way to work that suits their way of thinking. My brain doesn't automatically think that circle is two 180º arcs, I think it's a complete 360º circle. +1 for a 360º dial that starts with 0 at the top. Be more amadine -
Finally got around to making a short video:
-
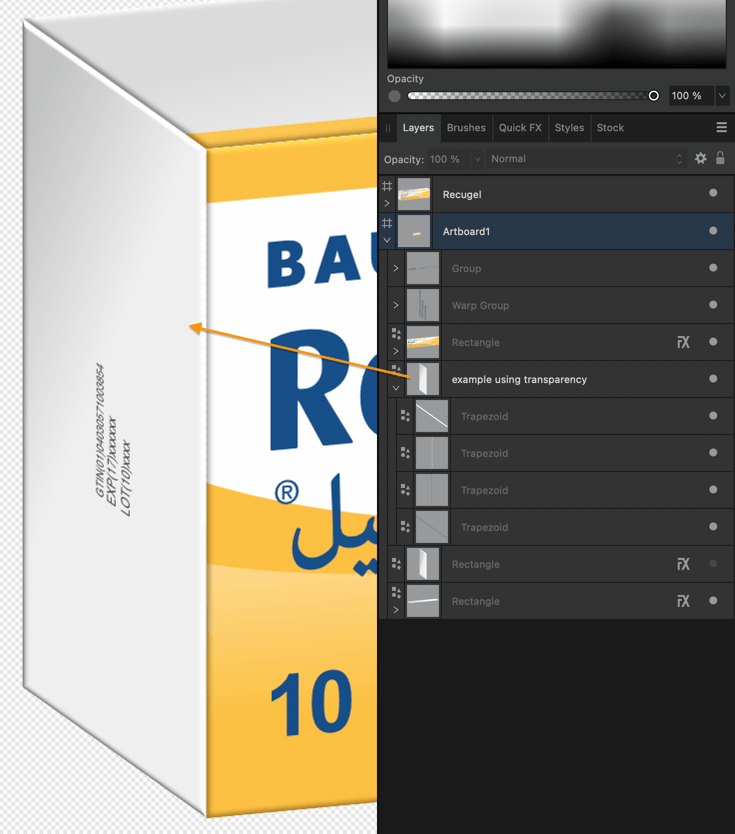
Instead of using the 3D fx try shapes and transparency. Lets take the end of the box as an example. See the added example in your document, there may be better techniques from the more knowledgeable people on the forum but this is a start. Export File (edited).afdesign
-
Thanks for the follow up @Ken MacAllister much appreciated.
-
I'm pretty sure Affinity can handle that, and the chapter/book feature is probably a good way to go, there are some people a lot better able to advise you like @walt, @MikeTO
-
Where is the ZigZag function???
firstdefence replied to Estalfos's topic in Affinity on Desktop Questions (macOS and Windows)
Always forget about that. -
Where is the ZigZag function???
firstdefence replied to Estalfos's topic in Affinity on Desktop Questions (macOS and Windows)
Or Use a grid set to the spacing of the zigzag you want, say 10mm so set the grid to 5mm and adjust the apex node to the height you want, now use power duplicate and select all of the zig's and zag's and join them. Save them as assets. -
Cheers matey.
-
People like to put things in boxes but I agree re layer labelling.
-
vector bruhses
firstdefence replied to Polygonius's topic in Affinity on Desktop Questions (macOS and Windows)
You can edit the brush stroke post draw on the stroke panel, there is a pressure profile box. there is also the brush size variance in the brush settings, you may have to use both of these in combination, it's clunky to do though. -
Didn't look very hard and it's an abstract sun.
-
A bit of a butchers job Imported from where? Illustrator can combine this mess of expanded strokes in one click from the pathfinder panel Pathfinder: Shape Mode: Unite but you still have to manually edit the lines around the area's where the expanded strokes are badly aligned. So, as @loukash has noted use Illustrator because if you have a lot of these poorly drawn shapes you are in for an epic journey in Affinity. add problem inc illustrator import.afdesign
-
How do i separate two shapes?
firstdefence replied to MWD's topic in Affinity on Desktop Questions (macOS and Windows)
The method you suggested earlier was also non-destructive, you can revert back to an ellipse and a rectangle using boolean/geometry divide, adjust position and size and reapply the boolean subtract. The benefit of a compound is you have the flexibility of movement and change without having to revert, so you can rearrange the elements of a compound and resize to suit on the fly. -
Yes, as Oufti has shown the special characters are hidden by default but they can help troubleshoot issues. Re your solution, it may have been a paragraph style that had some lock or limitation but glad you got it sorted, persistence pays as they say.
-
Turn on Show Special Characters: Text > Show Special Characters maybe there are page breaks.
-
There is an alternative way to colour the badge... Use the Colour Panel and the colour picker tool to select a colour from the original cap (I used the right side of the cap) Drop into Pixel Persona and Cmd Click on the Badge layer to make a selection Add a pixel layer and use the fill tool to fill the selection onto the pixel layer Change the pixel layers blend mode to colour.
-
Hi Chris, I just eyeballed it, I have quite good eyesight, I think the recolour filter should have a colour picker tool but I guess it works differently than the colour panel. Here is the file, again was just trial and error to get a look I was happy with, I've probably over worked it. I did make the cap using the cog tool and an ellipse. Gold Badge.afdesign
-
The cap is a bit more involved but maybe something like this?