Ron P.
-
Posts
3,141 -
Joined
-
Last visited
4 Followers


-
 matisso reacted to a post in a topic:
Affinity PHOTO export to .bmp *HELP*
matisso reacted to a post in a topic:
Affinity PHOTO export to .bmp *HELP*
-
 Ron P. reacted to a post in a topic:
Designer/Photo Problems Saving and Opening Project File
Ron P. reacted to a post in a topic:
Designer/Photo Problems Saving and Opening Project File
-

Designer/Photo Problems Saving and Opening Project File
Ron P. replied to Powerhorse's topic in V2 Bugs found on Windows
So you created the file from scratch, or edited in V2? In order for that message to be triggered the file had to come from AP v1. Do you still have AP V1? I still have V1 Affinity apps installed. If you could upload that file to the forum, I could check it to see what's going on with it. If it was created, or saved in V1, I should be able to open it with V1. AP V2 should still be able to open it, but to preserve the ability to open/edit it in V1, it should only be Saved As, and a new name given to the file. -
Designer/Photo Problems Saving and Opening Project File
Ron P. replied to Powerhorse's topic in V2 Bugs found on Windows
Not according to your first screenshot. The file was created using Version 1 of an Affinity app. It is a warning, caution, letting you know that if you edit it and then Save it in a Version 2 Affinity app, then you will not be able to open it with a Version 1 app. The second screenshot is telling you that the file is corrupt and can not be opened. File corruption is generally caused when opening, working on files that are on external drives, like cloud, NAS, network. Serif recommends the files be on a local drive when working on them. Once finished working on them, you can then back them up, save them, move them, to external drives. -
Affinity PHOTO export to .bmp *HELP*
Ron P. replied to Max Mitty's topic in Desktop Questions (macOS and Windows)
I understand, and don't know why Serif does or does not do things. -
Affinity PHOTO export to .bmp *HELP*
Ron P. replied to Max Mitty's topic in Desktop Questions (macOS and Windows)
I'm not sure why Paste Special is not available on Macs. I don't use Macs and not very familiar with them. Hopefully someone that does will pop in here to help you with that. Have you tried searching the Mac App store to see if there's Mac Specific image file convertors? I'm surprised a car would require Android or Windows type format. Generally everything is Apple, iPad, ect. I guess we can thank Google for that. EDITED: I just done a quick forum search and found out the Paste Special command is a Windows Only feature. -
Affinity PHOTO export to .bmp *HELP*
Ron P. replied to Max Mitty's topic in Desktop Questions (macOS and Windows)
@Max Mitty, I done a Screen recording of what this process looks like. I used your provided image file. 2025-07-15_04-07-25.mp4 -
Affinity PHOTO export to .bmp *HELP*
Ron P. replied to Max Mitty's topic in Desktop Questions (macOS and Windows)
Ok, I think you'll need to simplfy or flatten the image. This can be done by Merge Visible, either from the Layers menu or Right-clicking on the top-most layer in the Layers Panel and selecting Merge visible. Then with the newly created (Merged Visible) layer selected, the Edit menu should allow you to Copy, then Paste Special. -
NotMyFault reacted to a post in a topic:
Affinity PHOTO export to .bmp *HELP*
-
Affinity PHOTO export to .bmp *HELP*
Ron P. replied to Max Mitty's topic in Desktop Questions (macOS and Windows)
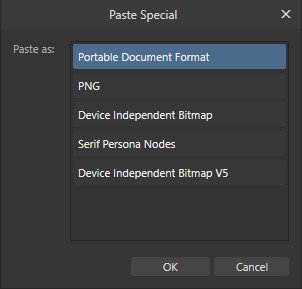
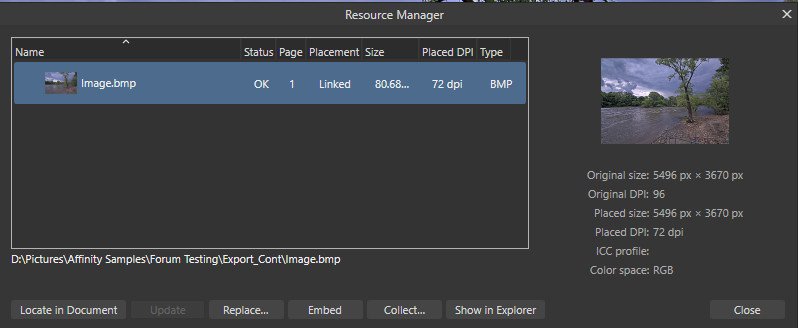
Hi Max, I was having a problem following what David posted. However I think I figured it out. It's the long-way-round to get a BMP file. With your Image file open in Affinity Photo, go to the Edit menu and select Copy. Then select Paste Special. In the Paste Special dialog that opens, choose either Device Independent Bitmap or Device Independent Bitmap V5. This will paste a copy of your image onto a new layer, in the BMP file format. Go to the Windows menu and open the Resource Manager. It should have your BMP file/Layer selected/highlighted. At the bottom press the Collect button. This will open a dialog asking for a Folder. Just choose a folder for the BMP file to be saved to. This will cause the BMP file to be Linked and not Embedded. Now opening Finder, you can navigate to that folder for your BMP image.
-
Affinity PHOTO export to .bmp *HELP*
Ron P. replied to Max Mitty's topic in Desktop Questions (macOS and Windows)
Why bmp format? You're running a Mac, and the BMP format is an old, MS Windows image format. It was created by Microsoft around 1980 for and a part of the Windows OS. Are you needing the 1-bit or 8-bit image, Grayscale file? -
Welcome to the forums @Meats Try making sure your shapes are positioned at full Integers, not partial. Use the Transform Panel to change the X & Y coordinates to integers. Also in the Snapping on the Context Toolbar, have Move by whole Pixels checked.
-
Ron P. reacted to a post in a topic:
Can't get rid of the Artboard
-
Prego
-
Try converting the Ellipse shape to a curve. On the Context Toolbar at the top, press the Convert to Curve Delete the bottom Node Adjust to have the bottom flattened using the Node tool.
-
Problems printing processed photos
Ron P. replied to Jhjennings's topic in Desktop Questions (macOS and Windows)
Simple guide? It's not simple. Are you wanting to print your photos to hang on the wall? Get the best possible for home printing, or Commercial quality? Print photos to sell? We know nothing about your setup, it makes a huge difference. Is your monitor(s) Color Calibrated? You asked How do ICC Profiles work. To find possible answers I searched the internet using the phrase Matching color print profile with paper. This is one of the many results https://www.artelo.io/color-matching Affinity Photo Online Help: Color Management -
Serif is going to need more information to provide meaningful help. What Windows version, 10, 11 ? Did you save your document (afdesign) file prior to working in it? If so where is it saved? Local disk, network, cloud? Do you have Hardware Acceleration/Open CL enabled? If so could you try disabling it to see if it helps. Are you running one of Nvidia's RTX 50 series cards? If so there's problems with them, and the current advise is to disable the HA. Also make sure your drivers are up to date.
-
Seems you've narrowed the problem down to your tablet, and possibly even to the stylus. Try disabling the Wacom Radius Menu, and see if that might be your problem.
-
My assets disappeared and won't come back
Ron P. replied to Mulan's topic in Desktop Questions (macOS and Windows)
Glad it helped