matthiasbasler
-
Posts
40 -
Joined
-
Last visited
Recent Profile Visitors
1,566 profile views


-
 Grant Robertson reacted to a post in a topic:
Is there a better RAW image development workflow? It still feels very slow compared to Adobe.
Grant Robertson reacted to a post in a topic:
Is there a better RAW image development workflow? It still feels very slow compared to Adobe.
-
 MEB reacted to a post in a topic:
Text box related bugs
MEB reacted to a post in a topic:
Text box related bugs
-
ArieV reacted to a post in a topic:
Is there a better RAW image development workflow? It still feels very slow compared to Adobe.
-
Isn't this exactly what they solved in AP 2.0 with the possibility to embed or link a RAW photo to an .aphoto file. You do still have a RAW layer after developing and applying further changes, and you can do modifications to it any time later without losing the modifications done on top. Not sure if there are tools where this doesn't work, I haven't tested each and every tool yet.
-
olesya reacted to a post in a topic:
Is there a better RAW image development workflow? It still feels very slow compared to Adobe.
-
Horseflesh reacted to a post in a topic:
Is there a better RAW image development workflow? It still feels very slow compared to Adobe.
-
Looks like there are many photographers having the same wishes for speed/handling improvement of the RAW develop workflow. See also this topic. Here is my personal take on this topic. As a background, I have worked with CameraRaw from Photoshop Elements, which has a comparable price tag to Affinity Photo, anthough a different target user group. I have also tested Open Source applications like DarkTable and RawTherapee but the first one didn't convince me from the workflow aspect, the latter is pretty difficult to master imho. But all of them, including AP 2.0 get the work done somehow. CameraRaw from Photoshop Elements has a (deliberately) limited set of adjustments, e.g. CA/color fringing correction is unfortunately missing. However, I find that what is there in CameraRaw works very efficiently. Here are the main differences to Affinity Photo which mean that I get the work done there in half of the time (or less, sometimes): Process multiple files at once: Just use DND to drop 2 or maybe 10 files into the application. You can then adjust settings for all of them or a subset of them, giving you full flexibily and avoiding redundant work for a series of images under equal conditions. Storing development settings in sidecar files transparently: Yes, in AP 2.0 you can link an .aphoto file to a raw image and thus do later changes to the development settings. Indeed this approach is flexible, as the .aphoto file will document changes both applied before developing the RAW file and edits done afterwards. In terms of speed however, a side care file has the advantage that it doesn't have to be saved explicitly. And if you decide to rename the RAW file, it is as easy as renaming the sidecare .XMP file equally. In Affinity you have to open the renamed .aphoto file, tell the application where the missing (renamed) RAW file is and save, which takes longer. Custom defaults per Camera and ISO: Lets say, you discover that for a certain camera and ISO you typically need the same corrections, like certain sharpening, noise reduction, shadow brightening and the like. In CameraRaw you can save these as a default and they will be applied automatically for future images of this camera/ISO. White balance settings are not stored in the presets, which makes totally sense given that they will differ among images. (And, in contrast to AP there's no bug preventing the presets from actutally getting applied.) An option to use the "last used settings": With two mouse clicks you can use your previously used RAW settings (covering all settings) as starting point for the current RAW image. I use this function often and it is a real time saver. In AP I tried to maintain a preset named "Last" to mimic this functionality, but this didn't work as you cannot even update a preset, you have to delete and then re-create it with te same name. And you would have to do this for every adjustment panel. In short, this is way too cumbersome Sensible (camera dependent) processing defaults: Here both applications aren't perfect. CameraRaw often shows a slight white balance shift (to the red) compared to the out-of-camera JPG, but otherwise matches the JPG pretty well (if the correct camera profile is selected!) The other RAW develoment applications are more or less pretty far off and require several sliders to be adjusted until the result matches or even excels the OOC JPG. In Affinity, specifically for my Powershow G5 II, the developed raw files lack saturation, maybe because there's no equivalent to the camera's "Landscape" camera profile (or "picture style") in Affinity Photo ... or is there?. So I need manual adjustments to get a blue sky blue again, for example. Also, RAW images are pretty soft in AP, initially. Same in CameraRaw. One positive aspect that that solved some usability issues in AP is the customizability of the shortcuts. Initially I fould the "Redo" and "Zoom to extent" shortcuts to be unwieldy, but could correct them to be more comfortable and thus quicker to use.
-
Just came across this bug too. I often just edit the "hundred's" digit of the white balance and check if the new value fits, but here this is not possible because AP 2.0.0 silently ignores the new value as long as the "K" unit is still there. Indeed it seems as if the input validation doesn't accept the output formatting of that field. See attached (small) screencast. AP200 - Temperature text field problem.mp4
-
Ivo Pavlík reacted to a post in a topic:
Batch Processing RAW files with macros
-
Well, I just checked and it seems at least the export resolution is not saved. I have to set it each and every time for the same image after doing some corrections and exporting again. Which seems odd in the light of the above.
-
I am not sure this is a bug or if there is some intention behind this which I just don't understand: Anyway, I save a photo, then I export this image to JPG. When I then close it (using Alt+W), AP asks me again if I want to save the photo. This dialog is a nuisance to me, especially since I cannot just press enter, but have to press "J" or use the mouse to make it go away. Unless there are actual changes that need to be saved (the export settings?), it would be nice if exporting did not cause the need to save again. In technical terms, it should not set the "dirty" flag. AP 2.0.0 on Windows, 100% reproducible.
-
Can a moderator please move this ticket in the "Photo 2 Bugs found on Windows" section of the forum. I didn't find the bug reporting forum at first, so I posted it here but now I realize this is subpar. Thanks.
-
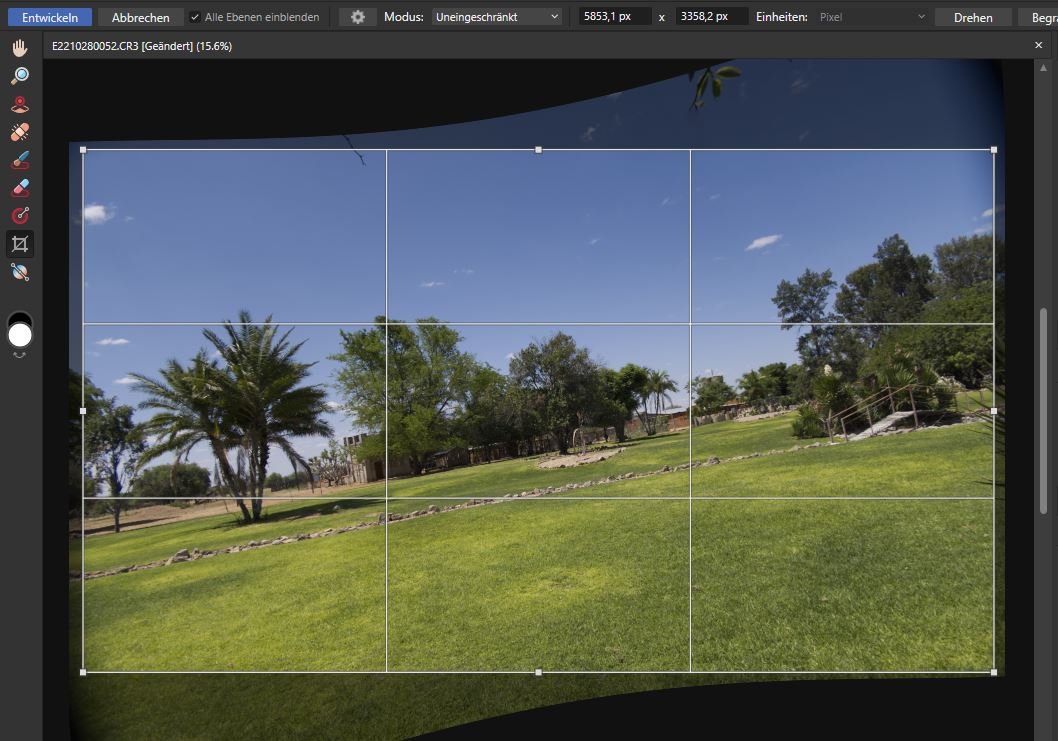
Expected behaviour: You apply your changes to the image and if you are satisfied, press "Develop" and you get exactly this result you saw before. Actual behaviour: The result after developing may vary, most prominently when using rotated crops. How to reproduce: Open a raw file with lens correction applied. (In this case it is a wide angle view.) I carefully cropped an image to a rotated crop section, avoiding any white corners (which is hard enough in AP having to take care of this manually). After developing, the top left and bottom right corner were white, so image data was missing in the corners. Switched back to develop persona - no white corners (as previously). (Note that I use the "linked file" option of AP 2.0) Developed again - white corners were there. My guess what happens is: The camera and its raw files use a heavy (automated) lens correction. I could go easily to 95% scale and still not see everything the sensor captured. So when rotating the image, there's quite a bit of head room to use without extending beyond the actual sensor data. See the third screenshot showing this . It seems as if the actual development process later only works on the data after the lens correction, so it works on already cropped sensor data, thus the white areas after the additional application of the rotation by the crop tool. (Note that the image used below is just for demonstration, I originally encountered this effect on a different RAW file of the same camera.) AP 2.0.0 on Windows

-
Presets seem not to work as intended, at least not in the "Develop" persona where I tested them. I created presets for all kinds of RAW development settings. When I now open a new RAW file, AP shows these (last used) presets as active, but they are not. The sliders/settings are at default positions. Switch the preset to "Standard" and nothing happens. Switch back to the preset and only then the settings are applied. Attached screenshot shows an example: I enabled "Improve details", set the values to 20% each and saved the preset. On the next image I can see the preset, but the option is actually disabled, so this state is inconsistent. This irritates, it defeats the purpose of having "quick" presets and makes RAW development with AP slower than intended. Affinity Photo 2.0.0, Windows.
-
And in addition I found that the presets seem not to work as intended either. I created presets for all kinds of settings in Affinity Photo 2.0.0. When I now open a new RAW file, AP shows these (last used) presets as active, but they are not. The sliders/settings are at default position. Switch the preset to "Standard" and nothing happens. Switch back to the preset and only then the settings are applied. This defeats the purpose of having "quick" presets and makes RAW development with AP slower than intended. I will create a bug report for this.
-
Ivo Pavlík reacted to a post in a topic:
Batch Processing RAW files with macros
-
I'm just testing Version 2 of Affinity Photo. It took me only two evenings to desperately search for a faster way of developing multiple similar RAW photos. And I haven't even started trying to process hundreds of images from time lapses yet ... During the last years I have been developing photos with either Nikon software and or CameraRaw from Adobe Photoshop Elements(!) While the latter is lacking some adjustments it is really convenient in terms of developing multiple images at a time: DnD multiple images into the software. The images appear in a sidebar. You can select one, multiple or all and apply settings to the selection. This gives you full flexibility to have consistent settings and at the same time some variance for settings where this is needed. Afterwards you select all images and process them in one step. This is the way I wish AP would work as well. Alternatively Nikon Capture NX-D as a concept that can also help, but is not as flexible: You can copy the settings from a raw file and paste them on any number of other raw files. The problem with this approach is that this will override all settings (brightness, contrast, WB, colors, denoising, etc.), so you have to be sure to first set and copy all those settings that must be equal before starting to adjusting any photos individually.
-
Leigh reacted to a post in a topic:
90 day trial licence cannot be activated
-
I am sure I didn't. But the installer itself triggers the Windows UAC dialog which requests for admin permission, so it gets the required permissions anyway. Just for completeness, I uninstalled Affinity Photo and re-installed it in a folder outside the somewhat protected "c:\programs" folder, in C:\Affinity\Photo. But the result was just the same: The program claimed it couldn't write the license (although, again, it did write the XML file). Maybe it wants to do something with the file afterwards and fails to do so? I also wonder if there's a timing issue in the application, so the program tries to access the license file when it is actually still in use by another thread or something of this sort. Maybe related to the fact that i have a very fast Samsung SSD960 Evo (NVME) inside the notebook? Just thinking loud. (In terms of permission issues, I simply cannot see that I have special circumstances on my machine. So to me this seems unlikely unless lots of other people have the same issue.) I don't think I want to pursue this issue any further. I actually spent more time on this problem than I intended to spend for the whole test.
-
Same result, as expected. I mean, running it not as admin was what I initially did ... and it did not work back then. This means: Folder is created, license file is created, message about writing problem pops up. License file is not recognized: Dialog querying me about whether I do have a license comes up on next start. I repeat my earlier question: Are there any log files which might help you finding the root cause of this issue?
-
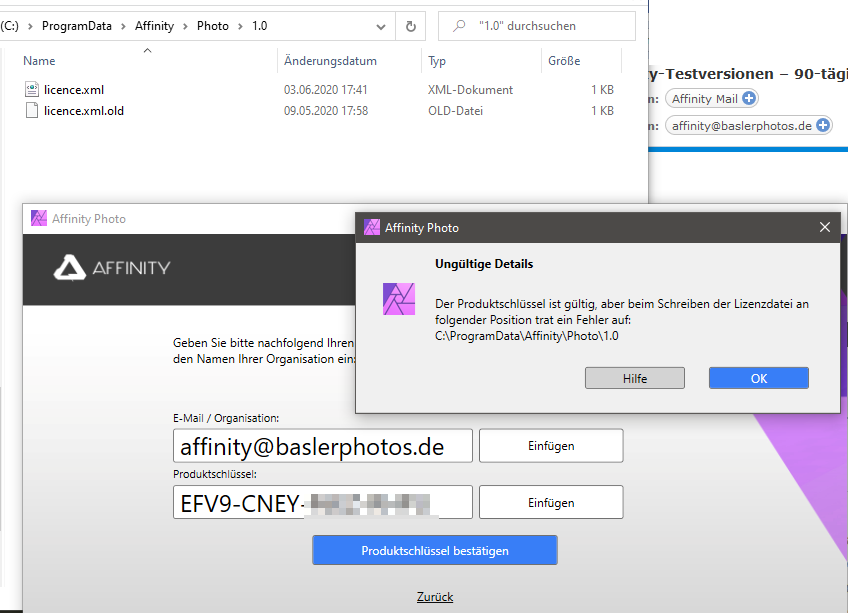
History repeats itself ... The funny thing is, the application did write the new license file as seen on the screenshot. But maybe it is not complete? Also funny: The dialog title says "Invalid details", but the dialog text says the product key is valid. Maybe you know how to interpret this... I don't. If I confirm the dialog I am back at the product key dialog. I closed the dialogs, deleted the license file again and started the procedure over again, this time running the application as admin user. Same result. (Win10 Home, 1909 update, default installation path, nothing fancy imho.)
-
Indeed it is there, created and modified on 2020-05-09, the day when I tried to activate the 90 day test licencse. It contains the correct product key and email address as shown in the first screenshot. Compared it again with the license key email I got.
-
A big thankyou for your attempts to help. Being able to test every major version once is actually what I expected from other software - and what makes sense imho. I can rule out the first things you brought up: I got the license email about a month ago, so even if the time started from there (which I don't think) I would have like 60 days left. I only installed the new version on the day I posted this ticket and thus did not have any activation attempty earlier. I did not manipulate the system clock and as far as I can tell the clock in Windows was correct all the time. So I hope Serif can shed some light on the issue. If I need to provide some log files, let me know.