ch22
-
Posts
84 -
Joined
-
Last visited
Recent Profile Visitors
1,603 profile views


-
 We had the same kind of discussion in our French-speaking forum, but this time one of the Windows-user victims was informed of the loukash proposal and was able to find a solution. I'm translating what he told us about the happy conclusion to his adventure: I found the solution for Windows myself: the assets.propcol file is located in Users / .../ .affinity/Common/2.0/user . Next to the file in question (a few Kb), there was an assets.propco_backup1 file of over 6000 Kb. All I had to do was change the name of this file to assets.propcol to restore everything. Phew!!! (And many thanks) Can qualified people explain what happened? It would be interesting to know whether other Windows users could benefit from the same happy coincidence.
 -
 Affinity_Pro reacted to a post in a topic:
Various issues in Develop Persona
Affinity_Pro reacted to a post in a topic:
Various issues in Develop Persona
-
Version 2 certainly is a huge improvement to working from RAW files, but there are still many points to be resolved or, at the very least, improved. Below is a short list (probably not exhaustive), ranging from clear-cut bugs to more debatable questions of software ergonomics. Its items are not listed in order of importance. 1. The Highlights adjustment remains very poor (in fact, it's been a persistent weakness of the whole Affinity Photo from the start). 2. The clipping alerts for blacks (blue) and partial clipping (yellow) are not reliable. This is all the more surprising as it works well when you open Develop Persona on a pixel layer, but not on a RAW file. 3. In the online manual, the notion of "clipped (mid-)tone" is not sufficiently explained. In this way any fully saturated tones would be clipped tones. I'd have preferred to be spoken for black, white or partially clipped pixels. 4. The online manual claims that once the Develop Persona output mode has been chosen, it cannot be changed. On the contrary, it seems to me that a file with a linked raw layer can always be transformed into a file with an embedded raw layer. 5. It would be nice to be able to rename lines in the Snapshots and Overlays panels. 6. The Show Overlay option should be an option in the Overlays panel rather than in the Brush and Gradient tools. 7. The same set of adjustments cannot be applied to several raw files at once. At most, you can create setting configurations on a first image and then manually apply these configurations to subsequent images, one by one. It would have been nice to automate the procedure with a kind of batch processing. 8. In the layer panel, the RAW layer lines should have an identifier (i.e. the pictogram to the left of the thumbnail). 9. The Colour Range and Tonal Range selection menus do not work on a RAW layer.
-
- 1
-
-
OK. That will be all for me on this issue. It's not very serious (we can live with it), but it would be better to solve it. I submit another bug of the same barrel, but rather Windows than Mac —a little anyway_, at https://forum.affinity.serif.com/index.php?/topic/186882-affinity-photo-is-show-others-menu-buggy/
-
I am afraid there is an issue in the command Show Others in the Layer menu. Please open the enclosed TIFF picture; it is made of 5 pixel layers, each with a single horizontal color band. Select the middle layer (blue), open the Layer Menu and choose Hide Others. Only the blue band is left. Now, reopen the menu and choose Show Others. The whole picture should be displayed again but it does not always. I made two trials with Windows machines (including laptop of mine under Windows 11) and it does not (the two bottom layers are missing). Under MacOS, I met the same surprise with my personal computer (Mac Pro, BigSur OS) but another attempt with a Mac Mini under Monterey OS was correct. bug-test.tif

-
Hum! My Console app seems in a better mood today or I messed up yesterday. Anyway, here are the 3 requested files. Also, I upgraded to 2.1 and it didn't change anything for me. Affinity Photo 2 Affinity Store_2023-05-20-181631_Gromac2.crash
-
Thank you for considering my message To clarify, on your Mac does the crash occur independently of if Method 1 (Clipping Mask to thumbnail/'Mask to below) or Method 2 (Nesting as a child layer/move inside) are used? I am not sure to exactly understand. Your Method 1 yields what I call 1st type child while your Method 2 yields a 2nd type child. The crash occurs when the child-parent group is folded. Then only the 1st type is visible and the only possible click and drag move is a conversion attempt from 1st type to 2nd and it always crashes I prepared a short video showing what I do, at https://oitregor.com/divers/AP2e/bug.mp4 (2mn30sec, 29 Mo) Based on your screenshot i'm guessing so, but can this crash occur on any file/set of layers when either of these two actions are performed or is it file specific? It is not file specific. My video shows two different occurrences Could you provide a few recent crash reports after encountering this? I've linked the FAQ below which details how to find these. Unfortunately, my Console application is not compatible with my OS ("Vérifiez auprès du développeur que Console.app fonctionne avec cette version de macOS"). I prepared a copy of the bug report prepared for Apple in https://oitregor.com/divers/AP2e/Bug_report.docx and I hope it will be convenient for you
-
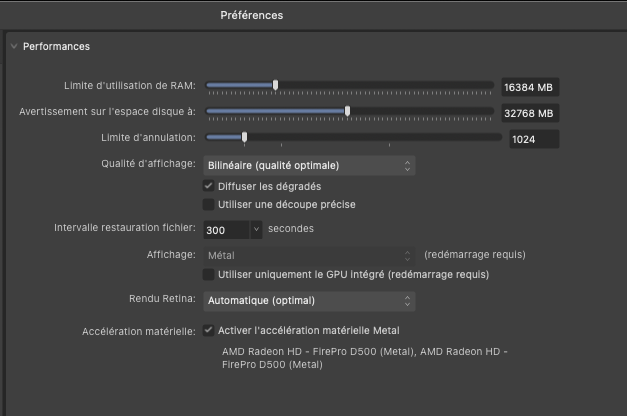
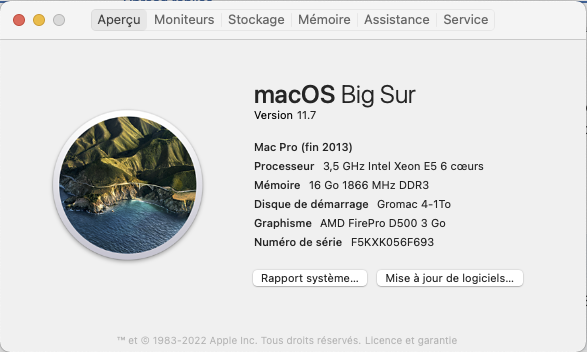
There are two ways to create child layers in Affinity Photo, but I couldn't find anything about this point in the online help. I therefore do not know the official vocabulary (if it exists) to distinguish the two types from each other and this makes uneasy to discuss it. So I begin with explaining how to get these two types. For this I start from an image with 3 ordinary layers, a background, a delimited pixel layer which will become the parent layer and a top layer which will become the child layer. Then : (1) The 1st type children are created by right-clicking on the upper layer and choosing "Mask to below". If this layer is an adjustment or a filter, you can also create this type of child directly with the buttons of the layer palette or with the items of the Layer menu (2) The 2nd type children are created by selecting the upper layer and then calling the menu "Arrange > Move inside" You can also transform the top layer into one or the other kind of children with the appropriate click and drag. You can also transform a 1st type child into a 2nd type with the click and drag shown below, starting from a folded parent-child group and moving the child layer thumbnail horizontally to the right This works fine on my Windows laptop, but this always makes Affinity Photo to crash on my Mac, regardless of the child layer (adjustment, filter, pixel layer). I tried in Preferences > Performance to cancel all hardware acceleration (see below screenshot), but this still crashes. I am working with a Mac Pro (under BigSur OS) with a AMD FirePro D500 3 Go video card
-
Smarter input boxes for width and height?
ch22 replied to ch22's topic in Feedback for the Affinity V2 Suite of Products
Sorry ! I messed up my message. What I meant is below : Changing the size of an image so that it fits within a predefined W x H rectangle is a common problem, which Affinity Photo does not know how to answer. However, it would suffice, in the dialog of the "Resize document" function, to write the expression * min(W/w,H/h) in the width and height boxes : Currently, unless I'm mistaken, the input boxes for width and height recognize the document variables w and h only in the Transform pane for the Move function. They do not recognize them in the Resize, Crop, and Export dialogs. Why not teach them all? Another issue is that the max() and min() functions don't seem to work in expressions — at least I cannot run them. However, this is not too serious insofar as we can find an equivalent for them, min(a,b) = b + (a-b) * roundup((b-a)/(b+a)) but it would obviously be more convenient to have these two functions at disposal. -
Changing the size of an image so that it fits within a predefined W x H rectangle is a common problem, which Affinity Photo does not know how to answer. However, it would suffice, in the dialog of the "Resize document" function, to write the following expression in the width and height boxes: *(W/w + (H/h-W/w) * max(W/w,H/h)) Currently, unless I'm mistaken, the input boxes for width and height recognize the document variables w and h only in the Transform pane for the Move function. They do not recognize them in the Resize, Crop, and Export dialogs. Why not teach them all? Another issue is that the max() and min() functions don't seem to work in expressions — at least I cannot run them. However, this is not too serious insofar as we can find an equivalent for them, max(a,b) = a + (b-a) * roundup((b-a)/(b+a)) but it would obviously be more convenient to have these two functions at disposal
-
Thanks In my experiments, I'm careful not to drag any non-transparent pixels from the source layer off the canvas with the Move Tool, and I find that Rasterize works just as well as Rasterize and Trim. I'm afraid that using the Move tool will create something else, in the very canvas.
-
@NotMyFault : thank you for your analysis. For the title, I made it deliberately provocative to get attention. I had observed an illogical behavior and I was looking for a suspect: I offered a misinterpretation of w and h because these two variables are poorly documented in the available online help. For example, in the online manual (the link you provide), w and h are really presented as width and height of the document, not of the layer. Besides, there is no clear definition for the various terms proposed such as “document” or “spread”. Anyway, the issue does not come from a misunderstanding of document variables w and h. Similar anomalies can be observed with much simpler equations such as x=300+(x-300)/a and y=200+(y-200)/a (homothety with respect to point (300,200), of ratio ‘a’) as soon as the Move tool has been used on the layer, even for a simple move without deformation. These anomalies can be avoided if the displaced part is set into a selection before moving it or, following your advice, by rasterizing the layer before applying to it the Equations filter. Incidentally, where did you find this need for rasterizing so as not fooling the Equations filter? I never heard of that before. A subsidiary question: what is different between a pixel layer and the same layer processed with the Move tool and which would disappear in the rasterizing operation?
-
The point is not to accommodate with the behaviour of my macro (I gave a way for that), it is that this behaviour is not acceptable. I built my process only to put it in evidence. Maybe I misunderstood something —in this case, please explain! I join the video record you asked for. odd_behaviour.mp4
-
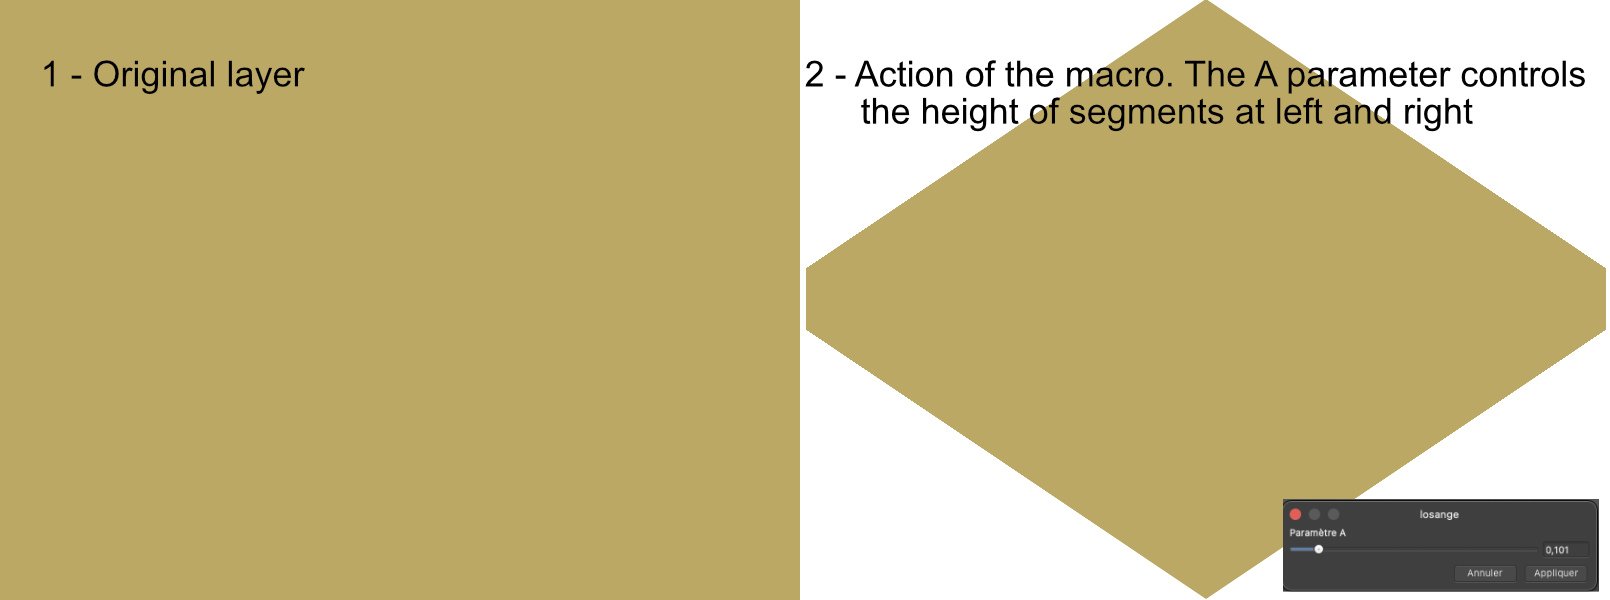
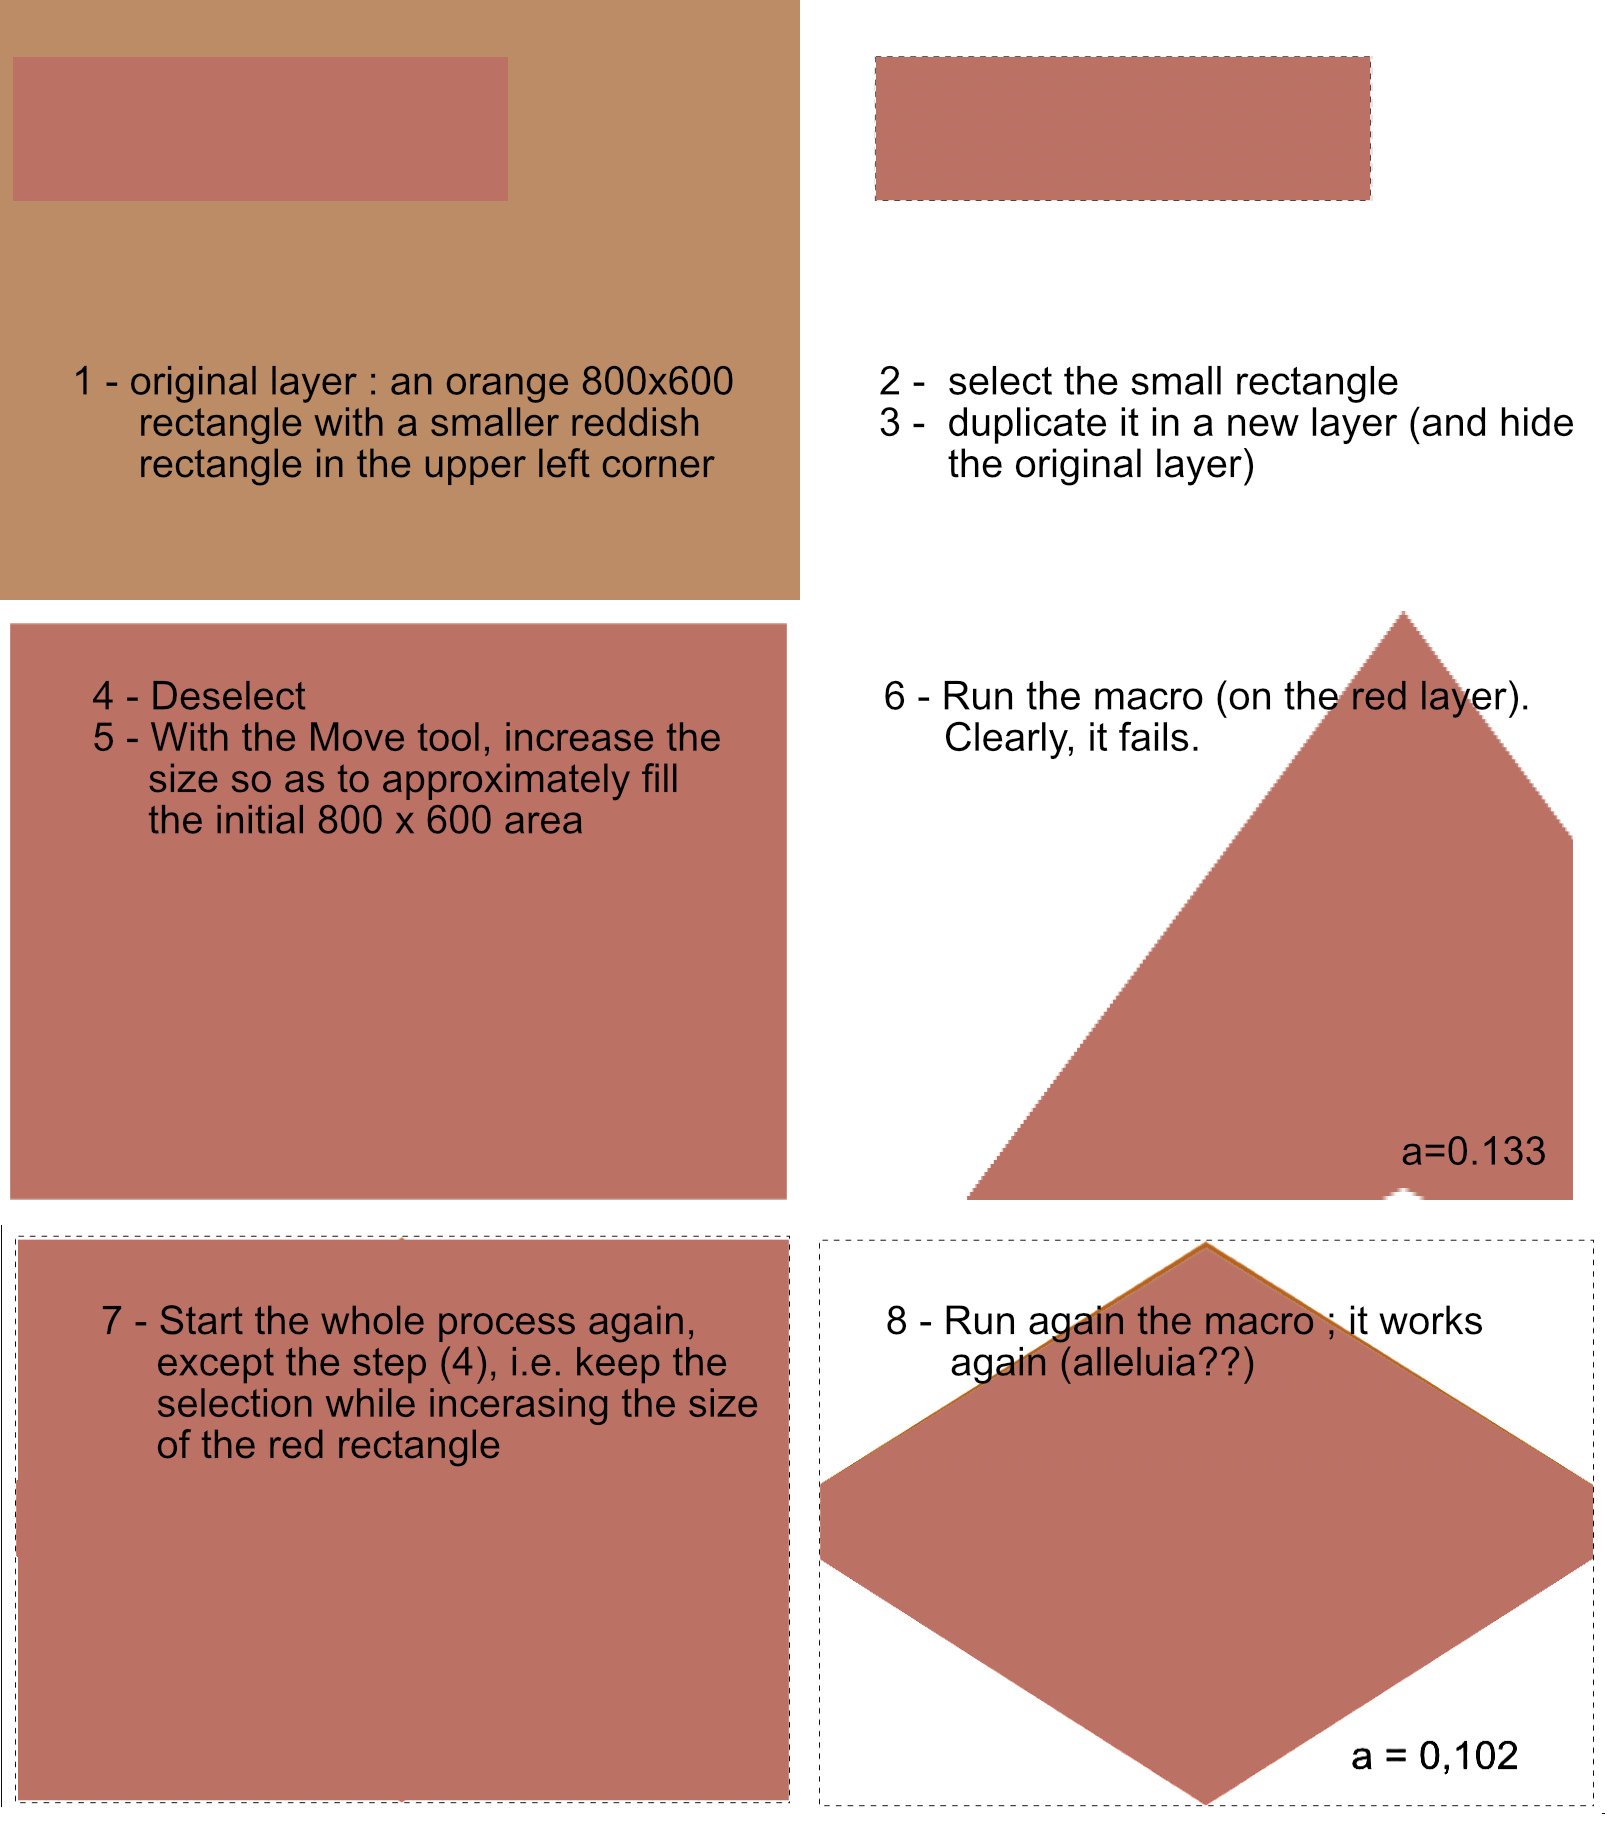
I recently wrote formulas for the Equations filter that map the initial rectangle of a pixel layer into a truncated diamond inscribed in this rectangle x=x y= h/2+(y-h/2)/(1-(1-a)*abs(1-2*x/w)) where ‘a’ is a glider-controlled variable between 0 and 1 (perfect diamond for a=0 and no distortion for a=1) To save time in experimentations, I made a macro of it, at http://www.oitregor.com/numeric/affinity_photo/divers/losange.afmacro (to be imported within Macro panel). It generally works as expected, as shown below: However it sometimes fails. I specially met up against this issue after using the Move tool. In the following picture, I prepared a detailed, simple process to show what can happen —and a possible way to avoid it. I would be happy to understand what occurs, whether it is a bug somewhere in Affinity Photo or a misunderstanding of mine.
-
Thank you for answering My OS is Big Sur. Things became worse with the new version 10.4 concerning the shortcut for masking the application. With 10.3, I was able to change it to ALT K. This is no longer possible with the new version and the shortcut for "Afficher la selection de pixels" remains stuck to CMD H, whatever I can attempt in the Preferences
-
I have a problem with the keyboard shortcuts in Affinity Photo in French language since I switched from the Apple Store version to the Serif version (i) There is a conflict between the shortcuts assigned by default to the menu "Hide application" and "View> Show pixel selection", both to CMD H (ii) I cannot cancel or modify the shortcut for "Show pixel selection". It remains stuck at CMD H and I had to change the shortcut to hide the application. I was able to switch to ALT H, but it's still pretty boring. This problem vanishes if I revert to Apple Store version 1.10.1 but it goes back when I revert to Serif version (1.10.3). There is no point in trying to save the shortcuts from the Apple Store version and reload them in the Serif version. This problem appears for the French language, but not for the English language. Out of curiosity, I watched what is happening in the Italian language. Luckily, the CMD H shortcut to hide the application is preserved, but there is still a problem with the shortcut assigned to "Show pixel selection", which is already assigned elsewhere (CMD W), but there we can change it. Happy Italians! (I haven't watched for other languages)