StefanK
-
Posts
38 -
Joined
-
Last visited
Recent Profile Visitors
2,269 profile views


-
 keiichi77 reacted to a post in a topic:
Brush indicator not showing actual brush size
keiichi77 reacted to a post in a topic:
Brush indicator not showing actual brush size
-
keiichi77 reacted to a post in a topic:
Brush indicator not showing actual brush size
-
Brush indicator not showing actual brush size
StefanK replied to lippemartinsm's topic in V2 Bugs found on Windows
No. For me this is with every brush. And also at 100 % hardness Yes, I know that. But I would like to see its precise border while moving the source brush. I can work much more precisely with it. That is not too much requested. And also. The target brush also has a border line for its limits! And pretty much precise in the effectiveness limits. See the above to the limits of the brushes. 🙃 -
Brush indicator not showing actual brush size
StefanK replied to lippemartinsm's topic in V2 Bugs found on Windows
It does not need screen recording. Everyone can see for themselves that the effectiveness zone of the brush goes well beyond the limit of their line marking. -
Brush indicator not showing actual brush size
StefanK replied to lippemartinsm's topic in V2 Bugs found on Windows
I have already mentioned that several times. But it doesn't seem to disturb anyone else. But the brush could be set and controled much more precisely if you can see your edges or limits. This is even more uncomfortable with the copy brush. Here the source brush is only a tiny cross. -
StefanK reacted to a post in a topic:
Auto apply Colour Panel's colour picker
-
V2.5 cannot be started. After 'fonts are initialized' the program crashes immediately. Old version completely uninstalled. Unsuccessful attempts with MSI and with EXE. I've never had anything like this before. Where can I download V2.4 again? @ Ok, I found that. I'll stay patient and wait for a solution... 😇
-
Ghost images when cloning
StefanK replied to StefanK's topic in Desktop Questions (macOS and Windows)
I was very interested in this now. Yes, it doesn't really seem like abnormal behavior. Photoshop has the same effect. 🥴 I had already forgotten that. 😇 Ok, it's annoying though. But I can live with it. There are worse things. Incidentally, the undesirable effect only occurs when the source brush slides over the area that has just been cloned. Probably some internal graphics memory thing or something. This didn't happen with my first graphics program, Micrografx Picture Publisher. But Corel bought it and has improved that to death. But now we finally have Affinity Photo. 🤩 -
Ghost images when cloning
StefanK replied to StefanK's topic in Desktop Questions (macOS and Windows)
No. Here is another example. There is only one layer. Nothing else. It's a simple jpeg image. The clone source is the current layer (in the second attempt). And in this video current layer & below. Now tell me this behavior is normal. For me it isn't. And it's really annoying when you have to constantly interrupt. 20240128_202555.mp4 That doesn't get us anywhere. Because there is only one layer here. One. -
Can anyone confirm this behavior when cloning? Also an annoying thing for me. Cloning overwrites pixels. But as you move the brush further, the pixels reappear even though they were just overwritten. 20240128_150520.mp4
-
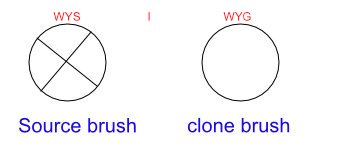
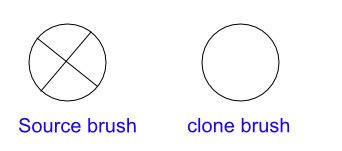
BTW. And this is what it looks like at the moment. The larger the source brush, the less clear its boundaries are. How can you move the source brush along the contours of a source if you cannot see the contours of the source brush?

-
No, that's not the point. I simply want 100%+ WYSIWYG. That's all.
-
Yes. I see it. But only in the preview. It is not visible during cloning. But that is secondary. I would like to lead the source accurate. Then I'm also sure that exactly what I see at the source will appear at the clone.
-
Yes, of course that is the case. Only you can't see the size of the source brush. Because only the center cross is visible. The actual - but invisible - size is significantly larger than the cross. I don't feel like using the undo brush all the time. Because there was always something more copied than I wanted. 😇 Yes, that's the problem. It can only be seen in the preview. And during cloning I cannot observe (invisible) source limit and result at the same time. My intention would then look like this. So quite simple
-
My problem relates to the fact that I don't have any real control over the coverage limit of the source brush. I found this very pleasant in another program. When cloning, I was then able to move the detection source boundary very precisely along the contour of my desire. Because the coverage limit was specified exactly by the source brush. At the moment I only see the center of the invisible coverage limit - without external borders. Ok, this isn't a drama. But it might just be more pleasant to use. But if you can easily change that, why not?
-
I'm still a little unhappy with the clone brush. Aligning the brush with the outline of the source is not possible because the source brush is just a cross. But the detection range is much larger. Isn't it possible to make the source brush look the same as the clone brush? So two identical brushes?
-
jsmith51 reacted to a post in a topic:
I don't like the new UI design
-
CoffeeBooks reacted to a post in a topic:
I don't like the new UI design
-
jmwellborn reacted to a post in a topic:
I don't like the new UI design
-
imagodespira reacted to a post in a topic:
I don't like the new UI design
-
I don't like the new UI design
StefanK replied to Zaxonov's topic in Feedback for the Affinity V2 Suite of Products
I feel the same way. -
creating a layer from a mask
StefanK replied to StefanK's topic in Feedback for Affinity Photo V1 on Desktop
There is nothing to be followed. It is written there the same and without answer.