Andi_CostaRica
-
Posts
28 -
Joined
-
Last visited
Recent Profile Visitors
1,053 profile views
-
 NotMyFault reacted to a post in a topic:
Screenshot/image fuzzy after rasterising
NotMyFault reacted to a post in a topic:
Screenshot/image fuzzy after rasterising
-
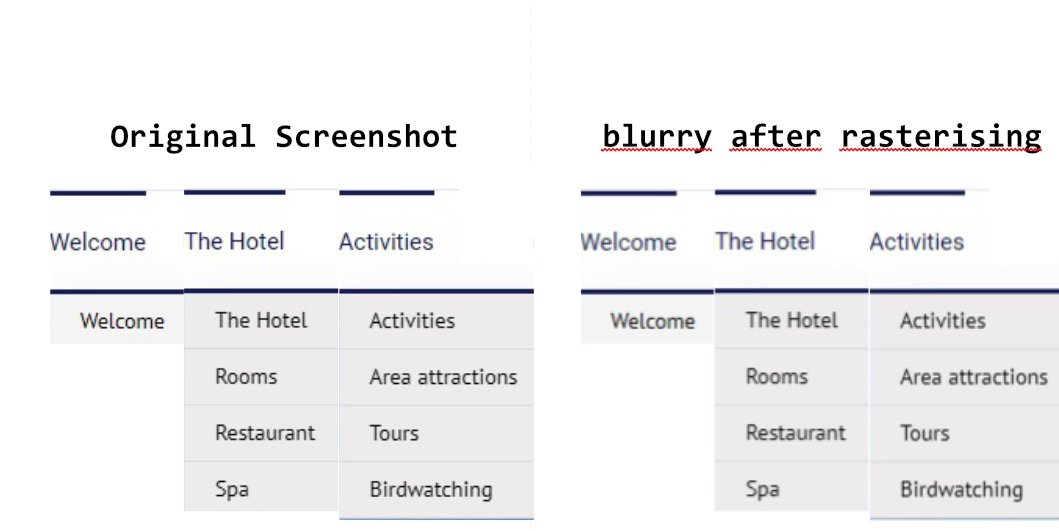
 Exactly! The pixel position was the problem. When inserting, the x and y position of the .JPG file had a decimal place (even if pixels were defined as document units) and this causes the problem with rasterizing. So avoid X:100.7, Y:100.2. Always make sure that the position is exactly X: 100 and Y: 100. And yes, even if pixels are activated as the document unit, there may be decimal places. Activate “Force pixel alignment” (and deactivate “Move by whole pixels”) Perfect and thanks for the help!
-
 Andi_CostaRica reacted to a post in a topic:
Screenshot/image fuzzy after rasterising
Andi_CostaRica reacted to a post in a topic:
Screenshot/image fuzzy after rasterising
-
Hello, I am working in Affinity Designer (Windows) to document the screenshots of a website. I have created a document with a resolution of 200 dpi and when I drag and drop (or place) the screenshots into the document, they are correctly transferred one to one and look perfect (just like the original). However, when I convert them with Layer>Rasterize, an anti-aliasing function seems to be applied and the result looks blurry. Is it possible to call a conversion function where there is no anti-alias and where the pixels are taken one to one unchanged? I would like to point out that the imported screenshots have not been resized or stretched in any way, but are in the document at their original size. thank you
-
Andi_CostaRica reacted to a post in a topic:
Removing raster from a photo
-
walt.farrell reacted to a post in a topic:
Publisher Vers 2; deleting pages completly messes up long document.
-
@MikeTO and @walt.farrell Wow, thank you so much for your quick responses. Both answers really help. My mistake was that I deleted whole double pages in the Pages panel. In my case it would have been better to select the text parts in the text frame (Document View) and then delete them. But as it looks it can get quite complicated if you have to delete large page areas, or possibly worse, rearrange them.
-
Hello! I have a book document with about 160 pages and would like to make a copy of this document to experiment with different formatting. To do this, I want to delete most of the pages beforehand. I only need a few pages as a playground, but I want to keep all the basic settings of the original document (page size, paragraph and character formats, etc.). However, as soon as I delete multiple pages, the entire document falls apart. For example, if I delete pages 10-90, it seems that not all of the front 80 pages are deleted, but only a portion of them. At the end of the document, however, many pages are missing. The last text frame shows an text overflow and the last 30 pages are no longer displayed. Somehow the page delete command seems not to have deleted all the pages that are at the beginning of the book (why I don't know), but instead chopped off the back. 1/ Are there any hints or reports on what to look for when deleting pages? 2/ How can I reinsert the 'invisble' overflow pages with the linked text frames at the end of the document? Thank you
-
I am not quit shure, but I think I messed up the files, and copied the new one over the old one. 🫢
-
It looks like I have lost my 'updated' dictionary.propcol file. There seems to be only one left with all the words I 'learned' missing.... Wondering now if there is a quick way to relearn these words. I have an already corrected book with 150 pages and about 100 words that I know are spelled correctly, that are now showing as incorrect in Preflight. Currently it looks like I have to right click on all the words to pick them up with 'Learn Spelling'. And that takes time...
-
In the newly installed version 2 of Affinity Publisher, the words learned in the User Dictionary of version 1 are not imported. After the installation of version 2 I have also copied the User Dictionary file ( dictionary.propcol) of version 1 into the installation of version 2 (...<User>\.affinity\Common\2.0\user\dictionary.propcol). Unfortunately the ready "learned" words are not recognized in the preflight and displayed as incorrect. How can I transfer the laboriously learned words into the dictionary of version 2? Thank you
-
Andi_CostaRica reacted to a post in a topic:
Lack of provision of basic grids for master pages
-
OK thank you. I will give it a try!
-
Hello, I am working in an multi page document and want to change the margins of the master page. What do I have to do to reflect these changes on the pages with the text frames in the previous dimensions. Is there a possibility to update a text frame to the new margins? Otherwise it looks as if I had to resize the text frames on all pages by hand? Thank you BTW I am still working with Publisher V1 😁
-
jmwellborn reacted to a post in a topic:
Save Designer V2 files back to V1 files?
-
mangauniversity reacted to a post in a topic:
Save Designer V2 files back to V1 files?
-
AlessioFB reacted to a post in a topic:
Save Designer V2 files back to V1 files?
-
 Andi_CostaRica reacted to a post in a topic:
Communication and Secrecy at Serif
Andi_CostaRica reacted to a post in a topic:
Communication and Secrecy at Serif
-
Andi_CostaRica reacted to a post in a topic:
Save Designer V2 files back to V1 files?
-
MikeTO reacted to a post in a topic:
Save Designer V2 files back to V1 files?
-
walt.farrell reacted to a post in a topic:
Save Designer V2 files back to V1 files?
-
I was now able to copy and paste all the elements back into a version 1 document. Did not create an art board, just a simple A3 document. I am relieved. Thanks to all for the help! 😁
-
As far as I know none. Just very simple line art (pen tool) and 2 bitmap files as background and templates. 😀
-
I tried to copy and paste. Works kind of. I can see the objects in the layer panel, but not in the document 🤥. All objects are invisible, when you select one in the layer panel you can see the object without stroke and fill until you select the next one. the file in Version 2 looks like this:
-
Cristian Dragos reacted to a post in a topic:
Save Designer V2 files back to V1 files?
-
@walt.ferrell: Thank you very much. Good idea! I will give it a try! @all: I would have really liked to work with the new version. Too bad version 2 is more of a quiet plop than a loud bang. In the last 2 days I felt more like an alpha or beta tester than a customer 'testing' a new version of a software...
-
Andi_CostaRica reacted to a post in a topic:
I have Deleted V2 and Gone Back to V1
-
Andi_CostaRica reacted to a post in a topic:
V2 is a downgrade
-
Andi_CostaRica reacted to a post in a topic:
V2 is a downgrade
-
Andi_CostaRica reacted to a post in a topic:
Bring back Layer on/off checkboxes
-
Andi_CostaRica reacted to a post in a topic:
Bring back Layer on/off checkboxes
-
Hello, Is there any way to save/export Affinity Designer version 2 files back as version 1 after working on them with the new version 2. When opening with version 1, I get a message that the file contains version 2 features. It is not possible to open it. I tried to work with Designer V2, but after two days of work I give up. Besides many crashes, I now give up, especially after discovering problems with duplicate ghost objects in the Layer panel... I think I better wait for version 2.1...
-
An other question. What is the current version of the Affinity Publisher Workbook. Is there an update planned for the changes in Publisher version 1.10? Thank you