Sara72
-
Posts
322 -
Joined
Everything posted by Sara72
-
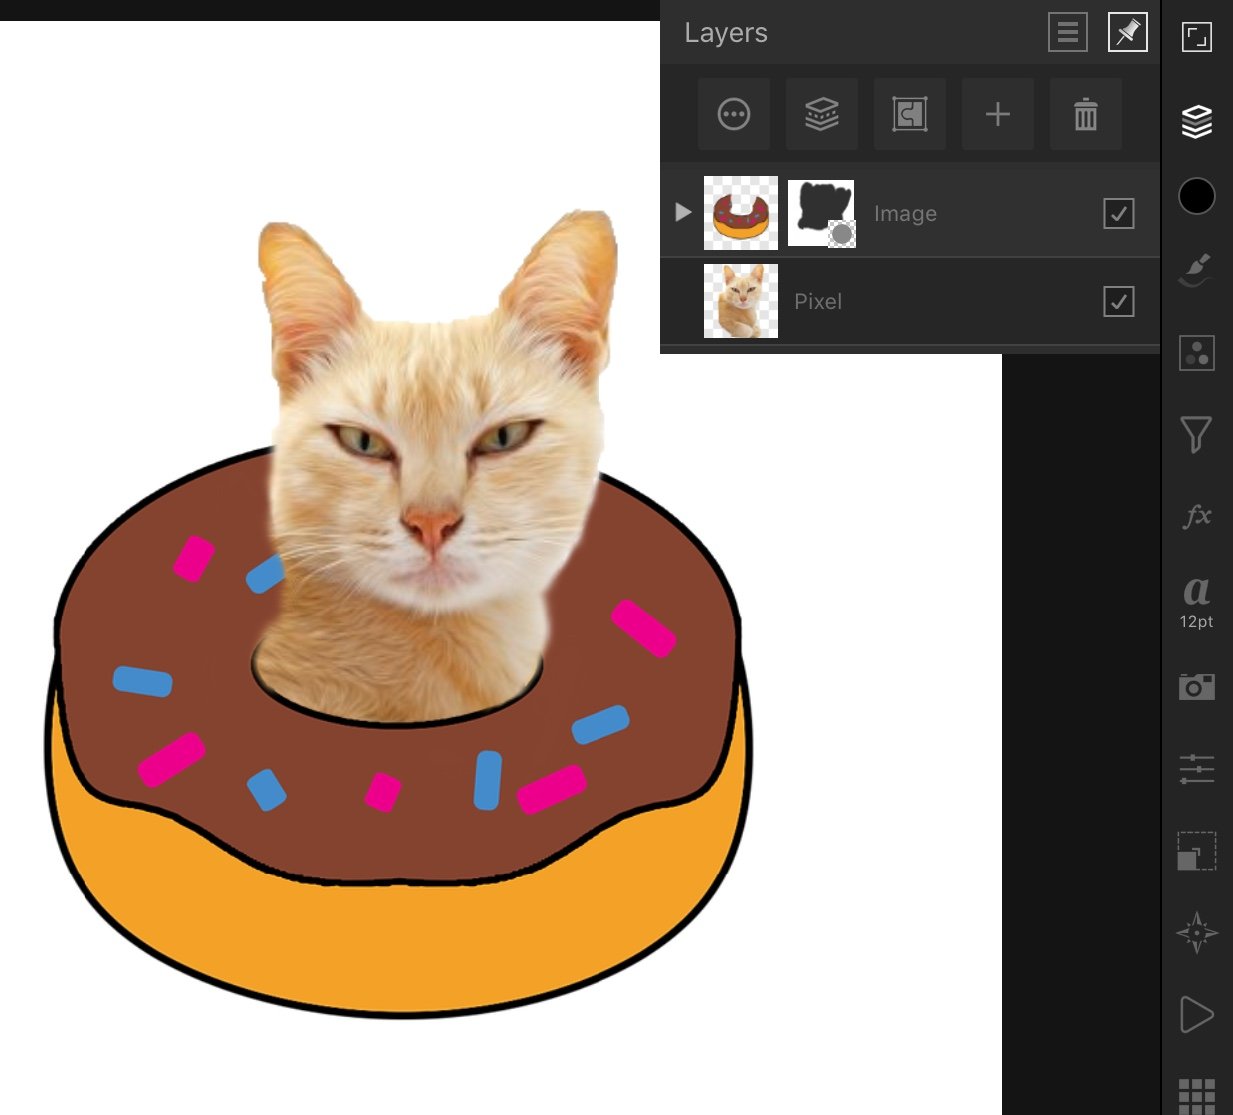
This is your file Josie, i downloaded it onto my ipad and painted on the mask with black to reveal the parts of the cat. Im using designer too, you just need to switch to the pixel persona to use the paint brush to paint on the mask.
-
 Okay, it was just a suggestion, going by the amount times this has come up on these forums. Nothing will come of it, feel free to move on with your life not being annoyed.
 -
It would be exactly the same way Josie, you just need to rotate the doughnut on its side and then use a different picture of a cat walking.
-
Josie, go into pixel persona and on the mask layer paint with a black paint brush to reveal the bits of the cat you want (black reveals and white takes away on the mask):

-
Yes, sorry that as well, should have included it in my reply. I personally think there should be a pop up notification when you bring in an image other than by ‘Open’ (which does silently do what you want) similar to what you get when you try to go into Develop persona with an image instead of an RGB pixel layer.
-
Yes, you have to rasterise an image layer for some tools to work, this only happens when you ‘Place’ or ‘Drag’ a photo onto your document. Posts in this thread explain the difference: What are pixel layers and image layers
-
Josie, are you following some type of tutorial? Can you post it here so we can see what it is your trying to do? Also can you keep you posts to this one thread, you don’t need to message me, I have notifications on and see your replays here.
-
You can still do the mask in Designer, just use the pixel persona. (And it’s done the same whatever the position of doughnut)
-
Background colour
Sara72 replied to Rob Chisholm's topic in Feedback for Affinity Designer V1 on iPad
Adding a +1 for this, something like an option to choose a colour canvas when creating a new doc. -
Remove background methods
Sara72 replied to Rob Chisholm's topic in Pre-V2 Archive of iPad Questions
No Problem Rob, glad to help and will add my +1 to the request -
You can just use a mask on the doughnut layer, painting with black to reveal the cat underneath, Crop the cat to part you want first (I’m using Photo by the way):
-
hand drawing
Sara72 replied to Charla's topic in Pre-V2 Archive of Desktop Questions (macOS and Windows)
Hi, You can do a lot of that kind of real drawing work in the Pixel Persona within Designer, having a drawing tablet if your on the desktop makes it easier: Paint Brush Tool Flood Fill Tool Drawn selections Smudge tools There are a lot more tutorials on Youtube if you do a search for Affinity Designer Pixel persona. -
Remove background methods
Sara72 replied to Rob Chisholm's topic in Pre-V2 Archive of iPad Questions
Hi Rob I usually drag out the rectangle tool in the colour i want to fill the whole canvas and then lock it in the layers, there isn’t that option like Procreate or sketchbook to set the background colour in the layers. It would be nice if designer had the option in document setup to choose a colour canvas, similar to what Corel painter has. -
Remove background methods
Sara72 replied to Rob Chisholm's topic in Pre-V2 Archive of iPad Questions
Lols, more of a burger in box Here you go, you see the transparency on thumbnails when checked:
-
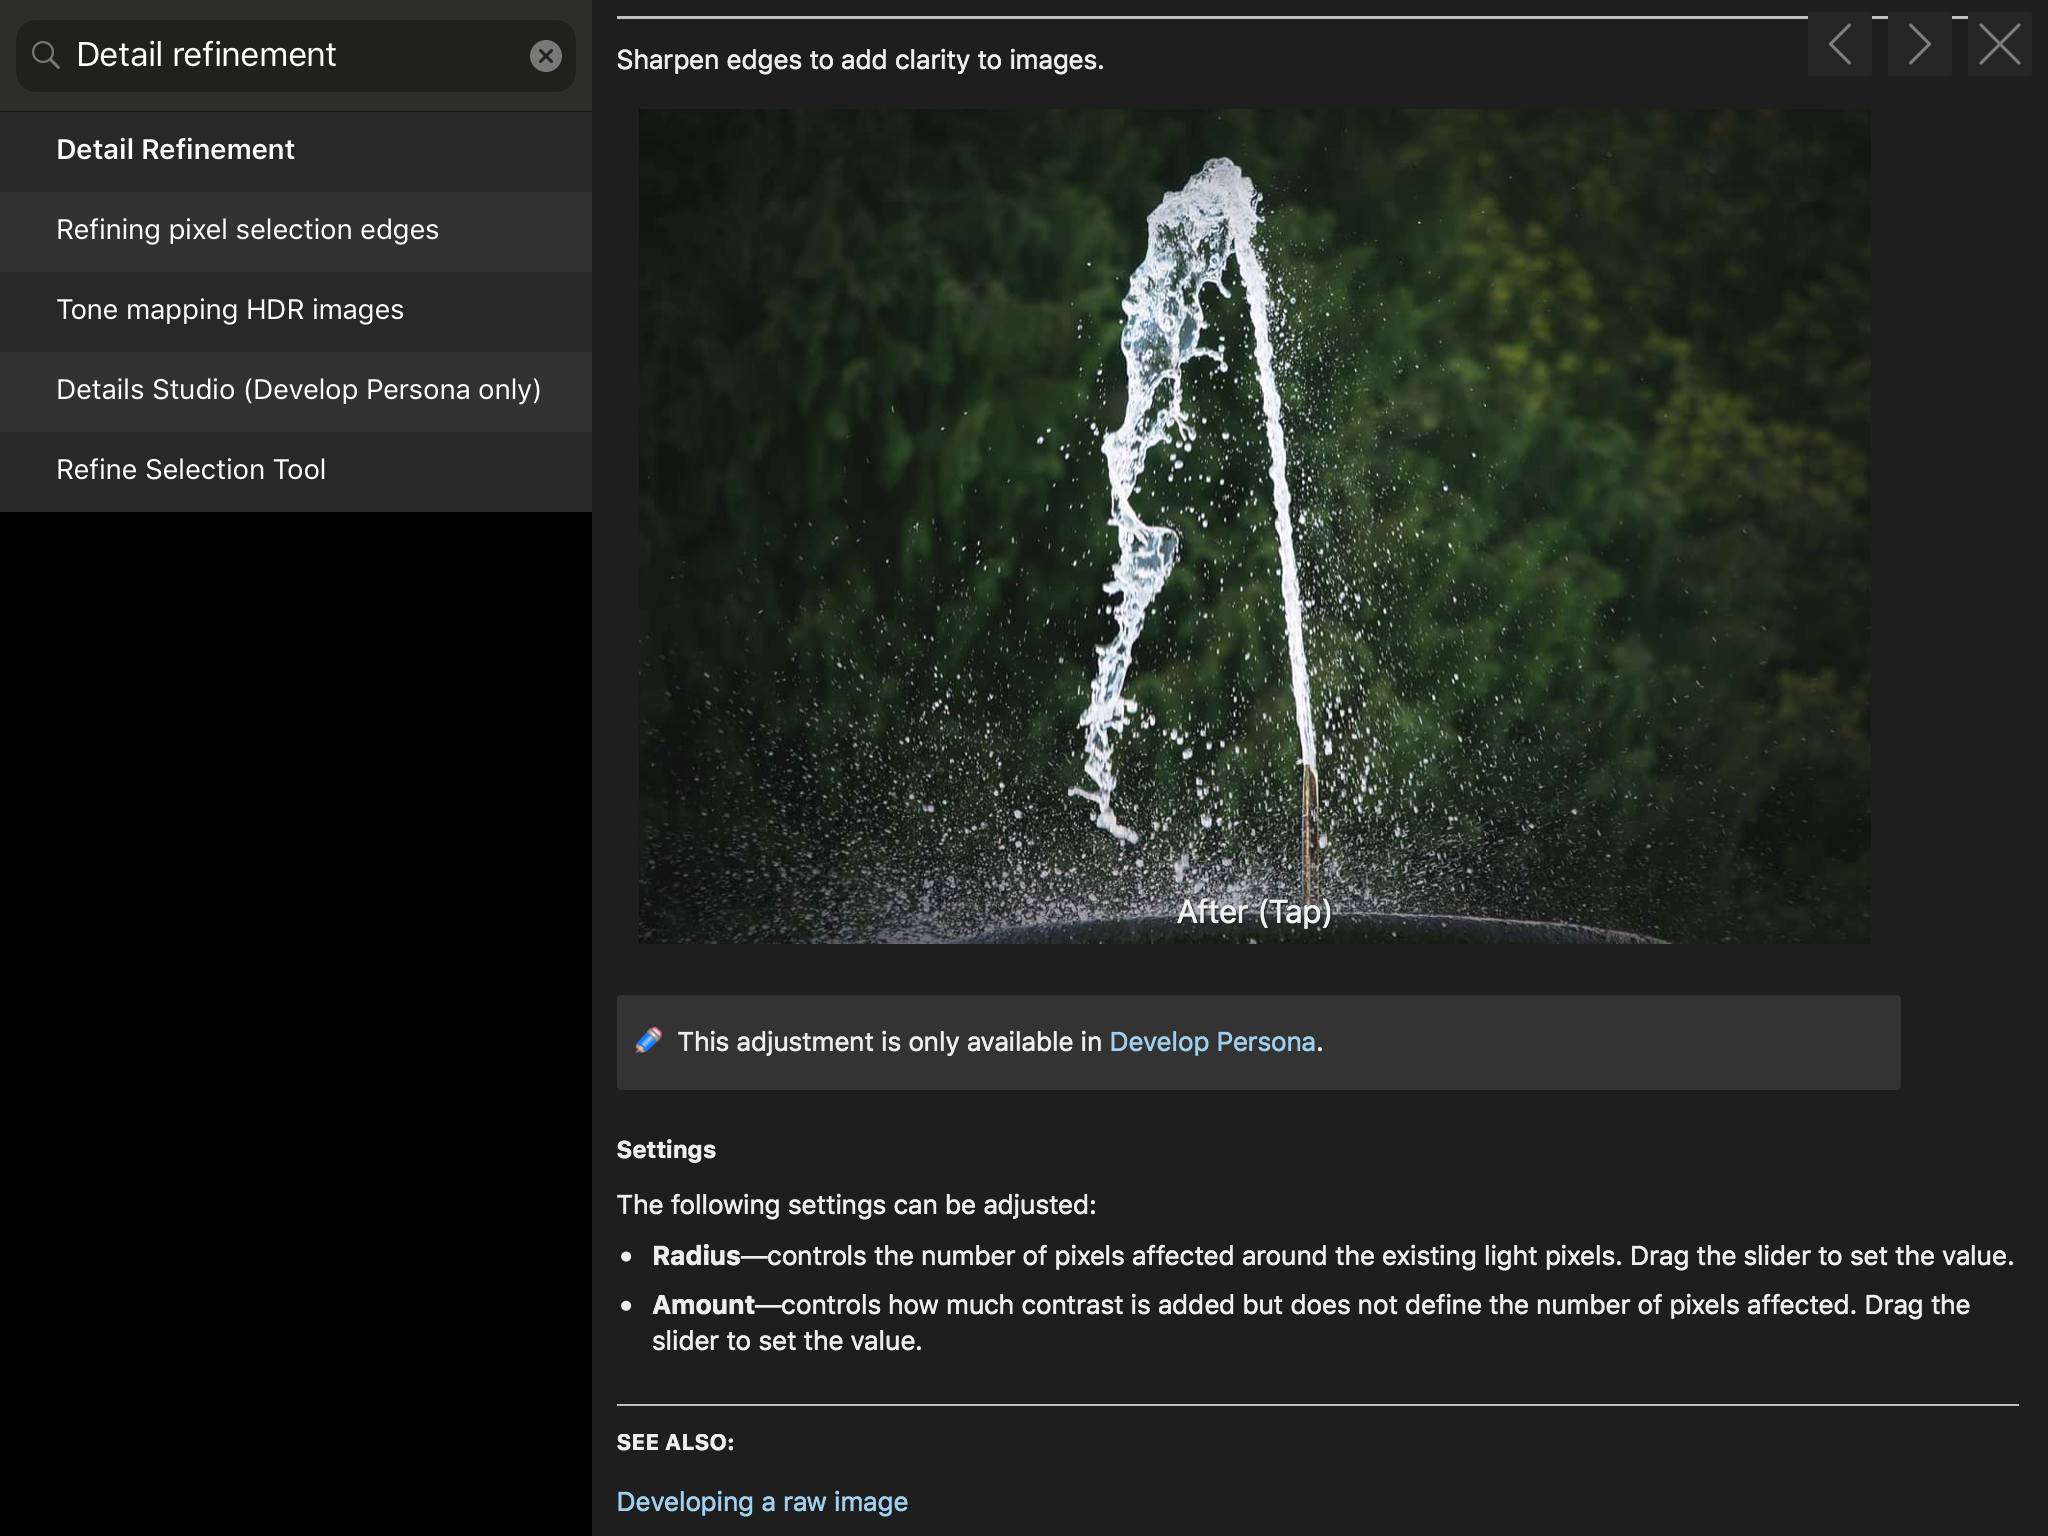
Hi, Is Detail Refinement under the Lens Studio in the Develop persona what your looking for?
-
Remove background methods
Sara72 replied to Rob Chisholm's topic in Pre-V2 Archive of iPad Questions
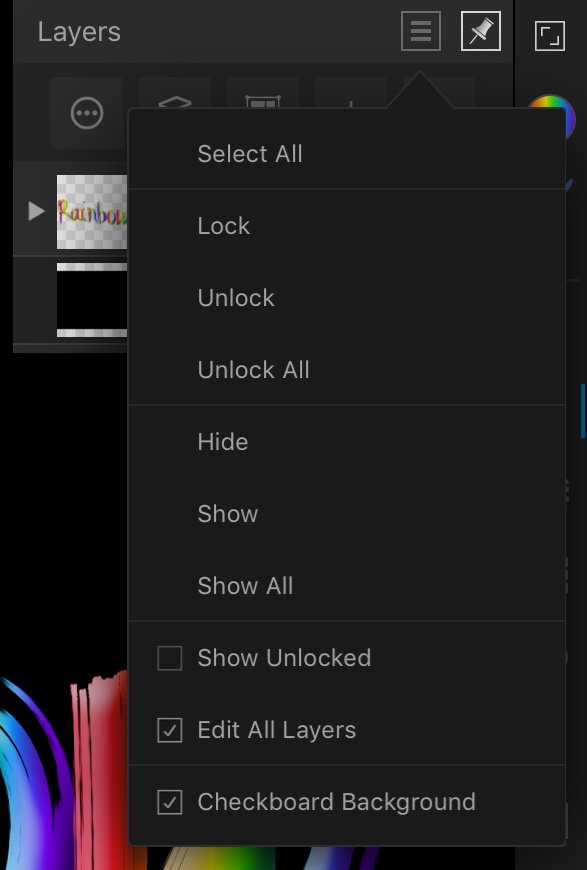
I’m guessing the Transparent canvas setting under documents is the same as the Options settings for transparent background when setting up a new document? Only other option I’ve found is under the burger menu settings for the layers Studio and a check box for checkboard background. -
It will only been stained with what is underneath, in this case the default, white document background (as mentioned) but could be the transparent checker-board if you checked that when setting up your document and a colour or photo depending what you put on the layer underneath. Push the layer pixels towards the edge instead and its easy enough to push them back if by mistake you have caught the edges.
-
Problems getting a transparent background on PNG
Sara72 replied to Ron99's topic in Pre-V2 Archive of iPad Questions
I would think it was probably not transparent when it was imported or got flattened and rasterised because some of the effects added (like the drop shadow) were not supported. -
Hi, If you Convert to Curves the circle, you can then select the 2 nodes that overlap the second circle and break the curve from the Action settings on the context toolbar, deleting the part you don't want or changing the fill to none.
-
Problems getting a transparent background on PNG
Sara72 replied to Ron99's topic in Pre-V2 Archive of iPad Questions
Hi, When you go to export make sure you have the cloud image selected, then when you go to Export as png, you will get the option in the Area settings to choose: 'Selection without background', at the moment it looks like that is greyed out in your settings and the whole document is getting exported. -
Hi, Isn’t it just pulling the black away from the edges and revelling the white underneath? Try using the smudge brush to push the black towards the edge instead.
-
I think i found the move back tool?
-
Lines at pixel level
Sara72 replied to Vespero's topic in Pre-V2 Archive of Desktop Questions (macOS and Windows)
No problem Vespero -
Selectiond
Sara72 replied to WaldoUSA's topic in Pre-V2 Archive of Desktop Questions (macOS and Windows)
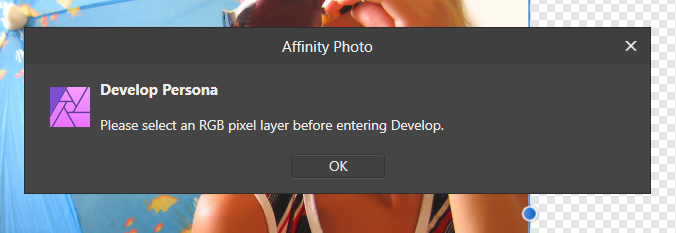
Hi WaldoUSA Make sure your working on a Pixel Layer and not an Image Layer, you'll need to right click on the image and Rasterise it to get some of the tools to work. (Maybe there should be a pop up notification similar to the one you get when going into the Develop Persona, to let you know you can't use that tool on an image layer)
-
Lines at pixel level
Sara72 replied to Vespero's topic in Pre-V2 Archive of Desktop Questions (macOS and Windows)
Hi, Hold down Shift key and then tap with the brush and tap again in location you want the line to draw to, I’m on Windows so not sure it’s the same process on Macs?