

jemmalee
-
Posts
29 -
Joined
-
Last visited
Posts posted by jemmalee
-
-
16 hours ago, Alfred said:
It looks as though you’ve accidentally set the text layer’s blend mode to something other than ‘Normal’.
I’m afraid I’ve no idea why your Shift key is misbehaving. What kind of keyboard are you using?
OMG you fixed my weird text issue! Thank you!
I’m using a Smart Keyboard for my iPad Pro!
-
Hi everyone!
I’m using Affinity Designer for iPad, v2.
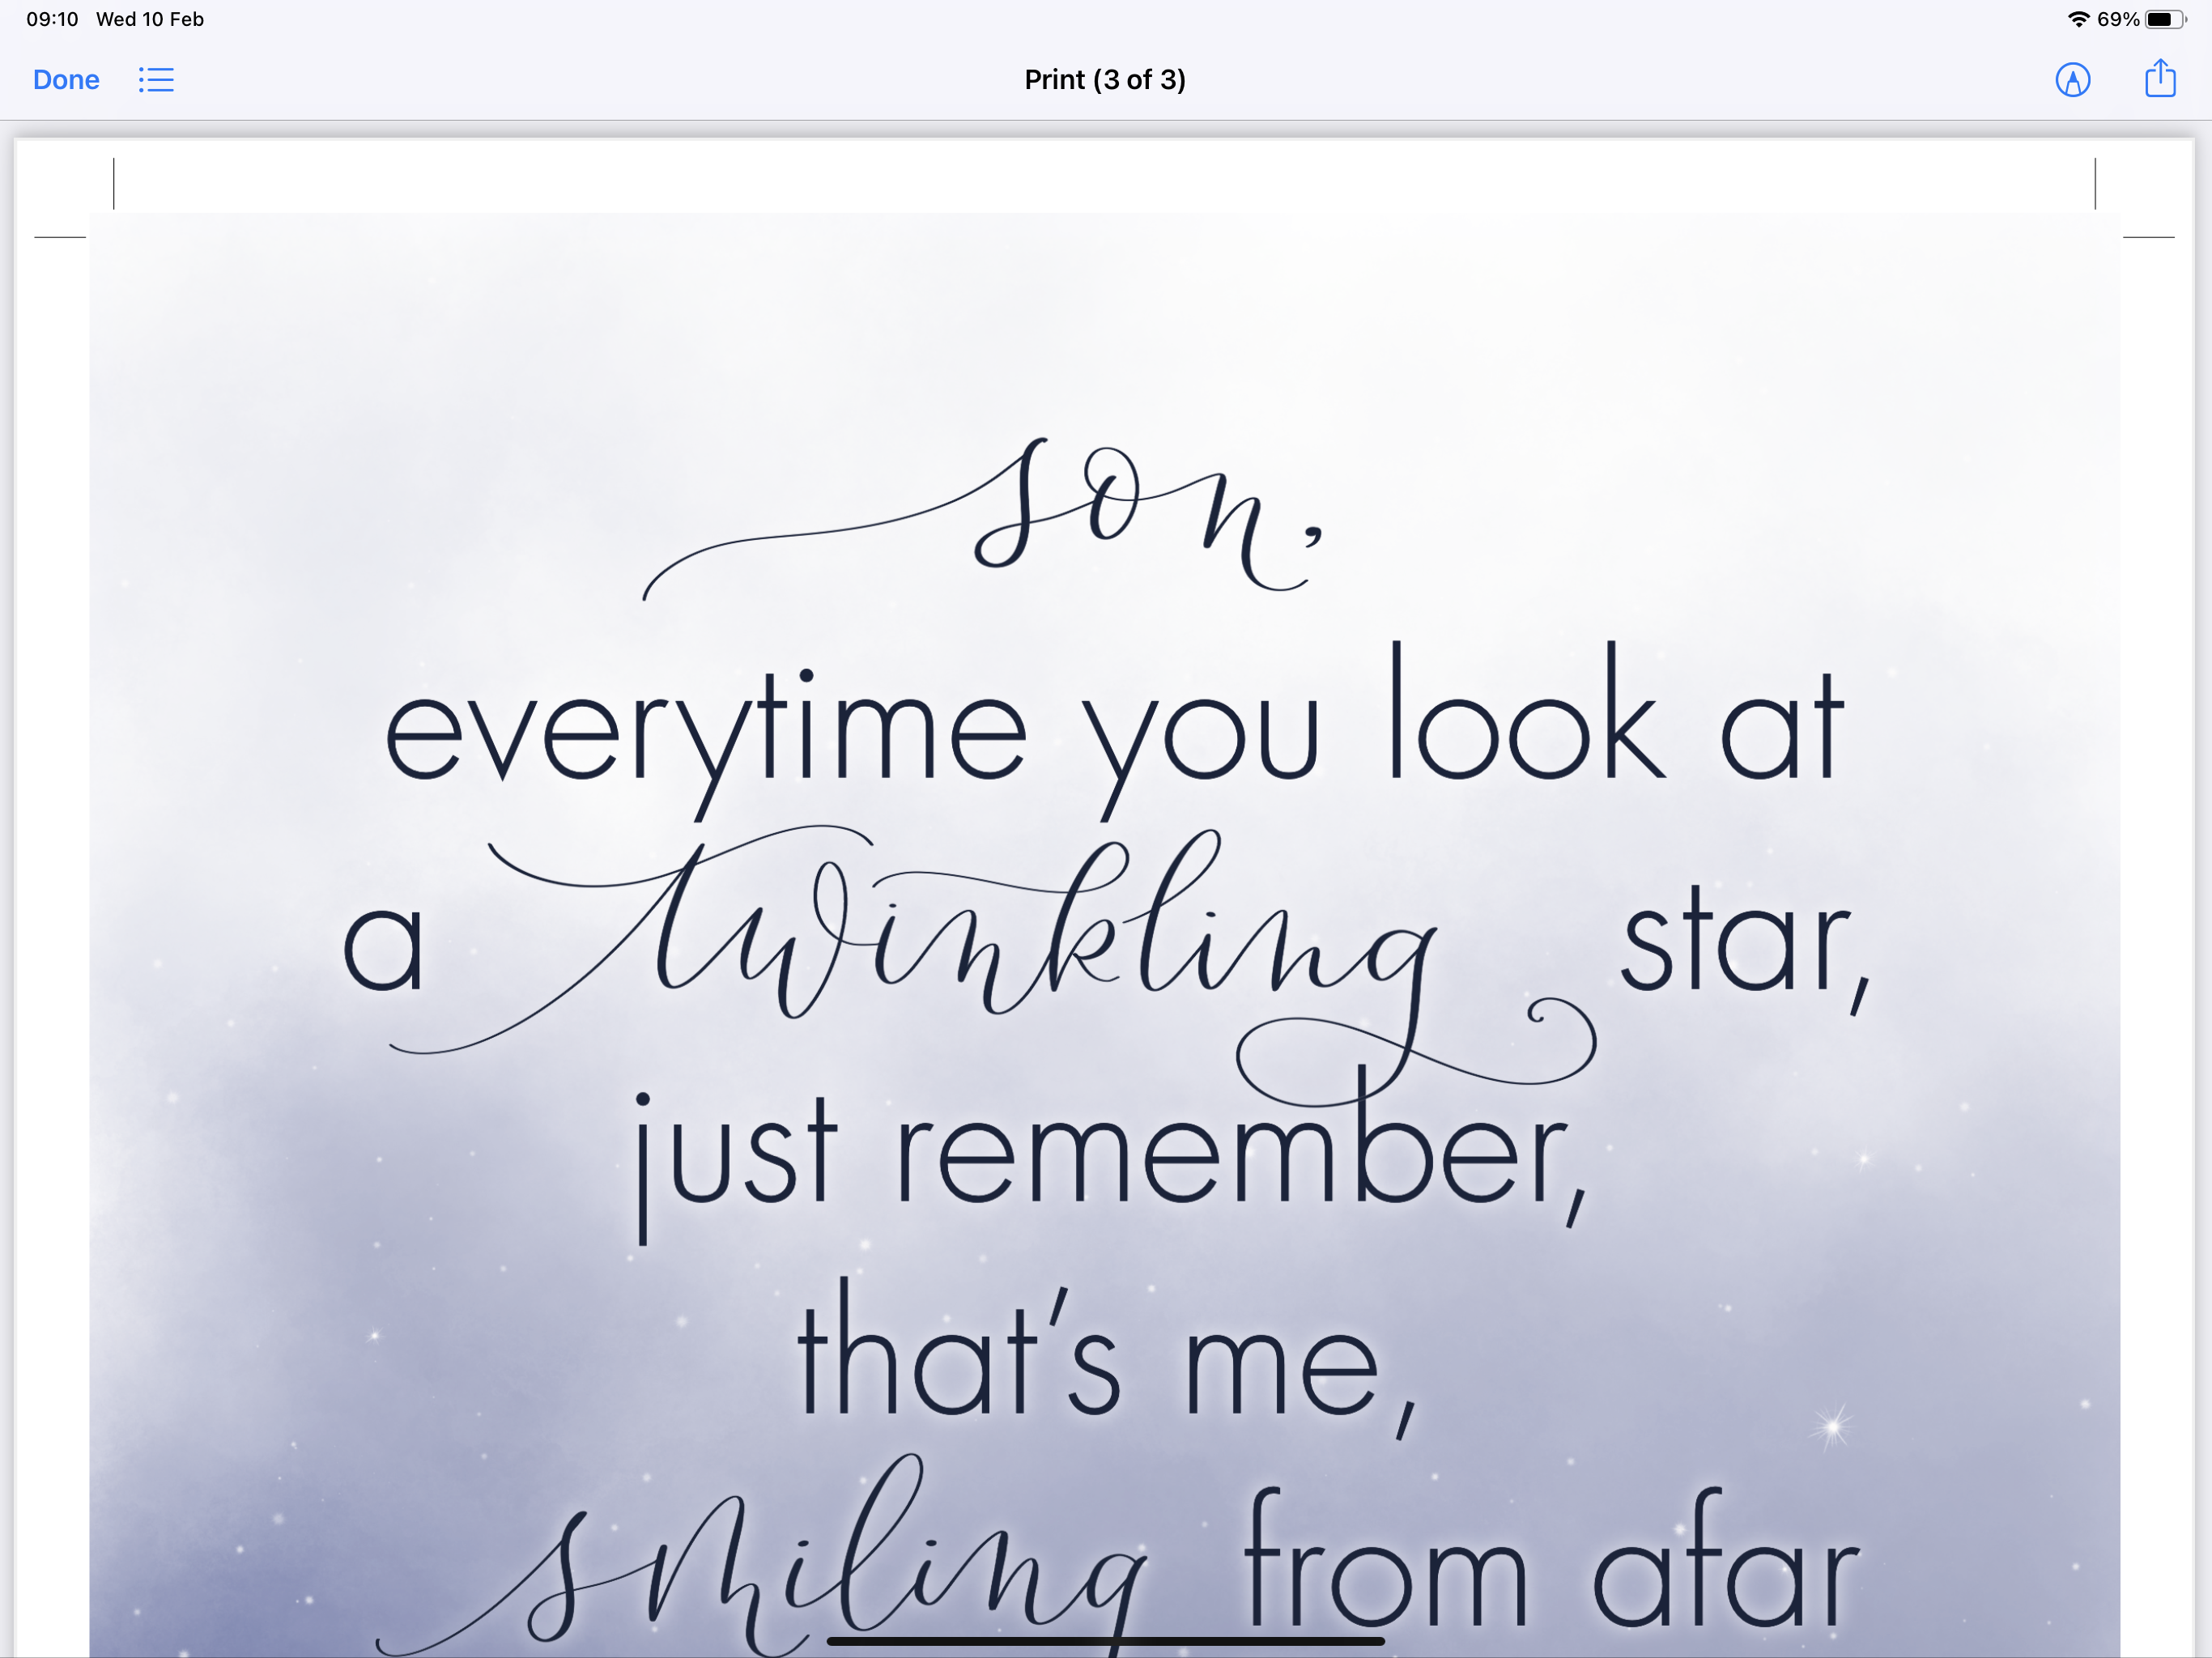
I can’t work out why my text is changing from black to white when I place a coloured box underneath it! See photo attached.
Also, weirdly, my shift key isn’t working in text mode (only in Affinity) so I can’t insert a + into text boxes. Weird right!!!
Any ideas?
Thanks in advance!
Jemma :)

-
-
1 hour ago, DM1 said:
White or see-through?
One way to create see through boxes in a curved line would be to use pen tool and draw a curve. Set the stroke thickness to suit and use expand stroke command on the curve. Draw squares and position on curve (with curve layer on bottom). Select all layers and tap the Geometry subtract command. You will be left with a black line with square see-through areas. Sorry if I have misunderstood what you are attempting to achieve.🙂

Hiya! Thanks for your suggestion. I tried that. This is what happened - see the screen recording. Thoughts?
-
Hi everyone,
Someone please please please help me.
I am creating a Polynesian pattern for a wedding invitation. The invitation is to be hot foil stamped so the file needs to be vector based not bitmap/image based. The areas that are black are the only things to be foiled gold, the background will be black cardstock.
SEE PHOTO.
I want to create white see-through boxes (that aren’t foiled) in the middle of the fat line. Can someone please explain how to do this? I tried putting it the mode as erase but when I export and set the rasterise option to nothing, the boxes aren’t showing up (as I have them set to 100% black (CMYK) plus the erase function).
Thanks
-
11 minutes ago, ProDesigner said:
Whoa!! Wow, that’s fascinating. Ok.....
- drag your pdf in
- tap on the pdf twice - or on its layer
- crop marks, etc, appear! (And lots of layers like you’ve opened the pdf)
- group and scale
- touch the Home arrow...... does not take you Home, but goes back to a view of the pdf!
I’ve ended up with the boundary of the newly resized pdf still set to the original page size definition... or... something... not quite processed it yet. You’ll possibly see it too. Not sure if it’s the order I’ve done things in, or if there’s a reset of some sort, or I’ve missed an object when grouping.
(the post you found was 2019)
Not sure what I think of this right now...
OH MY GOODNESS YOU ARE A LIFESAVER.
Seriously thank you so so so so much
-
5 minutes ago, ProDesigner said:
Wow, fascinating, but not much help to you @jemmalee, sorry.
Just dragged a pdf in. Same. Seems it’s imported it cropped to page.
It is importing the whole PDF because I managed to tap on the imported pdf layer and convert it to objects - I don’t recommend doing it btw. The crop marks are there, but not visible.
Will continue having a play, but can’t promise to help much.
It’s disappointing because I used to be able to fix this issue in Designer desktop by using the PageBox function as discussed here.
Thank you for trying
-
On 12/15/2019 at 12:07 AM, markw said:
Hello credesign,
With the placed PDF still selected, go to ‘Page Box’ in the Context Toolbar and select one of the following; MediaBox, CropBox or ArtBox.
As this is not a sticky setting so you will have to reset it for every PDF image you place. So just duplicate the first placed image and then arrange them as needed.Hi @markw, do you know if this function is available in Designer for iPad? I used to use it on Designer desktop all the time but I can’t find it on the ipad!
Thanks
-
On 10/23/2020 at 8:50 AM, anon2 said:
Welcome to the Affinity forums
Select the placed PDF with Move Tool. The context toolbar has a control labeled Page Box where you can choose from "BleedBox", "CropBox", etc.
Hiya, do you know if this function is available on Affinity Designer for ipad? I can’t find it anywhere! I used to import PDFs onto a blank page in Designer for desktop all the time and then use the PageBox function but I can’t find it on the ipad.
-
6 minutes ago, ProDesigner said:
Apologies > Document menu > canvas > clip to canvas.
It seems to be the equivalent to ‘preview mode’ in Adobe (if you’re familiar with that). It reveals or hides whatever exists beyond the page/canvas.
It’s a toggle on/off command but doesn’t have a tick to indicate which it is set to. I assume because Serif think it’s obvious.
Ok, I tried clip to canvas a few times but it didn’t change anything. Any other ideas? I posted some photos above so you can see what I’m talking about.
I want to be able to embed multiple PDFs to a page (like business cards for example) and then print them and trim them myself. But obviously can’t do if it doesn’t show the crop marks or bleed!!! Arghhh
-
46 minutes ago, ProDesigner said:
I'm intrigued how you've embedded a PDF using iPad Designer? I can only see 'Place Image". How have you done this, please?
You're sure you've set the Designer page to have a bleed too?
And if you have, you've unclipped the Canvas?
I just dragged and dropped the PDF into the new document! This is what I used to do in Designer desktop.
What do you mean by unclipping the canvas?
When I export the original PDF and view it in files, I can see it has bleed and crop marks, but then when I drag that into a new page in a new document, the bleed and crop marks disappear.
Here are some pics. You can see a) the original file, then b) exported with crop marks and bleed and then c) placed on a new document without the crop marks or bleed.
Basically, I want to set two up on a page so I can print easily.
-
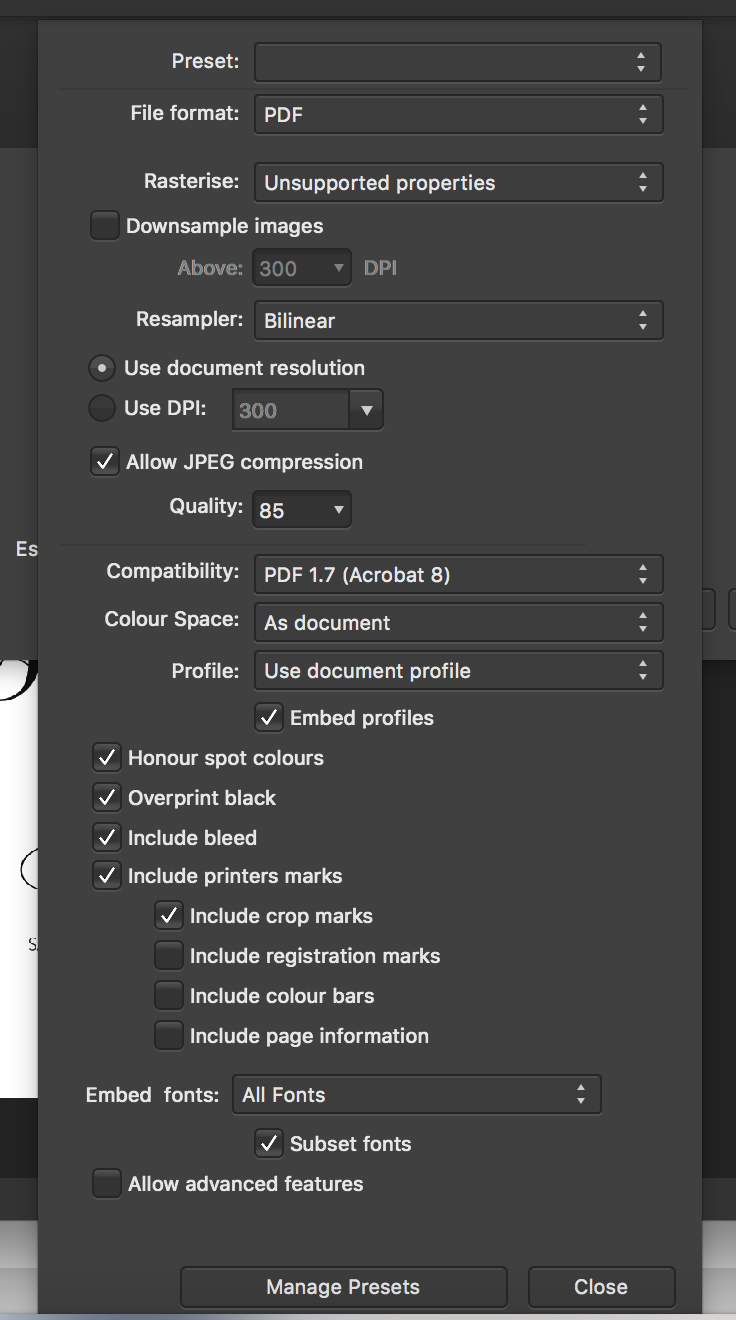
I want to export numerous slices with bleed and crop marks through export persona but I can’t work out how to create a custom preset with these settings!
I know how to do a custom export through the regular way but it becomes a very long process when exporting 20+ files!
Does anyone know how to do this?
-
Hi everyone,
I have embedded a PDF with crop marks into my document on Designer for iPad however is doesn’t show the crop marks! Is there a way to do this on the iPad? The PDF has bleed and crop marks and I need those when the file is embedded on a new page.
I’ve recently started using Designer for iPad, instead of Designer for Mac. I recall there being a PageBox function in the tool bar where you could choose between CropBox, MediaBox and Artbox. But I can’t find this on the iPad anywhere.
please help!
thanks!
-
@chelcod after your post, I opened up a new artboard with one of my invitation suites and tried out doing a bleed and exporting and I worked it out! I’m now able to set bleed on all docs within the artboard , place images & export with bleed and crop marks. Just curious to see if you worked it out too?
-
3 hours ago, chelcod said:
Hello! I am having issues with Affinity Designer not exporting the crop marks properly on a booklet I'm trying to send to print. The bleeds are not working properly. Each finished page is 7" x 10" and I am trying to export bleeds and crop marks at .125" around each edge. I tried transforming each page to 7.25 x 10.25 thinking maybe I had to take account of the bleeds in the page size, but that didn't seem to work either.
I am on a tight timeline to send to print and I am unable to fix this myself. Is anyone able to help?
Hiya @chelcod!
i was having this exact same issue when I started this thread. @toltec showed me how to achieve a bleed - although I wasn’t using an artboard, i was just using a regular document setup. Here’s what I had to do:
1. set your document size to the proper size (in your case, 10” by 7”).
2. Then select all the layers within your document and stretch them out past the document size to be 10.125” and 7.125” (that’s if you’ve set your bleed to .125.)
3. Make sure your bleed is set to .125.
4. When printing, turn on bleed and crop marks and export. If you are confused by what I mean, go and open my test file above when I posted “I did it” - you’ll see what I mean about stretching the layers out past the document background to create the bleed room.
Edit— I actually remember now reading above that @toltec said bleeds and crops don’t work on an artboard. Could you just set up a regular document instead?
i remember the thing I wasn’t doing was making my images on the document bigger than the document size (which is step 2 above) which is why my bleed wasn’t working - you need to have the images sit slightly outside your document size to act as the bleed area.
Does this help?
-
55 minutes ago, jemmalee said:
OMG @JimmyJack what you've created is awesome!! So, to achieve what you achieved, I tried the following:
1. Created a new document the size of the actual invite size (12.9cmx18cm)
2. Inserted the invite (with the extra room for the bleed) onto the new document
3. Added bleed in the document setup tab
4. Exported as PDF with bleed and crop marks included.
I still didn't get the crop marks to sit inside the bleed area
I swear I am going mad haha
@JimmyJack OMG I DID IT!! Is what I did right?
-
-
36 minutes ago, toltec said:
The black boxes are for the crop lines, but the lines must not come to the edge of the invite or they will show on the invite. Basically, the white boxes just mask the corners of the boxes. See Designer file (attached). Note, you don't need to apply bleed when outputting or anything like that, it is all done on the Designer page. Simples !
This is amazing @toltec! I am definitely going to give this a go. If I can create a template like this, then I only need to drop in my invites and tadaaa!!
Ok, I will have a play and see how I go. Thank you
-
OMG @JimmyJack what you've created is awesome!! So, to achieve what you achieved, I tried the following:
1. Created a new document the size of the actual invite size (12.9cmx18cm)
2. Inserted the invite (with the extra room for the bleed) onto the new document
3. Added bleed in the document setup tab
4. Exported as PDF with bleed and crop marks included.
I still didn't get the crop marks to sit inside the bleed area
I swear I am going mad haha
-
@toltec that file you gave me with the crop marks inserted is great..... how did you do it? All I see is lots of "rectangle" layers and I have no idea how you actually achieved that! If I can preset pages like that, I will love you forever!
For the invites, I basically need, on one A4 page, to be able to insert two invites (13.2cmx18.3cm) which include a .15cm bleed edge and have the crop marks there so that when I crop them, the final printed invites are 12.9cm x 18cm (obviously trimming off .15cm from each side).
If you could tell me how you were able to insert those crop marks, that would be amazing then I can set up pages for all my documents (RSVPs, thank you cards, etc etc) and then just drop them in to the affinity file.
-
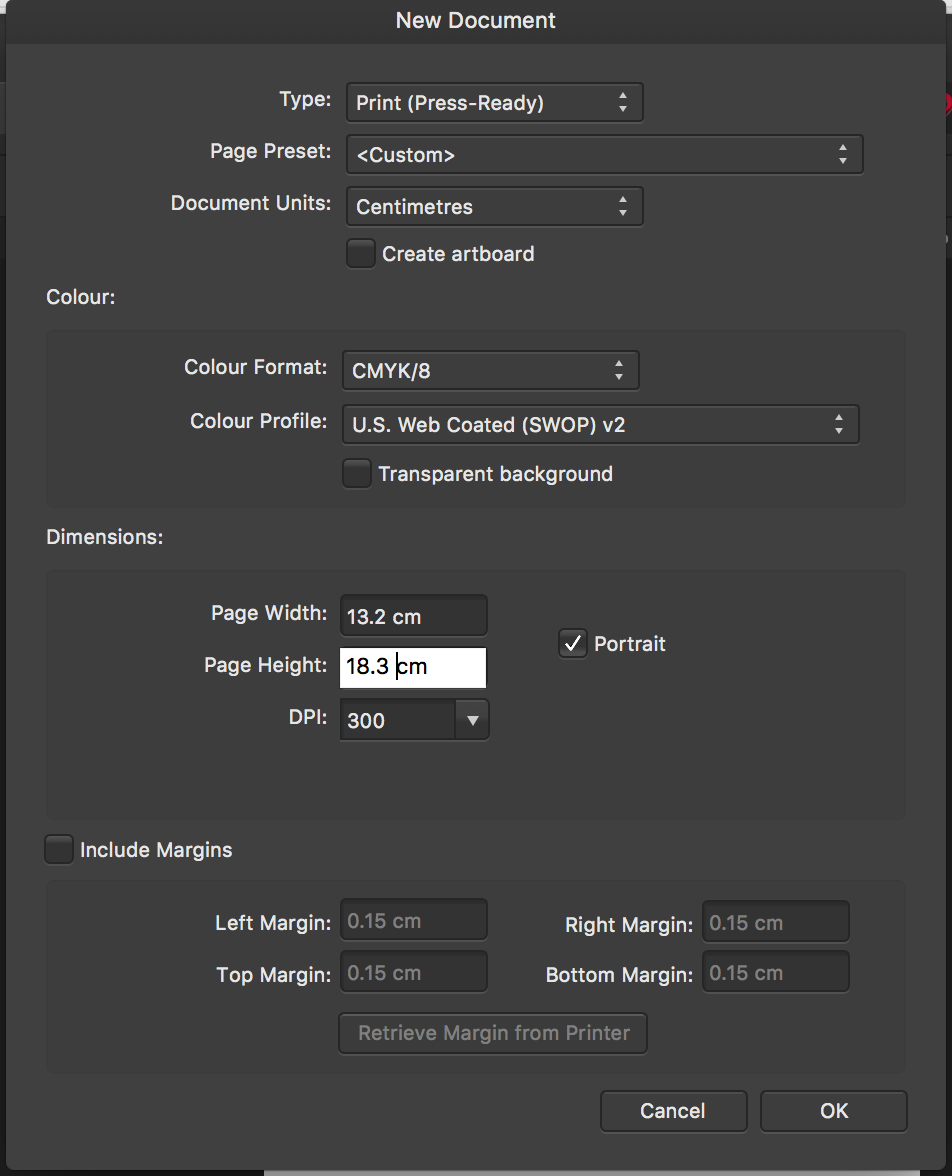
@JimmyJack in addition to your post, I tried just playing with one invite and seeing how I could get a bleed edge with crop marks to the actual size, but everytime I exported, the crop marks were outside the bleed! I don't know what I'm doing wrong. I actually have some RSVPs,
1. Firstly, I created a new document the size of the invites including the bleed edge.
The size of the invite is actually 12.9cm x 18cm. So including the 1.5mm bleed, the size goes up to 13.2cm by 18.3cm. So I created the document size using the 13.2cm x 18.3cm.
2. Then I inserted the invite, which covers the whole document size (it's preset at 13.2 x 18.3).
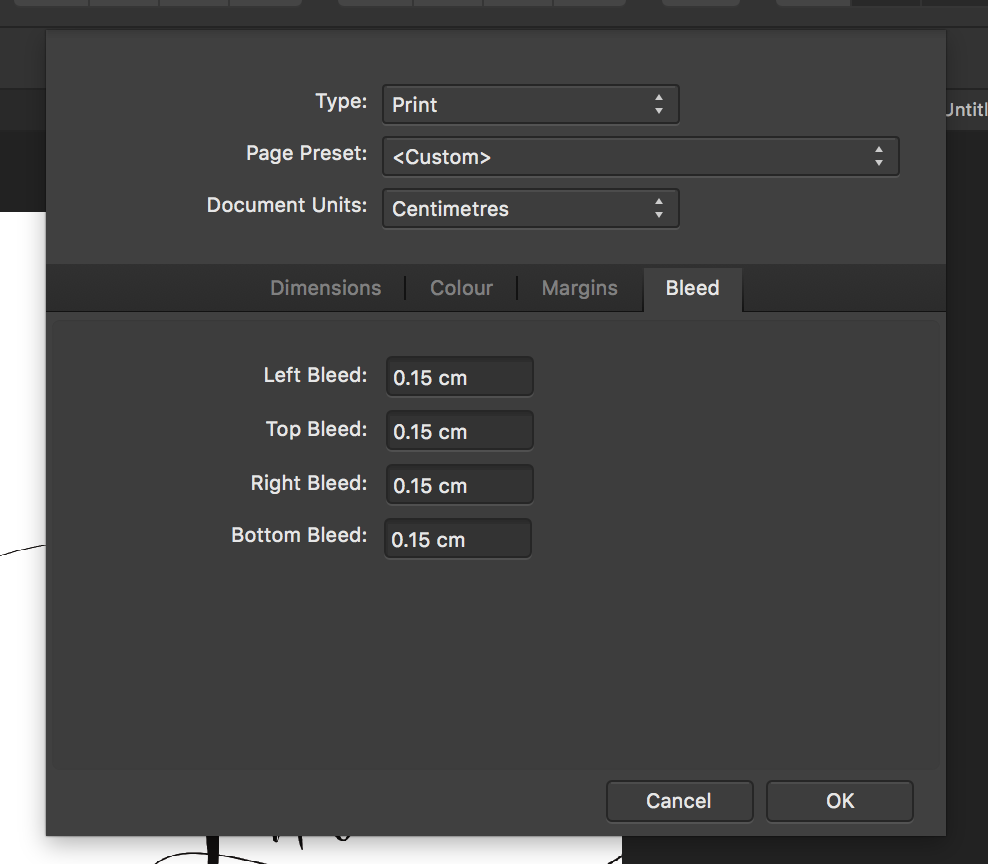
3. Then I went into document set up and set the bleed to 0.15cm (15mm).
4. Then I exported using PDF function. I went into the more tab and ticked "include bleeds" and "include crop marks", thinking that it will take into account the .15cm off each side and insert the crop marks .15cm inside the picture on each side.
5. Then I exported and saved. When I opened the PDF document in Preview, the crop marks are still outside the bleed area!! (I double clicked on the picture so it turned pink so I could see the picture area).
6. Here's my file so you can have a look. I don't know what I'm doing wrong!!
-
@JimmyJack nah they're two different invites (they are addressed to two different couples).
I created an A4 artboard (because I want to eventually print on A4 with two different invites on the same page), then I inserted the two different invites but then I couldn't work out how to get crop marks for both invites with a bleed edge. From what @toltec was saying, it sounds like I can't put crop marks on an dartboard when theres two or more pieces. @toltec has posted a AD file of an A4 page with crop marks already inserted, now I just need to work out how the hell he did that!!!
-
10 minutes ago, toltec said:
What isn't working ? There is an issue (aka bug) when two artboards are put together to do with bleed, but there is no part of your images that bleed off the page.
So, why do you want bleed when there is nothing to bleed or are there other images you need.
Toltec, this is what I mean. I've used the margins as the bleed edge to show you what I mean, see how the black lines run off the page?
-
Just now, toltec said:
What isn't working ? There is an issue (aka bug) when two artboards are put together to do with bleed, but there is no part of your images that bleed off the page.
So, why do you want bleed when there is nothing to bleed or are there other images you need.
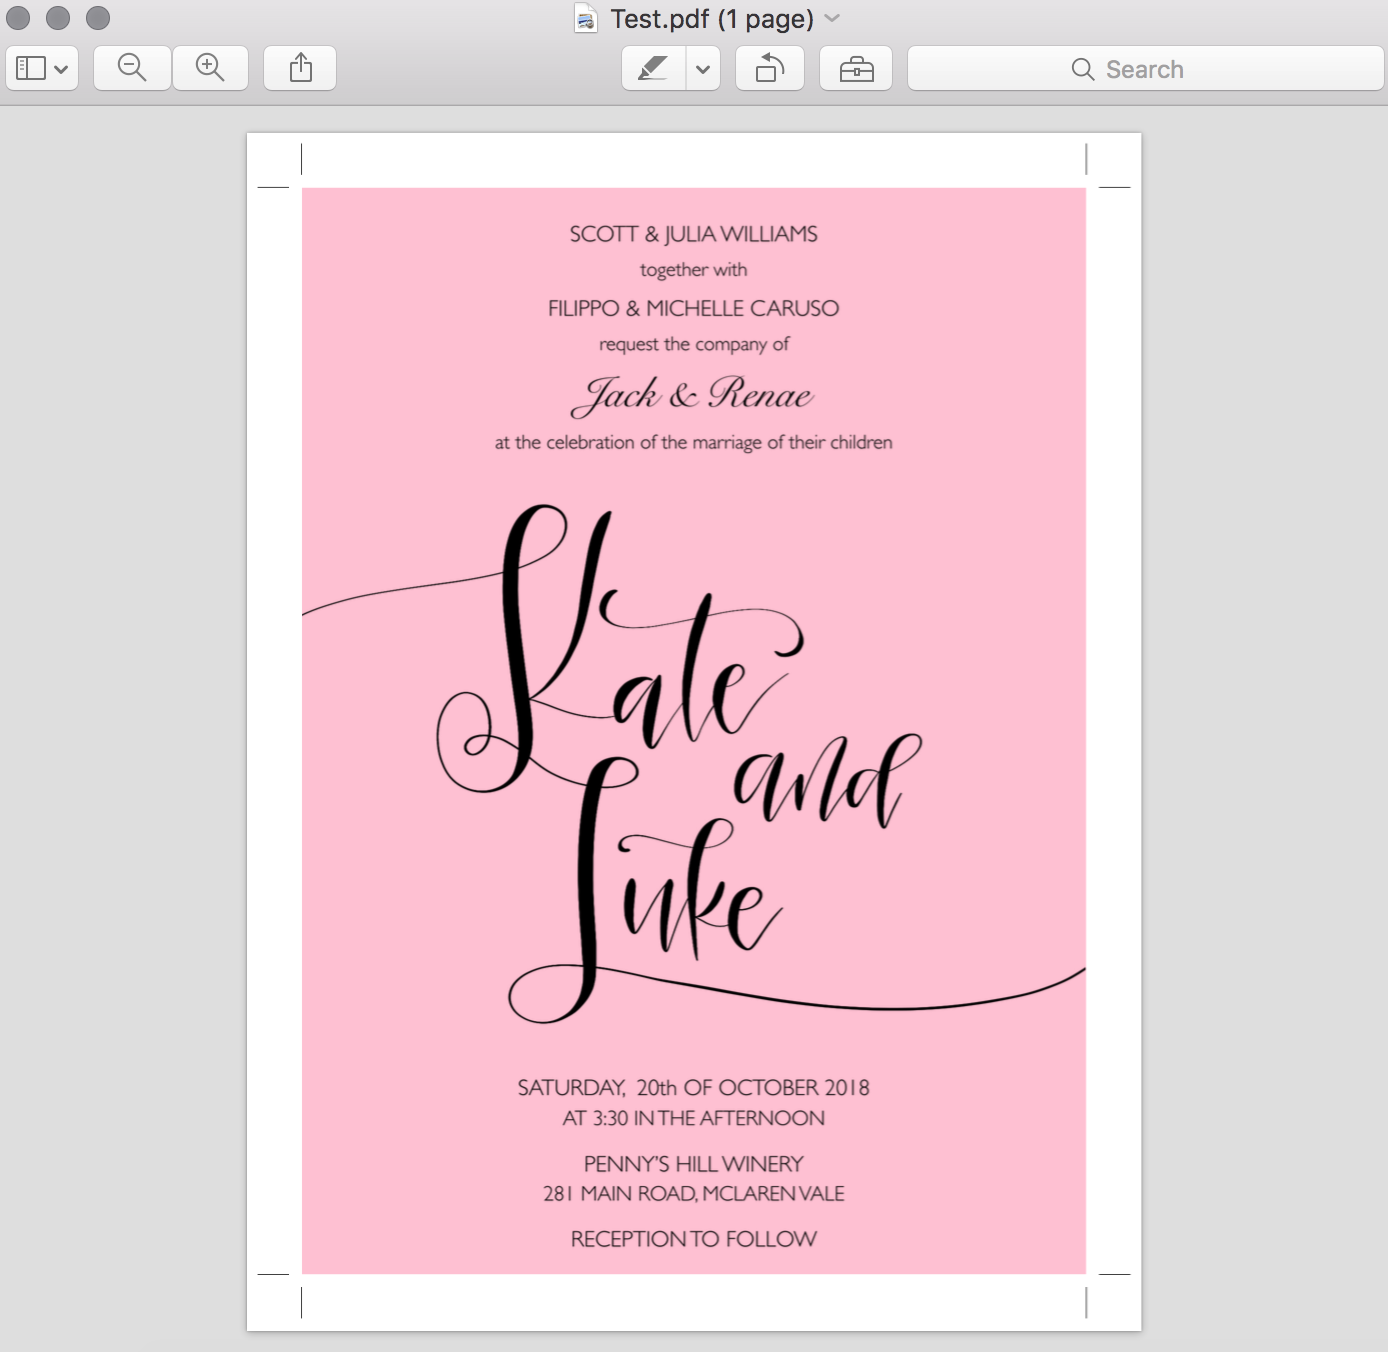
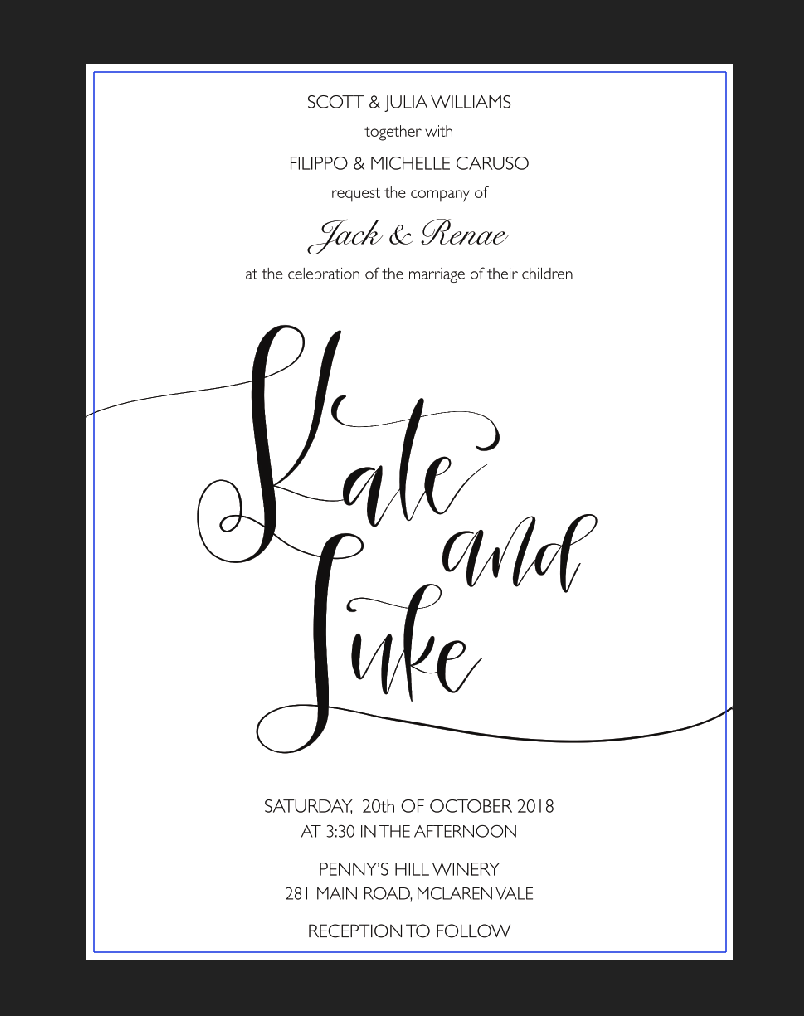
The line leading up to "Kate" and the line leading away from "Luke" are to run off the page so that when I trim them, they definitely go to the edge of the page and don't stop before the edge of the page. I was advised by my printer that I need a bleed for these invites to ensure that the black lines definitely run off the page because any movement in the printing can cause the line to stop before the trimmed area. This actually happened on one of the samples that I tried printing.


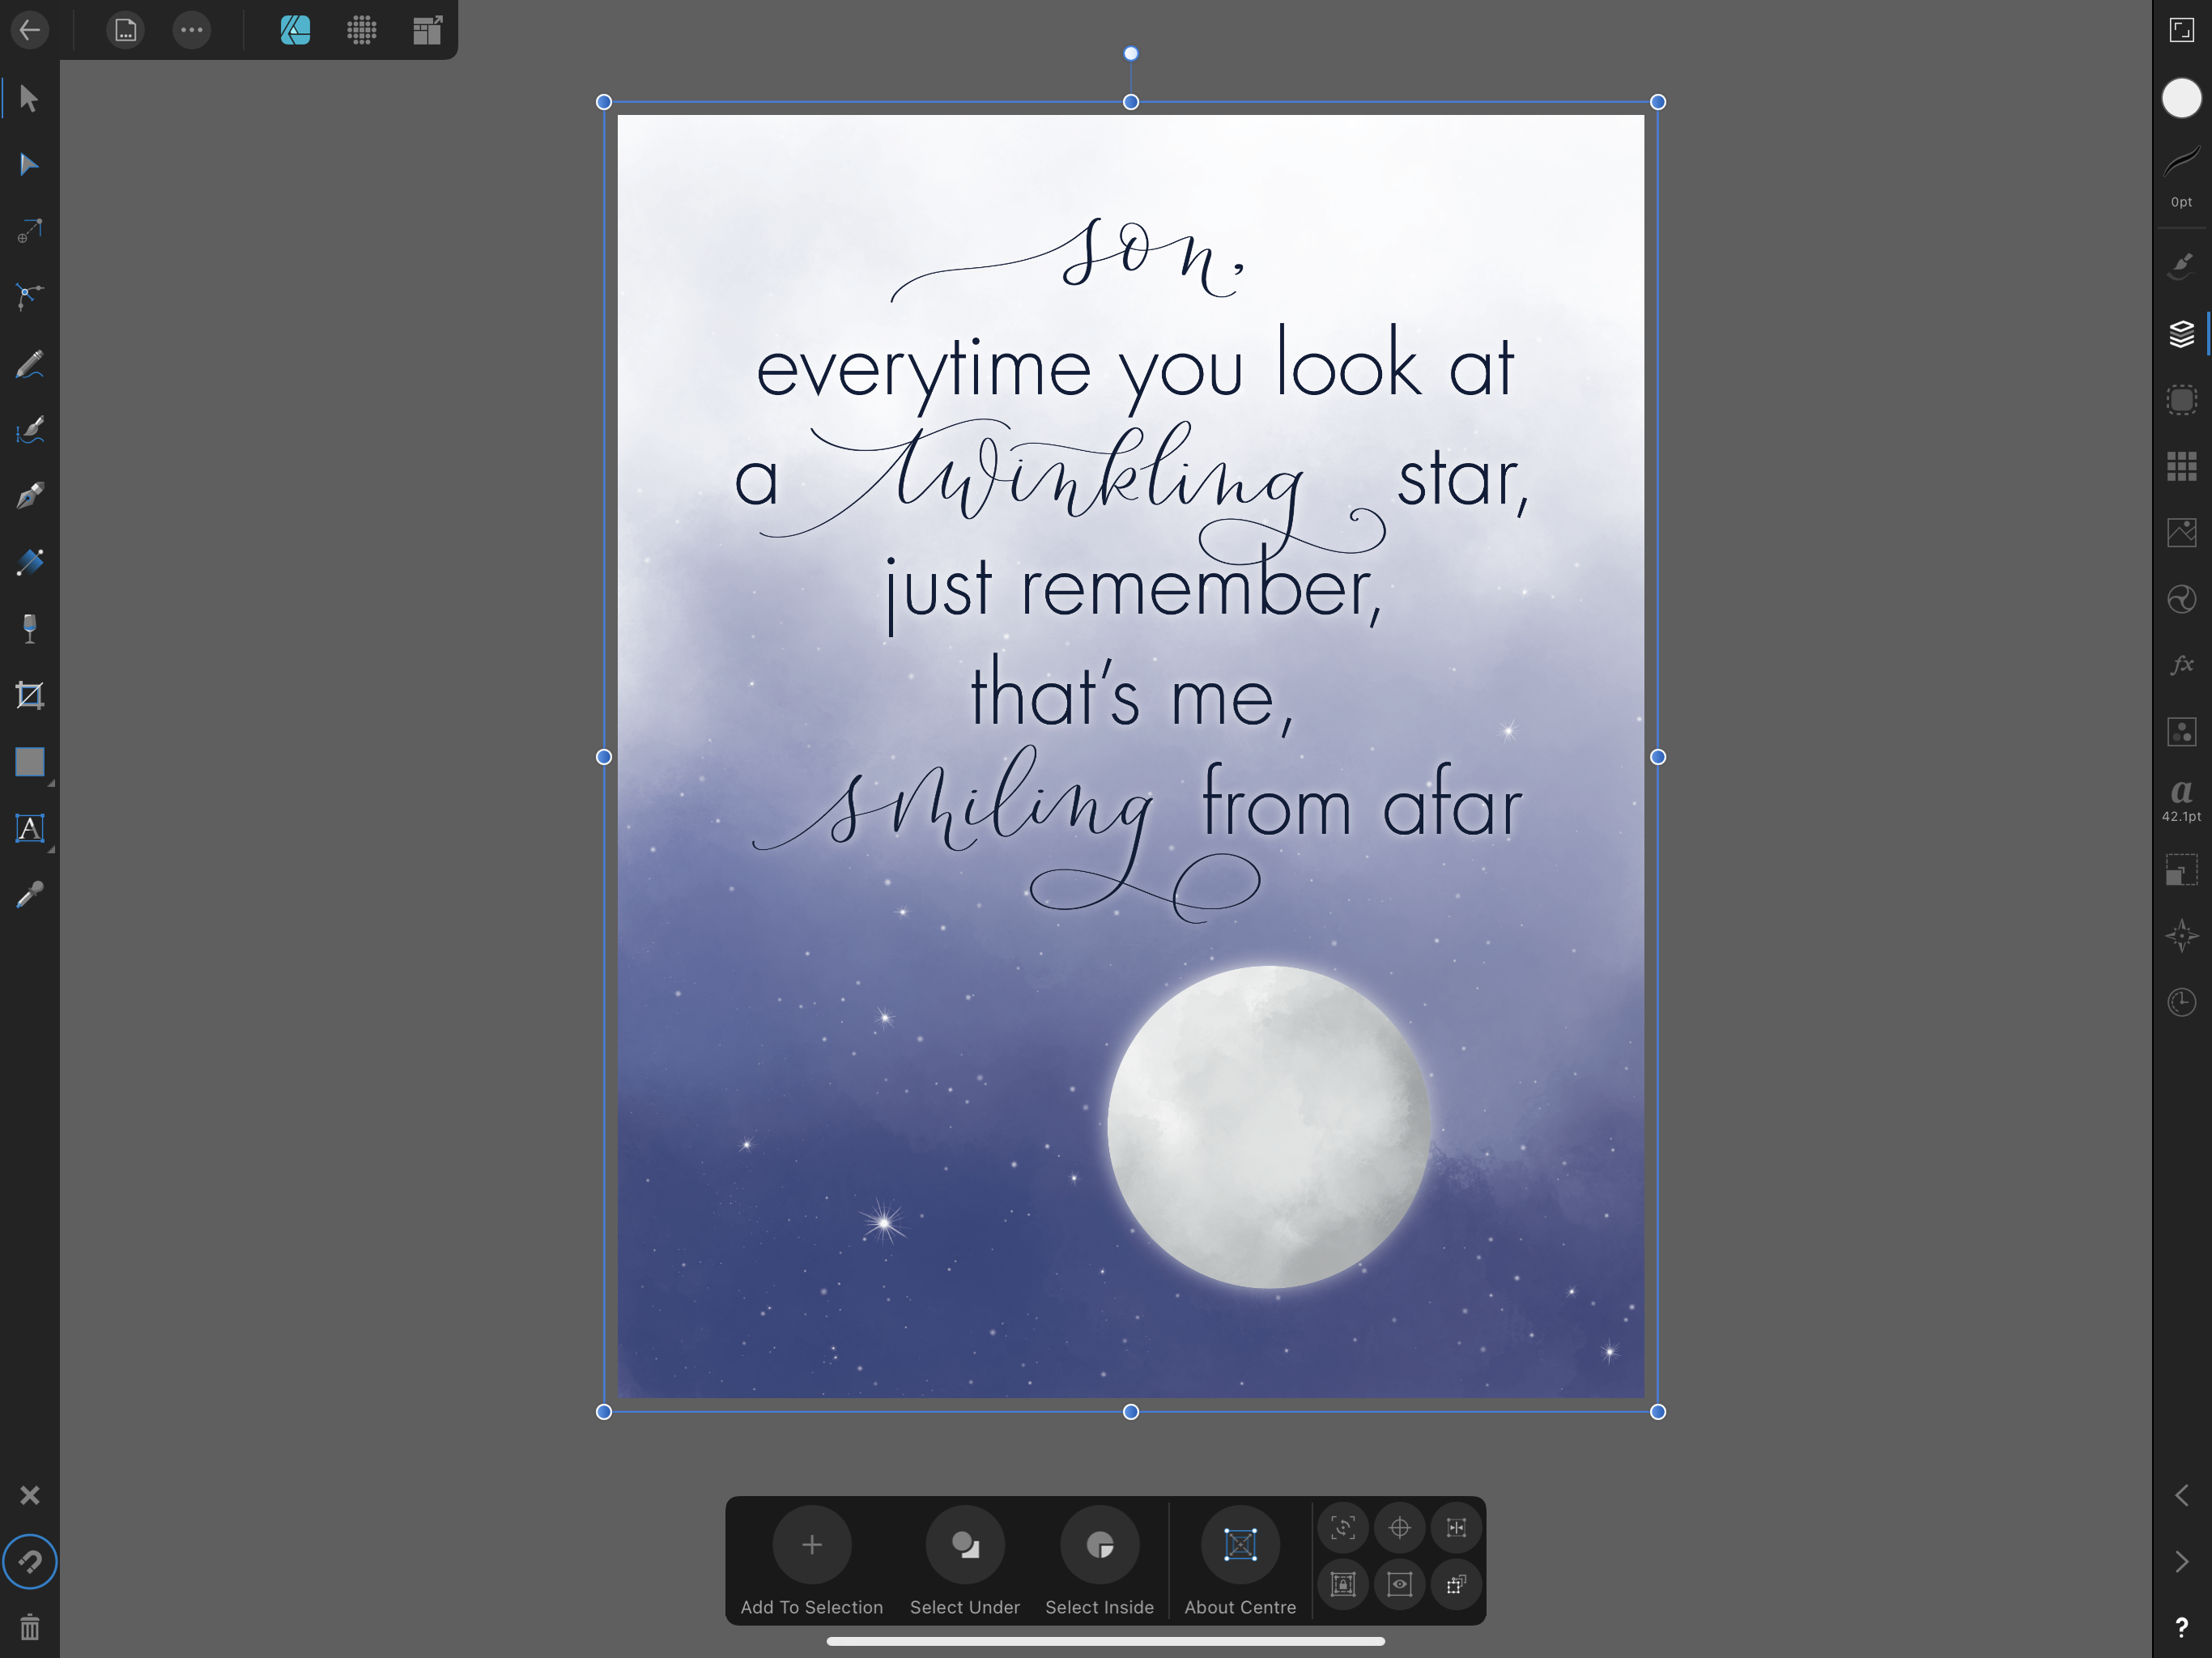


Text changing colour over coloured background
in V2 Bugs found on iPad
Posted
I will keep my eye on this issue! Hopefully they fix it soon! I’ll keep copying and pasting the + from my notes app in the meantime!
Thank you