

h_d
-
Posts
1,472 -
Joined
-
Last visited
Reputation Activity
-

 h_d reacted to R C-R in Raw files
I had never heard of this app until you mentioned it. Your "as close to raw as you can get" comment inspired me to do a bit of online research, which eventually took me to its FAQ page. I found several things mentioned there quite interesting, particularly the discussion of "slow & precise" 32 bit FP math vs. faster but less precise integer math & the rather blunt explanation of why raw files look underexposed ("because they are").
Some of this stuff seems somewhat applicable to Affinity Photo, like why by default it does not produce results with as much "punch" as other apps & why that is not necessarily a bad thing.
I am still in the dark (pun intended) about many aspects of raw file development but posts like this one get me a bit closer to where I would like to be, so thank you for sharing it.
-
 h_d got a reaction from R C-R in Raw files
FWIW this is how the image opens in Raw Photo Processor 64 on the Mac:
I'd expect the flat tones, as RPP64 opens files as close to raw as you can get - but again there's no lens correction. I wonder if it's worth updating the firmware on your camera. I shoot Panasonic (GX-7) and I've never had issues like this with .rw2 files in any application.
-
h_d reacted to drippy cat in Removing complex objects from photo
Ok, so I decided to put up a newer clone stamp video to replace the old one. It's here - https://www.youtube.com/watch?v=0nifk0bGLnY and is one of the reference videos for a new series coming up which includes reference videos plus workflow videos so you can tackle learning Affinity Photo from both sides. Hope it proves to be useful.
-
 h_d got a reaction from Limerickman in How can I remove this image from background?
Or...
Flood select tool, 20% tolerance, uncheck Contiguous in the context menu, click once on the background to select it, then press delete:
-
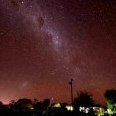
 h_d got a reaction from John Rostron in black and white point astro light pollution
Hi,
If you zoom in on the darker areas of the image there's a lot of luminance noise: green and red speckles, for want of a better word, One of official Affinity tutorial videos shows a method of toning this down by converting the original to LAB colour and blurring the two colour channels. The relevant section of the video starts at around 6 minutes 30 seconds in. It's a fairly advanced technique, but I think when combined with a curves adjustment it can improve the (already amazing) image when viewed at full size.
-
 h_d got a reaction from Dingdong in black and white point astro light pollution
Hi,
If you zoom in on the darker areas of the image there's a lot of luminance noise: green and red speckles, for want of a better word, One of official Affinity tutorial videos shows a method of toning this down by converting the original to LAB colour and blurring the two colour channels. The relevant section of the video starts at around 6 minutes 30 seconds in. It's a fairly advanced technique, but I think when combined with a curves adjustment it can improve the (already amazing) image when viewed at full size.
-
h_d reacted to smadell in Dark RAW files
So, I was tinkering around with DxO some more. I wanted to figure out why it seemed to be adding something to my "no correction" preset. It turns out that DxO will, by default, render the colors according to the camera's default. I'm not even entirely sure what that means! But, if I open the RAW file with no corrections (no geometry corrections, no color or tonal changes, nothing....) but then change the panel labelled "Color Rendering" to a Generic Setting called "Neutral Color, Realistic Tonality (gamma 2.2)" I get an image that is more-or-less in line with the un-corrected images from Affinity and RPP.
I believe this is the way to go (for me, at least - and zfor now). This seems to give me a flat image to start with, and gets all my highlights, shadows, and midtones squeezed down into a usable histogram - it seems to avoid the clipping problems that were evident in the setting I had been using previously.
Once I get my histogram properly placed and my white balance corrected, most of the other work can be done in the Photo Persona of Affinity Photo.
-
h_d reacted to SF Charter Boat in Confused with RAW/Affinity compatibility
Many thanks, look forward to starting!
-
h_d reacted to R C-R in Black & White Affinity Photo
When I first started using Affinity I thought that you had to drop the masking layer onto the narrow space to the right of the thumbnail of the masked layer (where the vertical blue line appears) but that is not true. Once I figured out that the masking layer can be dropped onto the thumbnail of the masked layer itself, I realized that it was not as fiddly as I first thought.
-
h_d reacted to R C-R in Where oh where do I go for support????
I didn't purchase Affinity so that when I came here either needing help or offering it, I would have to be subjected to self-indulgent rants like the one in your first post, but it happens from time to time. I accept that as just another part of human nature. Despite that, I still believe this by far the best way to get support for the products, not to mention a great source for advice from knowledgeable pros.
-
-
h_d got a reaction from R C-R in Background blur?
How about:
Movable blur.afphoto
The original sharp image is at the bottom of the layer stack. A duplicate blurred version is at the top.
The blurred image is masked by a rounded rectangle and then locked. Select the rounded rectangle with the Move tool, and drag it around.