

h_d
-
Posts
1,472 -
Joined
-
Last visited
Everything posted by h_d
-
 A further added extra benefit of doing it with the pen tool is that once you've drawn your path, you can duplicate its Curves layer and hide the duplicate, before rasterising the original. Then you can always go back and change the line/path later if you want to.
 -
FWIW I can confirm (OSX High Sierra, Affinity Photo 1.6.7): Cmd-c with a nested mask selected copies just the mask "Right click", a two-finger (secondary) click on trackpad, on a nested mask, and selecting "Copy" from the pop-up menu copies just the mask Control-click on a nested mask and selecting "Copy" from the pop-up menu copies both the mask and its parent layer. EDIT: Control-click, again on a trackpad, meaning hold down the ctrl key and single-click on the pad.
- 11 replies
-
- 1
-

-
- mask
- right click
- (and 1 more)
-
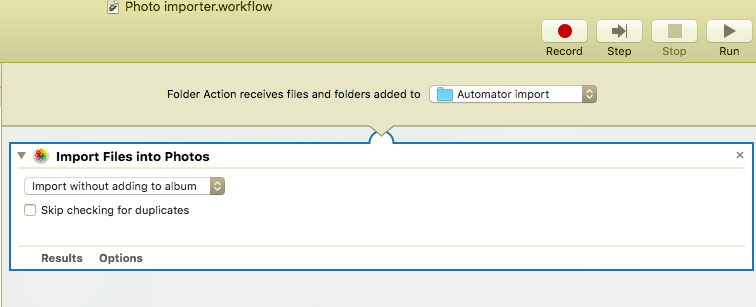
[Windows users stop reading here...] With an AppleScript Folder Action, Photos itself throws an error and rejects non-importable files, just as would happen if you tried to import an .afphoto (or .eps etc) file manually. The AppleScript as it stands is simply this: on adding folder items to this_folder after receiving added_items tell application "Photos" activate import added_items with skip check duplicates --pull the file(s) into Photos end tell end adding folder items to which is linked to a folder as a Folder Action. It could no doubt be improved on - for example by filtering acceptable file formats, and by adding commands to move the old file out of the drop folder to a "Processed" folder or the Trash. With the Automator "Import Files into Photos" action, no obvious user error is generated. The file simply does not import. The Automator Folder Action is just this: and given Automator's lack of branching or error reporting it doesn't offer much scope for refinement.

-
With AppleScript or Automator, you can set up a Folder Action to monitor a drop folder and automatically import into Apple Photos any images that are added to the folder. I've tried it with images edited in Affinity Photo and then exported, and the exported file pops right into Apple Photos. It saves the pain of manually importing each image. Post back if you're interested and I'll do my best to describe how it works.
-
Were you truly wafted here from Paradise?
-
Food of the gods...
-
They're the same colours, but they're arranged slightly differently (16 columns on the left, 14 columns on the right).
-
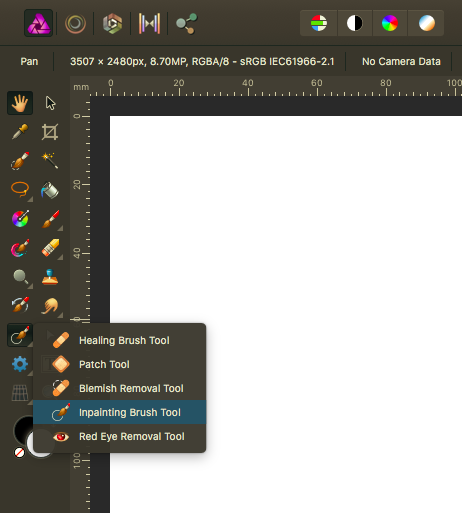
If you're using Affinity Photo, then it's nested with the other "healing" tools: To access the fly-out menu, you click on the small triangle below and to the right of the tool icon. You can also cycle through all these five tools with the keyboard shortcut which is simply j (no modifier). Hope this helps
-
Export definition
h_d replied to Argyllsteve's topic in Pre-V2 Archive of Affinity on Desktop Questions (macOS and Windows)
Hi, If you view your AFPhoto document at 100% (Cmd-1 on a Mac or Ctrl-1 on a PC) you'll see the blurring/camera shake on the original image: This is less obvious when the image is viewed at the magnification you've been working to, but it's being brought out in your exported image when you view it full size. Scale down the export and you'll get an apparently sharper result. But you won't get any sharper than the above at the original full size.
-
CYM
h_d replied to jwcat's topic in Pre-V2 Archive of Affinity on Desktop Questions (macOS and Windows)
I've removed the original video and uploaded what I hope is a clearer version. -
CYM
h_d replied to jwcat's topic in Pre-V2 Archive of Affinity on Desktop Questions (macOS and Windows)
Oo that's pretty cruddy. Recorded with QuickTime Player 10, then opened and exported to MP4 with QuickTime Player 7. Let me see if I can improve it. -
CYM
h_d replied to jwcat's topic in Pre-V2 Archive of Affinity on Desktop Questions (macOS and Windows)
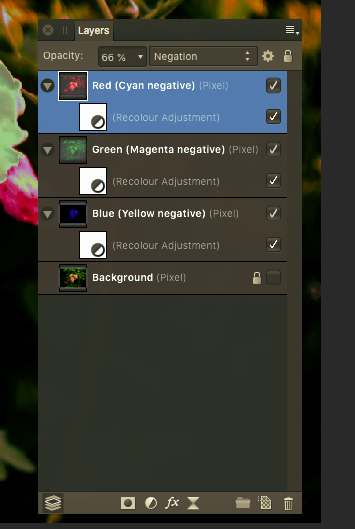
Again I don't know if this is possible on the iPad version, but the approach I would take would be to create a greyscale layer from each of the RGB background channels. This will give you three additional layers in your document, which in the movie and attached .afphoto document I have labelled: Red (Cyan negative) Green (Magenta negative) Blue (Yellow negative) digitalneg-desktop.m4v digitalneg.afphoto These three layers can then have separate curves adjustments applied to them, and then be exported separately to give you three individual negative files in whatever format you require. In the movie I've gone on to apply nested Recolour adjustments to the three layers, set their blend modes to Negative, and set the opacity of the top layer (Red...) to around 66% and the opacity of the middle layer (Green...) to around 33%. This gives a vague impression of what the reconstructed image might look like, but clearly needs a lot more work with balancing. Hopefully a moderator will see this thread and move it to the iPad Questions area of the forum. ADD: I've just found the tutorial video which shows a rather more elegant method than mine, again with the desktop version of AP.
-
Raw files
h_d replied to Arnulf's topic in Pre-V2 Archive of Affinity on Desktop Questions (macOS and Windows)
That's true. I'm still using a supported camera, but when I grow rich and buy a new one, I'll probably have to wave RPP goodbye. -
Raw files
h_d replied to Arnulf's topic in Pre-V2 Archive of Affinity on Desktop Questions (macOS and Windows)
There's also the RPP Manual, accessed through the application's Help menu, which give some helpful pointers about getting the most out of it. -
Raw files
h_d replied to Arnulf's topic in Pre-V2 Archive of Affinity on Desktop Questions (macOS and Windows)
The learning curve on RPP 64 is steep, but that FAQ is very helpful and I enjoy using it. It's a personal thing I suppose, but I would rather start with the basics rather than the presets that seem to be applied in most so-called "Raw Developers" to make the image look "good". As you say, AP can be configured to get close to the original, which is why I smile wryly when I see posts here along the lines of "AP makes my raw pictures look wrong." The really powerful thing about RPP 64 is that you can apply batch settings to groups of raw files, based on folder, camera, almost anything. It will process and export to a wide range of formats without even opening the images in the UI, which speeds things up incredibly. Now if AP could do that... -
Text inside path
h_d replied to chris.bannu's topic in Pre-V2 Archive of Affinity on Desktop Questions (macOS and Windows)
I think to be accurate you want to align text to give the impression of a specific shape, rather than fit it inside a path. Here's an example using text inside a shape, as per the link in the previous post, and a separate ellipse with a border to give added definition to the text shape: If you're dropping text into an ellipse or circular shape you'll want to set the alignment to centred justified. You'll also need to play with the line spacing (leading), text size and possibly even the word order to get a pleasing effect. If your text starts with a long word, it won't fit well at the top of the shape. The word spacing above is horrendous, especially in the shorter lines, but I don't know enough about AD to adjust it. Hyphenation might help - does AD hyphenate? EDIT: Better with smaller text?
-
Raw files
h_d replied to Arnulf's topic in Pre-V2 Archive of Affinity on Desktop Questions (macOS and Windows)
FWIW this is how the image opens in Raw Photo Processor 64 on the Mac: I'd expect the flat tones, as RPP64 opens files as close to raw as you can get - but again there's no lens correction. I wonder if it's worth updating the firmware on your camera. I shoot Panasonic (GX-7) and I've never had issues like this with .rw2 files in any application.
-
Going via the File menu, what happens when you click the Export button?
-
Ah your black shape is constructed in a different way to mine - you have a very broad stroke round yours and no fill. This is what happens if I reduce the weight of the stroke: Try drawing a simple shape, no stroke, just a fill:
-
Should work the same way, artboard or no :
-
You've got the layers nested - they need to be separate, one above the other.
-
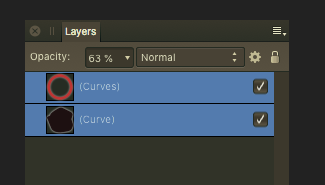
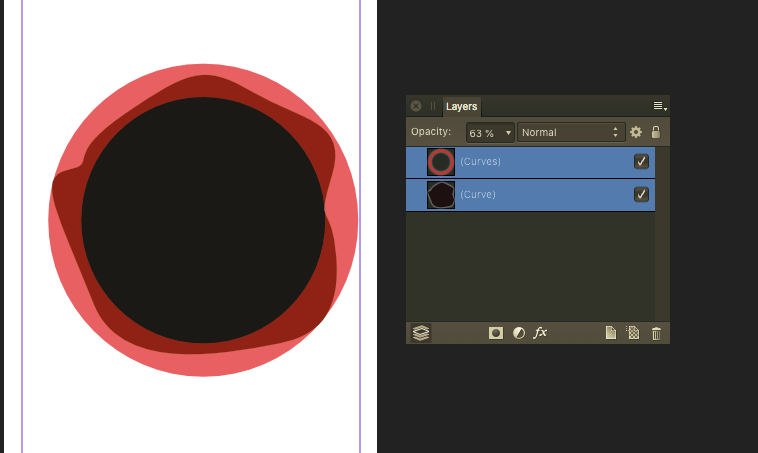
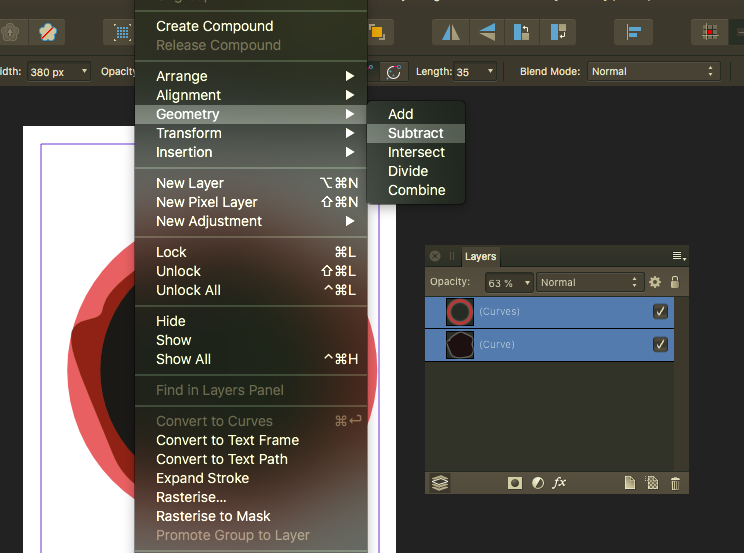
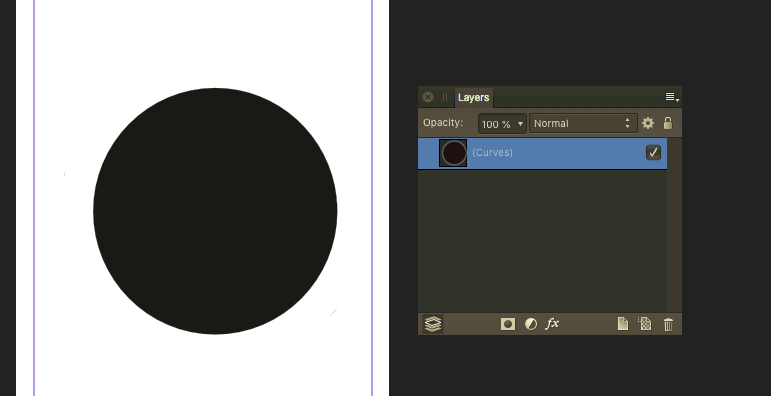
I don't think that this can be achieved by masking or clipping, as the red circle can't mask or clip itself. It can be done destructively by ordering the red circle layer above the black splodge, selecting both layers and applying a Subtract operation. I've reduced the opacity of the circle to make it clearer what's going on:
-
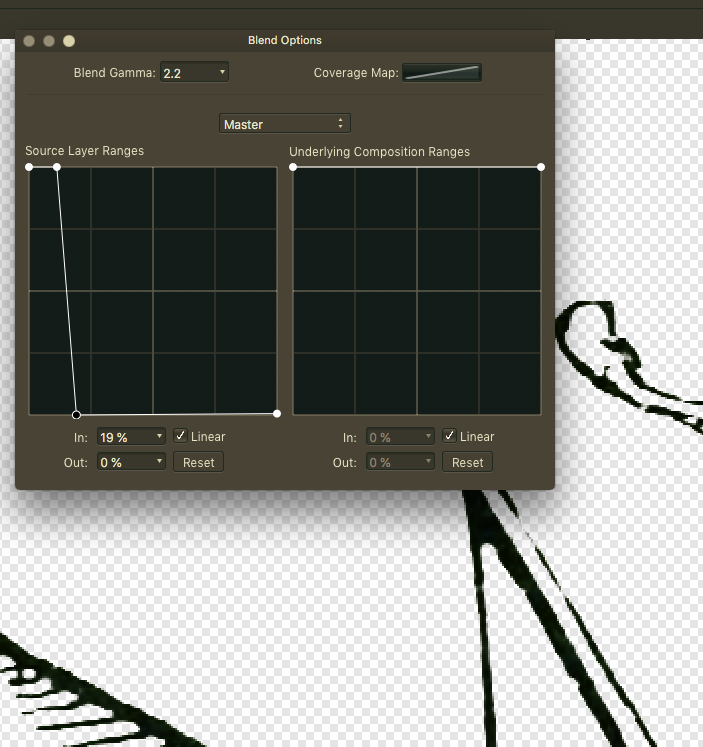
Zoom in on the image and display the Information panel (View - Studio - Info). As you move your mouse over various areas of the image, you'll see the RGB values (the strength of the pixels) in the information panel change. While the mouse is over a background area as in the screen grab above, the RGB values are high/strong - around 150-200. When you move it over a black line in the image, the RGB values are low/weak - no greater than about 20. Now set up the Blend Ranges panel as in MEB's example, and see what happens in the Info panel when you move the mouse around. Background pixel strength has been reduced to zero, but the black line areas stay more or less the same: The left-hand graph in Blend Ranges - Source Layer Ranges - has two axes: X (across) goes from weak pixels (left) to strong pixels (right); Y goes from "don't show" at the bottom to "show" at the top. In MEB's example the Blend Ranges panel is set up to show the weak pixels (left,top) and hide the strong ones (right, bottom). It's much more subtle than my original flood selection answer, which left some darker brown areas undeleted - I should have been a bit more careful with the tolerance in the flood selection tool. Hope this makes sense!
-
Or... Flood select tool, 20% tolerance, uncheck Contiguous in the context menu, click once on the background to select it, then press delete:
-
Hi, If you zoom in on the darker areas of the image there's a lot of luminance noise: green and red speckles, for want of a better word, One of official Affinity tutorial videos shows a method of toning this down by converting the original to LAB colour and blurring the two colour channels. The relevant section of the video starts at around 6 minutes 30 seconds in. It's a fairly advanced technique, but I think when combined with a curves adjustment it can improve the (already amazing) image when viewed at full size.


.jpg.529f787979525e81ec9dedd12838d601.jpg)