NathanC
-
Posts
4,437 -
Joined
Everything posted by NathanC
-
 Hi @Xanadu apologies for the late reply, Using your sample file on Windows causes the curve shading to turn entirely white when the Gaussian Blur FX is applied in combination with Colour burn blend mode, this is certainly unexpected behaviour so I've logged this with the developers.
 -
Pattern editing after placement?
NathanC replied to WhirledPeas's topic in Desktop Questions (macOS and Windows)
Hi @WhirledPeas apologies for the late response, When you mention 'Gizmo' are you referring to the Gradient Tool's Bitmap fill transform handles? After placing a bitmap image as the shape fill using the Vector Flood fill tool, if you select the shape and switch to the Gradient tool, you should find that you can adjust the handles on the canvas and change the fill properties along the context toolbar. In terms of checking the applied bitmap fill's width and height, I don't believe these properties are reflected in the transform panel. -
Hi @frauharemsa Apologies for the late reply, Unfortunately, this is a likely indication of your local user styles file (objectstyles.propcol) corrupting. Store-purchased styles (E.G The Shizzle) have potentially been retained in the list since they've been automatically re-installed via 'My Addons'. It may be possible to restore the objectstyles.propcol file to a previous state via Time Machine Backups, as described in Loukash's post below.
-
Hi @Jill Wolcott Apologies for the late response, If you're still encountering a PDF export failure with the presence of a file hyperlink within your document, we can look into this further if you could supply us with the following: A copy of your .afpub document A copy of the hyperlinked file Feel free to upload the documents to the private upload link below if you don't wish to share if publicly. https://www.dropbox.com/request/2eGt0bfJkO5l35NApks3 Thanks
-
Welcome to the forums @Petimo apologies for the late response, To confirm, are you attempting to swap the highlighted character for a different one via the Glyph Browser? On iPad, this should be possible by a simple double tap on the desired Glyph. What may help is increasing the size of the Glyph Browser menu to make the glyphs easier to replace. You can change the size of the Glyphs via the Glyph Browser context menu at the top right-hand corner (3 line burger menu) to the 'Largest Size' option.
-
Affinity unable to load settings after restart
NathanC replied to tonyk11's topic in V2 Bugs found on Windows
Hi @tonyk11, Can't say I've observed specific historical reports of this, but to confirm, is this just an intermittent issue with the app losing the local user data settings between restarts, and is all custom user preferences lost or just certain settings (E.G Assets, Brushes, Styles)? Could you also confirm if the app was installed via the MSIX or MSI/EXE installation method originally? If access to the entire folder was lost, I would expect to see a Firewall communication error when the app is started, or everything, including the license data becoming lost and forcing a re-activation of the apps. Thanks -
Hi @voom, I've logged this labelling issue with the developers, thanks for your report.
-
Designer, Symbol or Warp group, move tool issue
NathanC replied to NotMyFault's topic in V2 Bugs found on iPad
Hi @NotMyFault, I'm observing the same transform sync issue within your provided sample file, but I'm not able to reproduce this issue from a fresh document using a symbol warp group. Could you confirm if there's a recipe to duplicate the issue from scratch? Many thanks -
Affinity Photo 2 completely crashing my pc
NathanC replied to Randymarsh's topic in V2 Bugs found on Windows
Thanks @EggyToast! Could you also send over the following two screenshots if you have a moment, just so I have all the necessary info. Thanks -
Affinity Photo 2 completely crashing my pc
NathanC replied to Randymarsh's topic in V2 Bugs found on Windows
Thanks @RolandF, To confirm, Is that the full contents of the log.txt file? Unusually, there's no reference to the display adapters (E.G 4070 Graphics card) in the provided log segment. if this info is entirely missing, can you advise what your current Nvidia Driver version is? This can be found in the Nvidia Control panel under 'System Information' at the bottom left hand corner, or in the Nvidia app 'Drivers' tab if you have that installed. --- Try checking both locations listed in my post as it depends on whether your app was installed using MSIX or MSI/EXE method originally, this folder typically contains all your app's local user data, including a log.txt file which is generated when the app launches (it's not a crash report). -
Bitte beachten Sie, dass diese log.txt-Datei beim Start der App generiert wird und die erkannten Grafikkarten und Treiberversionen enthält. Es handelt sich nicht um einen Absturzbericht. Wenn Sie am angegebenen Speicherort suchen und uns eine Kopie der Datei sowie die zuvor erwähnten Screenshots zur Verfügung stellen, wäre das hilfreich für uns. Vielen Dank
-
So we're able to identify any trends and potential underlying causes of these total system freezes with H/A enabled while working in the affinity apps, we'd be grateful if users experiencing this specific issue could provide the following: App Log.txt file This log file can be found in the following locations, which differ depending on if you have the MSIX or MSI/EXE build installed and can be accessed via 'Run' (WIN + R): MSIX(x64): %USERPROFILE%\.Affinity\Photo\2.0 MSI/EXE(x64): %APPDATA%\Affinity\Photo\2.0 If you're using a different affinity app, update the above file paths for the respective application you're working in (Designer or Publisher). App Performance Settings Please take a screenshot of your Edit -> Settings -> Performance window and attach it to your post. Windows Version Type 'winver' into your Windows search bar or run window and take a screenshot of the 'About Windows' window that prompts and attach it to your post. Guide: https://learn.microsoft.com/en-us/windows/client-management/client-tools/windows-version-search ----- Please '@' me in your response so I can collate this info. Many thanks
-
Affinity Photo 2 completely crashing my pc
NathanC replied to Randymarsh's topic in V2 Bugs found on Windows
So we're able to identify any trends and potential underlying causes of these total system freezes with H/A enabled while working in the affinity apps, we'd be grateful if users experiencing this specific issue could provide the following: App Log.txt file This log file can be found in the following locations, which differ depending on if you have the MSIX or MSI/EXE build installed and can be accessed via 'Run' (WIN + R): MSIX(x64): %USERPROFILE%\.Affinity\Photo\2.0 MSI/EXE(x64): %APPDATA%\Affinity\Photo\2.0 If you're using a different affinity app, update the above file paths for the respective application you're working in (Designer or Publisher). App Performance Settings Please take a screenshot of your Edit -> Settings -> Performance window and attach it to your post. Windows Version Type 'winver' into your Windows search bar or run window and take a screenshot of the 'About Windows' window that prompts and attach it to your post. Guide: https://learn.microsoft.com/en-us/windows/client-management/client-tools/windows-version-search ----- Please '@' me in your response so I can collate this info. Many thanks -
AP2 crashes when using the new object selection
NathanC replied to dogbone's topic in V2 Bugs found on macOS
Hi @dogbone, I've now responded to the email you sent concerning this issue, we'll continue to reply via email to avoid confusion between different support channels. -
Hi @OldHickory30 Apologies for the late response, PS Neural Filters (Such as Depth Blur) are not available in Photo 2, I'm not aware of any plugins that offer this specific function, but perhaps other users may have some recommendations.
-
Layers changes order when I add pages
NathanC replied to DesNordlund's topic in Desktop Questions (macOS and Windows)
Hi @DesNordlund welcome to the forums and apologies for the late response, I can't replicate the behaviour described of the layer stack reshuffling on the insertion of additional pages, but it does potentially indicate the problem might relate to the page migration changes in 2.6. If you could provide us with a copy of the document and necessary steps required to replicate the issue, we can investigate further. I've provided a private upload link below. https://www.dropbox.com/request/wOwFMFoXY2oJBc0ozaLH Thanks -
Welcome to the forums @Glenm apologies for the late response, You can change this permission in the iPad System Settings -> Apps -> Photo 2, as shown in the screenshots in NMF's post linked below. If this isn't a permission you're able to change from Private access it could be because the iPad device is externally managed (for example via an MDM) restricting this option, which is out of our control. This is something we've observed internally comparing a Personal to an MDM managed device.
-
Hi @beaker apologies for the late response, I've moved your thread over to the bugs section of the forums, and can confirm I've replicated this issue and logged it with the developers, thanks for the additional confirmation on the cause of the issue.
-
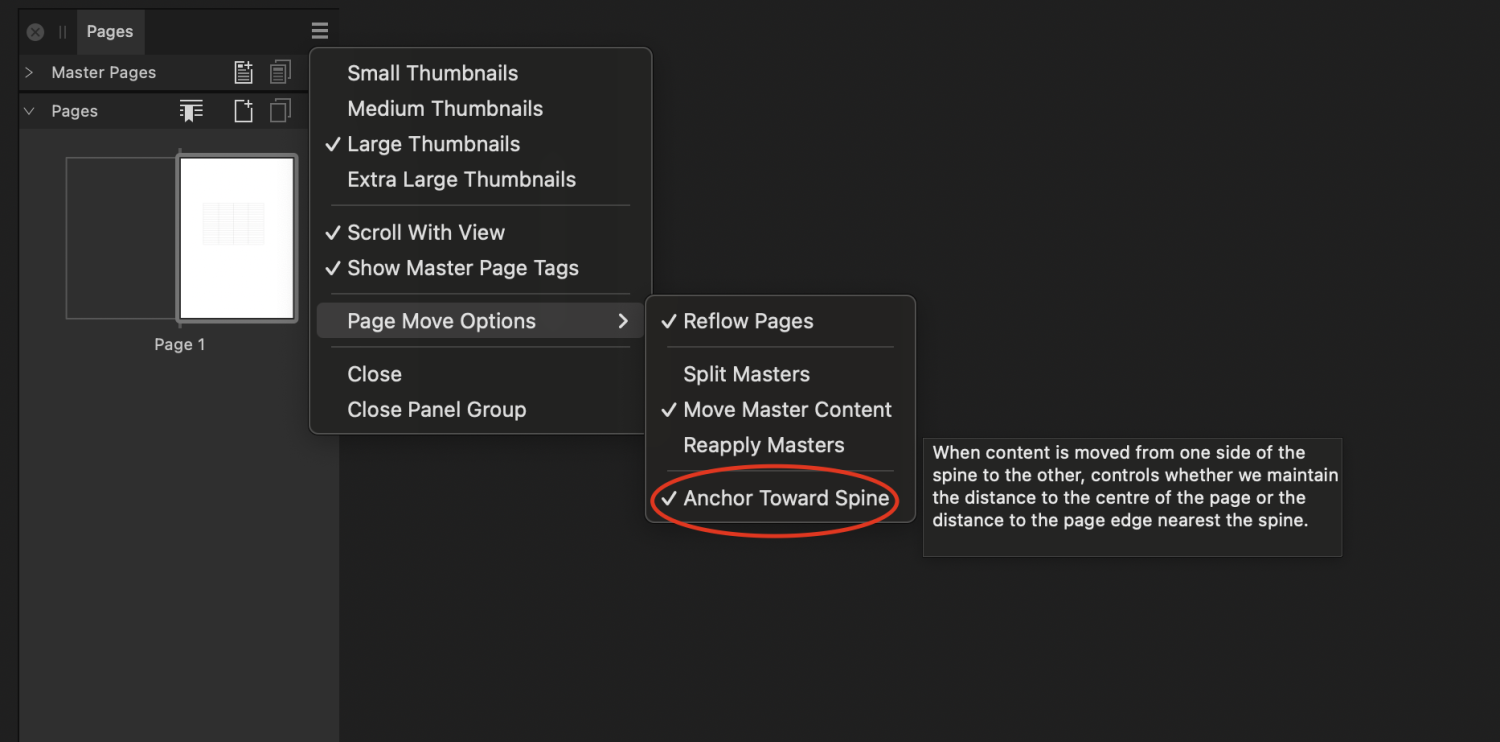
Hi @Chris_06, This is likely related to the new 2.6 'Anchor Towards Spine' functionality maintaining the object's distance relative to the spine. From the 'Pages' panel context menu under the 'Page Move Options' submenu, disable the 'Anchor Towards Spine' option and then try merging your facing page document again, this should prevent the undesired content shift in the merged doc.

-
Palette shrinking horizontally / Palette hierarchy issue
NathanC replied to RWhite's topic in V2 Bugs found on macOS
Hi @RWhite, The font dropdown list hierarchy issue is currently logged with the developers, I've bumped the existing issue with your report. Docking/Snapping panels side by side will hopefully be something the team implement in the future in alignment with the Windows functionality. However, I can't reproduce the issue described concerning the panel group shrinking when switching between panels in a group, can you provide a screen recording demonstrating this, and also confirm your MacOS version? Many thanks -
DESIGNER not exporting Whole Document
NathanC replied to tom182's topic in Desktop Questions (macOS and Windows)
Hi @Glucci, Could you send a copy of the original .afpub and the exported PDF for comparison to the private upload link below so we can take a look? https://www.dropbox.com/request/09DakZeBxntHfNtjowAn Many thanks! -
Hi @kvetner apologies for the late response, I can confirm this is a known issue currently logged with the developers, I've bumped the issue with your report. The original report surrounds the context menu in the channels panel in Photo, but as you've demonstrated it can affect other menus.
-
Hi @Psychrome apologies for the late response, Can you provide a copy of the file where you're encountering this snapping issue so we can identify what may be causing this? Many thanks
-
Welcome to the forums @Bart123 apologies for the late response, I'm assuming that you're referring to the visible gradient banding when the contents are flattened on export to JPEG? I believe this comes down to similar 8 bit limitations described in the thread below. Following the same guidance to add Gaussian Noise to help Dither/blend the gradient in the final output can help, but you'll need access to Photo 2 to initially add the filter. I've attached a copy of your file where I rasterised the Gradient rectangle and then added a noise filter, which helps reduce the banding on output to JPEG. You can however open this file in Designer and adjust the filter. 4% Gaussian Noise.afphoto