robertochaves
-
Posts
35 -
Joined
-
Last visited
Everything posted by robertochaves
-
 This feature stopped working completely with the latest update that added support for the new Apple Pencil. In the update before it would sometimes not work
 -
I'd like to be able to select multiple images and import them at once from dropbox/icloud. Right now I can select several, but it will just import them into some hidden place, making it hard to keep track on which is the next picture I need to import (as it won't have the download icon on the top left corner of the image) And I'd like to be able to import them into a folder without having to open them up and save them in Affinity photo (preferably in the background so that I can continue working). My workflow is after a shoot going over the pictures and doing the main adjustment inside Capture One, then export the ones that need retouching into an dropbox import folder. After that Import them into Affinity Photo on my iPad, this part is painfully inefficient as I need to Import from Cloud, pick a photo, wait for it to load into the app, exit into the gallery view, wait for it to do some further processing (otherwise it might fail once I try to import the next), and repeat this procedure for each picture.
-
It seems like this feature has become buggy with the latest update Version 1.6.9.81 First I could't get it to work, even toggling the setting that I had not touched before. Now I tried it again and it works. So something is weird..
-
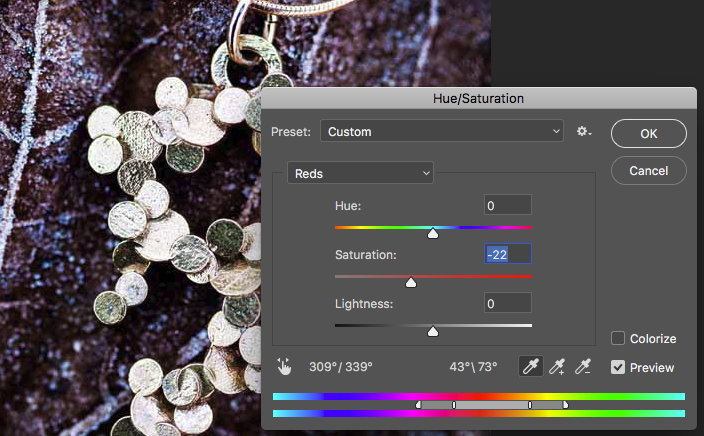
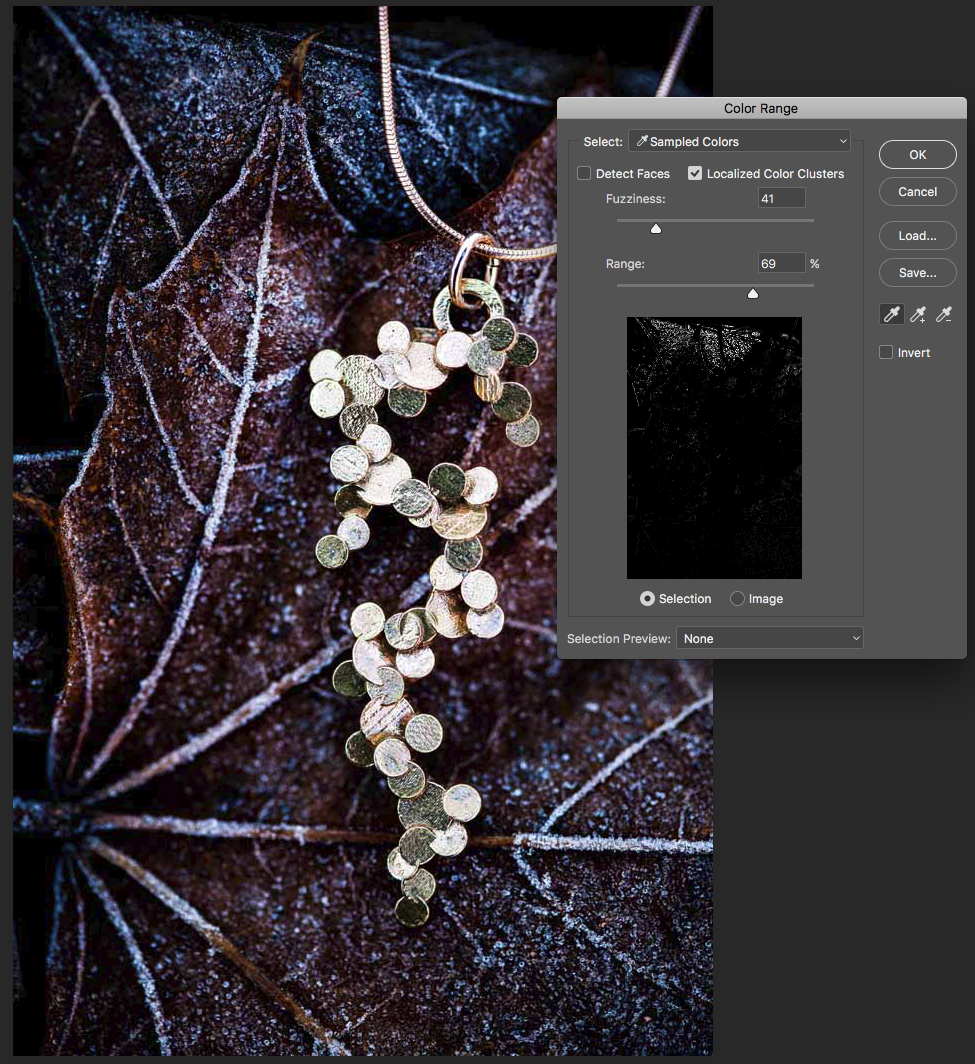
I'm looking for a way to easily remove redness/blemishes when doing skin retouch. If the sponge brush had the option to select a color range. The color range selection could work in a few ways: 1) like the Hue/Saturation dialog works, where you can pick a primary color and then select the range (bottom) and how it fades over these star and end points. 2) similar to how Photoshop allows you to do selective color (the two last images I've included try to visualise this), I really like the radius distance option! These sort of selections could probably be useful in many more scenarios.

-
Résolution with focus stacking
robertochaves replied to csalome's topic in Pre-V2 Archive of iPad Questions
It would be nice for both the desktop and iPad version to be able to focus stack raw images into a raw file that could be saved. This way one could edit this raw file in Lightroom as a single input file and then do retouching on Affinity photo on the iPad. -
Image trace equivalent (Illustrator)
robertochaves replied to cwmbrancon's topic in Pre-V2 Archive of iPad Questions
I'm one of all those also waiting for this feature to be added! Please make it better than Illustrator. If you can get the same performance quality as VectorMagic that would be great! Check this comparisons between VectorMagic, Adobe and Corel: https://vectormagic.com/comparisons Maybe you can just license their algorithm? Or allow plugins? -
It would be very helpful to get a much stronger maximum blur setting on the Blur Brush. The current one is fine for high frequency data, but when I'm working on a frequency separated image and trying to blur selective parts of the low frequency layer it feels like nothing is happening. I noticed I started pressing the pencil harder, almost to scratch my iPad :-) Please save my iPad and add the option to increase blur maximum.
-
For some features merging down a layer is super slow, and because it is unpredictable what is happening I will sometimes not know if it detected my merge down layer request and I will do a second one. One is most often able to pan and interact while it is merging in the background (without any sort of info about this happening). I like that the UI allows you to do this, but I really would want to see some sort of progress bar clearly visible. Also having merge be faster would be nice. Mergin a 42 pixel frequency separated layers takes forever... (I'm running on the latest 10.5" iPad pro)
- 1 reply
-
- 1
-

-
Import multiple photos at once
robertochaves replied to adsimpson's topic in Feedback for Affinity Photo V1 on iPad
Something I forgot to mention. It seems there is some weird bug when importing making the above workflow even harder. For some reason once I import an image and go to import a new one the order is being changed... The first image on the top right will have moved one position to the right, and then they keep reorganising as I continue to import more. This is very confusing when I'm working on several similar picture, especially as the ones already imported are cropped to a square, making it hard to see which ones I've actually imported. So I need to keep track of the first image (hopefully it is quite different in looks to the others) to know which one I should import next. Rather annoying. Plus it is not very obvious that an import has stated (it just shows a progress circle on the top), I'd prefer the whole screen to change with a clear progress bar. Ps. Merging layers should also have a progress bar -
Maybe a way to solve this would be to have the option to hold down say three fingers one the screen, which would mean that when you touch the surface with the pencil it would only show a preview (as hoover is not something support on the iPad). So anywhere press down for example three fingers and while you hold them the pencil will just show a preview brush size where it touches. Then release to paint work as normal. Another one would be to have a preview button on some corner toolbar that would allow to be pressed to enable this in the same way as the three finger gesture (being able to configure this would be the best!)
-
+1 I'm also thinking the color wheel could use some more features, to be able to select HSV, or RGB etc. And always being able to pick a color from the image by holding with the finger (I've disabled editing with my fingers to avoid drawing with a tool when zooming/panning and can do this in some cases). It would be nice to have a few colors "saved", so you could quickly swap between a few favourites (they could be shown as circles on the side, say 8 of them). Affinity if you are reading this, I'd be happy to send you a mockup of the UI how I imagine it!
-
Import multiple photos at once
robertochaves replied to adsimpson's topic in Feedback for Affinity Photo V1 on iPad
I too have been waiting for this to be fixed (not sure if I already posted a feature request for this before). But for my workflow it would save lots of time. I usually use Lightroom to select and do the base corrections on my images. Then the ones that need retouching I will mark with a different color, click open in Affinity (desktop) so that it creates a copy. These copies will then be copied to an import folder I have in iCloud. And then on my iPad I will create a new project with a name to match, and in this import all these photos. However, having to click import, select the retouch and then import folders (that's my structure) for each one, which is also pretty slow process for 42MPixel images with 16bit per component, for each photo is pretty slow. If I just could get a window to selection which photo to import (and I don't want them to be opened for editing, just importing into the folder!) and then start import, so that I can do something else while it works. But having to wait some time between each one is a bit of annoying. I also then would like to be able to export the same way. To select a bunch of photo and export (maybe create my own settings to apply to all) to my iCloud/retouch/fixed folder. It would also be nice to assign colors, similar to Lightroom, to be able to know which pictures I've started working with, which ones are ready, etc. -
On-screen Option/Alt Key is CRITICAL.
robertochaves replied to zacwork's topic in Feedback for Affinity Photo V1 on iPad
This feature could also be added with a multitouch option. Holding down three finger fingers could work like a ALT feature. That would make it even faster, then you could do that anywhere on the screen and have no need to find the ALT virtual button. Thought it would be nice to have this configurable. -
Secondary? Undo/Redo placement (suggestion)
robertochaves replied to Duel's topic in Feedback for Affinity Photo V1 on iPad
Hi! I agree that the bottom right corner is not the best place, especially if you are right handed, then you arm will most often be covering that area, which means you will need to move your arm away and then search for it. I believe the bottom left corner might be better. But I think even better would be some sort of hand gesture. Maybe a four finger swipe to the right for undo and to the left for redo? Also it would be nice if the area that is affected (especially for small retouching details) would be highlighted when an undo step happens, so that you get quick and clear visual feedback on what the undo did. -
Just tried it! It works like a charm! This made my day! Ok, so the only thing I then miss is a button to quickly turn this on/off in the main interface. Say if you switch to liquify, then you might want to use your fingers... but heck... I'm happy with how it works now!
-
AWESOME!! Thanks :-) Will check it out!
-
I'd like to be able to tag images with a color flag in the corner, so that I can mark images I've started working on with one color (say red), and those that are done with another (say green). And then have a easy way of exporting multiple images to iCloud to get back to my computer.
-
I notice that I often have a tool, say inpaint tool selected and want to zoom or translate and when I go to pinch zoom/move I by accident very often draw a long line, which I then have to wait for it to finish before I can undo. I never use the fingers to edit the image, I only use them to select in the menus, but most often I use the the pencil for that too. I think adding a toggle button, say in one corner of the display, that allows for panning with one finger touch + two finger zoom/pan but disables drawing or retouching with the fingers on the image. I'm not sure how easy it is to differentiate between the pencil touching the screen compared to the hands, but I feel it would speed up workflow immensely by not having to fear to edit the image by mistake by touching on it with your fingers when you mean to zoom or pan. So to clarify the fingers should be detected on all menus, and if I touch the image then it should only act as a pan/zoom tool, so unless the pencil is being used on the image the selected tool would be ignored.
-
Dublicate document
robertochaves replied to Andreus's topic in Feedback for Affinity Photo V1 on iPad
Hi! I'd like to see the duplicate image added into the Plus icon on the layers menu, where you right now can add pixel and fill layers. I notice that I tend to look for it there, so it wouldn't hurt to duplicate it in the layers panel, as it is a layers operation. -
It would be nice to be able to flag photos with a color. This way one could tag files that are finalised and ready for export.
-
Hi, Today I came up with, what I think is, a great idea I'd love to see implemented in Affinity photo. I'd like to be able to get a noise profile on the picture I'm working on, then be able to add noise according to this profile to areas of the image that have been retouched. There was many many years ago (I'm not sure it still exists) a program called Noise ninja, in which you selected a square in the image (like a clear sky patch) to use for creating a noise profile. Then this could be used to remove noise from the entire image. Or you could build a library for different cameras and ISO settings, and just use the exif info to get the right profile. Now, what I'd like is to be able to either analyse the whole image to create a noise profile (the software could try to find areas with little variance automatically to sample, or one could select and area). Then if you work on retouching a certain area you could re add noise to this area. Maybe one could simulate parts of this with the low pass and high pass filters. But I think it would be better for some types of retouching (jewellery photography in my case) where I want to remove small scratches on highly polished parts (that you can't see with your naked eye, but that become quite visible when photographed) where this would be extremely helpful. Have a great day! Ps. Found a link that describes Noise ninja: https://luminous-landscape.com/noise-ninja-review/
-
@Leigh : Hi! I've now attached two files. One zip file contains the exported LUT file from Affinity Photo and the converted LUT file. The other zip contains the original photo with the adjustment layers that I used to create the LUT (just something I did quickly to test it). Let me know if this is helpful! Best regards, Roberto High contrast sepia look test.zip Romeo LUT test image.afphoto.zip
-
Yes, I do have both. They are on my other computer, I will share them tomorrow. @MEB: Thanks for the tip, will try this out tomorrow!
-
Thank you Kirk! I'm trying it out right now and converting it to a Color Finale .... And the verdict... It worked! Strange, here I thought that the .cube format was a standard file format.... In the list I see about 17 different types of .cube formats... what is the matter, why can't people create one standard for such a simple thing.. Anyway, thank you both for your prompt replies and help!
-
I've tried adding a curves layer and a levels adjustment layer. And when I do export, I see the preview cat being adjusted in accordance to this. However when I start FCP X, apply a Color Finale (also running a trial, to evaluate it) effect to a clip. From the LUT utility menu I select Cube Manager and the Launch button to open the LUT Manager. Here I add the file, which works fine, but when I click on it to see the preview then I get the error "Malformed DOMAIN_MIN tag Line:8" I must then be doing something wrong.. I can't find any way of attaching a file in this forum, not sure if there is, then I could include the generated file.