kirkt
-
Posts
440 -
Joined
-
Last visited
Everything posted by kirkt
-
360 degree HDR
kirkt replied to Emma Wood's topic in Pre-V2 Archive of Desktop Questions (macOS and Windows)
@Emma Wood - That may be the result of the alignment process, which may automatically crop the image where there are no pixels at the margins of the shifted images. You should check how this affects your panorama at the seam where the 360 edges join together. A solution to this would be to mirror the edge pixels or each source image, top and bottom, left and right to add content around the edge seams. Then, when the source images are aligned, the shifted edges that are cropped will not crop into the actual content, but the added sacrificial pixels. Once the alignment and merge is made, you can crop the image back to its original (prior to adding pixels) dimensions, with a 2:1 aspect and the seams should be invisible. Kirk -
Affinity Photo Customer Beta (1.9.2.228)
kirkt replied to Andy Somerfield's topic in [ARCHIVE] Photo beta on macOS threads
v 1.9.2.228 - macOS Big Sur, v11.2.2, 16in MacBook Pro. A minor interface bug/fault - in the L*a*b* color picker interface, the a* color slider shows a gradient from cyan to magenta, instead of green to magenta. Using the MacOS Digital Color Meter, the color values on the negative end of the a and b sliders are essentially identical, i.e., cyanish, which is ok for the b* slider, but not for the a* slider. kirk EDIT: This fault is also present in the current App Store version, v 1.9.1.
-
360 degree HDR
kirkt replied to Emma Wood's topic in Pre-V2 Archive of Desktop Questions (macOS and Windows)
@Emma Wood - I just opened an EXR (32bit HDR) file and cropped it so that it was 2:1 aspect ratio, just to simulate what you would get if you opened an equirectangular HDR panorama in AP (or merged to one in AP). I was able to invoke the Layer > Live Projection > Equirectangular mode on that file, so it should work. You definitely have to make sure that the image you are trying to edit in this mode indeed has a 2:1 aspect ratio or the Equirectangular menu option will be grayed out. Kirk -
360 degree HDR
kirkt replied to Emma Wood's topic in Pre-V2 Archive of Desktop Questions (macOS and Windows)
@Emma Wood - I am not familiar with the output from this camera - are you saying that you have three exposures (say-2, 0, +2 EV) of a single 360° equirectangular pano? If so, then making the HDR file should be as straightforward as merging the three images using AP. Can you post a link to source files (for download) and a detailed description of what you want to achieve as the final output? You don't need to post the files you are working on, but some sample files that can be used to provide a basis for a step-by-step would be helpful. Kirk -
The image does not have an embedded grayscale profile, and the overall interpretation of the grayscale values in the data can vary depending on the profile that is used for display. You might want to check the Typhoon FLA scanner software to see if it has the ability to export the TIFF with a particular profile embedded (tagged) in the exported file. Either that, or see if the scanner software user manual explains how the grayscale image data are formatted (for example, the gamma of the grayscale encoded data) so that you can ASSIGN that particular profile within AP. User Manual: https://www.dbi.udel.edu/wp-content/uploads/2017/07/Typhoon-FLA-9500-UserManual.pdf According to this literature: https://rega.kuleuven.be/bac/economou/files/pdf/manuals/typhoon-fla9500-biomolecular-imager.pdf the output files are stored in two different formats: The dialog warning that AP displays is telling you that the image you are opening has no embedded profile and that AP is assigning one, by default (based on your color settings in the Preferences). This may not be the correct profile to interpret the image data, so the appearance of the image may not be what you expect in AP until you assign the correct profile. kirk
-
Thanks for the tip. Probably not worth it here, but I will remember that for future files that may require more of their integrity preserved. kirk
-
Attached is a JPEG saved at "12" (max quality) in PS. The image was constructed by first making two rectangles in AP - 1) using the vector tool and setting the fill color to cyan and the stroke to 8px black; 2) on a new pixel layer, making a rectangular selection with the marquee tool and filling it with the same cyan color and then using a layer effect to add the outline at 8px in black. 1)" is referenced in the attached JPEG as the "Vector" version and "2)" is referenced as the "Bitmap" version. I then rotated copies of each rectangle 75° clockwise to induce aliasing and exported the resulting exercise in AP at 90 percent JPEG quality and opened that JPEG in PS. In PS, I repeated the exercise on a new document but filled the shapes with green. I copied and pasted a section of the rotated AP results into the PS results for comparison. The antialiased edges pretty much look identical between the two methods of generating the shapes and across both applications. I used a 1920x1080 document at 72ppi, per the original post. The attached doc is a JPEG saved at max quality in PS, as stated previously, but I do not know what the Affinity forum might do to it to compress it. Obviously you want to inspect it at 100% - doing so makes it clear that the Affinity forum robot compresses the image significantly, as JPEG artifacts are obvious at the black outline, where none exist in the source image that I uploaded. But you get the point. I am viewing this on an Eizo ColorEdge 1920x1200 display, so maybe it will appear different on a Retina or other HiDPI device. kirk
-
@Wanderer3 Dropbox or a similar file sharing service works for this kind of thing. Sorry that AP is not working for you at the moment. kirk
-
@Wanderer3 - do you have a data set (a few Pixel Shift files) that you want to merge to HDR that you could upload to a file sharing service for us to test? Kirk
-
Astrophotography Stack Unbelievably Slow! 1.9.1
kirkt replied to ds.johnston's topic in V1 Bugs found on Windows
Are you shooting compressed raw (C-RAW) files? If so, try not doing that and see if there is a difference. kirk -
@Patrick Bell See: https://practicalastrophotography.com/a-brief-guide-to-calibration-frames/ for example. Collecting a set of these frames is called "calibration" - characterizing your camera's sensor and optical systems. Calibration helps deal with the issue inherent in astrophotography, which is mostly about increasing signal-to-noise ratio (SNR). The sources of light that you are trying to capture are so far away that very little of their light falls onto your camera's sensor, so it is a balancing act between exposure time (light gathering) and SNR. As exposure time increases, not only does your subject move across the frame, but the electronics in your camera heat up and create noise, above and beyond the noise inherent in the system. Dark frames handle the noise inherent in the system, and bias frames deal with the noise created for a specific exposure time and temperature. Flat frames help deal with the optics of the system (color and vignette issues inherent in the optics). You want to capture the noise-related images at the same temperature as the Lights, although it may not be super critical for what you are trying to do. And, of course, Light frames are the actual images of the subject. You can also use these techniques in critical non-astrophotography settings, where you need a clean signal but lighting does not give you a lot of signal to work with. Have fun! kirk
-
You can also spend hours going down the rabbit hole of film sims by using infer LUT in AP with the help of the Raw Therapee film sim collection. The collection is based on a HALD CLUT image (a synthetic image of a wide range or color, used as a reference) and the altered HALD images with each film sim applied to them. You use them in AP by implying the Infer LUT operation just as you have done - the reference HALD CLUT image is loaded first and then the altered HALD film sim image is loaded. AP infers the LUT and applies the film sim for that HALD image. https://rawpedia.rawtherapee.com/Film_Simulation Have fun! Kirk
-
Here is an online resource for altering LUTs, including changing their resolution: http://cameramanben.github.io/LUTCalc/LUTCalc/index.html Have fun! Kirk
-
You may be exporting your LUTs from AP at a very high resolution, which might be necessary if the LUT does some really wild mapping, but is usually not necessary for many milder applications. In the Export LUT dialog, turn the LUT resolution ("Quality") down to something reasonable - try a smallish resolution first to see if it is sufficient to make your images look the way you want without causing banding or other artifacts. If you need to increase the resolution to address artifacts, do it in reasonable increments until you see the artifacts go away. For example, I made a LUT in AP, based on a white balance and a curves adjustment, and exported it at 17x17x17 and again at 34x34x34. The 17x LUT was about 135kB, the 34x LUT was about 1.1 MB, or about 2^3 or 8 times larger, as you would expect. Think of the LUT as a cube of color - if you double each edge of the cube, its volume increases eight-fold (two cubed). Also, remember that LUTs are not color space aware, so if you are using, for example, an sRGB document or working color space in AP as the basis for making the LUT, the transform contained in the LUT will only really be accurate (give you what you expect) for transforming images that are in the color space for which the LUT was constructed (ie, sRGB). Kirk
-
Layers and Frequency Separation
kirkt replied to bleyden's topic in Pre-V2 Archive of Desktop Questions (macOS and Windows)
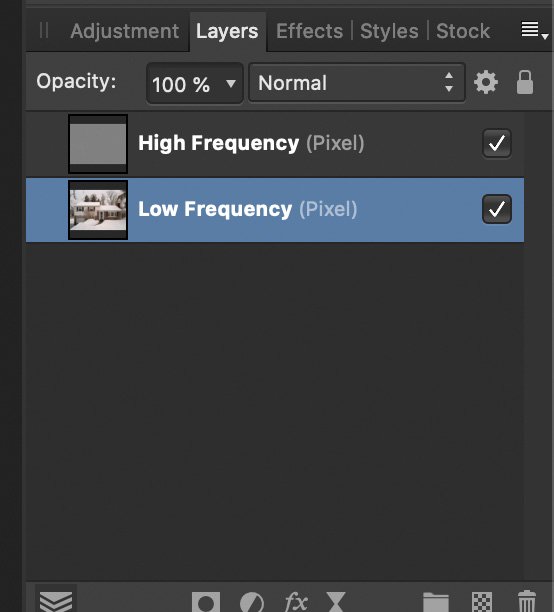
Checking and unchecking the box for a particular layer only affects its visibility. To operate on the actual layer you have to select (click on) that layer. In the attached screenshot, both frequency layers are visible (checkmarks), but the low frequency layer is selected and active/targeted for editing (highlighted in blue). Kirk
-
How to Edit the Alpha Channel
kirkt replied to John-B's topic in Feedback for the Affinity V2 Suite of Products
I believe this is where AP falls apart, because it does not preserve the alpha channel as a separate channel without burning its effect into the RGB channels. Ideally, one would be able to pack the alpha as well and leave it intact as its own channel, instead of burning its effect into the color channels. The exception is exporting your packed document as EXR, which may not be a viable option for a gamma-encoded texture workflow, for example. Just because it can be done, does not mean it is an efficient and useful workaround for a particular workflow. Kirk -
How to Edit the Alpha Channel
kirkt replied to John-B's topic in Feedback for the Affinity V2 Suite of Products
@Sandrooo - It is not 30 steps and it takes 15 seconds tops. No offense taken, if your workflow is that brittle, then it sounds like AP is not a viable solution for you. best, kirk -
How to Edit the Alpha Channel
kirkt replied to John-B's topic in Feedback for the Affinity V2 Suite of Products
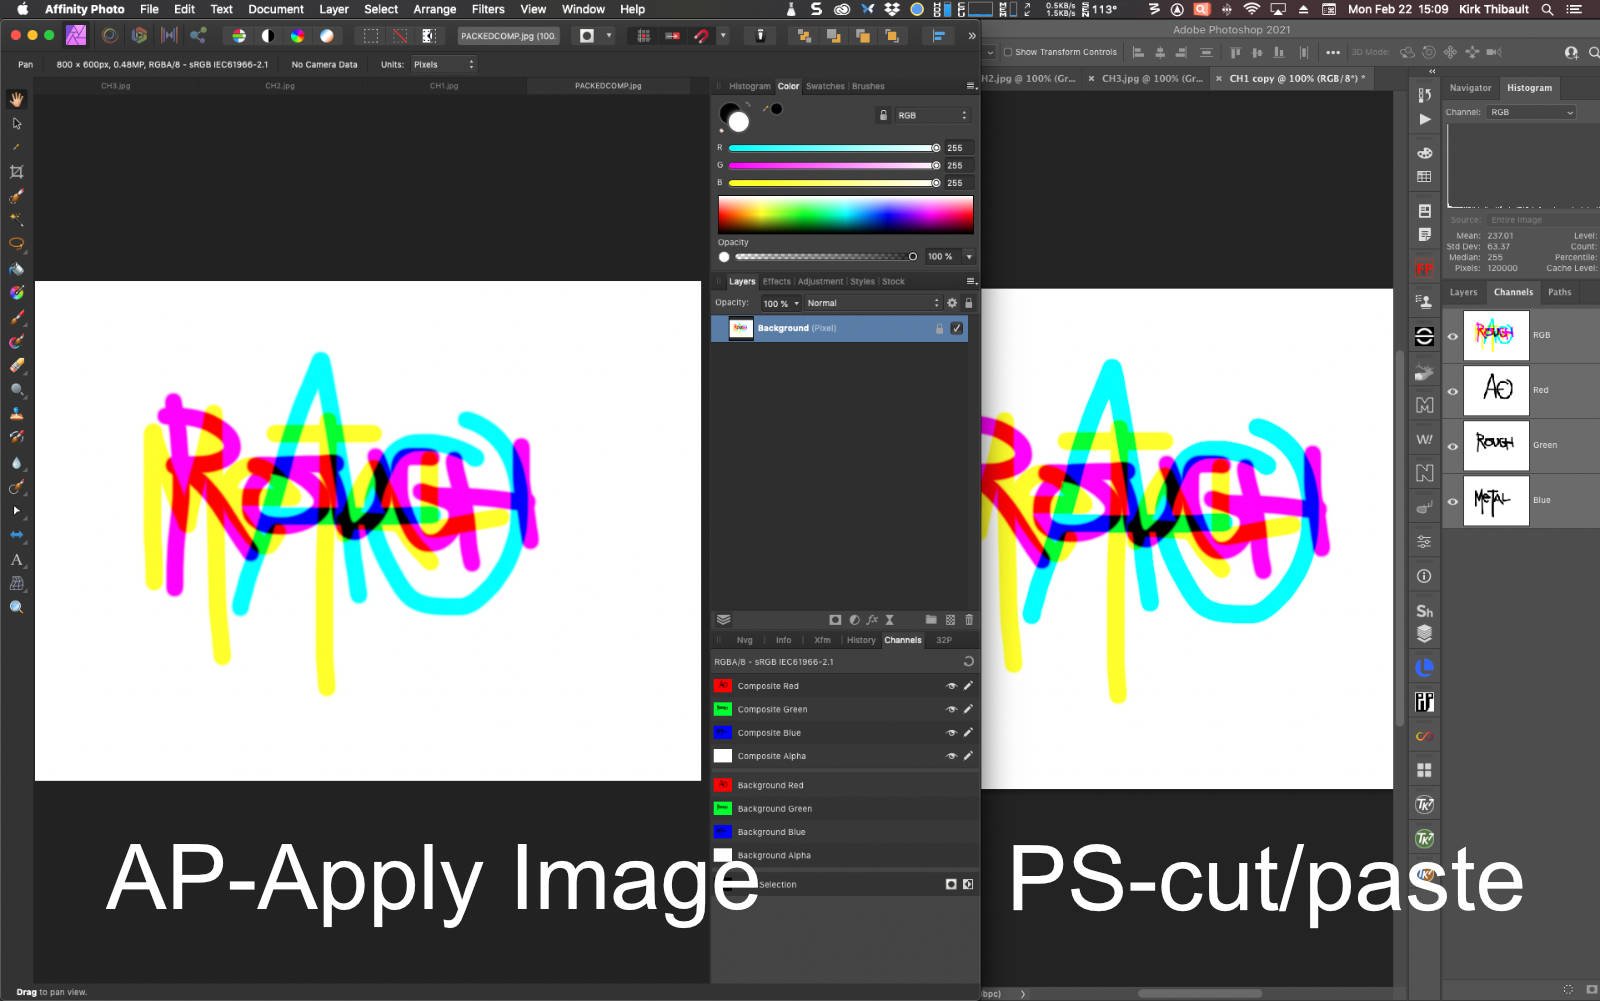
Let's say your images that you want to pack exist as separate grayscale images (in this example, let's assume you have an AO pass, a ROUGH pass and a METAL pass that exist as grayscale images - pretty typical for a CG render workflow). You can use the Apply Image operation to pack the ROUGH and METAL grayscale images into the G and B channels of an existing basis document that you make from your grayscale AO grayscale image, as you described in a previous quoted post. 1) Open the grayscale AO pass in AP and convert it to an RGB8 image, so it supports R, G and B channels. This will be the new WORKING DOCUMENT for your channel packing exercise. 2) Use Filters > Apply Image and select "Load Source From File ..." and select the ROUGH grayscale image. 3) in the Apply Image dialog, check the "Equations" box and enter the following equations: DR = DR DG = SG DB = DB DA = DA where "D" denotes the Destination of the operation, and "S" represents the Source of the operation. In this case, this will place the GREEN channel from the ROUGH image (the "Source" or S in the Equations) in the Destination Green (the DG) and leave the rest of the channels in the Destination document as they were originally. 4) Do the same as Step 3, only use the METAL image as the Source and enter: DR = DR DG = DG DB = SB DA = DA This places the METAL image's blue channel into the blue channel of the destination working document. 5) Save As (for an .aphoto doc) or Export (for a JPEG, TIFF, etc) the resulting file and your are done. It does not require 30 steps and is pretty straightforward. You do not even need to open the other files (ROUGH and METAL) explicitly into AP' interface to select them and incorporate them into the G and B channels of the AO doc to pack them. QED. You could avoid having to open the ROUGH and METAL documents explicitly in PS to to pack them into the AO-based RGB doc's G and B channels by using .... you guessed it - Apply Image! Same operation as described above for AP, same amount of steps. Sometimes you have to change your routine slightly to adapt your longstanding workflow to new tools. Have fun! Kirk
-
You can also export the images from Exposure as TIFFs, for example, and in AP choose "File > New Stack..." and then select all of the rendered TIFFs you want to composite. They will be opened in a single AP document as individual layers in a stack. If you do not want to work with them in a stack, you can just drag them out of the stack and they will become plain old layers. Kirk
-
Nik Collection Plugins
kirkt replied to Daniel.'s topic in Pre-V2 Archive of Desktop Questions (macOS and Windows)
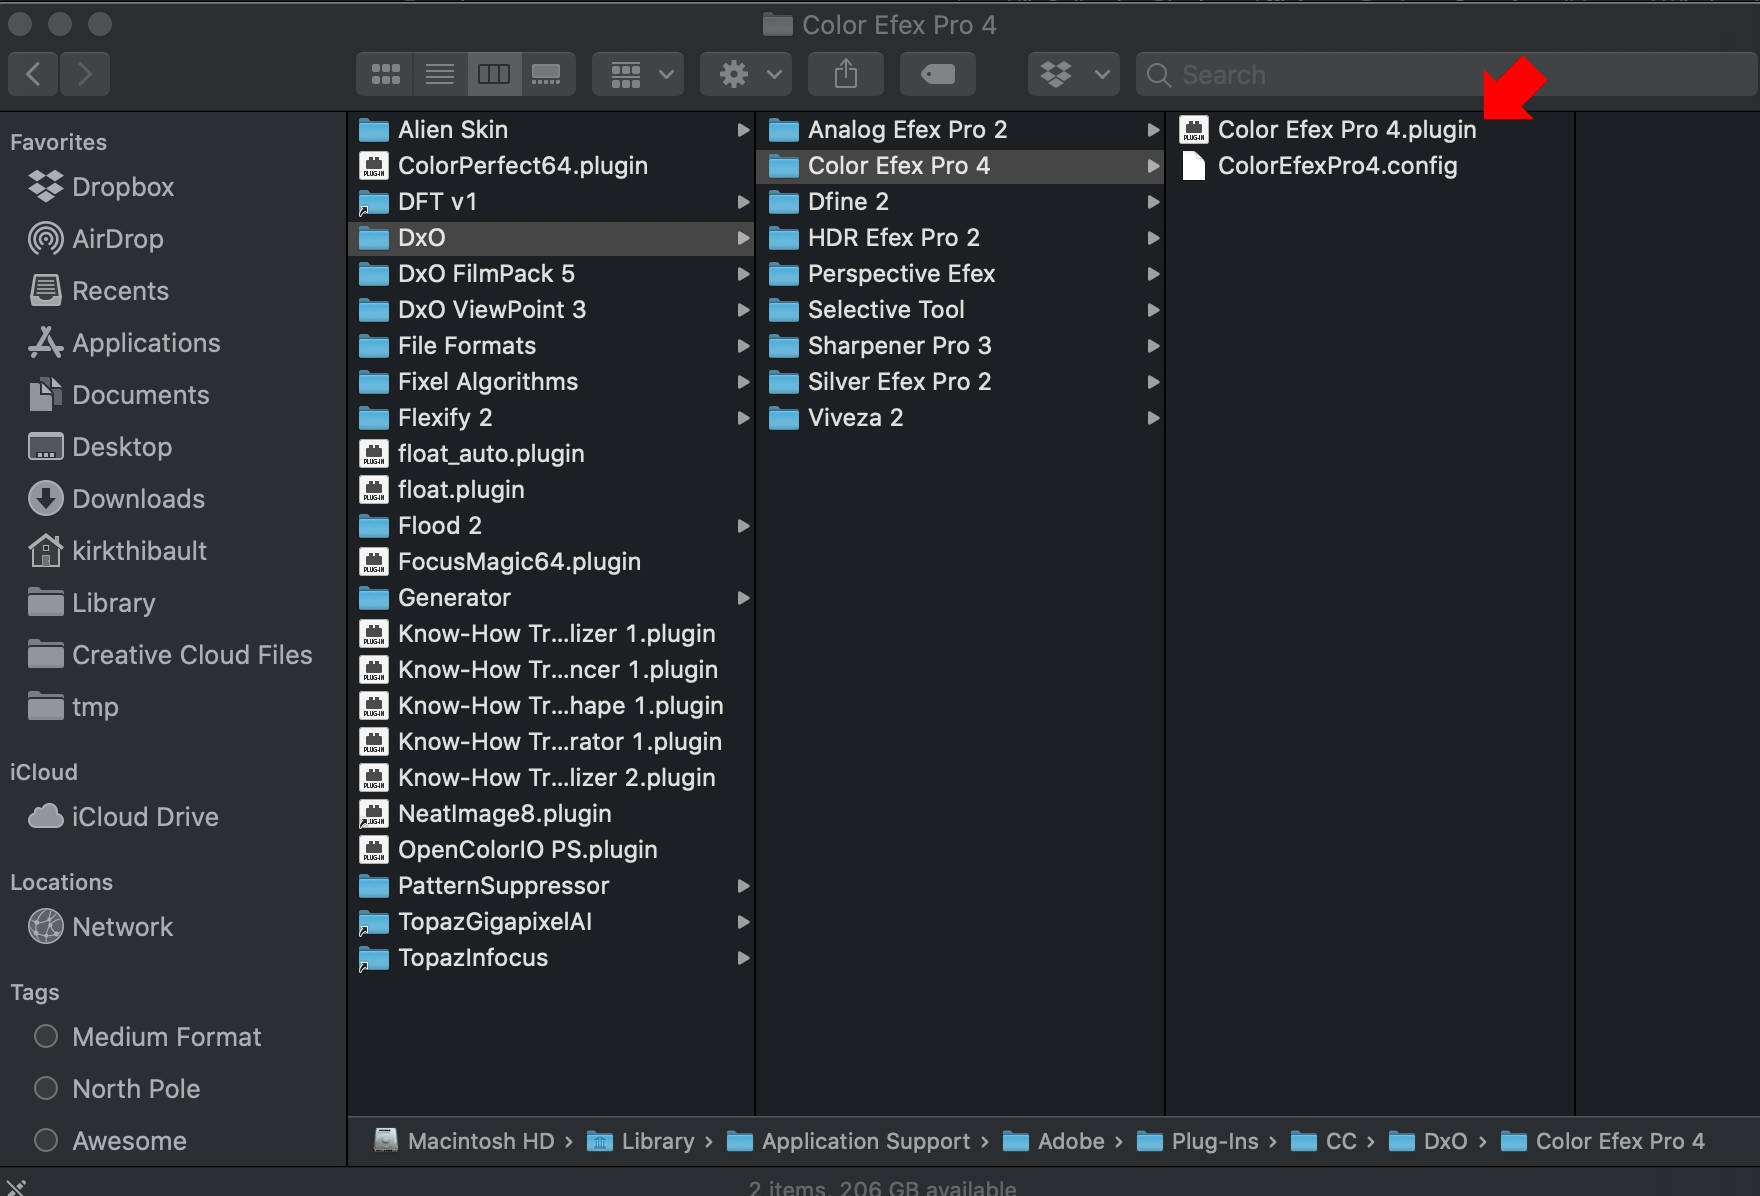
You want to target the directory in the Plugin Preferences where the Nik Collection plug-ins live, not the applications. The red arrow in the attached screenshot shows the plug-in file you are looking to have AP find, for example. Kirk
-
Nik Collection Plugins
kirkt replied to Daniel.'s topic in Pre-V2 Archive of Desktop Questions (macOS and Windows)
@Daniel. You will need to authorize (globally) the support for the Nik Collection in the Plug-In preferences (click the "Authorize Global button). You can also just leave the Nik Collection wherever you want and specify that folder in the Plug-In Preferences too (add filters to the "Plugin Search Folders list). On the Mac, the Nik Collection lug-ins are located in the folder: /Library/Application Support/Adobe/Plug-Ins/CC/DxO/ for modern installations of the Nik Collection (ie, for modern Photoshop installs, and for the Nik Collection after DxO took it over). Your install directory for the Nik Collection Photoshop plug-ins may vary. Kirk
-
Excellent! kirk
-
For a straight, vertical line, (anti)aliasing should not be an issue, regardless of whether the antialiasing checkbox is selected or not. This looks more like there is a feathered selection, if what your figure appears to show is partial transparency of the blue area butted up against the gray area. What tool(s) or methods are you using to make your selections? For example, if you use the Selection Brush Tool and have "enable soft edges" checked, it will affect the selection edges. You probably need to explain more about what you are doing and what resolution your are working with. Also, Windows or Mac? I am on a Mac and this does not happen if I simply use the freehand selection tool to make a selection, copy it and paste it - the result is a hard-edged selection (anti-aliasing not enabled before making the selection). kirk
-
The new pattern layer does not create a tileable pattern (using the affine hack) but it permits the user to use that tileable pattern non-destructively on its own dedicated layer, instead of creating a fill layer and using the texture on the fill layer. I posted it here because it is a new feature that folks who make and use tileable patterns may want to try. If you need to make your pattern tileable (seamless), you can record a macro that will do the affine steps, do all the cloning that you need to blend the seams, then use a second macro to reset the affine transform with your new, seamless tile. Once you have the seamless tile on its own pattern layer, you can duplicate that layer and transform it multiple times to add scale, offset and rotation variation to the texture you are creating and you can paint in the effect of an individual variant using regular old masking tools. If you feel that using another piece of software to make your tile is worth the extra effort and adds value to your work, that might work for others as well. kirk
-
AP v1.9.0 has a new layer called "pattern layer" - you can make a pattern layer from a selection automatically. For example, you paste the original art above into a new document, select all, make a new pattern layer from the selection, and now you have a tillable, scalable, rotatable moveable tiled pattern. See: kirk