Alex W
-
Posts
36 -
Joined
-
Last visited
Everything posted by Alex W
-
Whilst that is useful to know, it doesn't help with the particular issues raised here. Align and mirror simply ignore the pixel alignment setting. I actually find that mirror ignoring transform locations as well and always using just the centre point of whatever you are mirroring is also pretty irritating, but that's a separate issue.
-
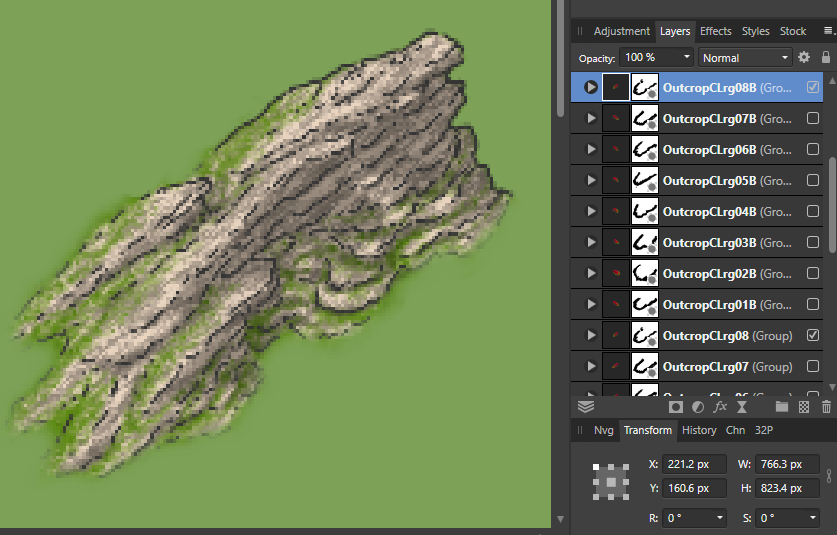
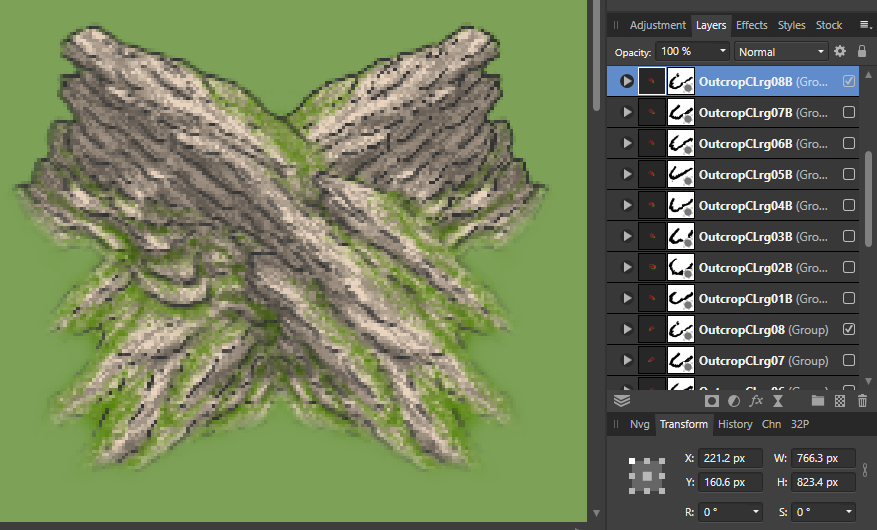
I appreciate you trying to help but whilst it sounds good in theory I can't change the relationship of the original content as this will make that blurry to start with. I'm already using a manual process to deal wit this and the point of the comment was really that when you have move by whole pixels and force pixel alignment turned on, it would be handy/intuitive if transforms and alignment respected the current pixel alignment of layers and images too, to avoid having to manually correct things. Here is an example Before mirroring a group After mirroring a group with original still behind. You can see the extents of the group and it's centre point are the same, but because of the fractional pixel size the actual pixels get offset by a fraction of a pixel and thus become burred. So far the only way I can find to resolve this is to rasterise and trim, which trims the rasterised layer to a whole pixel size and mirroring then works fine. But this is obviously destructive and doesn't work for what I need to do. I currently have to turn off pixel alignment and manually drag the mirrored version horizontally until the images look the same. It's a particular issue for me here, but more generally people may not realise that mirroring an image/layer/group which has a fractional pixel size could subtly change the way it looks... this may not matter in many cases but it could for some. Given this I actually think it should be changed so that in general mirroring or aligning doesn't change the relationship of pixel data to the pixel grid, by default, and you have to actively change the behaviour if unwanted.

-
M<ove by whole pixels is very useful if you are doing pixel art or using a very fine brush and want to keep detail. However using align or transforms such as mirror will not maintain pixel alignment, leading to blurring after the transform. I appreciate there are issues with odd and non whole pixel data on a layer making the centre point a non whole pixel, but it would be really handy if things like align and mirror especially could at least maintain the same pixel relationship of the image/layer to the canvas as the pre aligned/mirrored image/layer/etc, even if this means that it doesn't quite precisely align to the centre or whatever. Eg when you mirror a layer horizontally, the furthest left extent of the left side has the same relationship to the "pixel grid" as the newly mirrored right side extents. This would at help enormously to maintain consistency of the image when you apply these functions to it.
-
I know it's different but I don't think it's necessarily less intuitive than using save-as. As far as I see it save as was not always there for "saving as a different format", it was there to save ayour current project AS a different PROJECT - useful for making various options or using previous work as a base to do something new. I actually think it was pretty lazy of certain programs to bundle in the exporting of that file to different formats in to the save as function. And, whilst this may be common to some programs, it certainly isn't to all. I don't quite understand why you say it is an old-fashioned UI/UX, imo it's actually a more considered choice, with using save-as being an antiquated "choice". I personally don't find it at a struggle to scroll the extra few lines down from "save as" to "export" in the menu (I certainly don't find it harder to find at all) when I want to export, nor do I find it a hassle to remember to press alt as well as ctr,, shift & s as a shortcut to export my creation to a different file format. I'm not really sure what it is you are asking Serif to "spare us" from. I actually don't save my work as jpg most of the time. If I'm using affinity to create a file I want it preserved in that format in case I want to make changes to it, or use it to do something new. I do of course want to export it as jpg (or png, etc etc) at various points, but this is a separate exercise to saving my work. In my opinion it is good that the two separate functions of saving a layer based affinity file, and creating a flattened file format is separated as they are. Export is a perfectly logical choice for creating a jpeg as that is exactly what you are doing - exporting your file to something which is fundamentally different to what it is. I welcome this kind of clarity of function. I'm not really sure I see why there is any difference from a work flow perspective between choosing "save as" or choosing "export" when you want to export a jpg from your file anyway... the only thing I can see is force of habit and one additional key modifier - neither of which seem a good enough justification to present it as a big issue or poor design decision. I honestly feel like this request boils down to "I'm not used to it being called export instead save-as"... and the perception that this is a wrong choice or somehow creates a stumblingblock to creating jpgs, pngs, etc, flows from that. Choosing export rather than save-as in the (same) menu, or pressing alt as well as shift s is not "inherently any more difficult as an operation, it's only really user habit that may make it so - which really needs to be considered against the reasons why it was done differently, and the fact that it won't actually be the case for eeryone, only a certain group of people. Personally, even having extensively used photoshop, I didn't really have any issue getting accustomed to this difference. This could be because other programs I also use a lot do it already though. I personally hope Serif don't make this change as I prefer it as it is. Just my opinion but I thought it worth adding the counter-point to your request.
-
500% this. I can't believe brushes are still stuck with 200% spacing maximum. I really can't see any good reason why this limitation should be forced on users.
-
ArcGIS for Affinity Designer
Alex W replied to Daniel Finch's topic in Older Feedback & Suggestion Posts
The ability to export shapefiles would be great to be able to re-project maps drawing in designer in to other map projections using other software. Also great would be a re-project map projection solution within designer! -
Image Vector Brush - non-stretch mode
Alex W replied to Alex W's topic in Feedback for Affinity Designer V1 on Desktop
To add to the corner issue above, this is even more frustrating if you are working with compound curves, because you actually can't add the extra control points to your shapes (or rather you can, but the rendering of the stroke on the compound path will just ignore them) meaning you are forced to destructively convert the compound path to curves, and then add your control points. It's not.... great. -
Textured Intensity Brushes and Body: Repeat
Alex W replied to AnnieW's topic in V1 Bugs found on macOS
Made a more detailed suggestion post about the above here: -
Image Vector Brush - non-stretch mode
Alex W replied to Alex W's topic in Feedback for Affinity Designer V1 on Desktop
It'd also be really nice if it could be set so that for sharp corners the image isn't stretched across the entire length of a segment when using stretch or fold (is there really any difference between these?), and instead was stretched only as far back as needed to wrap around the corner. At the moment you an resolve it by adding extra control points in, but for a lot of image based brushes like the one above you just don't want to hap pen and it can get tedious fixing it (not to mention you have to re-fix it every time you merge curves, because the ones you have added get removed).
-
So this is pretty weird. Following the above I've noticed that if I rasterise a group, it can go really screwy, blurring and sometimes darkening areas of the asset. However if I use rasterise and trim it works fine!
-
I'm just uploading now. I had to ditch the upscaled version in the end. It did finally save, but it was just a portion of the 10mb file I've uploaded, yet scaling it up by 200% ballooned the file to 3.5gb! Which might explain why it took over two hours to save. I still have the same problems with the original file I have uploaded. I also have a weird issue where rasterising a large number of the grouped assets (rasterising the group for that one asset) changes the way it looks, sometimes drastically. It seems to get more blurred, as if the image had been shifted by a fraction of a pixel.
-
Thanks I'll def upload it. Unfortunately I'm still waiting for it to finish saving! I do have a live box blur filter layer in each of the asset groups.
-
I'm getting really slow performance in a file which has a lot of layers (its basically a bunch of assets with lots of layers making up each one). The file is around 3k x 8k (resized from 1.5k x 4k) pixels in total, but a lot of that is empty space. There are approx 100 assets each with about 6-10 pixel layers and 4 adjustment layers. Zoom and pan seems to work, but the screen takes ages to refresh beyond a blurry mess. Weirdly when I zoom and pan I often see parts of image showing as if they were from several actions ago... eg if I have moved something it will appear in the old position until the screen is fully refreshed when it will suddenly snap back to its adjusted position. I am just now trying to save it after the resize (which again took ages, like nearly an hour) and it has so far been half an hour and its still nowhere near done. Is this really just my machine performance not being great? I'm running on: i5-8500 CPU @ 3.00GHz 3.00 GH 32GB RAM Geforce 1060 (6GB - drivers up to date and using studio version). 1TB M2 SSD system disk (also set as my pagefile disk, with over 300GB free) 1TB SSD document drive
-
Creating a compound shape
Alex W replied to marmite's topic in Pre-V2 Archive of Desktop Questions (macOS and Windows)
Could someone tell Autodesk that 😄 -
[AD] Isolation Mode
Alex W replied to luispedrofonseca's topic in Feedback for Affinity Designer V1 on Desktop
Isolation could just be an additional function for the visibility in the layers panel which toggles off visibility all but the selected item (be it a layer, group, curve, whatever), and then toggle back to previous visibility settings. This would be more a layer panel feature than a groups feature, and be far more flexible than trying to address it via groups. -
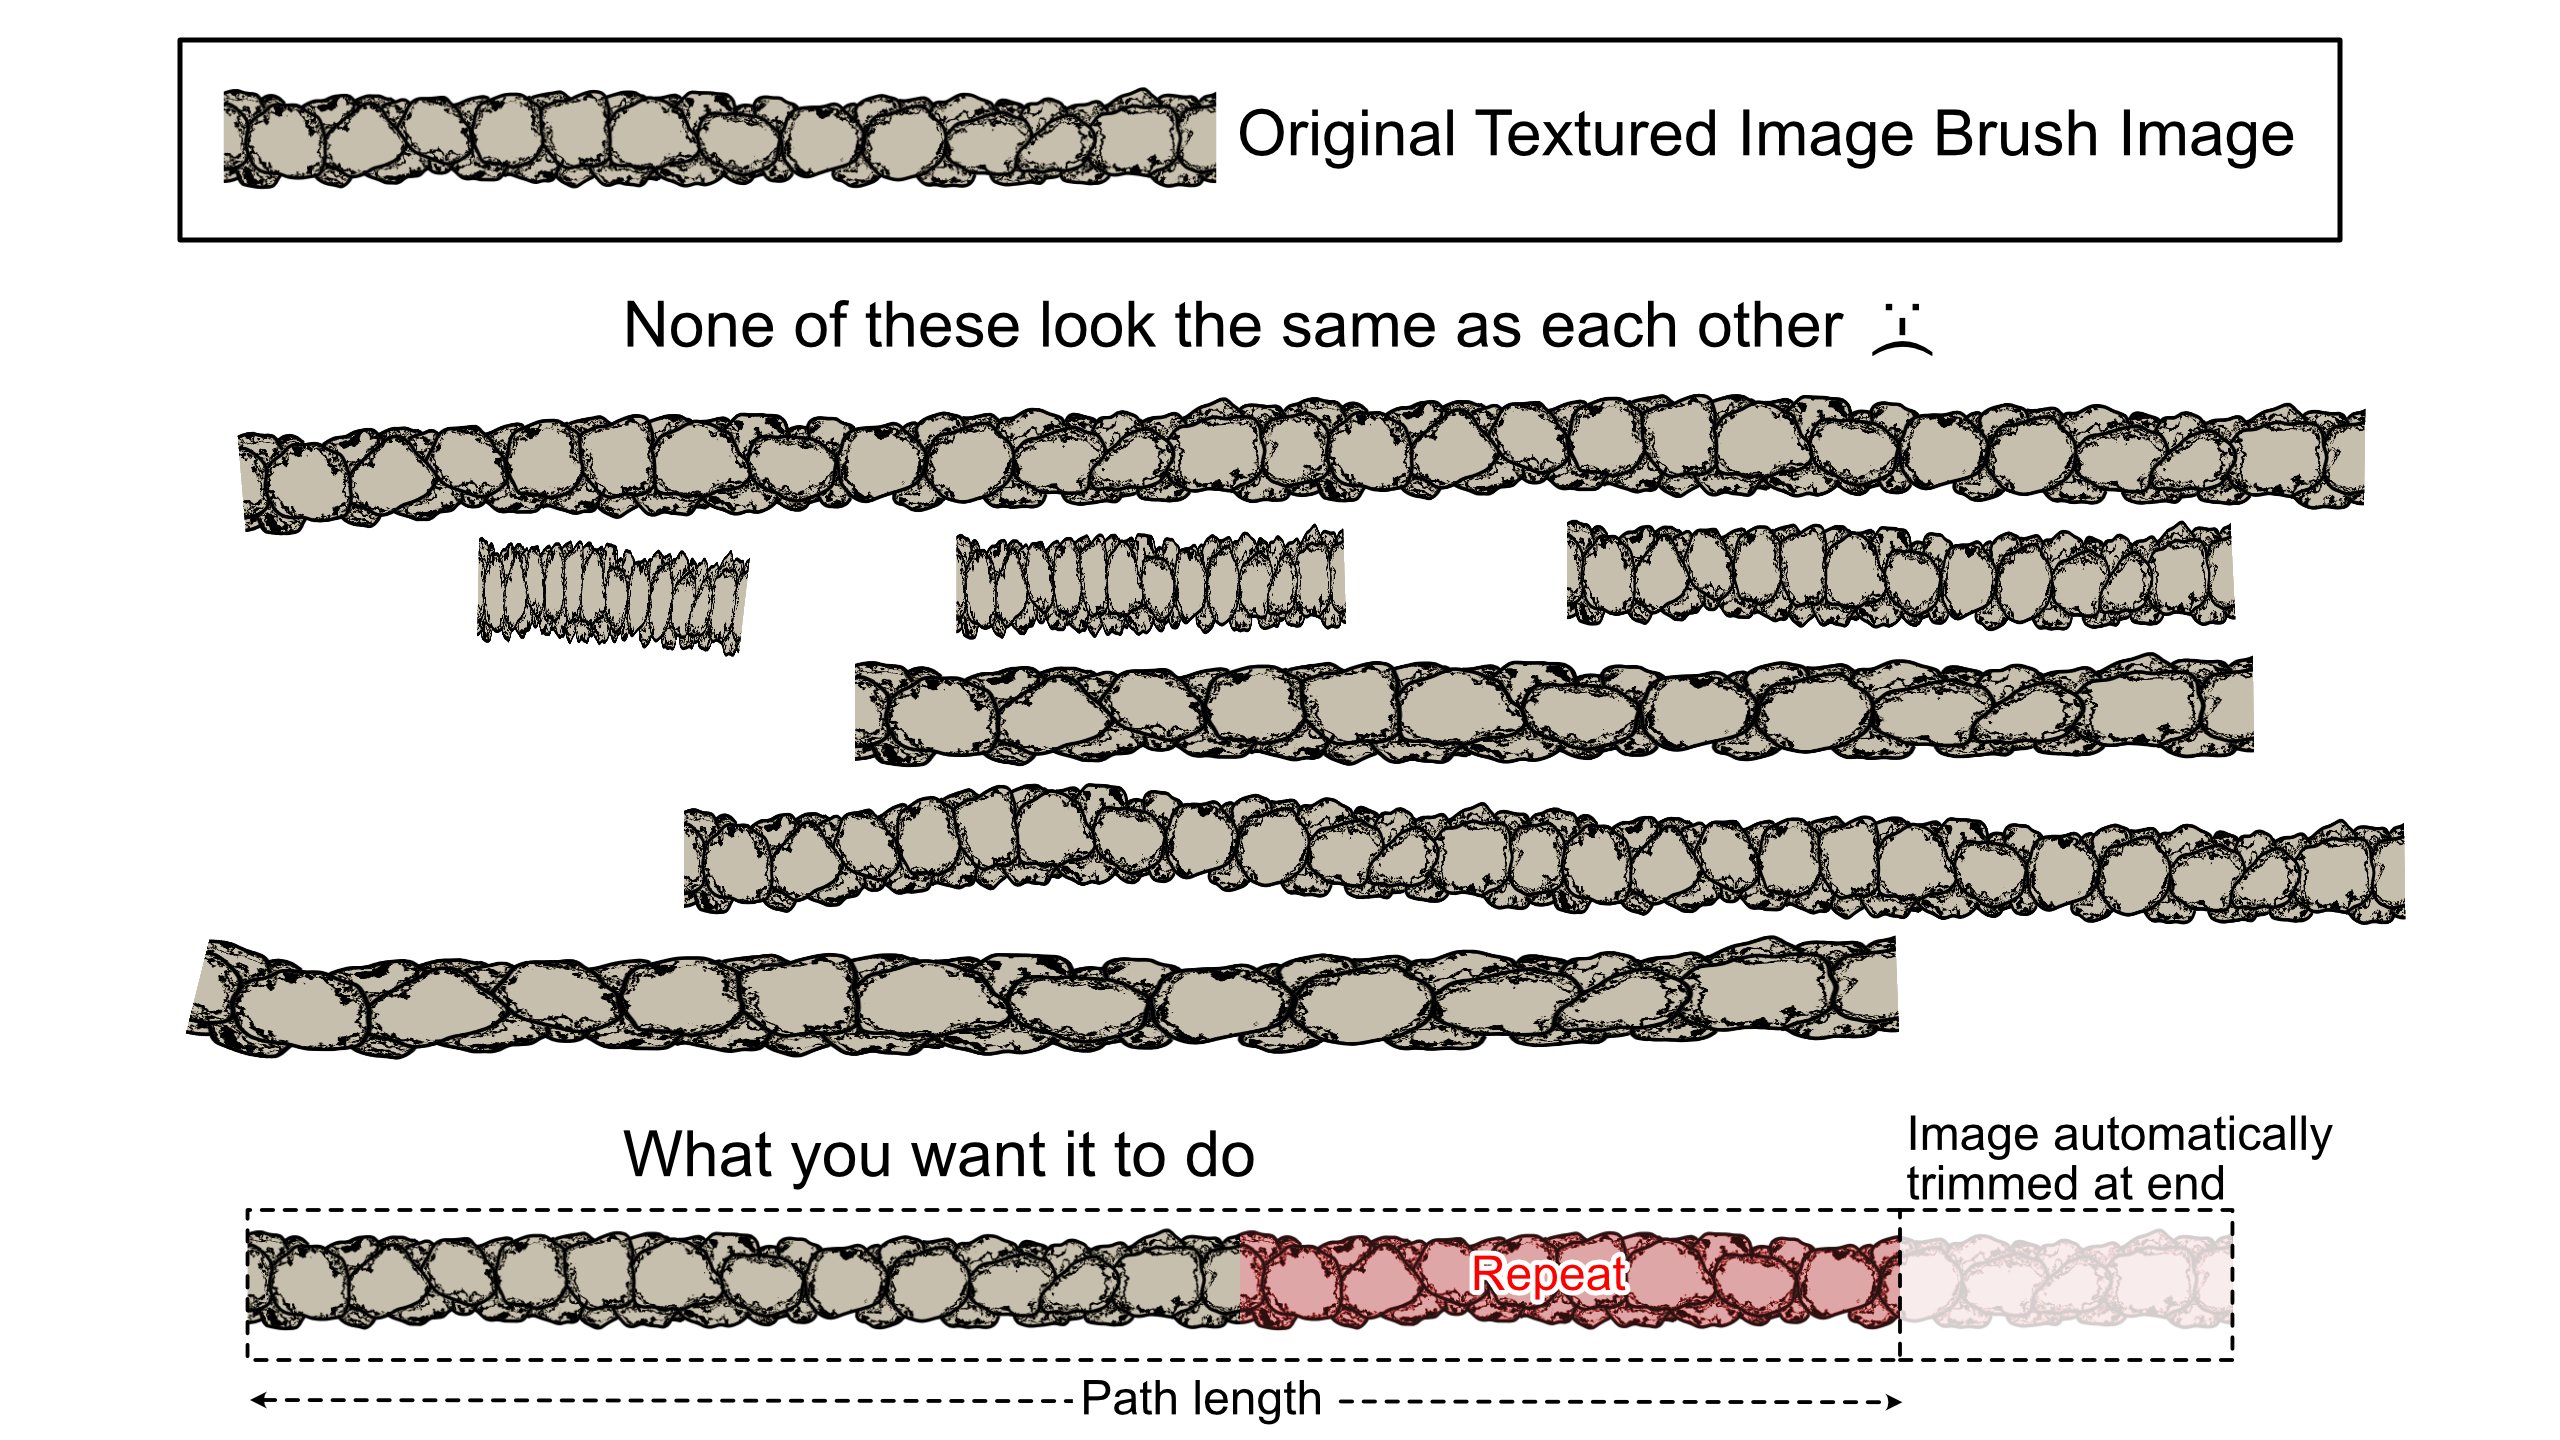
Why: Vector brushes are great, but can be quite frustrating when using them for certain purposes, especially vector image brushes. Quite often you will have a nice image that you want to draw along the path, set up just how you want it... then Affinity goes and stretches it. This is particularly an issue when you are creating brushes that represent real things, like walls, or cliffs. You want a decent amount of variation and so need a decent length image to do so. It's fine if you are doing really long paths where the repeat is numerous and the stretch can be spread out, or have lines that are very close to exact multiples of your image, but other than that you will find your paths just look totally different, which is often not at all what you want, and when you have short paths, squeezing one whole repetition of the image in to the path can look really wrong/ugly. What: The ability to set a vector brush to just repeat the image and cut off at whatever point along the image the path happens to end (ie. to not stretch the image at all) would be a really helpful addition. Granted this would mean that closed path ends would not meet seamlessly, but that is a trade off that is perfectly acceptable for the benefit of consistent image representation and not relevant in all use cases. Maybe another option could even allow it to be set to stretch only if closed. Image attached for clarity. Lastly I did search for similar posts, but apologies if this has come up already.
-
Oh, I see. That doesn't work for me, at least not with vector brushes (raster brushes are fine).
-
So probably the same as me then. Vector brush pen pressure does work, but only if Windows Ink is enabled in the tablet driver. Seems wrong to me that AD would require Windows Ink to be turned on in the tablet driver if it is set to NOT use Windows Ink in the preferences.
-
Just to add to this. The issue only affects vector brushes in AD. Raster brushes in pixel persona still register pressure.
-
I did. I also tried using "pressure" as well just in case. It works fine so long as I have Windows Ink enabled in my tablet driver settings, whereas Affinity Photo works fine with it off. Does your tablet have Windows Ink enable (assuming it has a setting to turn it on or off)?
-
Textured Intensity Brushes and Body: Repeat
Alex W replied to AnnieW's topic in V1 Bugs found on macOS
It would be really handy for certain use cases if textured intensity and especially textured image vector brushes could be set to instead of trying to fit a whole number of repetitions within your line, just cut off the image wherever it happens to finish along a repetition. The stretching to fit can play merry hell when you have things like a rocky wall that you want to have a good level of variation (so a long image and repeat zone) but also look the same on all your linework regardless of length. Stretching can leave you with wildly different looking lines, especially on shorter ones which are 1.5 or less than 1 repetition long, with the only recourse being to adjust the repeat areas of each line individually. I'd almost say for textured image brushes this is probably a default behaviour you would want. -
Still the same on 1.9. Have to have Windows Ink enabled on my Huion tablet settings for pressure to work. This is weird given I have Designer "Tablet Input Method" set to use "low precision" and NOT "Windows Ink" in Designer. I really don't understand why my Huion tablet works fine in Affinity Photo with windows ink turned off in the tablet settings, yet refuses to work in Designer with it off. Turning Windows Ink on in my tablet settings makes it work in Designer, irrespective of what I have "Tablet Input Method" set to. Feels like a bug to be honest.
-
If you convert to curves and use node edit instead of transform, then the fill is maintained as originally placed. That's the only way I've found to maintain it without having to create a clipping layer for it I'm afraid. Bit of a pain tbh, especially as there is no way that I can see of inputting actual values for the image fill scale. It'd be nice to be able to lock the fill when transforming an object.
-
Asset and Resource File location
Alex W replied to melina's topic in Feedback for the V1 Affinity Suite of Products
Granted it's only temporary if you don't feel the need to keep the download. Some people will want to in case they ever need access to it without requiring it to be hosted on Serif's servers. It's obv a personal choice & subjective as to whether it's necessary, but I don't think keeping a copy of your purchased products for future installation is that unusual, or excessive, behaviour. Also still leaves the multiple installations for each program, which is arguably a bigger deal. -
Asset and Resource File location
Alex W replied to melina's topic in Feedback for the V1 Affinity Suite of Products
So it seems that when you install assets, brushes, etc, they get lumped in to a single .propcol file in the relevant product appdata folder. So the location of the original download. This means you essentially are taking up twice the hard drive space. One for the download and once for the installation (assuming they are things you first downloaded to install). It gets worse if you have more than one product installed though, because they do not share an install. So if you have a download that can be used in all three programs then you have your original download, plus three separate installs of this in to each program, taking up four (ish) times the space on your hard drive. I can't help but feel that there must be a more efficient way of managing this, even if it was just enabling all three programs to use a common install, especially given a lot is made of the compatibility between them, and the common file format. Whilst not being able to specify a location is an issue if you have minimal space on your main/install drive, this really exacerbates the issue. I was made aware of this mostly because I noted that in each program when I went to the My Account panel, I had to download and install the same assets each time.