Martin S Taylor
-
Posts
54 -
Joined
-
Last visited
Everything posted by Martin S Taylor
-
Ah! Sorted! I needed to reboot both the scanner and the Mac and now it works. Thanks! MST
-
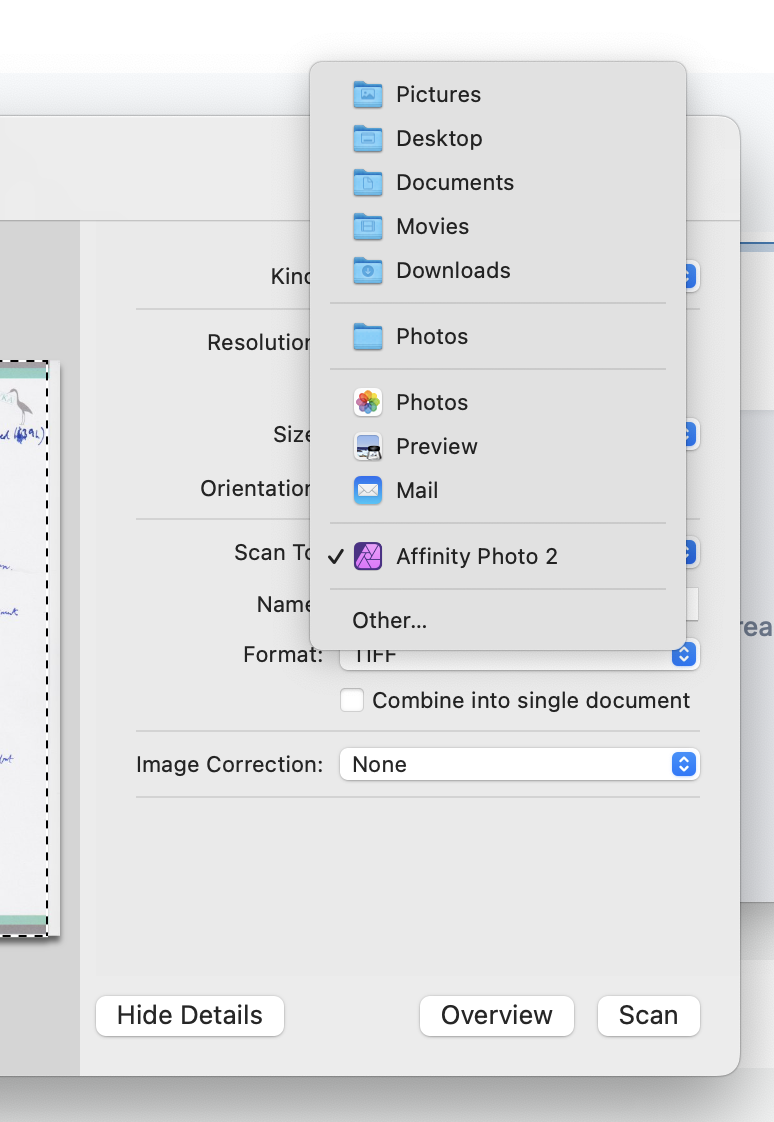
Either this is no longer working or I'm misunderstanding. When I do this, it puts the scanned file into the Package which is Affinity Photo 2. It does what you say when I scan it to Preview or Photos or other system apps. Could this be because Affinity Photo 2 has me as the owner, not 'system'? MST

-
It depends on your definition of 'soon'. Affinity have been aware of this bug for nigh on four years now, so don't hold your breath.
-
I'd just like better documentation. I had no idea what a 'Signature' was in this context until I had to research it. I have a document comprising five A5 pages, and I want to print the first four pages on a single sheet of A4 – pages 4 and 1 on one side, and pages 2 and 3 on the other. Surely not a ridiculous request? Yet selecting the 'Booklet' option prints all the pages, with half of each sheet blank in a way I can't understand. Fortunately for me the 'Book' option does what I need, but still – some kind of explanation in the documentation would be helpful, no?
-
Seems sorted now, as you've said. Many thanks. Martin
-
I didn't say that reducing the max memory had resolved the issue, only that it had improved it. I'm still coming to my Mac first thing in the morning and finding that all the Affinity programs have crashed in the background. Martin
-
I tried setting the RAM Usage Limit to 16384 MB, and things were much improved. I've gone over a week without any Affinity programs crashing. This morning, though, I turned on my computer to the familiar report of Publisher having crashed, but in addition there was a system message to say that I'd run out of application memory (screenshot attached). I'm not using anything that chews up ridiculous amounts of memory, and there's 64 GB on the machine, so I'm starting to suspect a memory leak somewhere. Martin
-
The Performance Pane looks like this. Is there any more I need to do? Martin
-
Turned off Metal, but both Publisher and Designer had crashed when I came to my computer this morning. Martin
-
As promised, I'm reporting that Affinity Publisher crashed again today. I wasn't even there! I left the machine to go to sleep on its own, and when I woke it up this evening there was the crash report. I've now turned off Metal, as MikeTO recommended and we'll see what happens. If it still crashes I'll try downgrading to 2.4.0 Martin
-
I do have Metal on, so perhaps that's the problem. I doubt that it's our settings of Affinity, as these crashes affect all the Affinity programs - Photo, Designer and Publisher. I also wondered if some background programs I run could be causing the problem, so I've disabled them. If this makes no difference I'll turn off Metal and see how that goes. I'll report back, in either case. Martin
-
(Following the reply from Dan C, I'm starting a new thread, as requested.) As per the title, all three Affinity products (Photo, Designer and Publisher) crash at random times, usually when I'm not using them, and often when these apps have no windows open. I would say on average I get about one crash a day. As Dan C recommended, I reset Affinity back to default settings, but the problems are persisting. Latest crash report attached. Martin MacBook Pro M1 Max. MacOS 14.4.1 Affinity versions 2.4.2 Affinity Publisher2 crash report.txt
-
Thanks. I've done what you suggest, and we'll see what happens. Martin
-
As per the title, all three Affinity products (Photo, Designer and Publisher) all crash at random times, usually when I'm not using them, and often when these apps have no windows open. I would say on average I get about one crash a day. Crash report attached. Martin MacBook Pro M1 Max. MacOS 14.4.1 Affinity versions 2.4.2 Affinity Crash Report.txt
-
My vote for restoring separated mode, too. Please can we have it back? MST
-
Is there any reason why Designer won't allow you to add a border to a text frame? It seems to be a curious omission. Martin
-
Ordinals in Garamond Pro
Martin S Taylor replied to Martin S Taylor's topic in V2 Bugs found on macOS
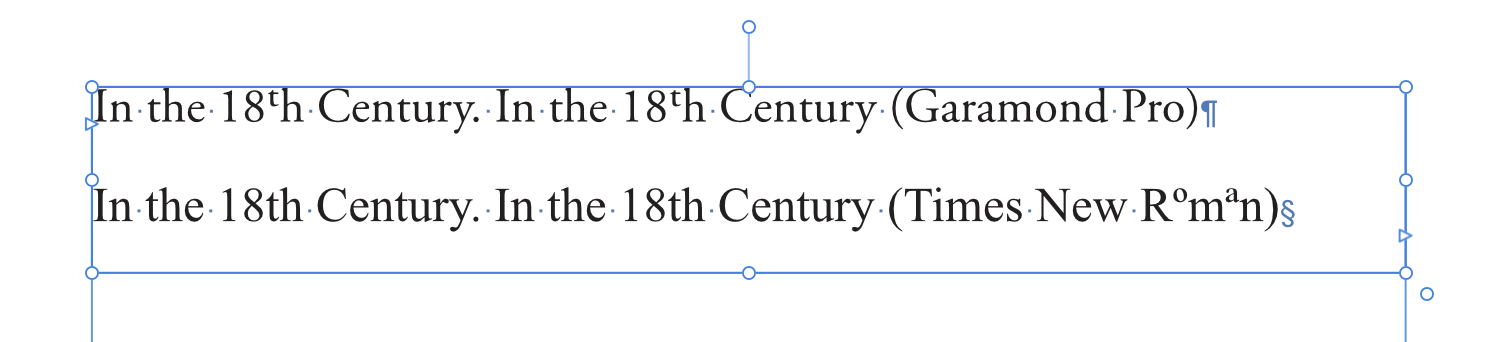
Aha! Thank you. It was the option "Superscript ordinals as they are typed" which confused me. It seems that this option forces faux-superscripts in appropriate places. Thus when I type "18th", it uses the faux-superscript 'th'. But If I select the option under typography, I get weird results because Garamond has a 'proper' superscript 't' but not a superscript 'h'. Martin -
I'm having trouble getting Ordinals to work properly. In my chosen font (Garamond Pro) , if I type a phrase like "19th Century", the t of '19th' appears as superscript, but the h doesn't. In Times New Roman the superscript goes very weird, as you can see from the screenshot. For what it's worth, "Superscript ordinals as they are typed" (in Settings) is switched off, but "Ordinals" (in the Character Palette), is on. Martin S Taylor Sonoma 14.0; Publisher 2.2.0
-
My point exactly. Better still, if Next Style is set to '[Same Style]', then don't strip the character style or local attributes. But if Next Style is set to the name of the paragraph style itself (not currently an option) then do strip them. MST
-
That's the problem. The style I'm working in is called 'Listings'. If I could set Next Style to be 'Listings', this would probably work, but I can't do that – 'Listings' isn't there as an option. All I can choose is '[Same Style]', and this doesn't strip out local formatting, as I've explained. MST
-
Yes, you're right and your workaround is good. I'm just a little surprised there isn't a way to start the new paragraph and automatically begin with a fresh text style, as it were, with no local formatting. MST
-
MacOS 13.2.1 and Publisher 1.10.6 Martin
-
I have a Text Style (called 'Listings') set up exactly how I want it. The text is in Garamond Regular (ie. not italic). However, I need the last few words of each paragraph to appear in italics. Easy to do, either with a Character Style or a local Italic override. But now I hit <Return> to start a new paragraph and the text continues to appear in italics. I'd like all that local italicising to be cancelled, so that the new paragraph begins, automatically, with the text style 'Listings', exactly as I've defined it – without italics. It's easy enough to cancel the italics manually. Or there's a stupid workaround, where I can define two identical text styles, 'Listings' and 'Listings 2', each of which is followed by the other. But this is a bit daft. Am I missing something here? Is there no way to clear local formatting automatically when I start a new paragraph in the same Paragraph Style? Martin
-
CURIOUS PRICING
Martin S Taylor replied to E9B6's topic in Customer Service, Accounts and Purchasing
Don't feed the troll. I'm off this thread. -
CURIOUS PRICING
Martin S Taylor replied to E9B6's topic in Customer Service, Accounts and Purchasing
Seems straightforward enough to me: if you buy in Jersey, the price is £89.99; if you buy in mainland UK, the price is £74.99 + VAT. Serif can charge what they like in different countries. If you prefer your extra £15 to go to Serif, buy it in Jersey; if you prefer the £15 to go to His Majesty's Revenue and Customs, buy in the mainland. Martin