fiëé
-
Posts
32 -
Joined
-
Last visited
Everything posted by fiëé
-

Support Colour Fonts
fiëé replied to prochurchmedia's topic in Feedback for Affinity Publisher V1 on Desktop
Did you maybe read about it on SAFEnet? Their CLI had a `cat` command that got extended by `dog` for sniffing metadata etc. Otherwise, color fonts are nice, and it’s a pity they don’t completely work in Affinity, but I can understand if they’re not a big priority. Some only show up in black, with “Liebe Heide”, the apps even crash. -
Another remark on this topic: Don’t use .afphoto pictures, they’ll never render as grayscale, even if their document mode is. Color management is difficult, but with Affinity apps it’s impossible.
-
A technical solution would be if we could assign color spaces to swatches, i.e.: Do I want a device independent (profiled) color or a device dependent (unprofiled, CMYK or RGB “numbers“) color? In my latest project I wanted a lot of elements to be 100% cyan, regardless of output intent or other profile. I’m still hoping that it did work, keeping everything in ISO Coated profile. If the printshop would convert to a different CMYK profile (like SWOP or ISO Uncoated), they would convert my Cyan to some CMYK value, so that everything gets rasterized. On the other hand, I’d like to keep the “look” of RGB graphics. *And* I’d like to be able to convert RGB black to 100% K. The current state of greyscale pictures (even from AP) is that they are always handled as DeviceGray, i.e. device dependent color space, and get rasterized in CMYK instead of just K! (At least that is what Acrobat’s separation preview shows; I hope the printshop will do better.)
-
Thank you, I thought there was a good Mac installer around, but didn’t remember where. As a known name in the TeX community I’m sure we can trust Richard Koch. (I still prefer the command line way, since I use a lot of “ports” anyway and can update all of them automatically.)
-
Yes it is. A workaround for a deficiency of all Affinity products. Doesn’t make sense to complain about that in this thread, there are several others on the subject.
-
Footnotes/Endnotes
fiëé replied to garrettm30's topic in Feedback for Affinity Publisher V1 on Desktop
In LaTeX they are, but with the coffins package you can get creative. In ConTeXt tables are mostly fun, see “natural tables”. OT, EOT -
Footnotes/Endnotes
fiëé replied to garrettm30's topic in Feedback for Affinity Publisher V1 on Desktop
I’m not completely serious, you know. But I like to remind people that there are alternatives. (Of course you can also try Scribus – I don’t like it.) I’m here because I need a layout program for, well, layouts that are too “visual” for TeX. But every time I did a book in QXP or ID and it needed “scientific“ stuff like footnotes or indexes I longed for TeX, because that’s where it excels. It’s no fun to do image placement in TeX. -
Footnotes/Endnotes
fiëé replied to garrettm30's topic in Feedback for Affinity Publisher V1 on Desktop
TeX! (LaTeX or ConTeXt, the latter is easier for people thinking in layout terms.) It’s free, but has a steep learning curve. I’m typesetting most of my books (science/humanities, fiction, architecture, children’s, proceedings) with it since 20 years. -
If you want to reduce the quality of your data, then you’re free to render to a fixed resolution. It’s better to keep vectors as such, then the output device will use its maximum resolution. GIF is nonsense anyway, it’s an outdated, RGB device dependend color palet format. Good enough for the web, but not for print. If you want to render, then at least use PNG. Inkscape also needs the fonts installed, you gain nothing in comparison to AD. (In my limited experience, AD interprets PDFs better than Inkscape.)
-
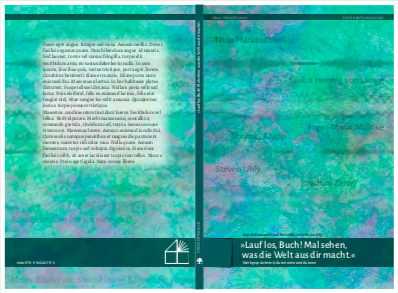
Thanks for listening We can close the case now. My first book cover in AD is completed! Now I’m just waiting for the blurb and text corrections.
-
No, that’s not the problem. Of course I tried different PDF options. At least PDF/X-4 is able to handle transparency. Back and front cover have the same layers with mostly the same settings (the background group of the back layer has reduced opacity). If I export single artboards, all is well, even in “simpler” PDF versions. The background uses two images (a yellow structure and a mostly turquoise structure that is set to “hue”), both are bigger than the page. It looks like one image from the back overlays spine and front up to the visible line, while probably the other image from the front overlays the back, i.e. the artboards interfere in exporting the combined slice. EDIT: If I properly crop those images, it gets better. I didn’t previously because I couldn’t see the overlapping parts. After cropping the background images, the export shows all the other elements that exceed the page. I hoped the artboards would take care of that. Ok, cleaned up: The artboards still add additional bleed. Need to experiment if I can find a way to avoid that...

-
You can’t avoid getting your hands dirty on the command line (Terminal.app). You can read on the websites of HomeBrew and MacPorts how to install them. Which one you use is a matter of taste, please don’t anyone start a flame war! I’m used to MacPorts; HomeBrew users please help with that. You need Apple’s development environment Xcode, you can install it via AppStore (or make a free account on developer.apple.com and download it there, as MacPorts suggests). You’ll never start that app yourself, but it contains the necessary compilers etc. that let Ports or Brew build programs from sources. Xcode is a huge download, after it’s completed you can install the necessary command line programs and confirm the license. Open Terminal.app and type/copy these lines into its window (don’t forget to hit Return after each line): xcode-select --install xcodebuild -license Then you download the pkg/dmg for your macOS version from https://www.macports.org/install.php and install it. This installs the basics for using MacPorts, but no programs that you can use. First update the list of ports (packages), again in Terminal: sudo port -v selfupdate (You should run that every month or so if you want to stay up to date.) “sudo” means “superuser do“, i.e. “execute as administrator”, you need to enter your account password to proceed. (And it means the whole thing won’t work if you don’t have an admin account, e.g. in a company, then whine at your admin until they yield and install that stuff for you.) If that worked, you’re set to finally install what you wanted: sudo ports install ghostscript This will download the sources, compile them and install ghostscript in /opt/local/bin/. To check that, call which gs That should answer with “/opt/local/bin/gs”. If it doesn’t, close your Terminal window, open a new one and try again. Still doesn’t work? Then you can call gs with the full path (i.e. “/opt/local/bin/gs”) or add the path to your PATH variable (that determines where bash, that’s the “shell” running in Terminal, looks for commands/programs): echo "export PATH=/opt/local/bin:$PATH" >> ~/.bash_profile A lot of hassle for a single program, but MacPorts as well as HomeBrew offer a lot of tools and fun stuff, mostly ported from Linux or *BSD, that you might like. That’s a tad off topic here... It’s probably easier to enter “ghostscript macos download” into your favourite search engine and choose one of the sites that offer free downloads. I don’t know which you can or should trust.
-
Ah, finally got it – you need to use the export button in the slices panel, not the general export (menu entry). And with selecting you meant the checkboxes, not the highlighting of active slices. But the result is still not what I wanted/expected: Some layers and their transparency settings get mixed up. Is this a bug or to be expected?
-
Ah, thank you! I didn’t really look for it. (In TeX I use it often while in layout programs I can mostly use just another frame to put something at the bottom.)
-
Find frames with overflowing text
fiëé replied to John Fleet's topic in Feedback for Affinity Publisher V1 on Desktop
The only text on my master page is a page number, and its frame is big enough. Might try the beta, thanks for the hint. -
Thanks for the hint about tabs “from right” – I’d never expected or looked for that. It’s a good idea and good enough if you don’t need other tabstops in the paragraph text style: You can’t keep that bit of text that you need right aligned from breaking, e.g. I often use the horizontal wedge (that’s the technical term, at least in German) for authors or photographers, and if there are other tabstops and the author names are too long, I can’t keep them in line. In TeX I’d use \hfill\hbox{Some long name}... BTW is there a vertical wedge to spread paragraphs in a frame or push the last one to the bottom? In InDesign it’s a property of the text frame, and in TeX it’s \vfill.
-
I found the hint to use a slice in the export persona and tried it, i.e. created a slice that spans all three artboards – but AD exports only the leftmost artboard, regardless of selection etc.
-
APub production ready?
fiëé replied to dasigna's topic in Feedback for Affinity Publisher V1 on Desktop
@dasigna: I agree, run into exactly the same issues. Didn’t recognize the color profile problem yet, though, since “my” ads weren’t properly profiled anyway so far. Not looking forward to the first customer with spot colors. You can workaround the fonts issue if you convert them into curves, see @Fixx WRT PDF placement: TeX does it (at least since dvipdfx or pdfTeX) , and that’s mostly public domain. Maybe these parts are under GPL, don’t know. Of course the workflow is so different, that there’s probably no code that Serif could use. Probably there are licensable parts of GhostScript or one of the PDF libraries (e.g. PDFlib). -
Find frames with overflowing text
fiëé replied to John Fleet's topic in Feedback for Affinity Publisher V1 on Desktop
Thanks for the hint about the text flow option, but in my document there is nothing red, while I get the warning about overflowing text at each export, as @rah1861. -
About what are we talking here? Automating single tasks from within the application? Remote controlling the application(s), possibly headless (i.e. in server mode)? The first doesn’t necessarily include the second, and it might be a political/commercial decision to not allow remote access. (Like i.e. Adobe made it hard to remote control their applications because they wanted to sell their server products. Wrote a Python remote control for Distiller on Windows over COM once; I guess it’s illegal.) In most “controllable” GUI programs that I know, automation is quite limited or stuck to a limited range, because scripting was never an important development goal. I doubt most of you JavaScript enthusiasts ever worked with JavaScript without a DOM and a basic library of functions, like in Acrobat. It’s a developer’s nightmare. So “JavaScript” doesn’t really mean anything, it depends a lot on the environment – similar to working with big libraries like .NET or Qt, you need more time (and documentation!) for learning the DOM and the library than for the language. Good documentation is key, and I don’t think we’re paying Serif enough to provide that – for only a few users, mind you. AppleScript has (had?) these nice introspection tools, but if nobody put an effort in the application library’s metadata, you can just guess which parts are usable at all and how. I left AppleScript behind decades ago mostly because it couldn’t do what I needed. Or I was too stupid to convert C data types in AppleScript... I did projects in BASIC, Turbo Pascal, Perl, AppleScript, PHP, VB.NET, Delphi, Shell, and Python, with parts in JavaScript, PostScript, XSL, Lua and several markups. I prefer Python, and Lua is good as an integrated scripting language. I just don’t trust PHP or any JavaScript variety from outdated experience (Unicode!?). (If I’d be intelligent enough maybe I’d prefer Lisp or Haskell...) Let’s be serious: In applications like the Affinity series, only a minority will use scripting at all. We’re already getting a lot for our money, and if Serif will offer any scripting, it’s nice. JavaScript is the most probable choice, and we can just hope to get an usable DOM and some documentation (that doesn’t contradict the implementation, like we know from Adobe and others). If I need something automatical, I’ll probably continue to use LuaTeX.
-
Footnotes/Endnotes
fiëé replied to garrettm30's topic in Feedback for Affinity Publisher V1 on Desktop
No, please don’t implement footnotes etc. – it would ruin my advantage as a TeX user. -
I’m using three artboards for a book cover. While it’s nice to get back, spine and front exported as pages in a PDF, I’d like to have the option to export all artboards together as one PDF page, similar to the pixel format exports. Or did I overlook some option? Additionally, the artboards don’t use the bleed options of the document but their own, and I couldn’t find how to change this. With or without artboards I’d like to be able to switch visibility of the bleed area (similar to InDesign) – usually I want to see “everything” and page borders and bleed area just as rules, and then preview only the page contents.
-
Workaround for the PDF fonts problem:
-
Workaround: Convert fonts into curves. See
-
(This subforum is not really the right place for this, but I’d like to have it found where people might look for it.) As most of you are aware, the Affinity apps can’t handle included fonts in PDFs, they always try to parse the PDF and do a good job about that, except they can’t use the embedded fonts but try to replace them with fonts installed/active on your system. Often you don’t have these fonts and must not replace them, e.g. if you get ads from a customer. There’s no possibility (yet) to “just place” a PDF as an image. You could rasterize the PDF into a high resolution bitmap – but not with one of the Affinity apps, and if you wanted to use Photoshop, you wouldn’t use Affinity... The best solution is to convert the text in curves. You can do that with Acrobat Pro, but I am here to avoid “Clay” apps. It’s easy with GhostScript on the command line: gs -dNoOutputFonts -sDEVICE=pdfwrite -o Myfile_nofonts.pdf Myfile.pdf Or to convert all files in a folder: for PDF in *.pdf; do gs -dNoOutputFonts -sDEVICE=pdfwrite -o "${PDF/.pdf/_nofonts.pdf}" "$PDF"; done You must first change into that folder, of course. And have GhostScript installed; you can get it via HomeBrew or MacPorts (there are also binary packages around I guess). (EDIT: The quotes around $PDF are necessary if your file names contain spaces.)