

Ozymandias1972
-
Posts
31 -
Joined
-
Last visited
Posts posted by Ozymandias1972
-
-
On 1/5/2023 at 10:59 AM, NotMyFault said:
If you search the forum for „anamorphic“, you will find older posts and a feature request. You should add your vote there to increase chances.
Another topic to consider: PAR / Pixel Aspect Ratio. Some users would prefer PAR over (automated) transforming which may impact image quality (both unavailable as of V2.0.3)
Nevermind actually. I finally figured it out as I had to manually select the image, go to document resize and multiply 1.33 or 1.77 ( the latter for a bit more stretched out 2:1 appearance ) while unlocking aspect ratio. It works now. Thanks!
-
On 1/5/2023 at 10:59 AM, NotMyFault said:
If you search the forum for „anamorphic“, you will find older posts and a feature request. You should add your vote there to increase chances.
Another topic to consider: PAR / Pixel Aspect Ratio. Some users would prefer PAR over (automated) transforming which may impact image quality (both unavailable as of V2.0.3)
Just got around to this message. Are you stating that PAR isn't available on Affinity 2.0 but was on 1.0? Otherwise, I'll have to manually 'de-squeeze' the photograph. My question would be is do I click on the image layer or the canvas itself? It seems that if you are going to change the ratio, then the document size or canvas has to change to?
Just wondering. -
7 hours ago, NotMyFault said:
Normally the factor *1.33 is placed in the „width“ field of the transform panel. And of course you need to unlock the aspect ratio (chain symbol).
https://affinity.help/photo2/en-US.lproj/pages/Workspace/expressions.html
Okay. It looks like I do have the click/select on the layer of the image itself to use the transform panel or document re-size. But the RAW anamorphic image looks stretched out originally and not de-squeezed via the Moment camera app ( JPEG and TIFF de-squeezes automatically so no need to manually do it ). When I import the RAW image, it always goes to the editor for 'processing' before using the full Affinity Photo workspace. You can't access the transform or re-size document during the processing phase and available AFTER you process the DNG/RAW images.
Also, if you transform or de-squeeze the image to proper anamorphic width and length, the canvas size is unaffected which means you have to change that as well or increase the canvas size for the de-squeezed image to fit in. And there's the little square icon with 9 or 10 pegs on it in the transform tool and I think you have to select where the transform should be at? At center? Upper left corner?
There needs to be a better way for Affinity to make it easier to do anamorphic processing for still photos or at least detect it. I'm surprised the Moment lens is not 'detected' by this app let alone other camera lens such as Nikon, Fuji, Apple, etc.
I'll see what I can do, though.
-
On 3/17/2022 at 3:33 AM, firstdefence said:
I'd say typing *1.33 is the easiest method to desqueeze an anamorphic image. There are variations of anamorphic lenses and in some cases *2 is required, it depends on the OP's Lens.
Wait. Do we have to add the multiply * symbol before the 1.33 value or after it in the X and Y fields or just one of them?
-
Okay, this thread does NOT make sense to me at all. There is a problem with the way the UI works on Affinity Photo v2 regarding anamorphic de-squeezing.
First off, I own a Moment Anamorphic lens for the iPhone 13 Pro and wanted to shoot ProRAW which works, BUT it's not de-squeezed. So I have to import it into Affinity Photo to do it manually. But when I import the DNG file, it goes into Raw editing mode automatically. The instructions in the above posts in this thread do NOT clearly answer the problem because it is 1.33x format. Every time I tried to multiply it on the Transform box, it does NOT look right.
When I shoot anamorphic in JPEG or TIFF format, it looks exactly how it's supposed to be de-squeezed, but it won't do it in RAW or ProRAW format. I do see Photo has a 16:9 : 1 crop option but that's NOT the solution which CROPS and does not 'transform'. Why does the transform tool NOT exist in the RAW editor but only in the main application?
-
On 5/22/2022 at 8:49 AM, AffinityAppMan said:
I need to check this out. Maybe moving to this free app instead of using Affinity Designer can solve a lot of issues. I haven’t seen many improvements on Affinity Designer in a while.
I think they will update Designer in the future as it already had a patch along with other apps. As for vector trace, I've never had a problem using Adobe Capture as a go-around to export an SVG to Designer on the Mac. The rest of Designer is fine but for vector trace, if I have to, is done on Adobe Capture which is a free app for iOS ( iPhone and iPad ). It works for me every time. Unless you're on Windows, then use Inkscape or other vector apps as a go around.
-
On 12/9/2021 at 3:03 PM, Sotalo said:
Any camera will introduce both lens distortion and perspective issues, not to mention if the paper isn't perfectly flat you won't be getting the same results as a perfect high-res scan from a scanner. If your designs work then they work, but this process is NOT ideal for everyone. Drawings that require perspective, faces, and shapes that would be more sensitive to distortions would benefit far greater from a proper scan. I'm selling prints of drawings from graphite and ink/pen with textural details: cell phones don't capture that level of detail as cleanly or accurately as what I need. And working 13x19 at 600dpi with many layers and a mix of vectors and bitmaps kind of rules out the option to work totally on mobile.
In a professional environment, everything that stands in the way of getting work done should be eliminated.
Sure, a flatbed scanner will do the job when you're in the office or home studio. However, mobile wise, if you want to scan, there's SwiftScan for the iPhone which I use a lot. Now, if you had a camera stand and a crane rod with the adapter to hold the phone while laying the artwork on the floor or table, you can use a bluetooth remote to take photos/scans that way. I have the stand/crane and it works. However, if you have a high end camera like a DSLR/mirrorless, that would do the job better than a smartphone.
However, working with this many layers on 600 dpi, then you definitely need to do that on the desktop or laptop. The iPad version of Affinity Designer works well but it depends on the available RAM and storage space to do the job. If you're doing 16 x 19, then the desktop with an external monitor will be much better of an experience so you can view everything at once, one with preview at the window fit size and the other full size in real time. That's how I do it. -
1 hour ago, Sotalo said:
I tried researching what export formats it supports, and nowhere on Adobe's page does it specify export to SVG. All it mentions is saving to libraries. Needless to say, the program is intended for cell phone cameras and taking the results to a separate program rather than performing a quality scan. Cameras introduce distortion and perspective, you need scans. And if the drawing is generated initially from a digital raster program, it doesn't make sense to spit out to a cell phone to get the job done. Adobe Capture's vectorizing is VERY quick and dirty, not professional in any sense of the word. There are other features in that app more worthwhile, like finding fonts on printed media. But if you want to vectorize a drawing in Adobe's suite, just scan it and use Illustrator. Personally, I just use Inkscape because it's free. But a single program that can do it all would be Godlike.
Adobe Capture can export to SVG once you save it to the library. Adobe Capture can access the camera or the photo album and once you select the vector image that's traced, you can export it as SVG, PDF, the image itself natively. I can take a drawing I did from my sketchbook, snap a clean photo, import it to Capture and then export it via AirDrop to my iMac as SVG. Or to Files on the iPad for any vector app to import. The reason I have Capture is because I had an Adobe ID which is free but dropped Creative Suite due to the ridiculous monthly subscription plan that makes no sense. I always use a dark background so that it scans in only the white paper and the black ink using the camera when I have to. There's nothing unprofessional about its results because it can be cleaned up during production ( as in using Designer ).
Also, when I do my artwork digitally on iPad such as Procreate, I can share it to Capture to be converted to SVG. In fact, Affinity Designer works on iPad so there's that, although I prefer the desktop version since it runs better and easier to deal with when using two monitors.And it's not limited to iPhone but works with iPad. Would it be nice if vector trace was in Affinity? Sure, but this is the best workaround I can find.
This is the post I made regarding Adobe Capture in detail:
And this one:
I eventually solved the problem after doing the shirt so now I know what to do.
Hope this clears it up. -
7 hours ago, KTDN said:
Don’t pay for any vector tracing apps. Despite not wanting to use Adobe being the primary reason I began using Affinity in the first place, the solution to all of this for now is very simple: get Adobe Capture. You can export shapes directly to Designer after saving to your Capture library, just hit the ellipsis menu on the image you want to export, chose SVG, and select Designer as the destination app. It’s the quickest, best vector tracing solution period. All you need is a creative cloud account. And if you really want to see Affinity add tracing to Designer get a Creative Cloud subscription and ditch Designer for Illustrator. Haha 😂🤣😂
Exactly! I've been using Adobe Capture for the last two years now as my 'go around' technique and this trick works every time. SVG will import to Designer or Publisher, although I recommend the former to be sure so as to save the template. I understand the frustration on the lack of vector trace for Designer and would've like it had they built it in, but for now Adobe Capture is free and does get the job done.
-
12 hours ago, v_kyr said:
"Image Vectorizer" (AFAIK it's only available via the Mac AppStore) is basically just an older Potrace GUI app from the Potrace author, it doesn't perform any color traces and thus only allows to set/assign manually a stroke and fill color to a trace.
The one you referenced instead is SuperVectorizer, which is one of the best tools for MacOS and much better than "ImageVectorizer". To get an idea of what common tracing/vectorizing tools are available see the following informations:
Some forum threads about bitmap tracing/vectorization:
- Image Tracing in Affinity Designer?
- Image Trace to Vector Path
- Converting Pixel drawing to Vector?
- Auto Trace In AFFINITY DESIGNER
- Best Image Vectorizer for Mac with Affinity Designer
- ... and so on ...
Vectorization and autotracing software for Win + Macs:
- Super Vectorizer 2 (commercial, Mac)
- TracedLines (commercial, Mac)
- Intaglio Vectorize (free to use, Mac)
- DragPotrace (Mac) + Potrace (free, Win + Mac)
- Potrace (free, Win + Mac)
- AutoTrace (free, Win+Mac)
- Inkscape (free, Win + Mac)
- MS Expression Design 4 (win, nowadays free)
- Image Vectorizer (commercial, mac)
- Vector Magic (commercial, win + mac)
Online tracing tools:
- autotracer
- vectorizer
- vectorization
- Vectorize Raster Images Online (online Photopea, free)
- ...etc...
Online centerline supporting tracing tools:
- Rapid resizer
- fConvert
- Online Vectorizer
- ...etc...
Actually, I found that using Adobe Capture has been the best solution in my workflow using AirDrop which works wonders. I recently updated to Big Sur with a new 2019 iMac I got a year ago using Affinity Designer and it's been very good. Especially given the fact that with AirDrop's ease of use, I used to go with Dropbox as a go around which was a pain in the neck. This was a thread I posted a year ago about this issue:
I hope this may help although SuperVectorizer looks great as an alternative.
-
9 minutes ago, PaulEC said:
That's probably just as easy.
I set the crop tool to a ratio of 16:9 then pulled a top corner to one side of the image, then the opposite one at the bottom to the other side (that makes the top and bottom bars equal). After cropping you get a transparent area at the top and bottom of the image, so I then applied a black matte. (Much faster to do than to describe!)
Excellent! That's actually a good approach and I'll give a try. Thanks!
-
15 minutes ago, PaulEC said:
I'm probably missing the point, but the only reason you normally have a black area above and below the image is that you are looking at the image on a screen that has a different ratio.
Actually your pics are wider than 16:9. Here's your pic with black bars above and below, which makes the whole image 16:9 ratio. Is this what you're aiming to do?

You're right. My bad, it's larger than 16:9 as I was thinking of a different ratio. But yes, this is exactly what I was talking about with the black bars. It looks like you created a black background layer with a snap to grid option? I suppose I could create a template or preset document to use letterboxes for future use.
-
19 minutes ago, Dan C said:
HI @Ozymandias1972,
My sincerest apologies for the delayed response here.
I've not personally taken or used any anamorphic images previously, could you please provide a sample image from your shoot so I can provide some personalised support?
Many thanks in advance
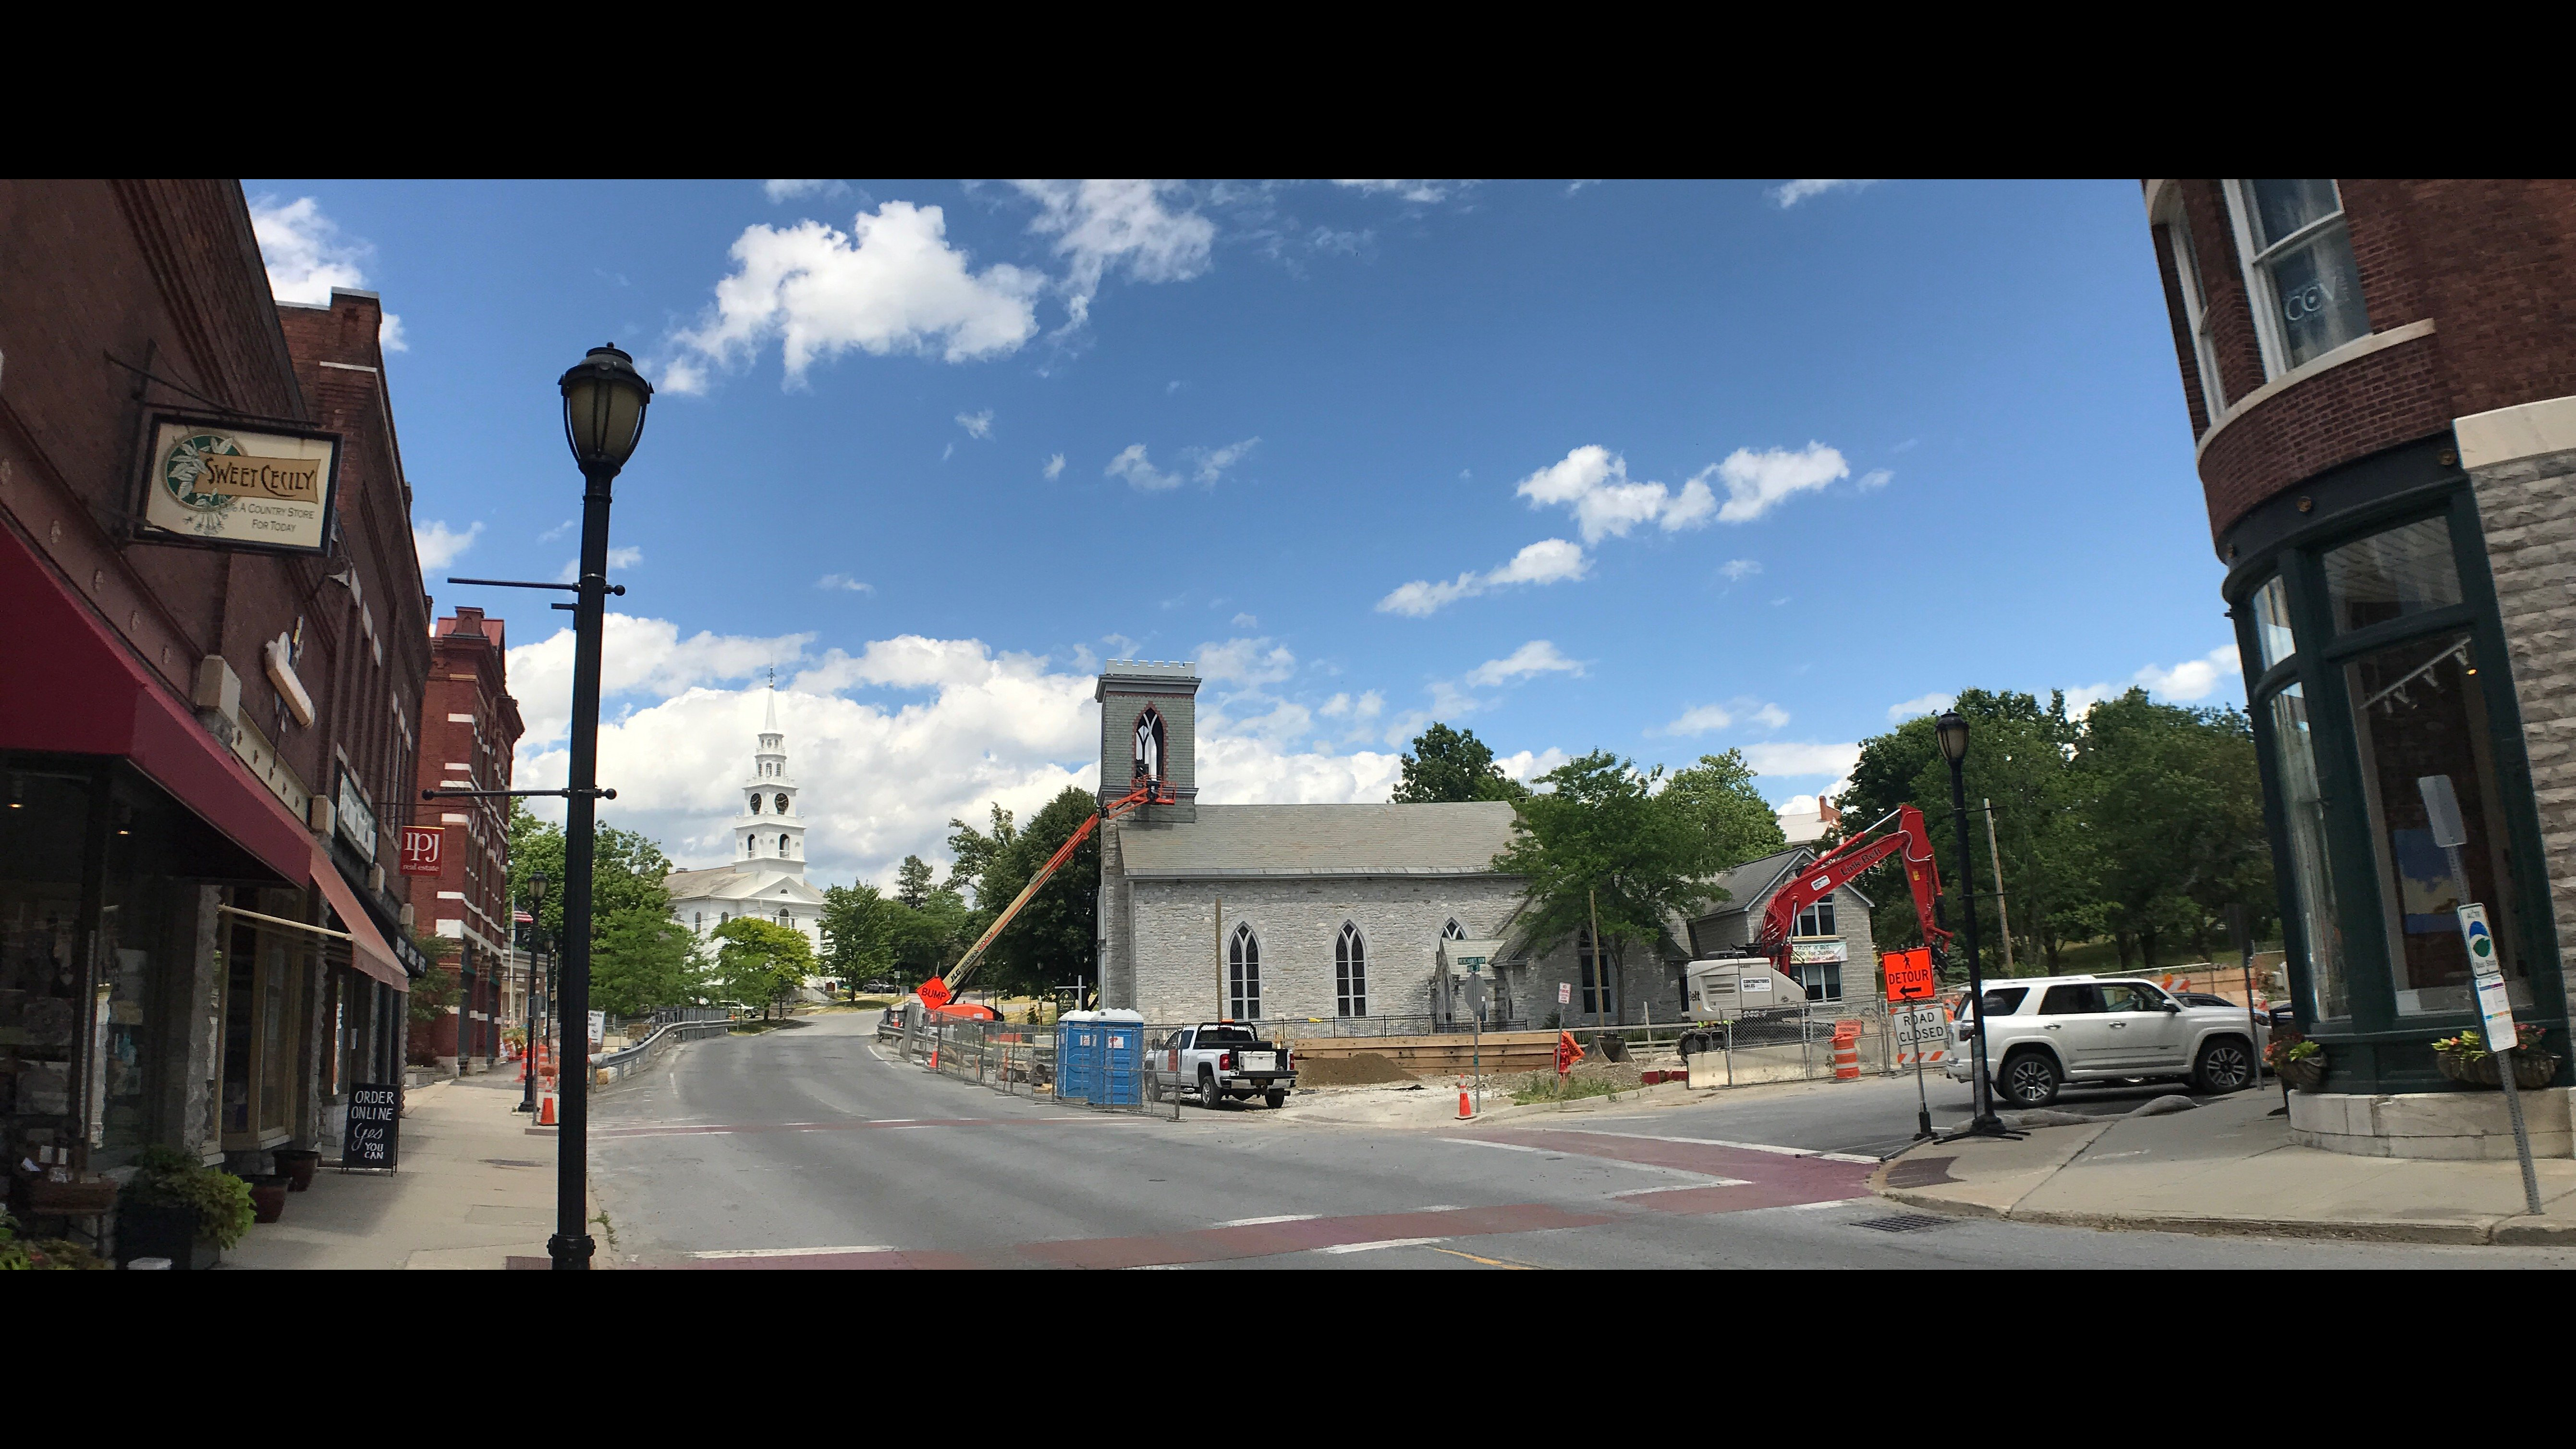
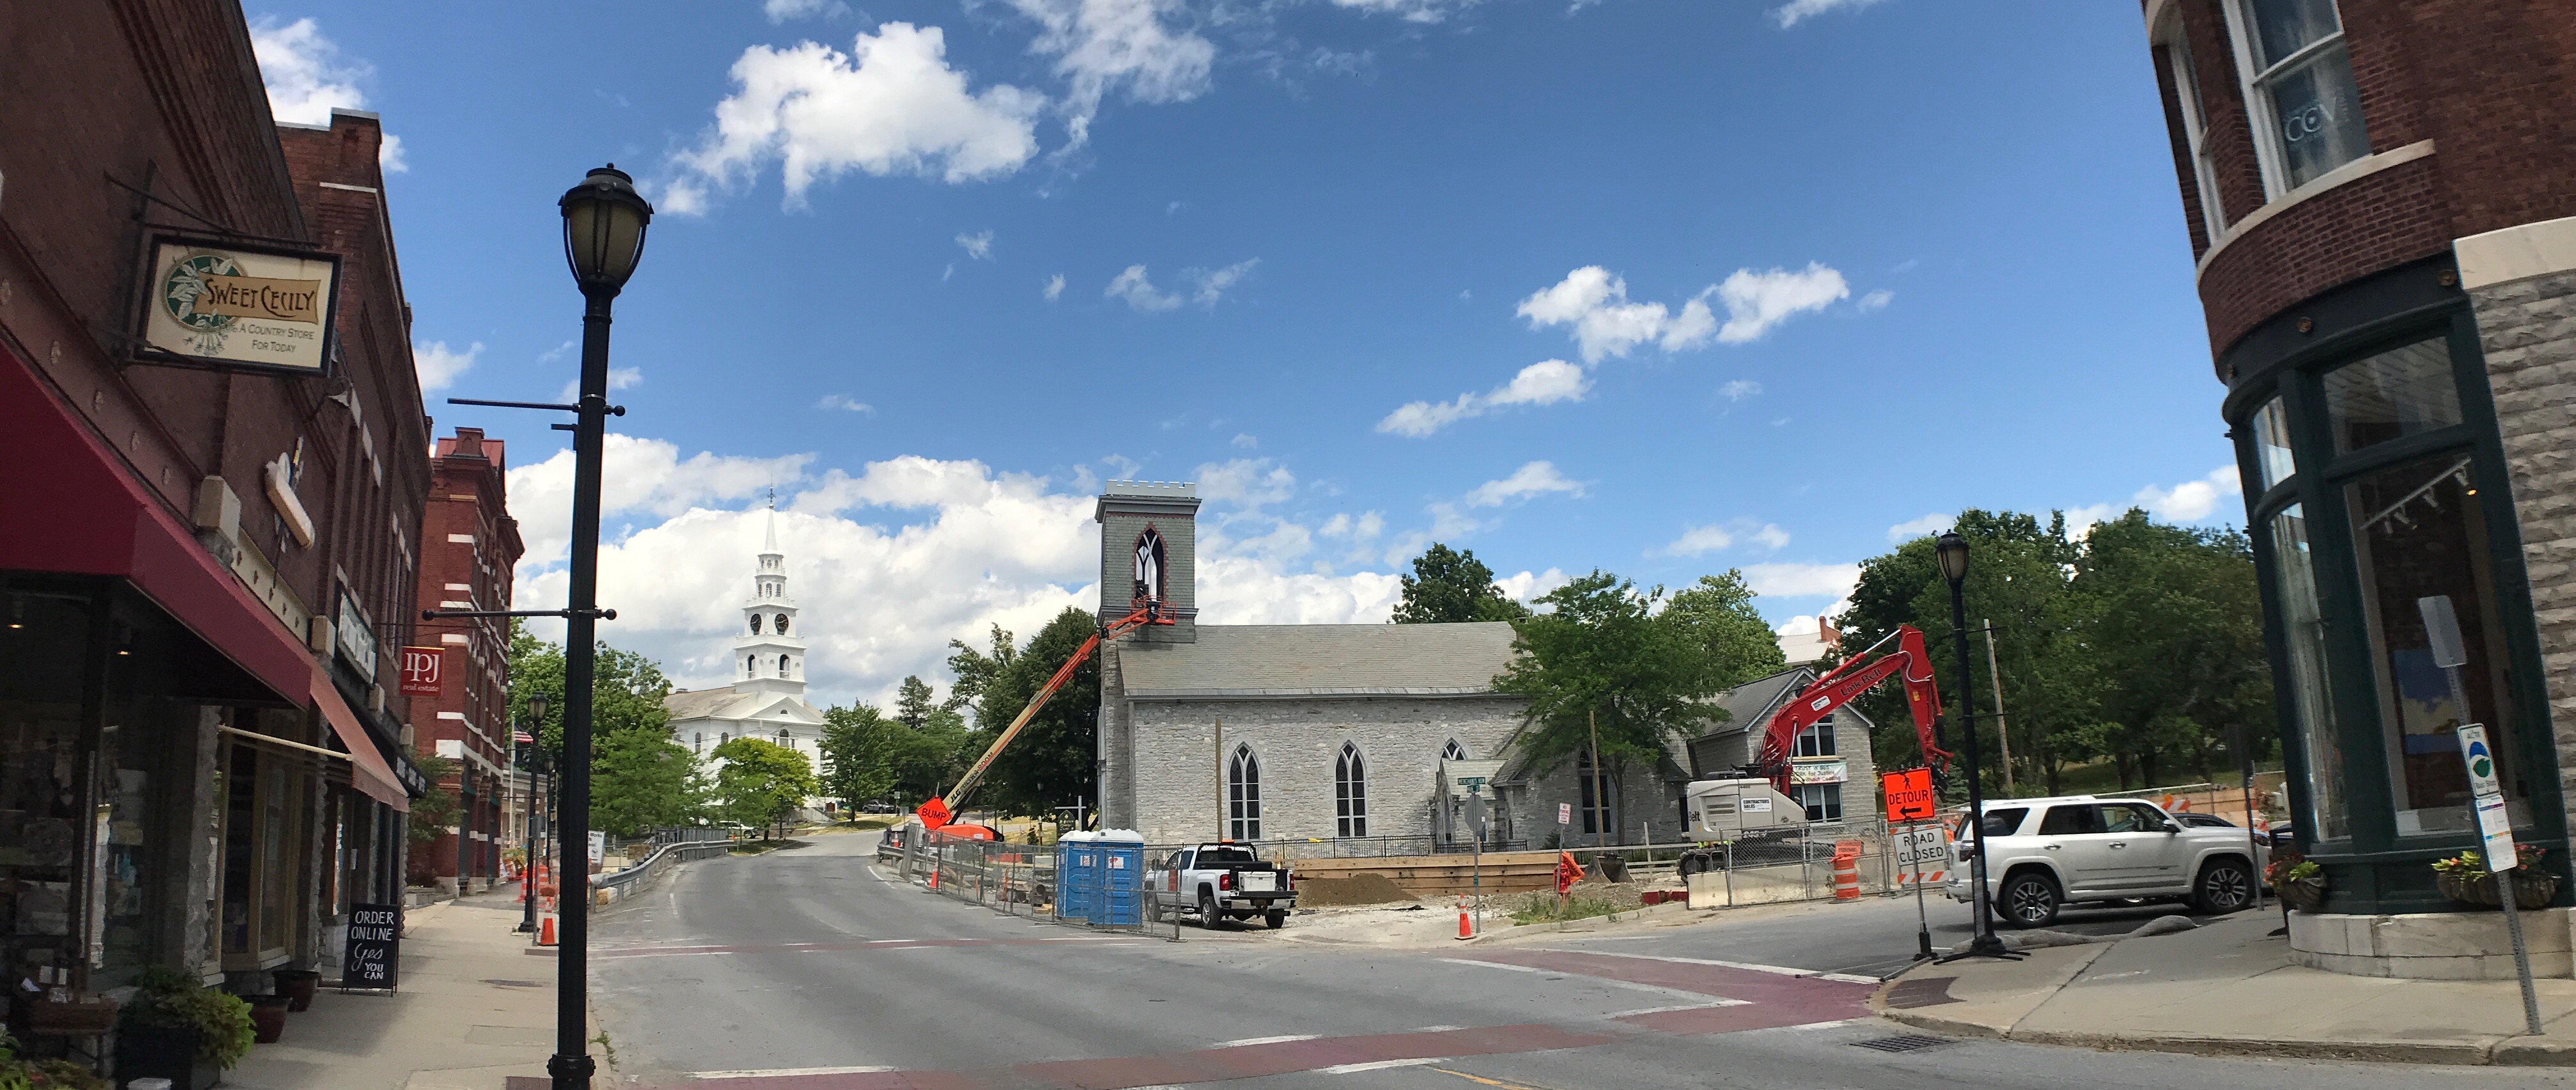
Sure. I'll give you two samples of recent shoots in my town in the New England region. The first shows my downtown area and the other is the trees with lens flare coming from the sun using the Moment anamorphic lens. Each appears to have a 16:9 ratio. What I'm trying to figure out is how to add letterboxes at the top and bottom for a 'cinematic' effect via Affinity Photo. Each image is 5363 x 2270 pixels at 72dpi.
With video, it's easy for me to desqueeze using a specific app and then import to Da Vinci Resolve to be exported properly after editing. But an anamorphic photo is a different situation so I wasn't sure if one is supposed to add letterboxes or just simply create a black background layer and put the image on top of it which is probably the only way to do it. When previewing the photos or video on iPhone, letterboxes are already shown when anamorphic is shot but once it's Airdropped to the Mac, you don't see them unless they are processed through an image or video editing app.
Thanks!
-
2 hours ago, Lee D said:
Was this effecting all of the default vector brushes within the Draw persona or one that has been added, can you let me know which so I can test?
If I recall, it was the default vector brushes, not the Vector Pencil. Basically, I would tap on the Vector brush tool and some times the lag occurs even with the basic strokes. Even the other brushes with inking and other texture effects would cause lag or glitch. I don't see any issues on the desktop version but only on my original 12.9 iPad Pro. When I draw with vector brushes, it needs to feel smooth and consistent. Even if I used the stabilizer, some of the lag can be noticeable.
Sometimes the Vector brush would work fine at first and then lag after several strokes later. It should be smooth, clean, lightweight and fast considering it's a vector path despite working on 300 DPI for print purposes. It's especially true when the ends of my stroke lines have a wispy look to it as if using a #2 brush for comics. Based on my experience, Clip Studio Paint utilizing a vector layer, Adobe Fresco ( vector brush mode ), and/or Procreate do a nice job with the stroke lines. Sometimes if the Affinity vector brush lags or fails me, I often find myself having to switch to Adobe Fresco to use the vector brush or Procreate on my iPad for consistency and then export it out as SVG via Adobe Capture to Affinity Designer to tweak.
As an additional note, I do NOT have any custom brushes imported to Affinity Designer on iOS. At the moment, I'm using an older Wacom Intuos 4 which makes it more difficult to draw consistently since it doesn't have a multi-touch feature so I plan on getting a display tablet later on for the desktop.
-
Hello,
I just got Moment's anamorphic lens for my iPhone and it does a nice job of creating that aspect while shooting film or photo especially with flares, although I plan to buy a filter to balance out the sun's intense overexposure to light. However, I'm curious how I can achieve this 'letterbox' effect by importing this 16:9 aspect ratio to Affinity Photo and exporting it out properly with two black bars on top and bottom? One can preview it on the phone by viewing the gallery but once you share it, it only shows 16:9 but without the letterbox.
I'm curious if any photographers here have shot 16:9 anamorphic photos and found a way to import/export them?
Thanks! -
Hello all,
I'm on the latest version of Affinity Designer for iPad Pro ( 1st gen model ) 12.9 inches and still keep seeing vector brushes lagging. Sometimes it works smoothly and sometimes it doesn't. I was working on a 300 dpi file at 11 x 17 so I don't know if it's related to the project size or if the vector brushes are glitching. Has there been a fix for this issue? Otherwise, the desktop version works flawlessly compared to iOS. It's ironic because vector brushes on another program works very well without any lag when I want consistent path lines.
Thanks!
-
16 minutes ago, HuniSenpai said:
Let's be honest, they're probably saving auto trace, shapebuilder, and line weight tool for version 2. The guys at Serif have proved that they are excellent software developers capable of solving problems and implementing new features relatively quickly. These are the main things keeping Designer from being a near perfect software.
If they give us these features now, what else is there to entice us to upgrade to version 2 when it rolls around? The performance is basically perfect, all other tools are there, and it already beats Adobe Illustrator in a few ways. They already have programmed these features in the past with DrawPlus X8, so they certainly have the skills necessary to program them again.
I do not blame them for putting off these features. I sometimes grow a little worried about Affinity's business model, and if they are going to stay afloat. With such a low price and free updates, it amazes me that they can pay all of these fantastic developers. Some time along the line, they will have to raise their price and get people to buy their products again. And, if version 2 has these features, I will gladly pay $75-$100 for it, especially if it means keeping Serif afloat.
Additionally, I feel confident that they will make my $75-100 well spent. I have no doubt that they will make the auto trace and shapebuilder etc. as good as they can possibly be. Frankly, if I had the money, I would be donating to Serif. Adobe needs competition.
No doubt about that. I'm sure they've been considering it and hope that it'll happen. It wouldn't surprise me if they roll it out for version 2.0 as they've done a fantastic job with the three apps. Serif deserves to be supported and continue the good work.
-
2 hours ago, Last Chance said:
I'll also add my vote for Autotrace. I do use CorelDraw but felt that supporting the Affinity team with their excellent 50% off was necessary.
I'm glad they did the 50% discount because this made it easier for me to purchase Photo to complete the suite I've been building up to transition out of Creative Cloud.
-
18 hours ago, Christian Southgate said:
Another vote for auto-trace. I regularly need to convert the edges of bitmap artwork to vectors for use in cutting machines etc., I was using Inkscape, but I really hate it. I bought Affinity Designer in the sale recently, and gleefully uninstalled Inkscape, never to use it again. When I couldn't find the trace feature in Designer, I searched and found this thread. I am now in the process of re-installing Inkscape. Please Serif, add bitmap curve tracing, and save us from Inkscape hell!
I can understand the frustration and experienced a similar thing. However, there is a workaround and in my case scenario, I used Adobe Capture app for iOS ( on iPhone or iPad ) that you can import an image or take photos of to convert black and white images to SVG format. Export or Airdrop it back into the desktop or open the SVG export on iPad ( Designer app ) from Adobe Capture. Then save the SVG file as the new native Designer format. Just make sure the paths are visible so you can confirm the vector is converted properly. It's not perfect but it works pretty well.
-
UPDATE: After some experimenting, I think I figured it out! I copied the original affinity file with paths and pasted it in the shirt file and the outlines can be seen. No wonder the embedded approach with 'Placing' an image didn't work out. The more I learn my way around Designer, the better it gets. I realized that double-clicking on an embedded image takes you to the 'embedded' window, not directly on a pasted vector image.
Now, I'm hoping that 'cropping' the vector image will solve the knock out on each sides and allow the screen printer to print the file with SVG which he said worked well.
-
Hello,
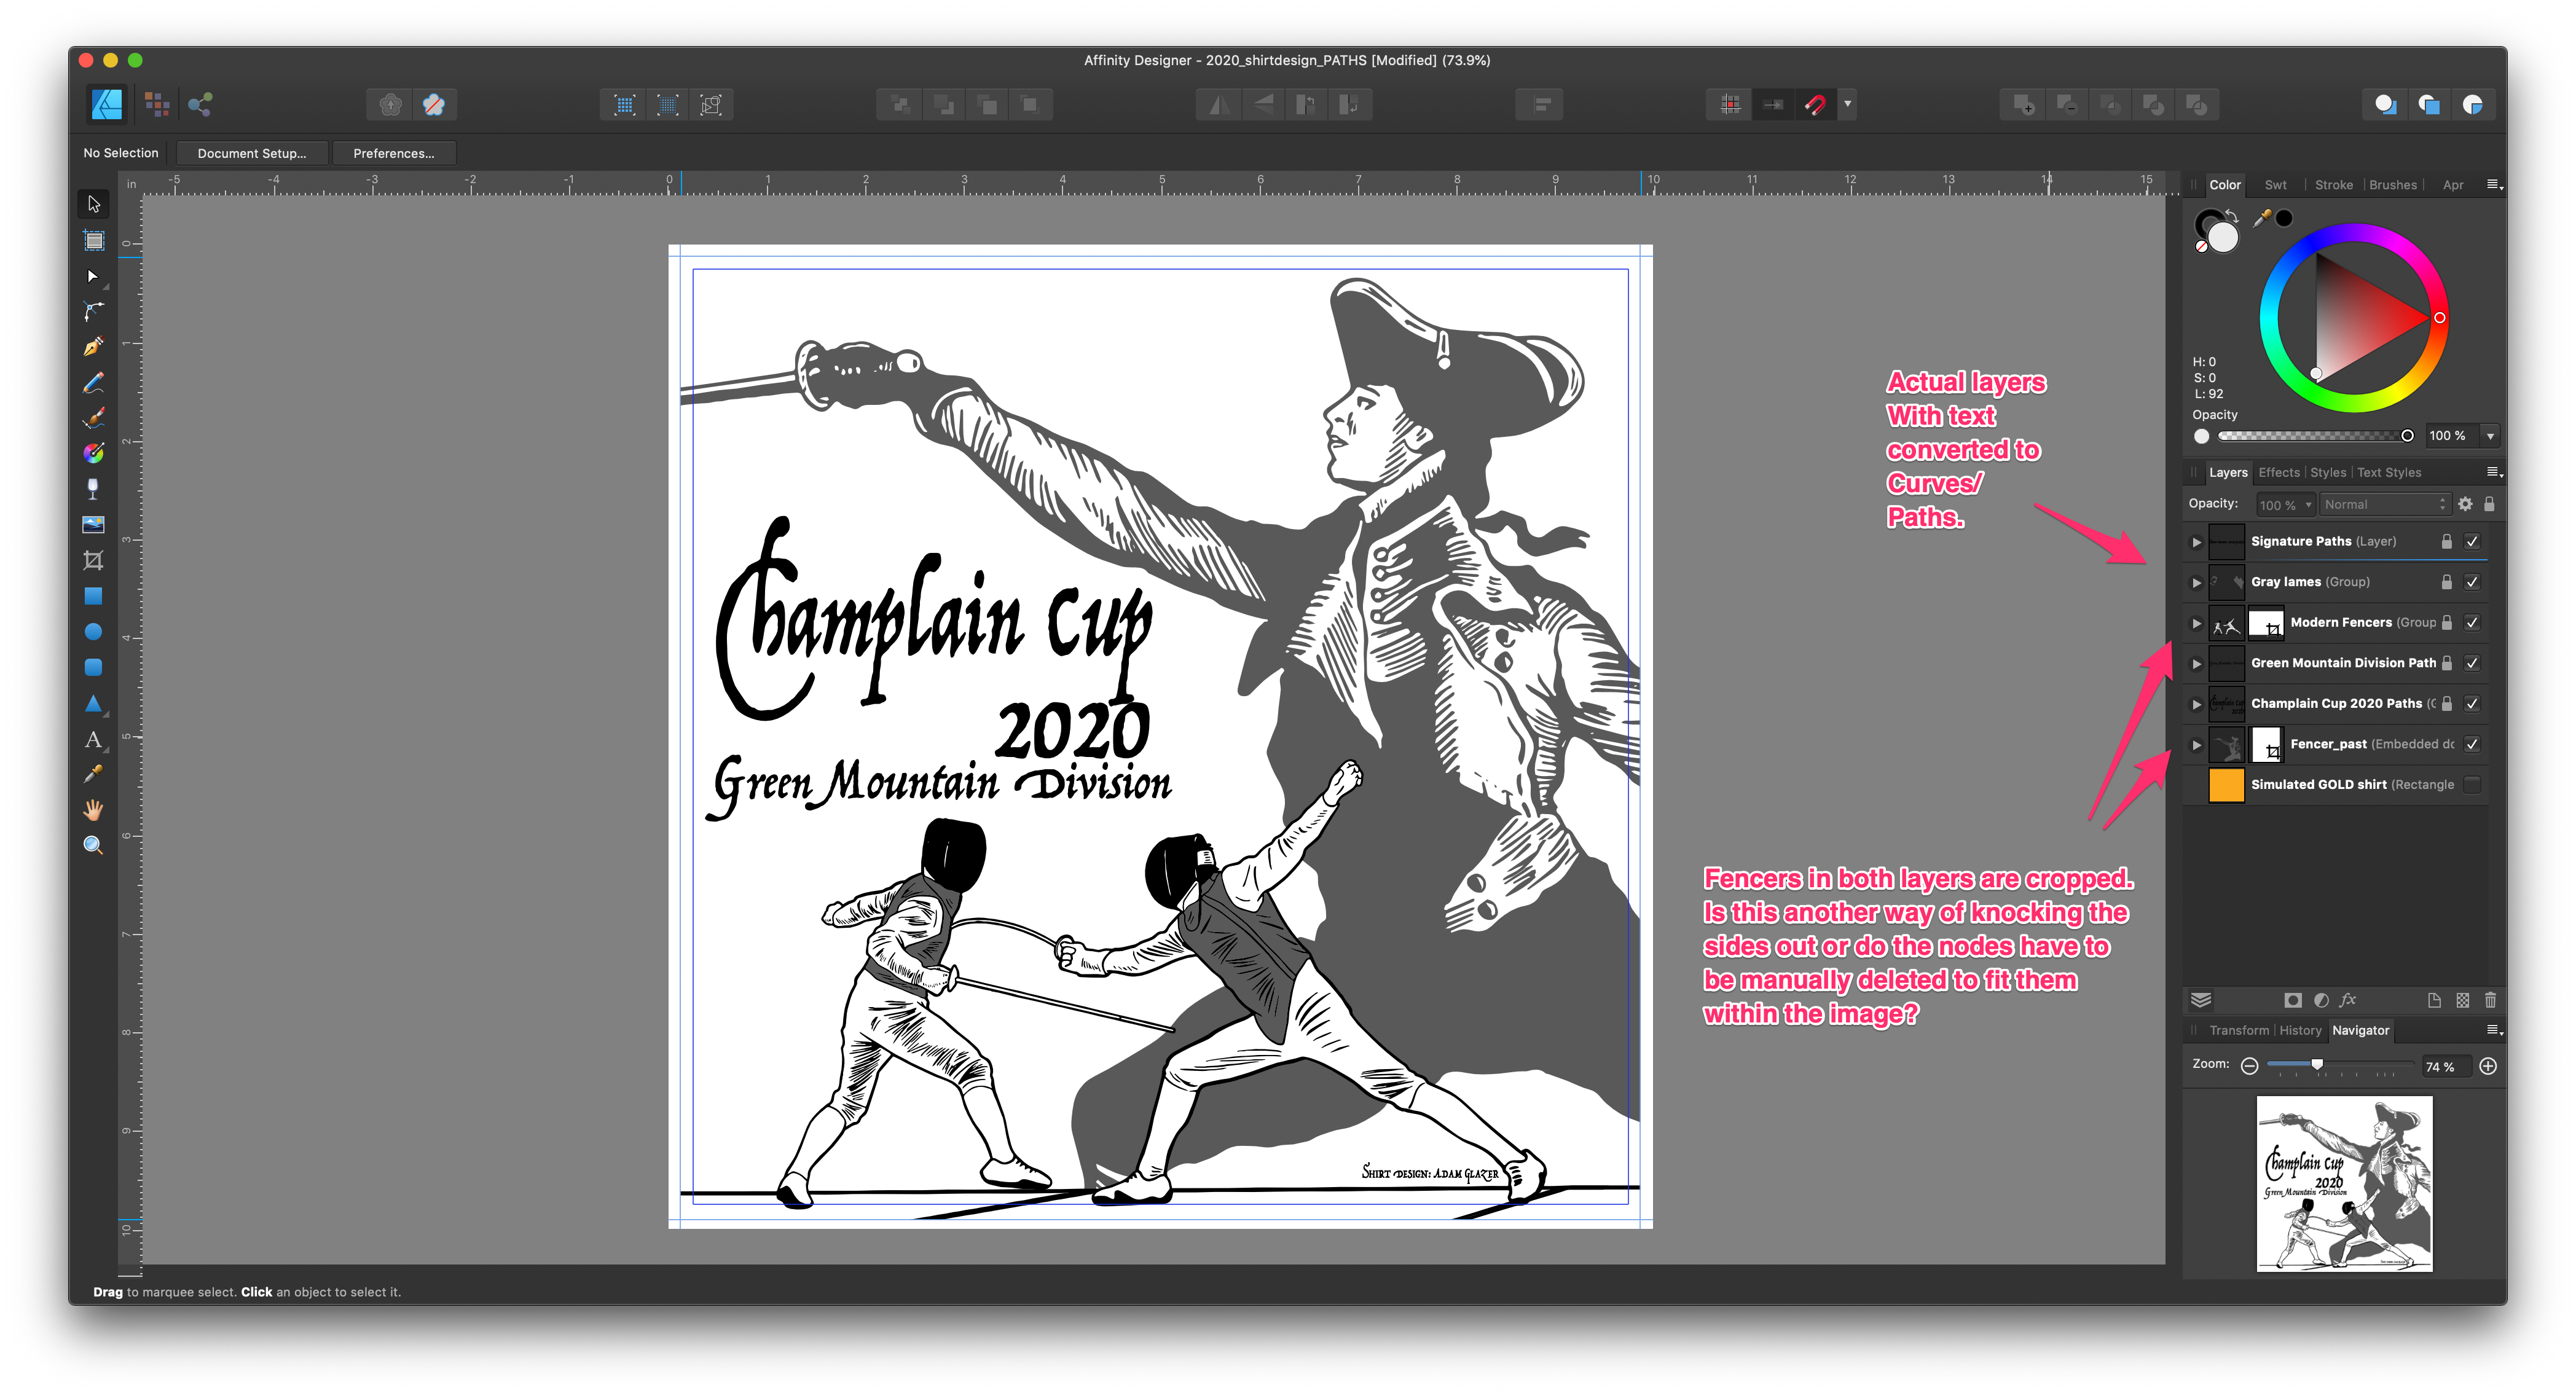
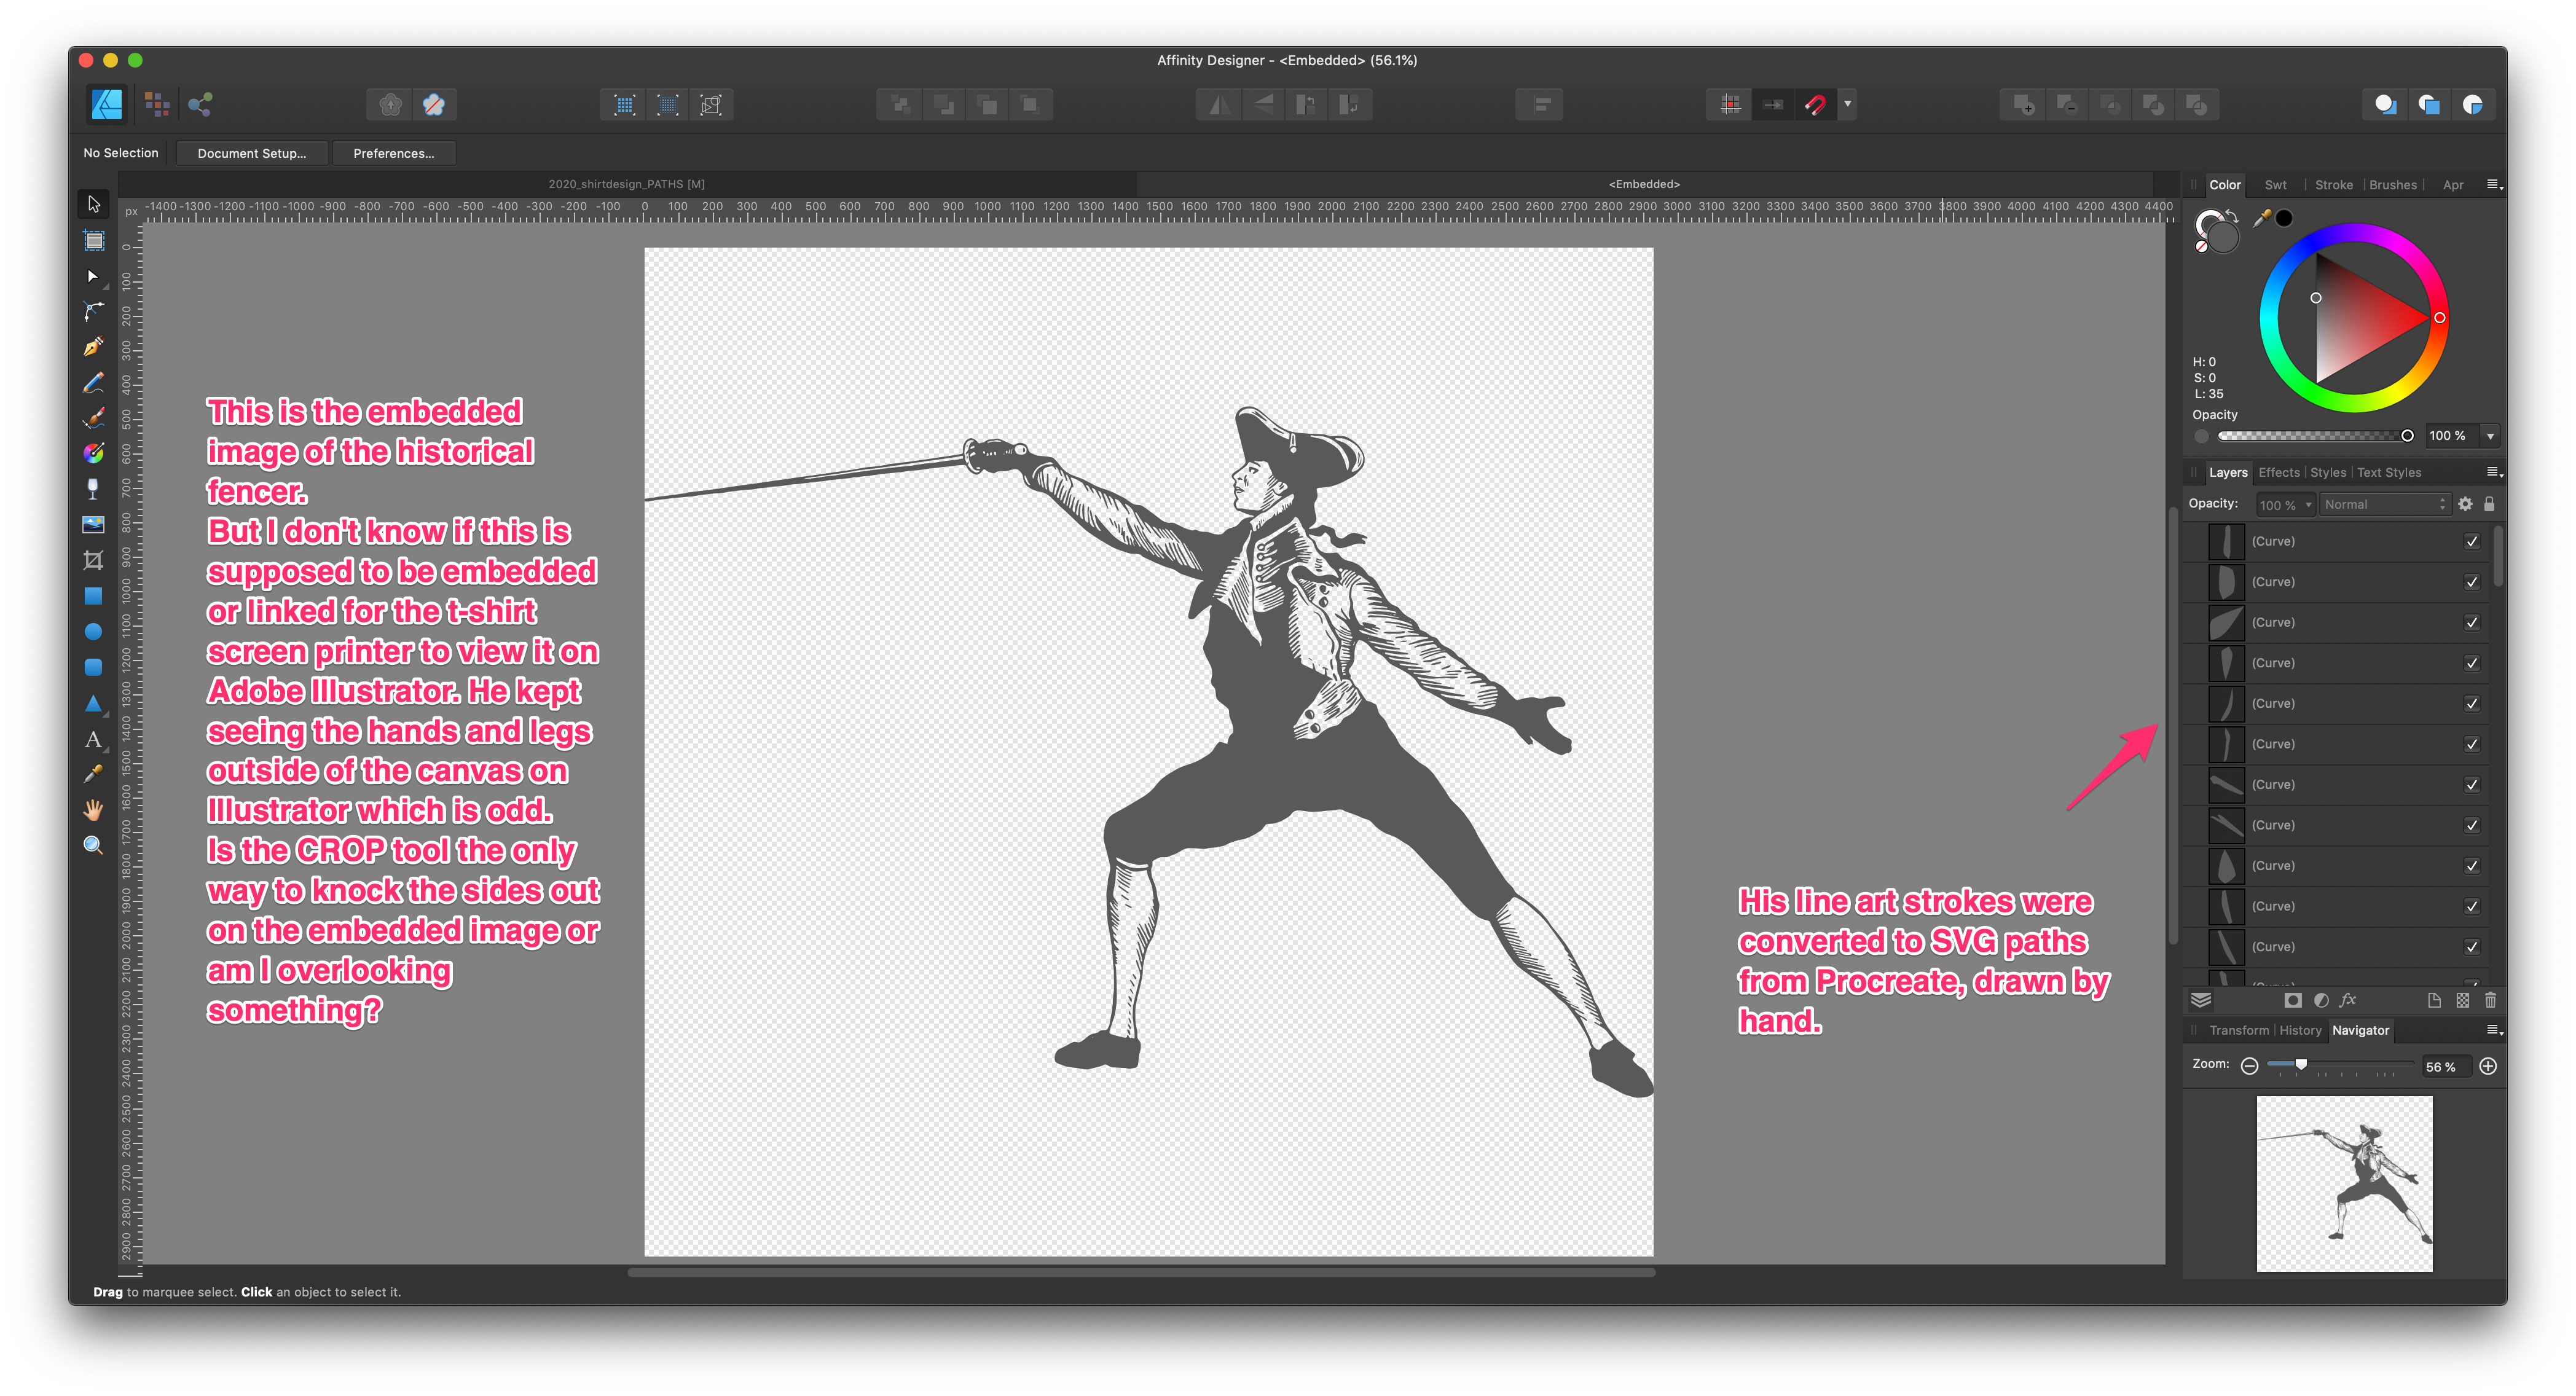
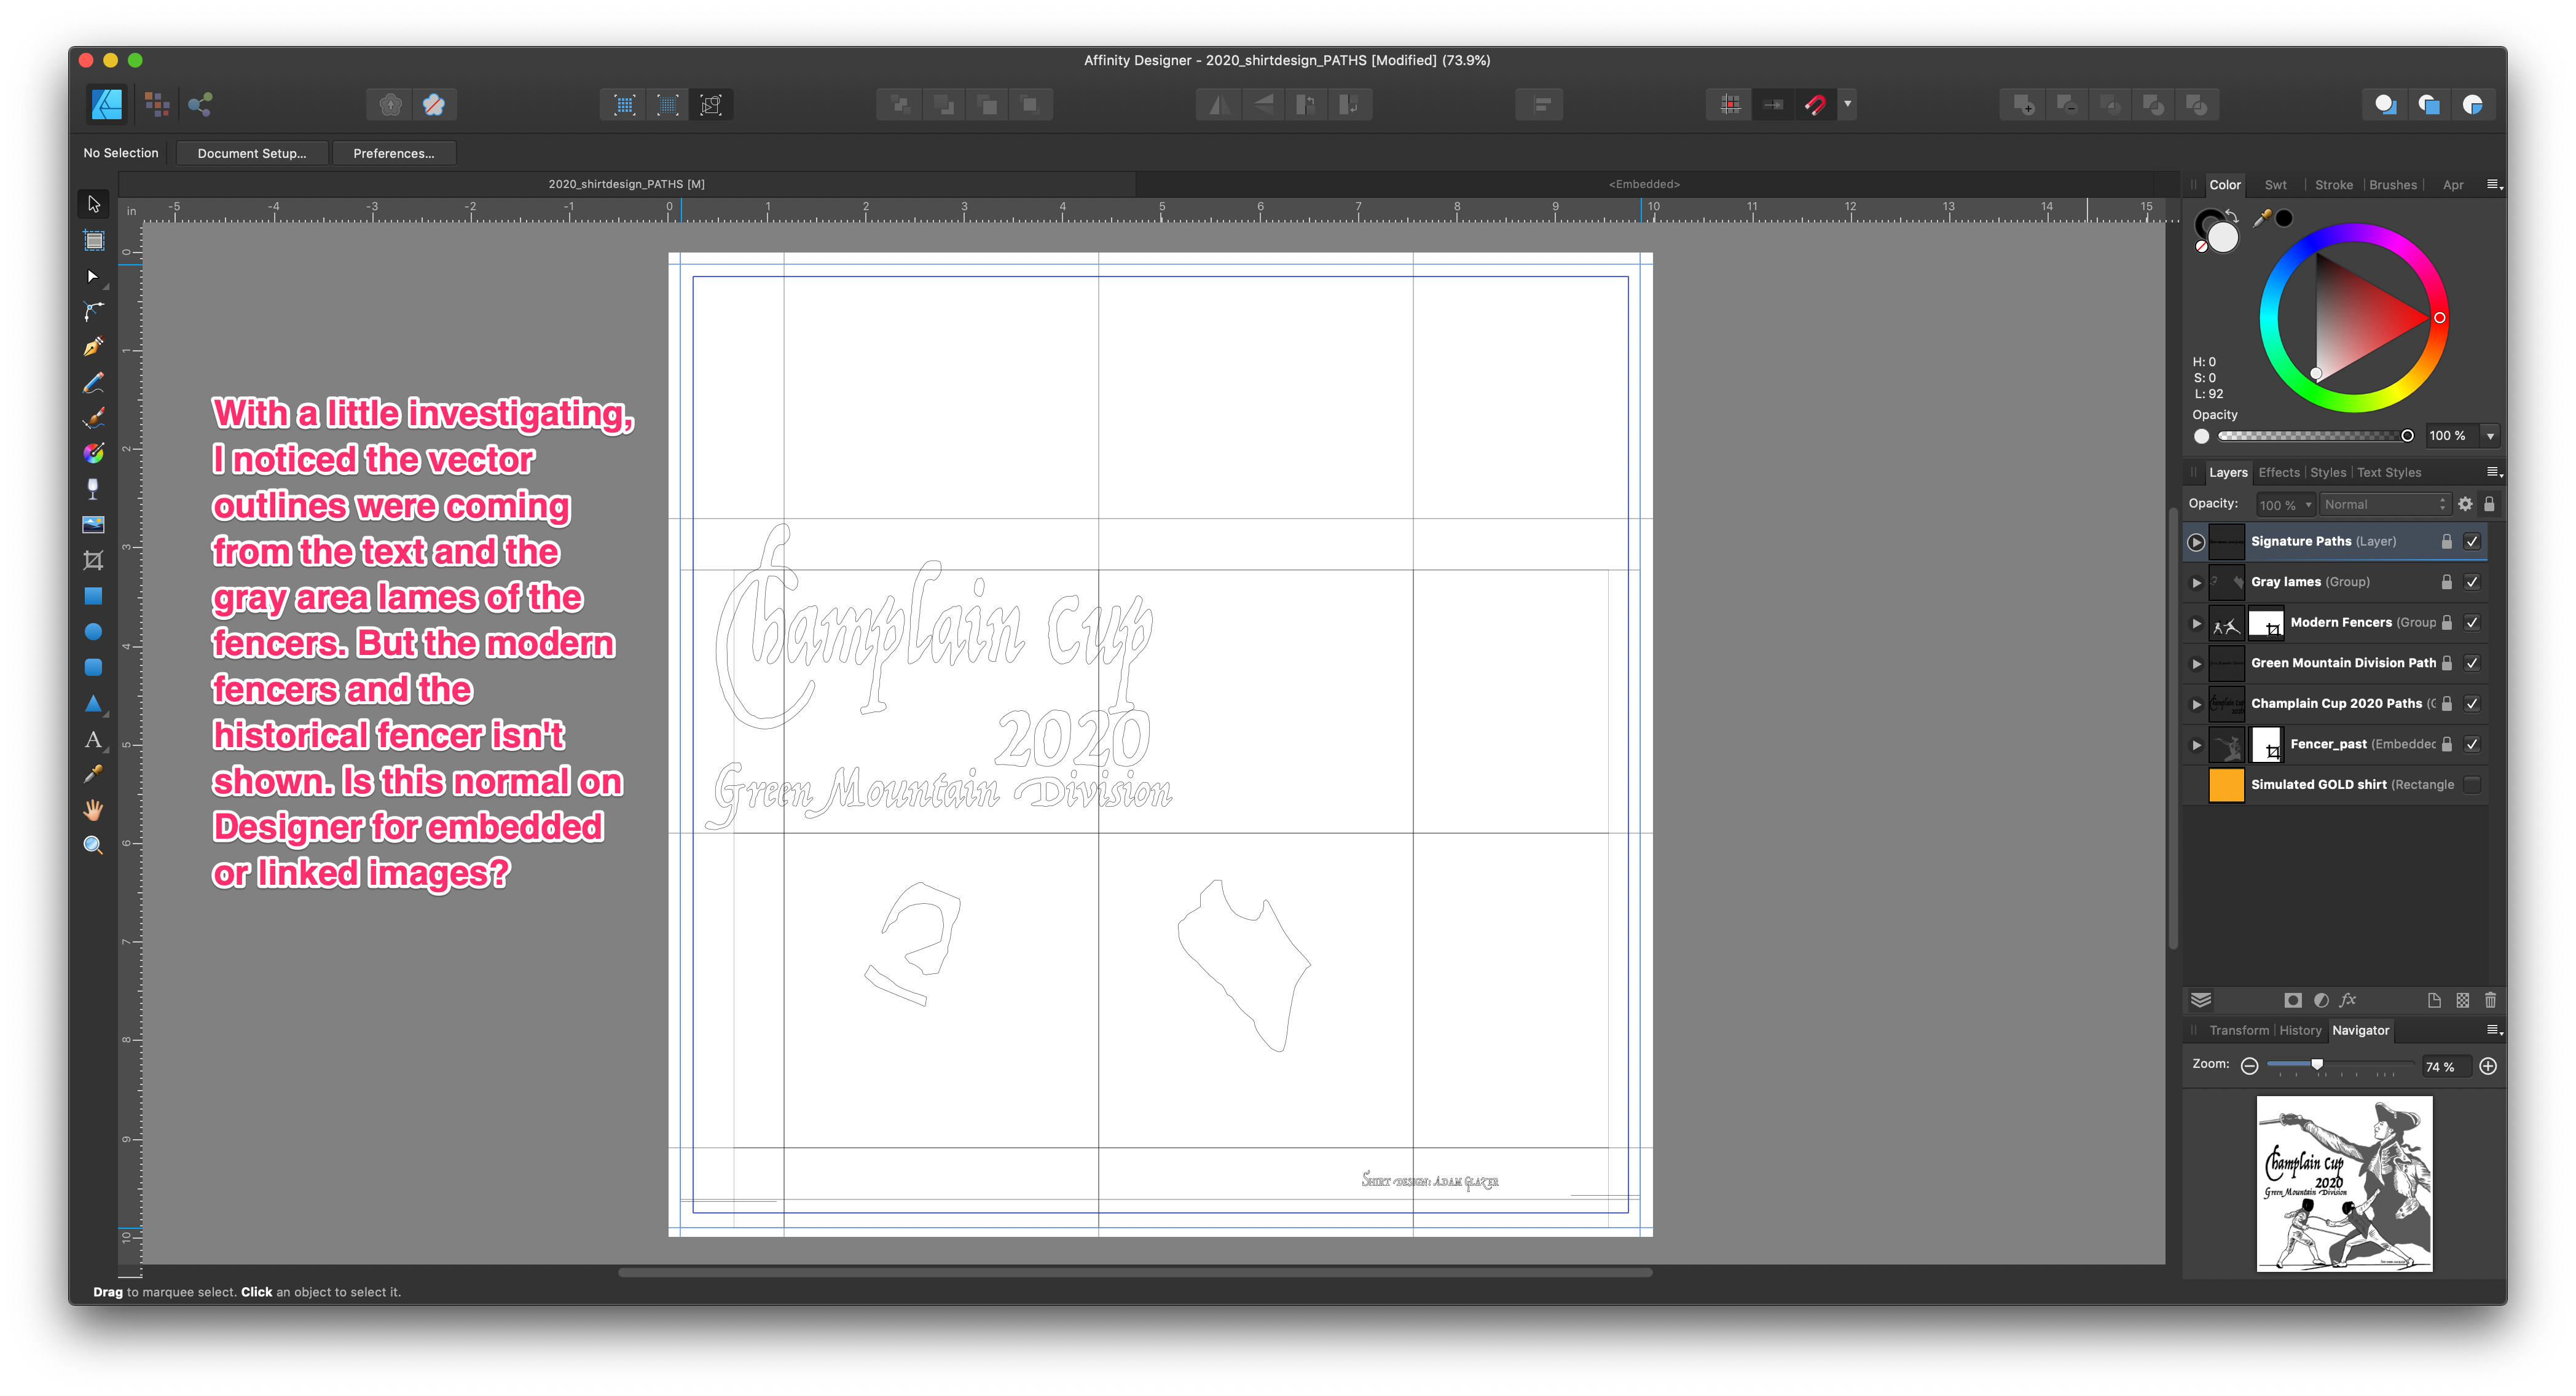
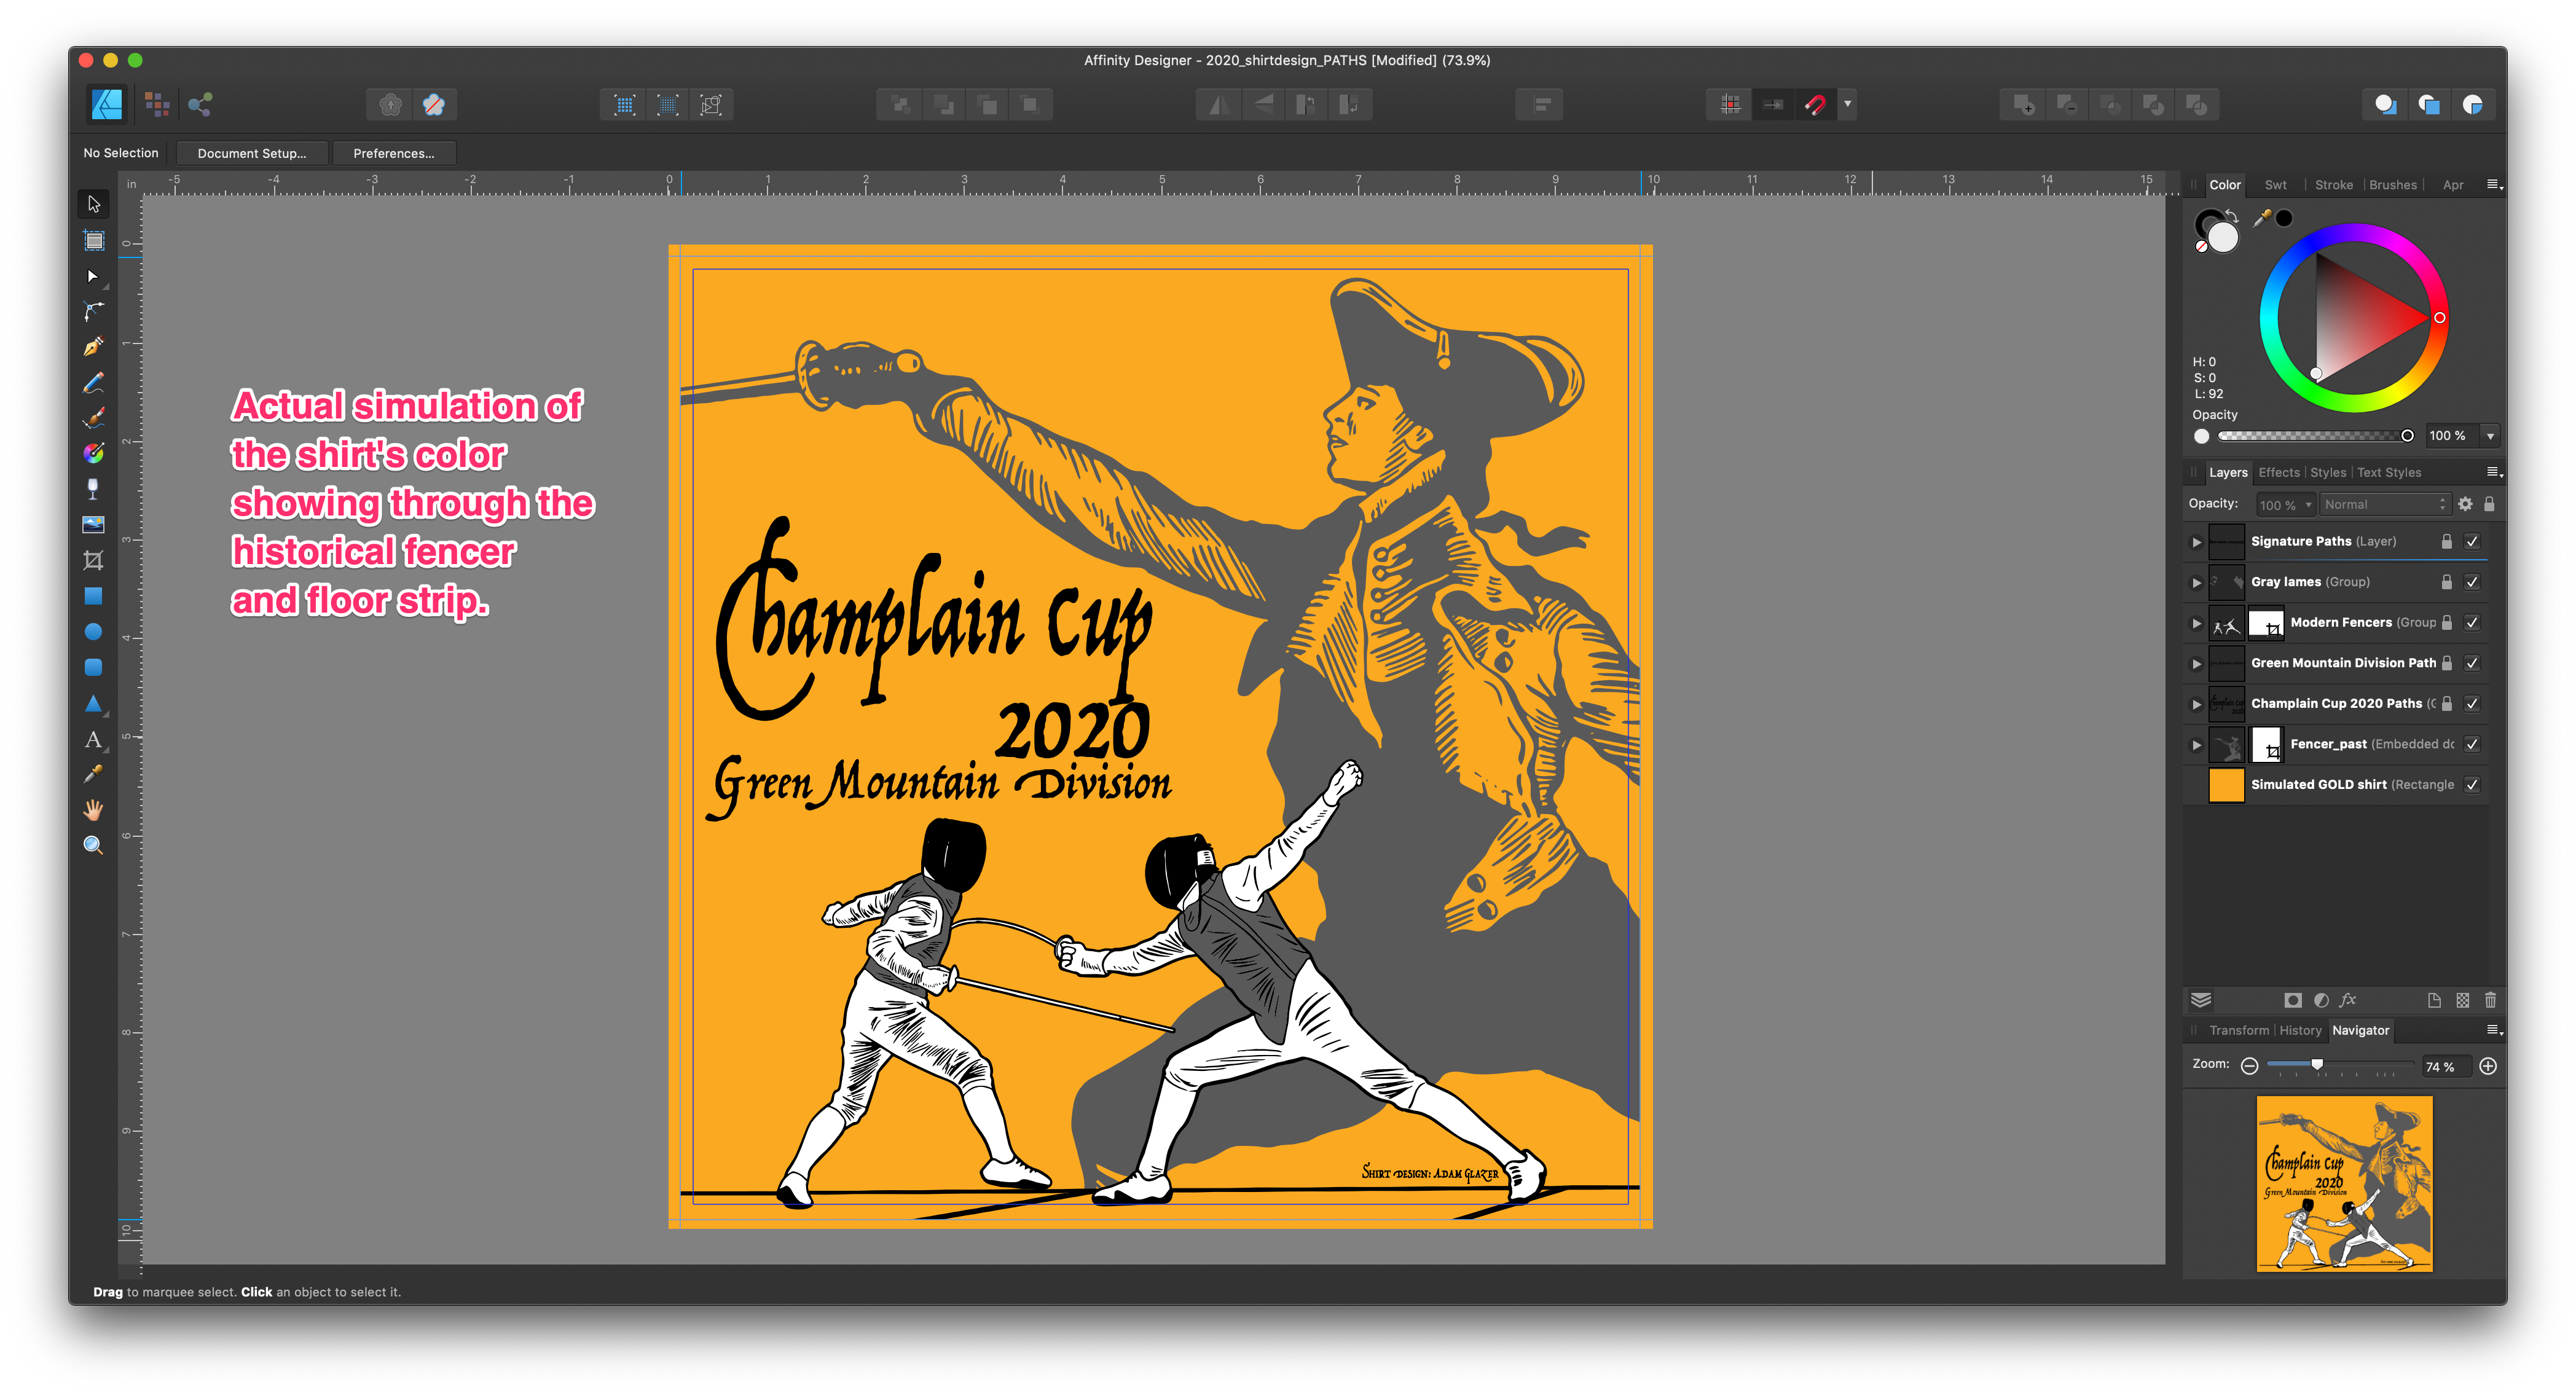
I'm in the process of finishing up a t-shirt project for a local fencing club's upcoming tournament. Over the years, I've used Adobe Illustrator with no issues. But now that I have Affinity Designer, I tested an export to SVG and other formats to the local screen printer and he was able to view them. BUT, he kept seeing the historical fencer's arm and legs extended outside of the canvas on his Adobe Illustrator which is strange since he's not supposed to. According to the screenshots attached, you'll see that his arm, legs and foil weapon are 'cropped' in. He asked me to 'knock' out the sides but I don't know if the crop tool is the right one to use for this purpose. Was I supposed to do it within the embedded image or linked? Or directly on the document?
Upon viewing the outline modes, I saw the fencers were not in vector even though they were converted to SVG vector paths using Adobe Capture. Was I supposed to place these images as linked or embedded? Every time I double click on these layers, it takes me to another 'embedded' window. All the text were converted to curves/paths and the gray area lames on the modern fencers' chests are vector shapes. The gray tones are the same gray color as the historical fencer to keep things consistent without using the opacity level drop. The GOLD layer at the bottom is just a simulation of what the actual shirt color is supposed to be.The shirt area is about 10 x 10 inches all around. The screen printer guy can take PDF, SVG, EPS, etc. But I've heard SVG is the best route to export to Adobe Illustrator.
If anyone can enlighten me on what I may have overlooked, that would be appreciated. -
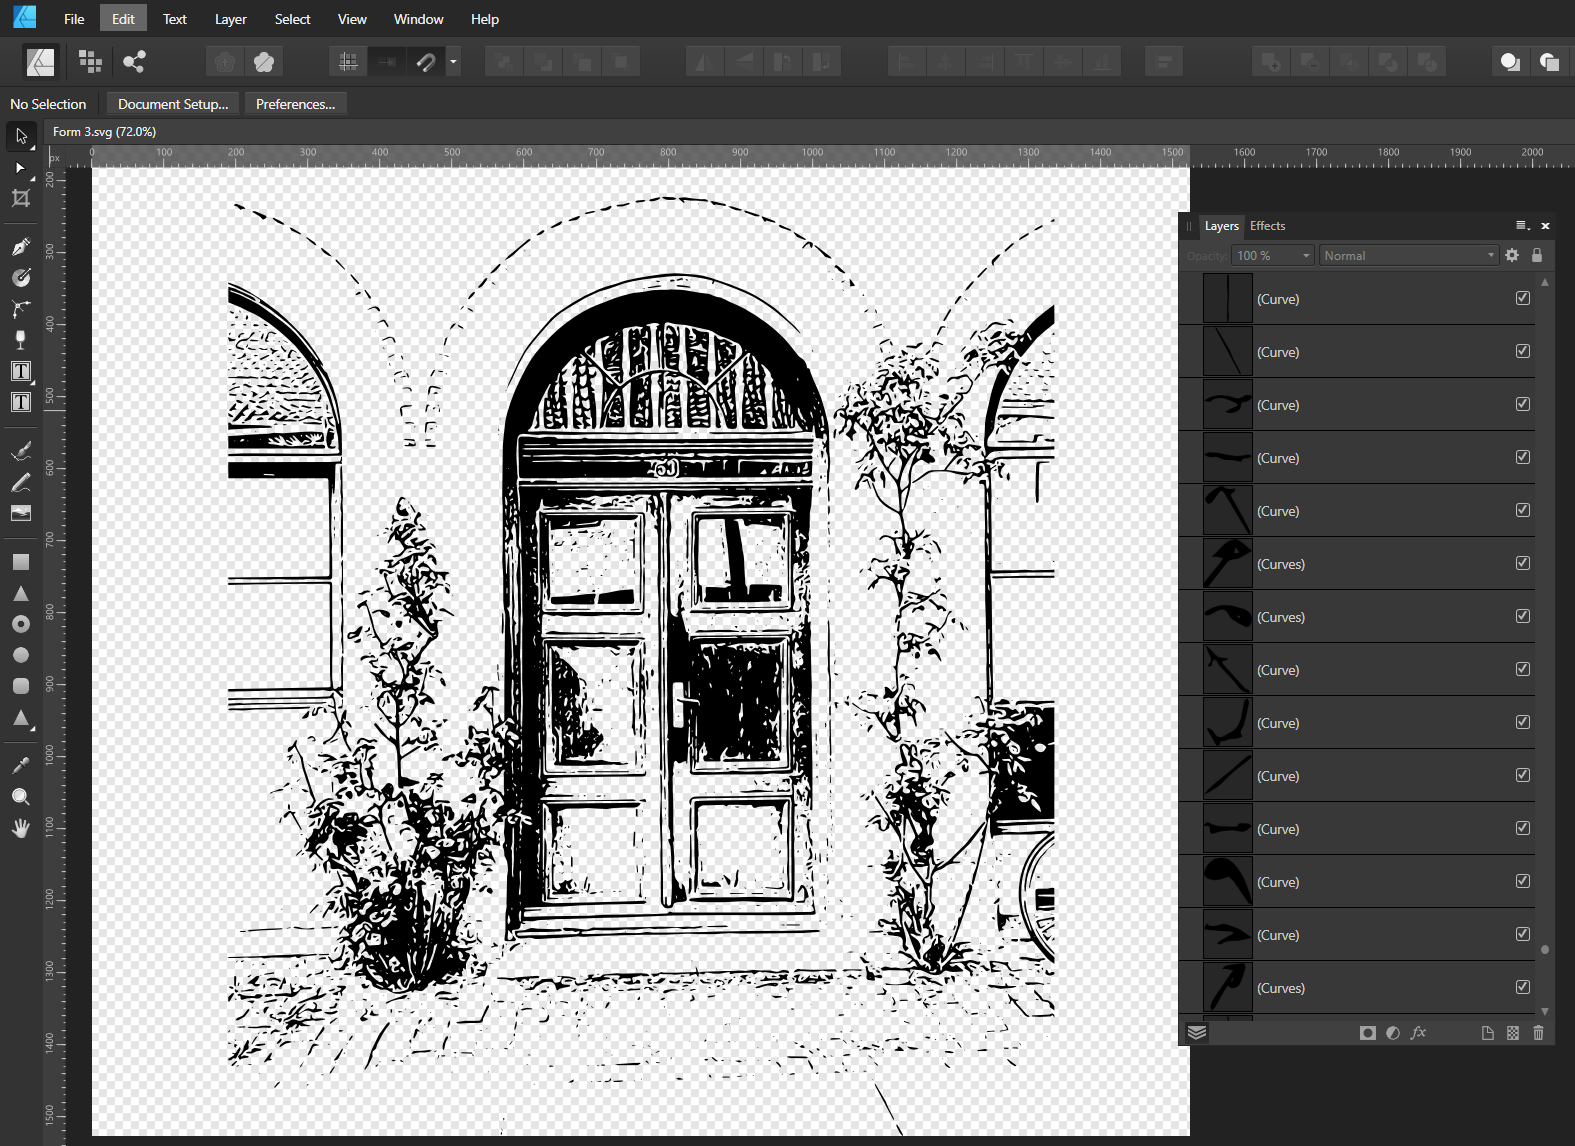
18 hours ago, Jowday said:
Out of curiosity I just tried on my iPhone - test traced this photo from 'Photos' - any image in 'Photos' (camera roll) can be used. It can be exported as an image, SVG or PDF via CC cloud, mail, messages, AirDrop, Dropbox, Google drive, you name it.
There you go! That works from the iPhone as well. I usually go with SVG directly AirDropped to my Mac. Dropbox as a last resort, however. But it still gets the job done.
-
On 1/13/2020 at 5:44 AM, Fixx said:
This would be a quick iphone camera to vector route but I cannot save the svg to dropbox. It seems that only CCcloud is supported?
You can export it to Dropbox using Adobe Capture app. Or AirDrop it directly to the Mac which is what I do nowadays with this workflow. Also, the iPad version of Adobe Capture works well, too when you export black and white line art.
-
11 hours ago, Fixx said:
OK I found the way. Somehow saving directly from processed image is possible only to CCloud (also export to Illustrator and PS is available), but there is Library/Resources view which allows saving to dropbox or airdrop.
Quality of the vectorizer is not like in Illy
There you go :). Dropbox or Airdrop will work fine either way. If I recall, you can export the file in any format you want but SVG is the way to go for vector projects.


anamorphic pictures
in Pre-V2 Archive of Desktop Questions (macOS and Windows)
Posted
Finally another update. I managed to figure it out after overlooking the 'crop' custom menu. It turns out the 2.39:1 anamorphic ratio is exactly what I was looking for instead of 2:1. Because it models exactly after the 1.33 anamorphic lens I have from Moment when shooting RAW which has to be edited manually. In short, I have to manually crop the RAW version while the JPEG/TIFF images are automatically 'de-squeezed' on the Moment app instead of RAW.

It's all good now! The image below is a screenshot showing the menu boxed in red as this was a test shot in Middlebury, Vermont.