lacerto
-
Posts
6,440 -
Joined
Everything posted by lacerto
-
PDF/X-1a:2001? Publisher V.2 export PDF
lacerto replied to Harrington's topic in Desktop Questions (macOS and Windows)
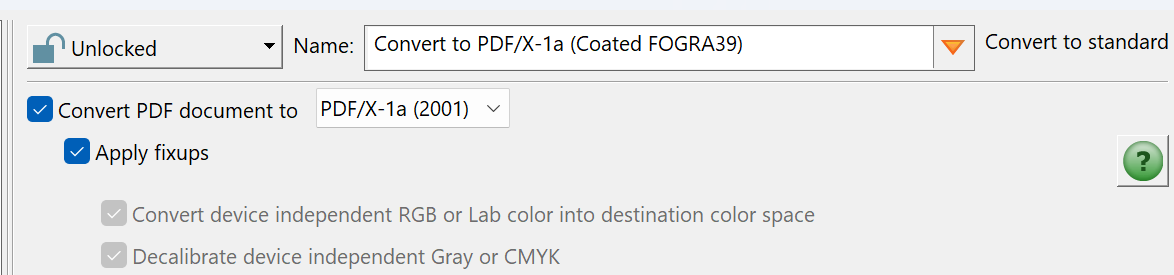
If you have Adobe Acrobat Pro, you should be able to convert to PDF/X-1a. The standard conversion applies version 2001: You may need to modify the factory preset preflight converter routine if you need to assign some other color profile, but as this is just color intent, the values are not changed even if the default Coated Fogra 39 is retained. Note that whenever you export from Affinity apps, transparency flattening is done by rasterization so if you initially export from Affinity apps using a method that does not allow transparencies (like PDF/X-1 or PDF/X-3), you will end up having rasterized transparencies. Also, please note Affinity specific "compatibility rules" so if your document has PDFs placed, their PDF version needs to be the same or lower than that of the PDF produced, otherwise you will get rasterized content with distorted color values. Distorted color values may also result if you have any PDFs containing transparencies placed within the document, even if version compatibility is retained. Anyway, you might want to try as the first option a workflow where you export from an Affinity app using the default PDF 1.7 ("Press ready") preset, and then take this to Adobe Acrobat and convert to PDF/X-1a (to retain flattened transparencies as vectors). I tested this is, and the result was PDF/X-1a:2001 verified file which should be fine with your printer. Note that the default PDF/X1a verified in Adobe Acrobat verifies for PDF/X-1a:2003 (and also approves PDF/X-1a:2001), so to verify specifically for PDF/X-1a:2001, you need to modify the default preflight verifier routine.
-
Publisher - Export Preview
lacerto replied to PaulEC's topic in Desktop Questions (macOS and Windows)
You cannot browse through the content of a multipage document, but you can have any page of a multipage document previewed by specifying the (starting) page. -
As far as I know there is no way to apply camera profiles within RAW processing in Affinity Photo. RAW camera profiles can be either .DCP files, which are recognized in addition to Photoshop at least by Exposure X7, or .ICC files, which e.g. Capture One can use. There are utilities like Lumariver (https://lumariver.com/) that can do the conversion, but version 2 of ColorChecker Passport can also natively create ICC camera profiles. The problem is that Affinity Photo only supports output profiles [and lens profiles] so it is not clear how settings and adjustments made within RAW processing combine when applied at output (probably not making sense, at all). Affinity Photo has also problems in opening certain kinds of .DNG files. To learn how to use ColorChecker Passport created camera profiles in Exposure or Capture One, see e.g. https://www.youtube.com/watch?v=qiji-r6BFg0 https://www.youtube.com/watch?v=-zMHJtAUq90
- 5 replies
-
- 1
-

-
- couleurcolor
- color
- (and 1 more)
-
This is odd, because I cannot reproduce this in v. 1.10.6(.1665) -- any of the three apps -- and also, the shortcut definitions do not make a distinction between Ctrl + numpad +/- keys and Ctrl + regular +/- keys. I wonder if this could somehow be system/machine specific? I tested the v1 behavior on Windows 11 Pro 23H2 both on a computer that has a separate numeric keypad (and using NumPad +/- keys both NumLock on and off), and one that does not (using regular Ctrl + +/- key combinations). As for Adobe apps, zooming in and out incrementally to selection with Ctrl+regular/numpad plus and minus keys works e.g. in InDesign and Illustrator but not in Photoshop (CC2025 versions tested). [UPDATE: What I meant is that zooming in and out has always worked similarly for me in 1.x and 2.x release version apps no matter whether using NumPad keys (NumLock on or off) or regular plus and minus (dash) keys, and have never featured a capability of zooming in/out in relation of a selection.]
-
Ok. I was curious to find out if this could have anything to do with HDR settings, because I have been using Affinity apps for years but had not experienced earlier the kind of behavior you described. The other "new thing" for me was having just upgraded to 24H2, but as you have Windows 10, that does not explain it, either. But otherwise a kind of a similar issue, and becoming effective as if by itself (for me without having been using Affinity apps for a while).
-
Hello, @Ian Cooper. This may be a totally separate issue, but I just experienced similar app crashes (exactly at same point) for all 2.5.7 Affinity apps on Windows 11 Pro (2024.H2 installed). I have recently played a lot with HDR photo editing (not involving Affinity apps themselves, though) and e.g. turning on and off HDR mode a lot, changing nVidia settings, etc., and noticed that at some point I could not have any of the Affinity apps loaded. I did not have any issues with other apps, though, and the system seemed to work correctly. The apps crashed so that they were not listed in Windows Task Manager, either (many apps that crash may still be visible in Task Manager). I did not examine any logs but simply just restarted the computer (in SDR mode), and the problem was fixed. I wanted to report this wondering if you might also have been experimenting with HDR (and possibly switching between HDR and SDR modes) when experiencing this error?
-
If you want to have predictable stacked transparency calculation (addition and subtraction), you can use appropriate blend modes, below demonstrated both in CMYK and RGB: transparency_adding_subtracting.mp4
-
Affinity programs can't open .svg file?
lacerto replied to Mandu's topic in Desktop Questions (macOS and Windows)
The file is in UTF-8 encoding but wrongly marked as being ascii (all other apps that I tried ignore this erroneous marking and successfully open the file). So change the first line of the file to read: <?xml version='1.0' encoding='utf-8'?> -
PDF image half rasterized.
lacerto replied to Jean Marie's topic in Desktop Questions (macOS and Windows)
Vectors within placed PDFs getting partially rasterized is typically a symptom of exporting objects that have transparency values in PDF format (like PDF/X-1a or PDF/X-3) that do not accept transparency. Affinity apps cannot flatten transparency any other way than rasterization, and this often shows so that a vector object has those parts rasterized where a transparency has been flattened. Another reason (inadvertent) rasterization of vector objects within a placed PDF happens at PDF export is when the placed PDF uses PDF version that is incompatible with the version of exported PDF. E.g., all non-PDF/X PDFs will be rasterized when exporting to PDF/X-based versions, and all placed PDFs using lower PDF version than the export PDF uses, will be rasterized. But this kind of rasterization is applied for the whole file, not just some parts of it, and it does not necessarily involve transparency flattening. -
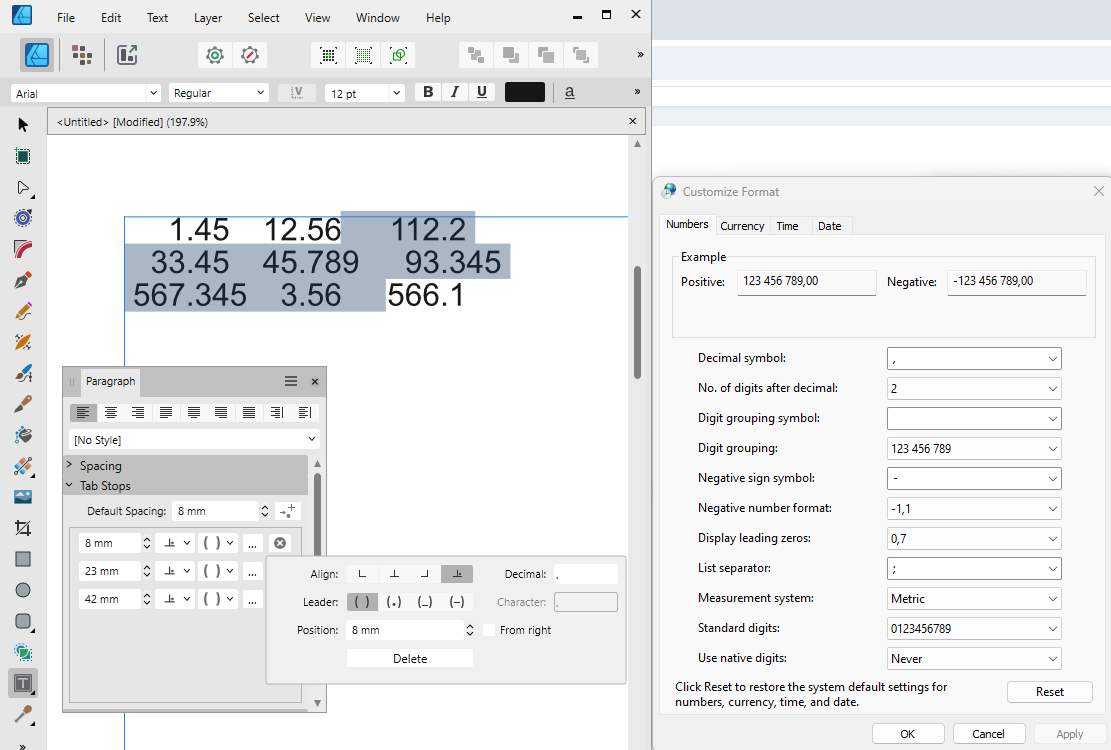
In what context are you trying to use a non-system defined decimal? At least in context of tables, you can specify a custom decimal separator (one that deviates from the system defined decimal): If you want to use custom (non-regional) decimal system-wide, you would need to specify the decimal symbol in Advanced regional settings accessed withing Region panel of Control Panel.
-
Thanks for all for useful tips and information. This has always been, and is still, to some extent, the bonus of having bugs and opaque operations, having skilled people working around them and shedding their light 🙂 I subsequently tested Apple created TIFFs (mostly 16-bit per channel), either created by Photos when editing a HEIC file (and applying some kind of analysis as per image so that the resulting TIFF in an editing app, also other than Affinity Photo, varies a bit), or when opening in Preview and exporting from there with user-defined options, and it seems that TIFF images, no matter how they are saved by these Apple apps, are somehow problematic to Affinity apps. I can reproduce the bloating issues with any "regular" image so it does not need to be HEIC, but the bloat is most remarkable when using 16-bit per channel images, and the effective compression of HEIC naturally puts the bug well on display, especially as HEIC images produced by default by iPhone are supposed to be an Apple "cool and easy" high-tech thing.
- 46 replies
-
- 1
-
-
- affinity photo
- filesize
- (and 2 more)
-
I was certain that it takes just a second of some Affinity aficionado to find a nice workaround and explanation so that this bug, too, can safely be ignored for years
-
Here. Basically the .heic file alone (which is shot by iPhone 16 Pro of a linear gradient on MacBook Air screen) would be enough. It would be placed (imported) to Apple Photos, then either opened for editing in Affinity Photos, and it should be opened as a 16-bit per channel TIFF image (converted by Apple Photos), or, it can be opened for editing with Preview and exported from there as a 16-bit per channel RGB TIFF (which is the way I saved the TIFF file in the ZIP archive). The remaining steps are: 1) Save immediately as an Affinity Photo file -- increase from 73MB TIFF (which is the size pixels take when saved uncompressed) to 95MB. 2) Add an adjustment layer (I applied Vibrance). Save. File size does not change. 3) Merge. Then save as an Affinity Photo file using a new filename. File size is now 158,7MB. So, from 2MB to 158,7MB in three small steps. Bloat.zip I ran the same test with an 8-bit TIFF and the increase is smaller then, but still remarkable and similarly without any obvious cause. I have done similar tests with these kinds of files (HEIC and TIFF exports from them) in other apps but cannot reproduce the bloat anywhere else.
- 46 replies
-
- 1
-

-
- affinity photo
- filesize
- (and 2 more)
-
"Obsolete" notes are just notes on the posts themselves being non-useable as their content is deleted (my attachment quota got full and when I deleted my uploads, I deleted the message content, as well, as they would make no sense in many cases without attachments). But many of my posts would have been obsolete also in the sense that they would no longer be valid because the software has changed. And this unfortunately also applies production of ICC-less press PDFs, which has become worse, but I cannot say exactly since when. I can tell that latest v1 versions were better in producing the kinds of DeviceCMYK content as e.g. InDesign, and that printing press regularly expects. But I cannot tell whether it worked up to some point similarly in v2 apps. Recently Serif published 2.5.6 version that would fail to produce ICC-less PDFs in most cases. Now there is version 2.5.7 that has this single fix applied and no longer fails. But there are other kinds of issues that have been there at least from version 2.4.2 (which I just installed to check this). I mean situations where e.g. PDFs placed for passthrough might be in DeviceCMYK mode, but they are often encapsulated in e.g. transparency groups, and they are typically assigned (by exporting code, not by the user) with an ICC-based blending color space, and this makes the PDFs ambivalent, causing color values where e.g. K100 objects appear as rich black objects, etc. Here are examples of productions with native CMYK objects, placed RGB image, and two PDFs, the other in PDF-X/4 (U.S. Web Coated v2) and the other in DeviceCMYK color space, exported using "PDF (Press ready)" forcing conversion of image color spaces, but with ICC unchecked. As can be seen Publisher v1 produces similar PDF as InDesign. The Affinity productions are from identical publications (v1 .apub just opened in v2). standardproduction_apub_v01.pdf (created with Publisher v1.10.6) standardproduction_apub_v02.pdf (created with Publisher v2.5.7) standardproduction_id.pdf (created with InDesign CC2025) It should be noted that all the v1 production issues are still existing in latest v2 apps (in addition to v2 versions introducing new ones), so the notorious Affinity PDF version compatibility rules are still a thing to adhere unless (inadvertent) rasterizations and color conversions are acceptable, so basically it is still true that it may require a highly skilled craftsman to create a truly press-ready high-quality PDF with Affinity app trio. And unfortunately one is not likely to find an Affinity expert in printing presses...so the best aid is probably available on this forum.
-
One update to the file size increase mystery. I now tested taking a RAW photo with iPhone 16 Pro. I chose to export this file via Apple Photos by first opening the image (originally saved as a .DNG file) in Preview, and exporting from there in TIFF format using the default 16 bit per channel format. When subsequently opening this TIFF file in Affinity Photo and saving as .aphoto, I can experience file size bloat whenever I apply an adjustment layer, merge it, and save it as an .aphoto file (using a new filename). So based on this the issue seems to be somehow related to TIFF file format (which Apple Photos uses), and especially 16-bit per channel images. But based on experiences described by @Ldina, similar bloat can be experienced when processing .DNG RAW files. Because .DNG is based on TIFF 6.0, the reason for this behavior might be some bug in Affinity apps related to TIFF file structure.
- 46 replies
-
- 1
-
-
- affinity photo
- filesize
- (and 2 more)
-
It is basically to avoid inadvertent color conversions when you switch the color model within the Color Panel. E.g., assume that you have R255 G0 B0 defined in RGB color model and then you switch to CMYK color model, and back to RGB. If you have lock off, you will have a different RGB definition when you come back, because you have actually first converted the original RGB color definition to CMYK, and then the CMYK value back to RGB. If the lock is on, the definition would stay the same when you return back to RGB, and having the lock turned on the only way to perform an actual conversion would be entering a color value and pressing Enter. Note that the conversion will be done according to an underlying secondary document color profile (when you create a new document, it will get the underlying document color profiles according to what is specified under Preferences > Color). The color lock is a fundamental feature in Affinity apps so it is a good idea to learn thoroughly how it operates.
-
Yes, there seems to be related behavior. Can you further increase the filesize by adding other adjustments then merge, then save as? TIFF files (of which DNG files are some kinds of sub types, I think), can be complex and have all kinds of tagged information. Perhaps this confuses Affinity Photo and causes this strange bloat whenever merge is performed?
-
Yes, this is what I have been doing all the time, showing it also on the video clip. I additionally have always saved as (in .aphoto format) using a new filename, so no overwriting, should that matter anything. My latest screenshot shows filesizes in three simple steps, each time save as performed to an .aphoto file using a new filename. These steps are: 1) opening an Apple Photos converted 16-bit TIFF file for editing and saving it immediately as an .aphoto file 2) Adding an adjustment layer and saving as a new .aphoto file 3) Merging the adjustment layer so that only 1 pixel layer exists, and saving as a new .aphoto file. This is originally a HEIC file size of which is 3042x4032px and takes 2MB disk space. There must be something in these files that prohibits Affinity apps from discarding the old data, but it seems these files are actually 8-bit RGB files (showing when exporting an original HEIC file and opening it e.g. in Photoshop). But it is not RAW data, RAW mode is enabled separately in iPhone Pro 16, and these files are saved as .DNG.
-
UPDATE: Now I tested this by creating an empty 16-bit per channel RGB image (3000x4000px), then filled it with a stock photo, and applied adjustment layers, merged and saved as an .aphoto file, and cannot reproduce the kind increase in file size as with images initially opened for editing from iPhoto Pro 16 HEIC images (from Apple Photos) -- even if doing this process repeatedly So perhaps there is something involved in these images that causes the file increase...even if I cannot reproduce this in e.g. Photoshop. @Ldina, can you see the same, the growth in filesize only happening with the HEIC images converted to 16-bit TIFF by Apple Photos? Here's the latest edition, a nice iPhoto HEIC shot of our sofa fabric, with initial save, then Vibrance adjustment layer applied (no change), finally merged to one pixel layer and saved as, and puff, double the file size (technically about 70MB is required to save uncompressed this kind of pixel data):
-
I do not understand why people keep on repeating this. I have now tested this with numerous 16-bit per channel images opened for editing from Apple Photos in TIFF format, and saved as .aphoto files. As mentioned, e.g. a file that theoretically takes about 73MB to save its pixel data uncompressed, typically takes about 30% more when initially saved in .aphoto format. When an adjustment layer is applied and merged and the image is flattened to a single pixel layer (clipped to canvas size), it might increase to take double the size that is required to save the data, even if each time saving as with a new filename, in .aphoto format. And this can be continued to further increase the file size. There might be a moment (or even a logical trigger), when purging happens, but I have not found it so far. I have not tested if this is specifically an issue related just to 16-bit per channel files, but I have not previously noticed these kinds of issues with regular 8-bit per channel images, and it may well be that save as (using a new filename) works consistently there, and purges the file from old stuff. Also, as mentioned, when exporting to e.g. TIFF or PSD format, there is no wasted space issue. The tested files have of course no saved history. Is nobody else able to reproduce this behavior? (The tests I have done so far have been performed solely on macOS, editing HEIC files saved by iPhone 16 Pro, but I cannot see this significant, other than perhaps in producing 16-bit per channel images for editing.)
- 46 replies
-
- 1
-
-
- affinity photo
- filesize
- (and 2 more)
-
Issue with Importing DWG
lacerto replied to bailey80x's topic in Desktop Questions (macOS and Windows)
You probably get the best results if you can export your drawings in PDF format from the CAD application itself. I do not think that there is necessarily anything wrong with your DWG file, since the fact that Affinity Designer crashes when it tries to open the file is not an indication of anything else than poor quality of Affinity DWG import filter. I opened your file with Illustrator CC2025, CorelDRAW 2023 and QCAD, and while none of these apps is a professional CAD application, none had issues in opening the document, but there are many options to be chosen at import time, and missing fonts, etc., so there is significant variance in interpretation of the drawing, depending on the app used, but I hope you have some use of the PDF exports made from these applications when trying to open them in an Affinity app: GA_plans_Warford_ Illustrator_CC2025.pdf GA_plans_Warford_ Corel2023.pdf GA_plans_Warford_ QCAD.pdf -
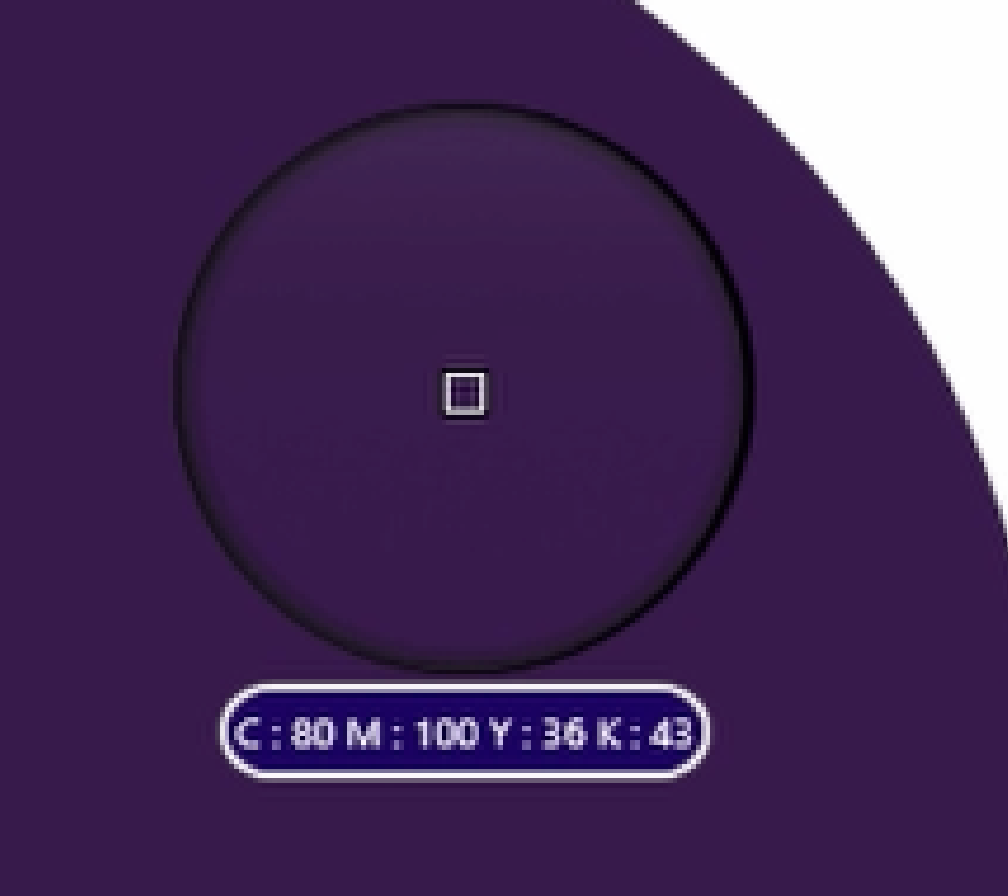
Hello, @Detective-Dohnut, welcome to the forums! You seem to have the document in CMYK color mode (most probably the default U.S. Web Coated v2, so when you pick what you think a HSL color value of the first ellipse, you actually pick its CMYK converted value (0:44 timepoint in your video clip): As you have the color lock turned on, the picked value is shown retaining the HSL model, but you can see that both the hue and saturation values have already changed from what you had, so when you subsequently change the Lightness value, the secondary ellipses get a color that is based on different hue and saturation.
-
Yes, it is Apple Photos that does the conversion. It does it whenever a HEIC file (at least in condition of opening a LIVE photo using iPhoto 16 Pro; I have not tested what happens if LIVE is turned off). All other apps that I have tested, however, retain the embedded wide color gamut, and only Affinity Photo has sRGB as the assigned (truncated) profile. UPDATE: Oddly, if I export "Unchanged original" from Apple Photos, the image has the Display P3 profile embedded, but it is an 8-bit per channel RGB, not 16-bit, as when opening for editing as a TIFF conversion! Not much appears to be documented in what Apple does here, but the size and color issues experienced with Affinity Photo are a separate thing. I do this on the video, and I think that OP mentions having done so, as well (but also having done at times successive saves using the same filename). EDIT: To make it clear, the size issue is ony related to saving as (merged, single pixel layer) data to native .aphoto format. I can e.g. export to 16-bit per channel TIFF and get expected file sizes. Similarly as @Ldina, I can go on adding complexity on the image, e.g. adding multiple adjustment layers, mixing them, but when I merge everything to one pixel layer, and save as to a new .aphoto file, the file size appears to keep on increasing, or stays the same. UPDATE: History is not saved, but something else appears to be accumulating. EDIT2: Just for information, v2.5.7 has no change to this behavior.
-
Here is capture of what happens basically with whatever I have tested. This is a shot saved in HEIC format using iPhoto 16 Pro of a random stock photo, which is then picked from Apple Photos in latest Sequoia for editing (this is deliberate, instead of extracting the original and opening the file, which is currently not possible because Affinity apps do not support the HEIC (HEIF) format Apple uses. As can be seen, the colors are first truncated to sRGB (instead using embedded wider color gamut like any other app I have tried) and then, when saving, filesize is 96MB, and after applying an effect and merging it, and saved as, 142MB. The image might of course have become more "complex" as a result of adjustment but the theoretical file size required to record the color information of an image of this size and color depth is about half of what was used. I ran the same test in Photoshop and saved in .PSD format and the image size stayed the same, 73,2MB, before adding a Vibrance adjustment, and after having merged the effect and saved as using different filename (and keeping it .PSD). It stays the same whatever is done within one pixel layer (canvas), even if it is just one color, as long as no compression is used. That is the space that it theoretically takes, then there can be extras like embedding a color profile, history, etc. But taking a double what is needed, and more, takes an Affinity aficionado to understand / explain. Anyway, considering that the original takes 1,73MB (and pretty much the same no matter what is photographed), I understand the concern, and the temptation to let Apple Photos do its editing magic, rather than using dedicated "professional" editors 🙂 filesizeincrease.mp4
-
I did exactly that, but without expected discard.