lacerto
-
Posts
6,440 -
Joined
Everything posted by lacerto
-
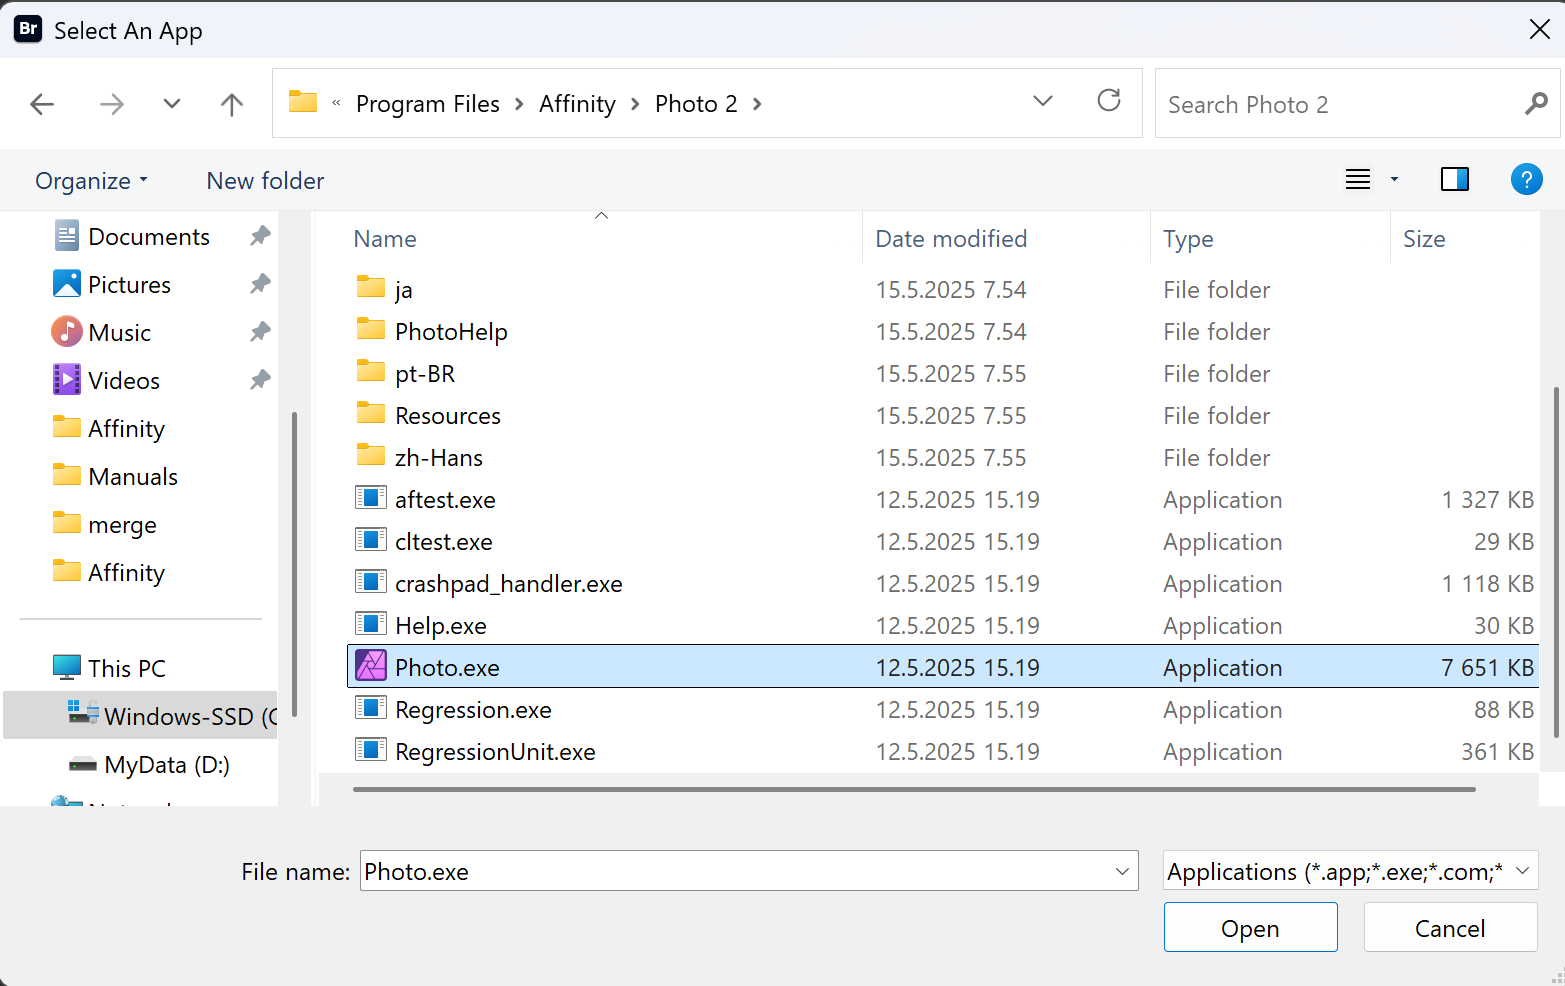
Click the Browse button within Bridge (see screenshot above), and then point to the Photo.exe, which you should have installed here: ...in case you have installed the app by using MSI installer. If you instead have installed as an app (using MSIX installer), then the executable is hidden under C:\Program Files\WindowsApps, which you cannot directly access. In this case you might have desktop shortcut (a .lnk file) created that points to Photo, and you could instead select this .lnk file when browsing for the associated app within Bridge. Or, you could alternatively choose to uninstall Affinity apps and download the MSI setup package so that you can install the Affinity suite as traditional Windows applications.

-
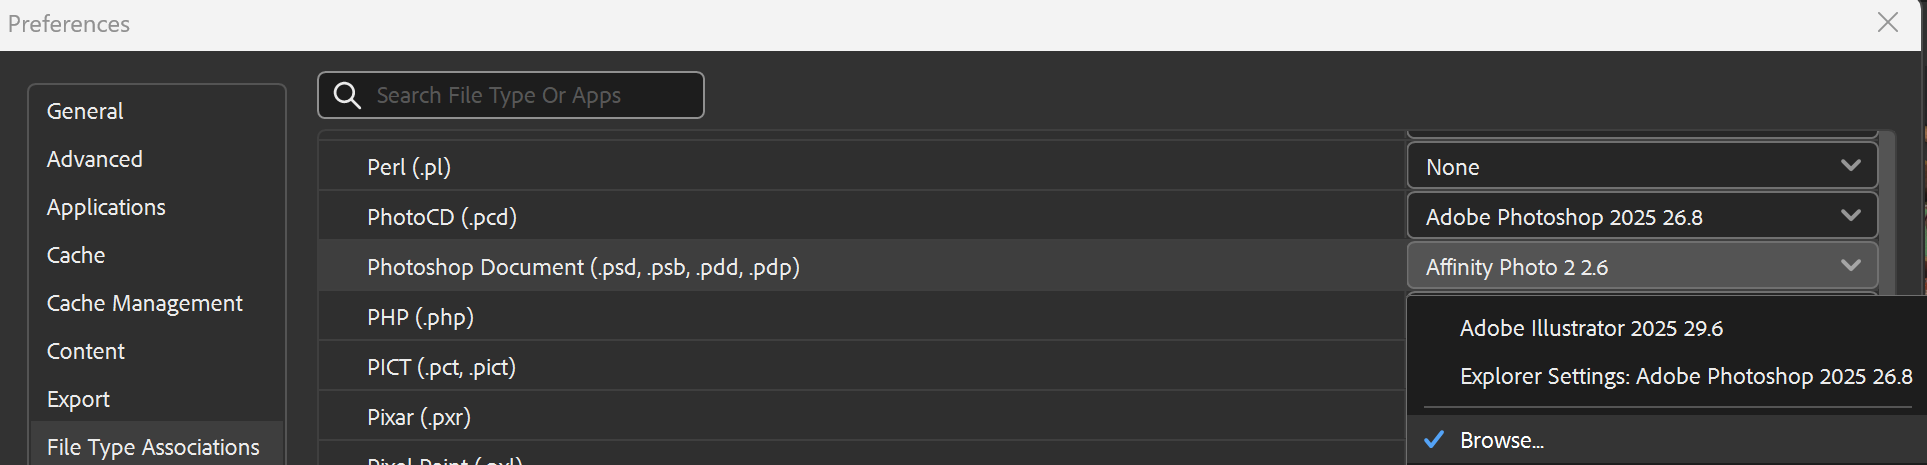
I think that in order to have .psd files associated with Affinity Photo within Bridge, you additionally need to explicitly do the association using the Bridge Preferences (File Type Associations), as follows: That is, the association within Bridge does not necessarily reflect the default app currently associated with the extension within Explorer, so you need to change it within Bridge to have PSD files browsed within Bridge to open by default in something else than Photoshop (or Illustrator).
-
Affinity PHOTO export to .bmp *HELP*
lacerto replied to Max Mitty's topic in Desktop Questions (macOS and Windows)
BMP is the native Windows bitmap standard, and in that sense very commonly used bitmap file format, which, as mentioned in this thread, is already (partially) supported within Affinity (Windows version) apps as opened / placed file format, Clipboard format and resource link format, and additionally as part of .WMF/EMF export format. The core of the BMP format, the DIB image structure, is also very commonly used in Windows programming (because being free and well documented image file format) to handle bitmaps programmatically. The BMP file format is also supported on macOS (both as open/import and save/export format) not just within office apps like Microsoft Office 365 and LibreOffice, but also e.g. by Photoshop, Pixelmator Pro and Corel apps, that is, within the kind of professional graphic design apps for which Serif wishes to offer an alternative. BMP file format is by no means a common file exchange format within graphic design industry, and is in many ways a limited file format, but nevertheless it is well supported by the competition. Serif's call, of course, to decide how high they aim in their claim of offering a "fully featured" (their choice of words) app package, and how much their offering lacks and requires additional tools for doing simple and common tasks like ones asked in this thread. -
Affinity PHOTO export to .bmp *HELP*
lacerto replied to Max Mitty's topic in Desktop Questions (macOS and Windows)
I think that the current omission of BMP export format is a kind of a priority issue. There is hardly a Windows image app in the world that could not save in / export to native Windows bitmap format, so in that sense not having explicit BMP support is a kind of an absurd shortcoming in a dedicated graphic design app suite. There is, after all, direct support for opening (certain kinds of) BMP formats, and as shown above, support for pasting inherent Windows bitmap formats via Clipboard (and subsequently saving them as linked .BMP resources), and support to save mixed graphic content as .WMF files, which can contain native Windows bitmap resources, so in a way the kind of minimum support already exists as a workaround. On the other hand, BMP format has several sub formats (1-, 4-, and 8-bit indexed formats that Affinity apps support only cursorily if at all, RLE packaging, advanced 16-, 24-, and 32-bit depths many of which only rarely used, legacy OS/2 format, etc., so proper implementation of the format would certainly take some time and effort. A kind of elementary implementation did not stop Serif when they added basic (currently bugged and incomplete) support for WebP and and JPEG XL, so in that sense just adding basic support for Windows BMP format (which inherently does not support ICC color profiles and would be very simple to implement in plain RGB format), as well, is something that at least Windows users can reasonably expect to have, and are also likely to have sooner or later. -
Letter spacing in the Publisher
lacerto replied to Gnobelix's topic in Desktop Questions (macOS and Windows)
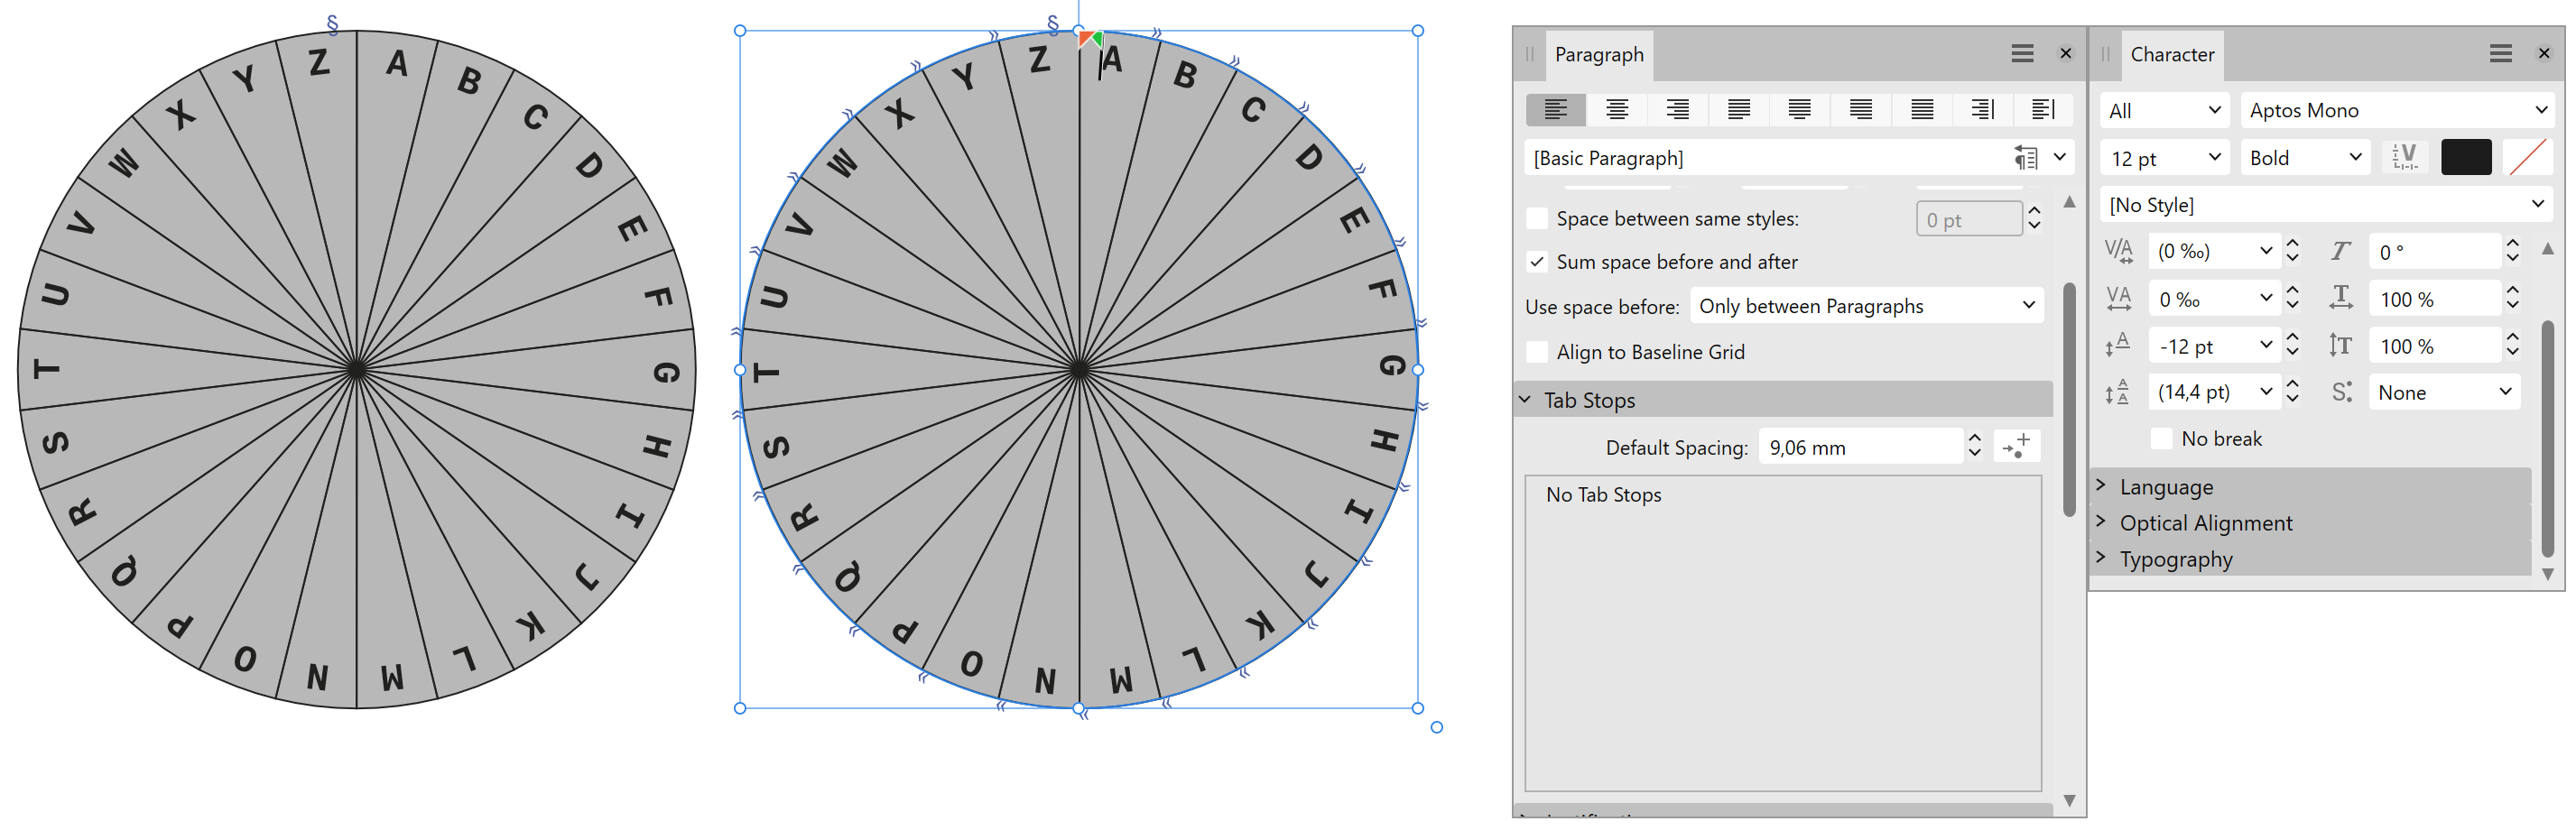
Yes, and both methods can also be used (with monospaced fonts) labelling e.g. sectors of a pie object:
-
Letter spacing in the Publisher
lacerto replied to Gnobelix's topic in Desktop Questions (macOS and Windows)
Using Justify All, as advised by @thomaso is useful, and can be applied accurately with a monospaced font to create a specific, uniform space width, like below, where the width is set to 5mm to create a kind of a ruler. I also noticed a bug since I suppose that the ligatures should not have effect if forced alignment is used [Actually I am not sure they should be used with monospaced glyphs, no matter which alignment is applied, so I do not see the point why ligatures have been defined for Aptos Mono, in the first place]. letterspacing.mp4 -
Ok, I see. It is quite possible that my example is not useful for you. It just limits to demonstrate a situation where a CMYK image that has already intended, final color values, can be merged using a blend mode without causing color values to change. The file also demonstrates the weak point of using Affinity based PDF/X-based transparency flattening, as the transparencies are flattened by rasterization, which shows clear pixelation of underlying rasterized text objects. In practice it may be necessary to manually remove background of all participating objects and then manually flatten them (merge them with the rest of the final image) at optimum resolution (to guarantee optimum and homogenous rasterization).
-
Try with the attached package. It may have elements that differ from the condition you have in your document, but the idea was to compare how using different Blend modes (Glow and Lighter Colour) on a placed CMYK TIFF bitmap compares to one where Blend Mode curve is used, instead. There is also a separate TIFF that has transparent background, just for easy comparison to how the yellow of the "logo" changes or is retained when using different methods. There is also a CMYK PDF that is exported by using the PDF/X-1a:2003 method that shows a PDF that has transparencies flattened (Amazon requirement), and where the original CMYK values of the logo are retained (when using the Lighter Colour blend mode). PDF/X-1a:2003 and PDF/X-3 are methods where transparencies are automatically flattened. PDF/X-1a:2003 additionally forces CMYK color mode in situations there are mixed color modes in the source files. Hope this helps! logotest.zip
-
The results may be file-dependent, but with my tests with using Lighter Colour Blend mode and forcing transparency flattening with PDF/X-1a:2003, the original CMYK color values of participating images were retained. Not so if using the Blend Options curve [But it is naturally necessary to isolate the blend mode to only affect the required layer(s)].
-
Lighter Colour blend mode respects the color values of the layer on top, which may be important as the OP mentions CMYK values.
-
Publisher rasterizes curves after data merge
lacerto replied to xtzws's topic in Desktop Questions (macOS and Windows)
I ran a quick test by placing PDF/EPS files in context of data merge, but could not reproduce the issue otherwise than when violating Affinity general PDF compatibility rules. So e.g. in the following two attachments, the Affinity logo is created in Illustrator and exported as PDF 1.3 (which Affinity apps cannot produce), and it is retained as vectors and colors unchanged (K100), no matter if it is exported to PDF1.7, or PDF/X-1a:2003 (internally 1.4) from Affinity Publisher, while the PDF containing CMYK elements ("A" characters and a K100 ellipse), exported as PDF1.4 from Affinity Publisher, will be rasterized because of violating compatibility rules for being a placed non-PDF/X file but exported using any PDF/X method (or if exported using non-PDF/X method but version number lower than the placed PDF). testpdf17.pdf testpdfx1a.pdf My point is that I could not reproduce data-merge specific anomaly in vector graphics being (inadvertently) rasterized, so it is worth the check if the reason for rasterization could be in violation of Affinity PDF compatibility rules. The easiest way to check this would be exporting using PDF v1.7, which is the most compatible export method within Affinity apps, as it should be able to export without rasterization and color changes all placed PDFs created using Affinity apps, whether PDF/X-based or not, and disregarding the version number; note though that I have note tested PDF2.0 which is not a common PDF version at least within commercial press and is not e.g. supported within Adobe ecosystem). PS. It was interesting to note that non-PDF/X-based PDF in version 1.3 (produced from Illustrator) works without issues within Affinity apps also when placed in a document that is exported using PDF/X-based methods, which demonstrates that there is something wrong in Affinity PDF/X-based exports whenever having Affinity-based non-PDF/X files placed in the document (PDF-X1a:2003 is based on 1.4, PDF/X-3 on 1.4, and PDF/X-4 on 1.6 so technically a PDF1.4 based non-PDF/X-based file, like in the posted example, should work without issues with all PDF/X-based exports). -
Why is some text black and some grey
lacerto replied to BobD's topic in Desktop Questions (macOS and Windows)
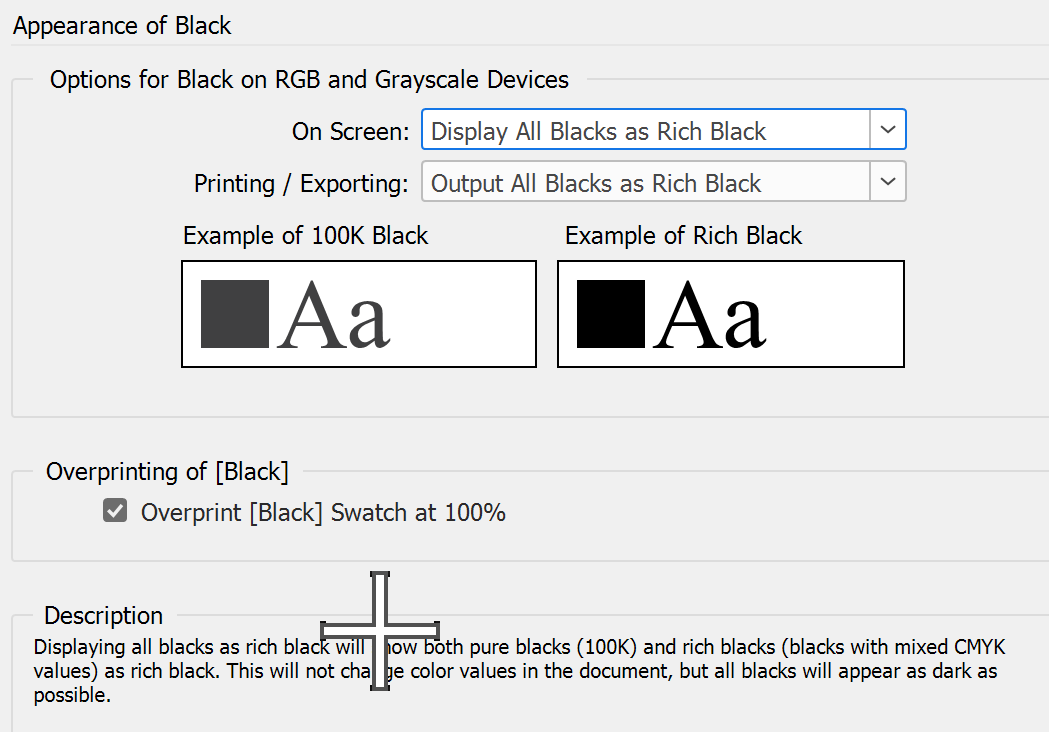
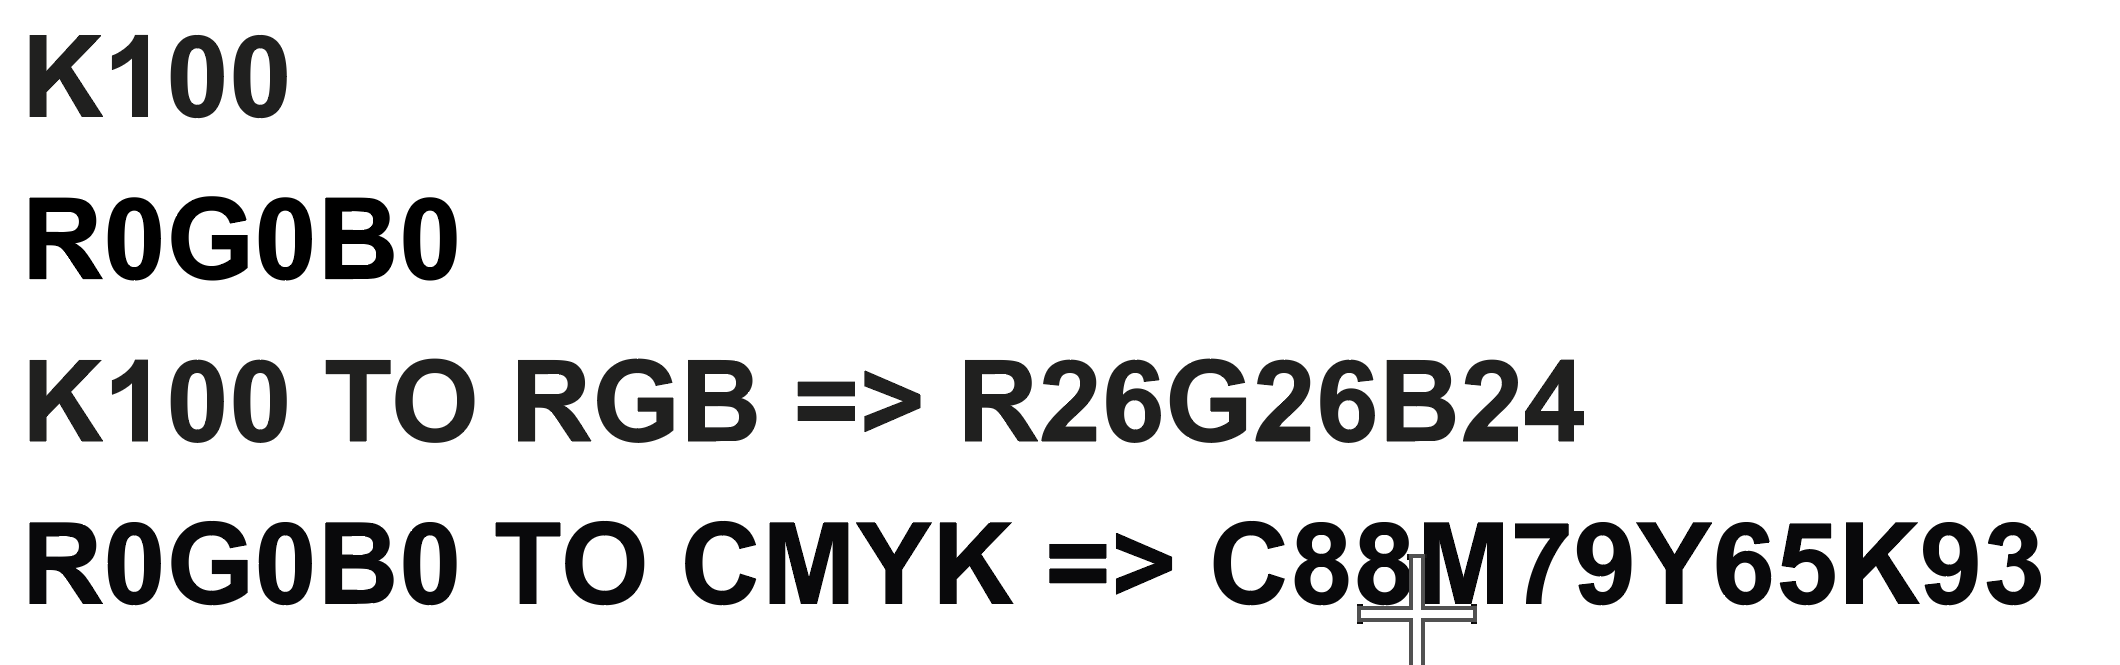
The way black color is handled can be rather complex, and is further complicated in a color managed environment where color definitions can (inadvertently) change when changing color modes, or when e.g. copy pasting identical color values from different color spaces. Just consider the following clip showing how "black" text gets handled and its appearance changes when defined in different color modes and when (intentionally) getting converted from CMYK to RGB color mode and vice versa, and also, when changing the document color mode from CMYK (where colors are simulated / proofed as if printed according to the active CMYK color profile) to RGB: blacks.mp4 In e.g. InDesign, there are user-selectable controls which allow avoid this fluctuation by optionally rendering all black as black as possible (without actually changing the underlying color definitions), instead of using true values. It is also interesting to note the differences in color conversions between Affinity Publisher (as shown above) and InDesign (below), when the underlying document color profiles are identical (sRGB and ISO Coated v2). The small difference in CMYK to RGB conversion is understandable, but I wonder if RGB0,0,0 to CMYK conversion was previously similar as in Adobe ecosystem, so that the conversion would be rich black (rather than K95)?
-
I would "solve" this by replacing the text parts that need to be hidden by using forced line breaks (assuming that the text object uses common line spacing) -- and making a hidden copy of the original text if it should still be available. Basically leaving clipped objects as "available" in an exported PDF is expected behavior, but it may require specific tools to be able to select and edit them (so e.g. clipped ellipses might still be ellipses in a PDF opened for editing even if not in a PDF viewer with editing capabilities). So simply just clipping objects would not typically result in a kind of re-composed design in an exported PDF that would (selectively) destruct exported objects: instead, the export would consist of different kinds of clipping groups. More specifically, I would not expect that clipped text, which is wanted to be retained as text, and selectable, would get any special treatment, when exported. UPDATE: In e.g. InDesign, it would be possible to select clipped parts of text and convert just these parts to curves (while retaining the visible part as selectable text), but that would not "hide" what was actually written, just make it non-selectable as text. If there are privacy or security interests involved, these kinds of issues should be resolved differently.
-
Visible Vector Seams/Bounds Removal?
lacerto replied to thinkerstjames's topic in Desktop Questions (macOS and Windows)
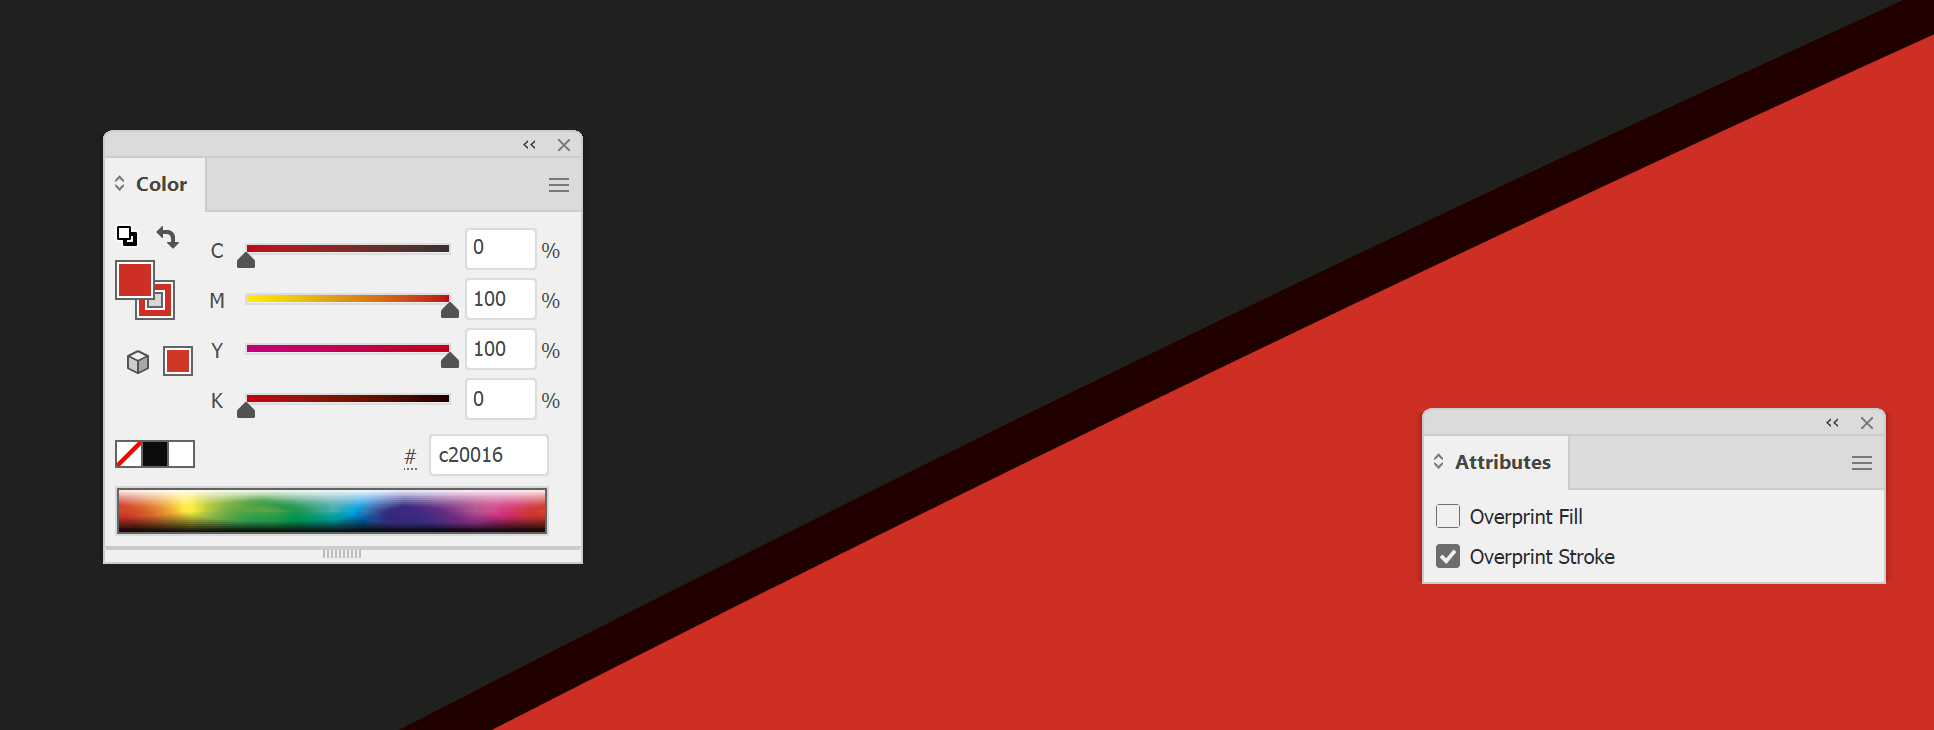
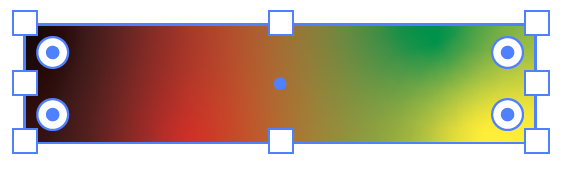
There is one thing that is not always obvious, causing all kinds of issues when opening Illustrator created PDFs in Affinity Designer. By default, Illustrator embeds native AI version of the job in a PDF saved from Illustrator. While some apps are able to interpret (at least some of) this native data, Affinity apps cannot do this, but just read in the PDF portion of the file. This means two things: The objects interpreted from PDF data have decreased editability, so the document has lost its structure, complex but editable objects have become separately rendered objects, etc. Certain objects, perfectly rendered and reproducible (printable) in PDF, may be totally omitted when opened in an Affinity apps. This includes e.g. complex gradients like this: ...also crucial production attributes like overprinting, so e.g. when a text object or any shape has trapping ensured using overprinting at abutting colors, like below having 0.2pt red outline overprinting over the background black, to avoid a gap caused by a tiny misregistration (below previewed in Illustrator, and fully carried out in the PDF saved from Illustrator): ...loses its overprint status when opened in an Affinity app (which is an omission within Affinity apps, not something that happens inherently when interpreting PDF), and becomes a knocking out element, which not only makes the text object visually "bolder" than designed, but also loses the trapping quality and typically results in the kinds of "seams" mentioned in the original post (not only showing in diverse zooming states on screen, but also when printed, as tiny gaps where paper shows between abutting colors not sharing a common ink): So, Adobe Illustrator support, which Serif lists as a kind of a compatibility feature, is severely limited, and cannot be trustfully used for professional purposes, because key features, related to (press) production, are not properly translated, and because certain objects might be totally missing, or coarsely misinterpreted when read from the PDF layer. I would be very careful in context of any kind of professional work claiming "Illustrator compatibility" without ability to open and check the details with Illustrator. This kind of trust may result in gross errors.
-
As the PDF has well-defined page boxes, Affinity apps should ideally (if not otherwise then for co-operative purposes) offer an option to crop a document (create artboards) according to an existing, document-defined page box, rather than automatically cropping to the bounding box of objects -- or at least default to cropping to the artbox (largest defined page box). I do not think that there is a conflict in having a trimbox (and bleedbox) smaller than artbox (or media box). E.g. Illustrator, CorelDRAW, VectorStyler, Xara Designer Pro and PDF-XChange all open the PDF cropping it to the artbox. Inkscape (1.4) offers options for cropping to different page boxes but then fails to create the page size according to the selected option.
-
Exporting to Webp color change
lacerto replied to Fookisan's topic in Desktop Questions (macOS and Windows)
I think these are just hastily implemented features. At some point Serif was eager to have an apparently competitive feature list half-way implemented, leaving loose ends to be "soon" attended (at some point even along some kind of a roadmap). The way the support for .webp and .jxl is implemented is a kind of a hallmark of this kind of development, sometimes called "promiseware". Now the development has been stalling for a good amount of time, so it could be said that we now have "hopeware". That's just fine if one is not dependent on missing features so that one can pay once for working, existing, software and then a little bit for a another, hoping the best for the future competition! Win-win, or lose-lose 🙂 -
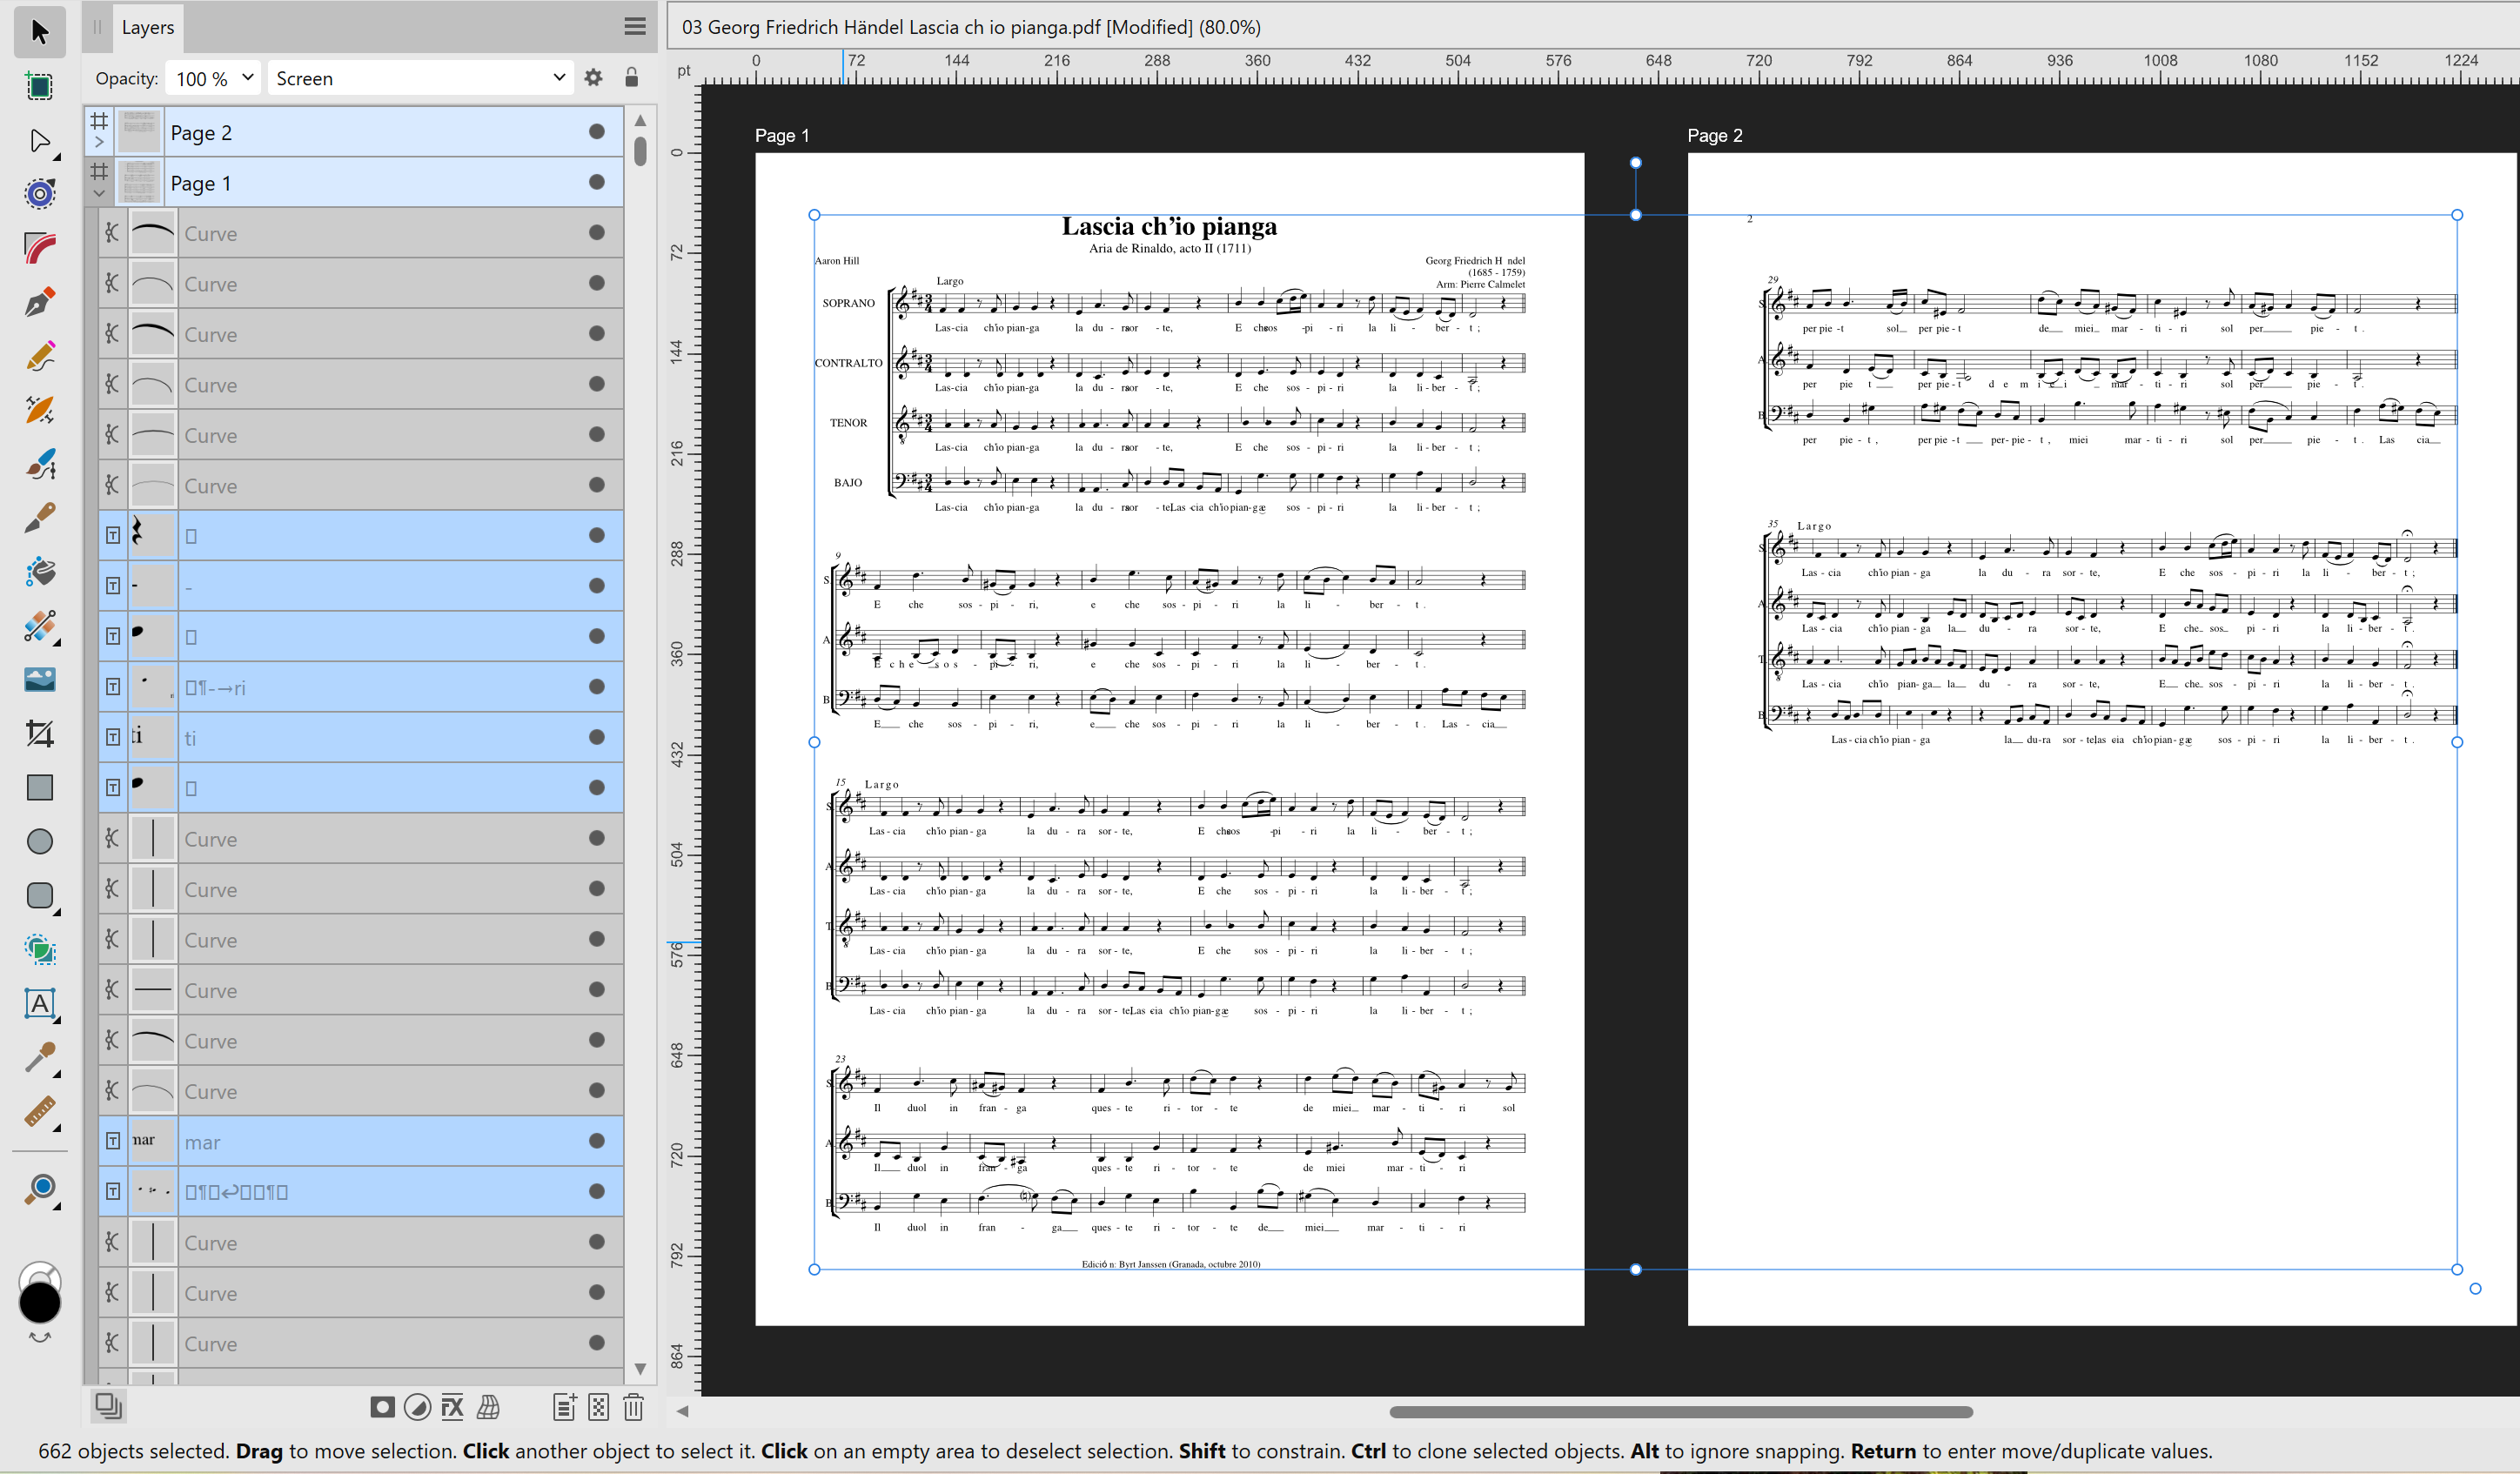
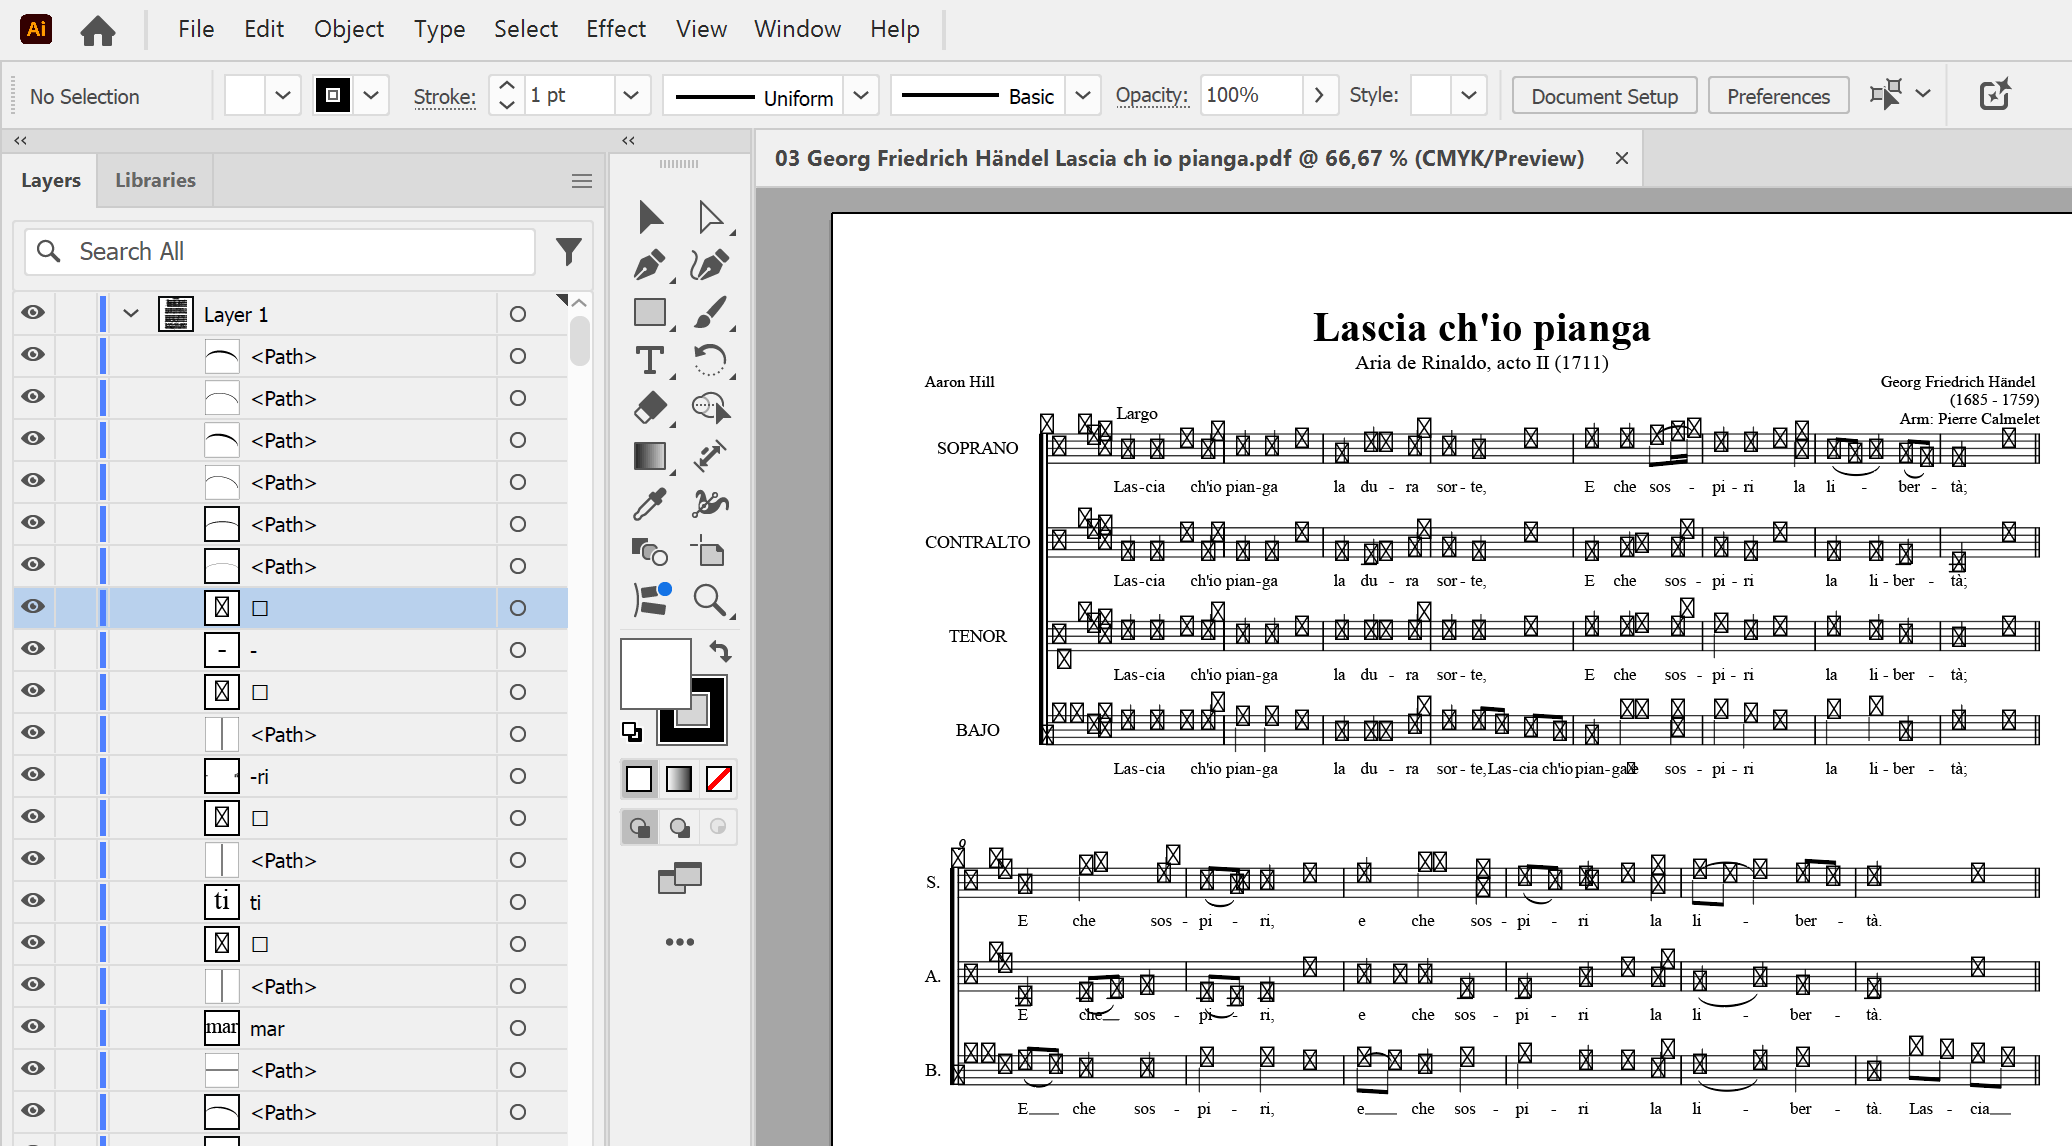
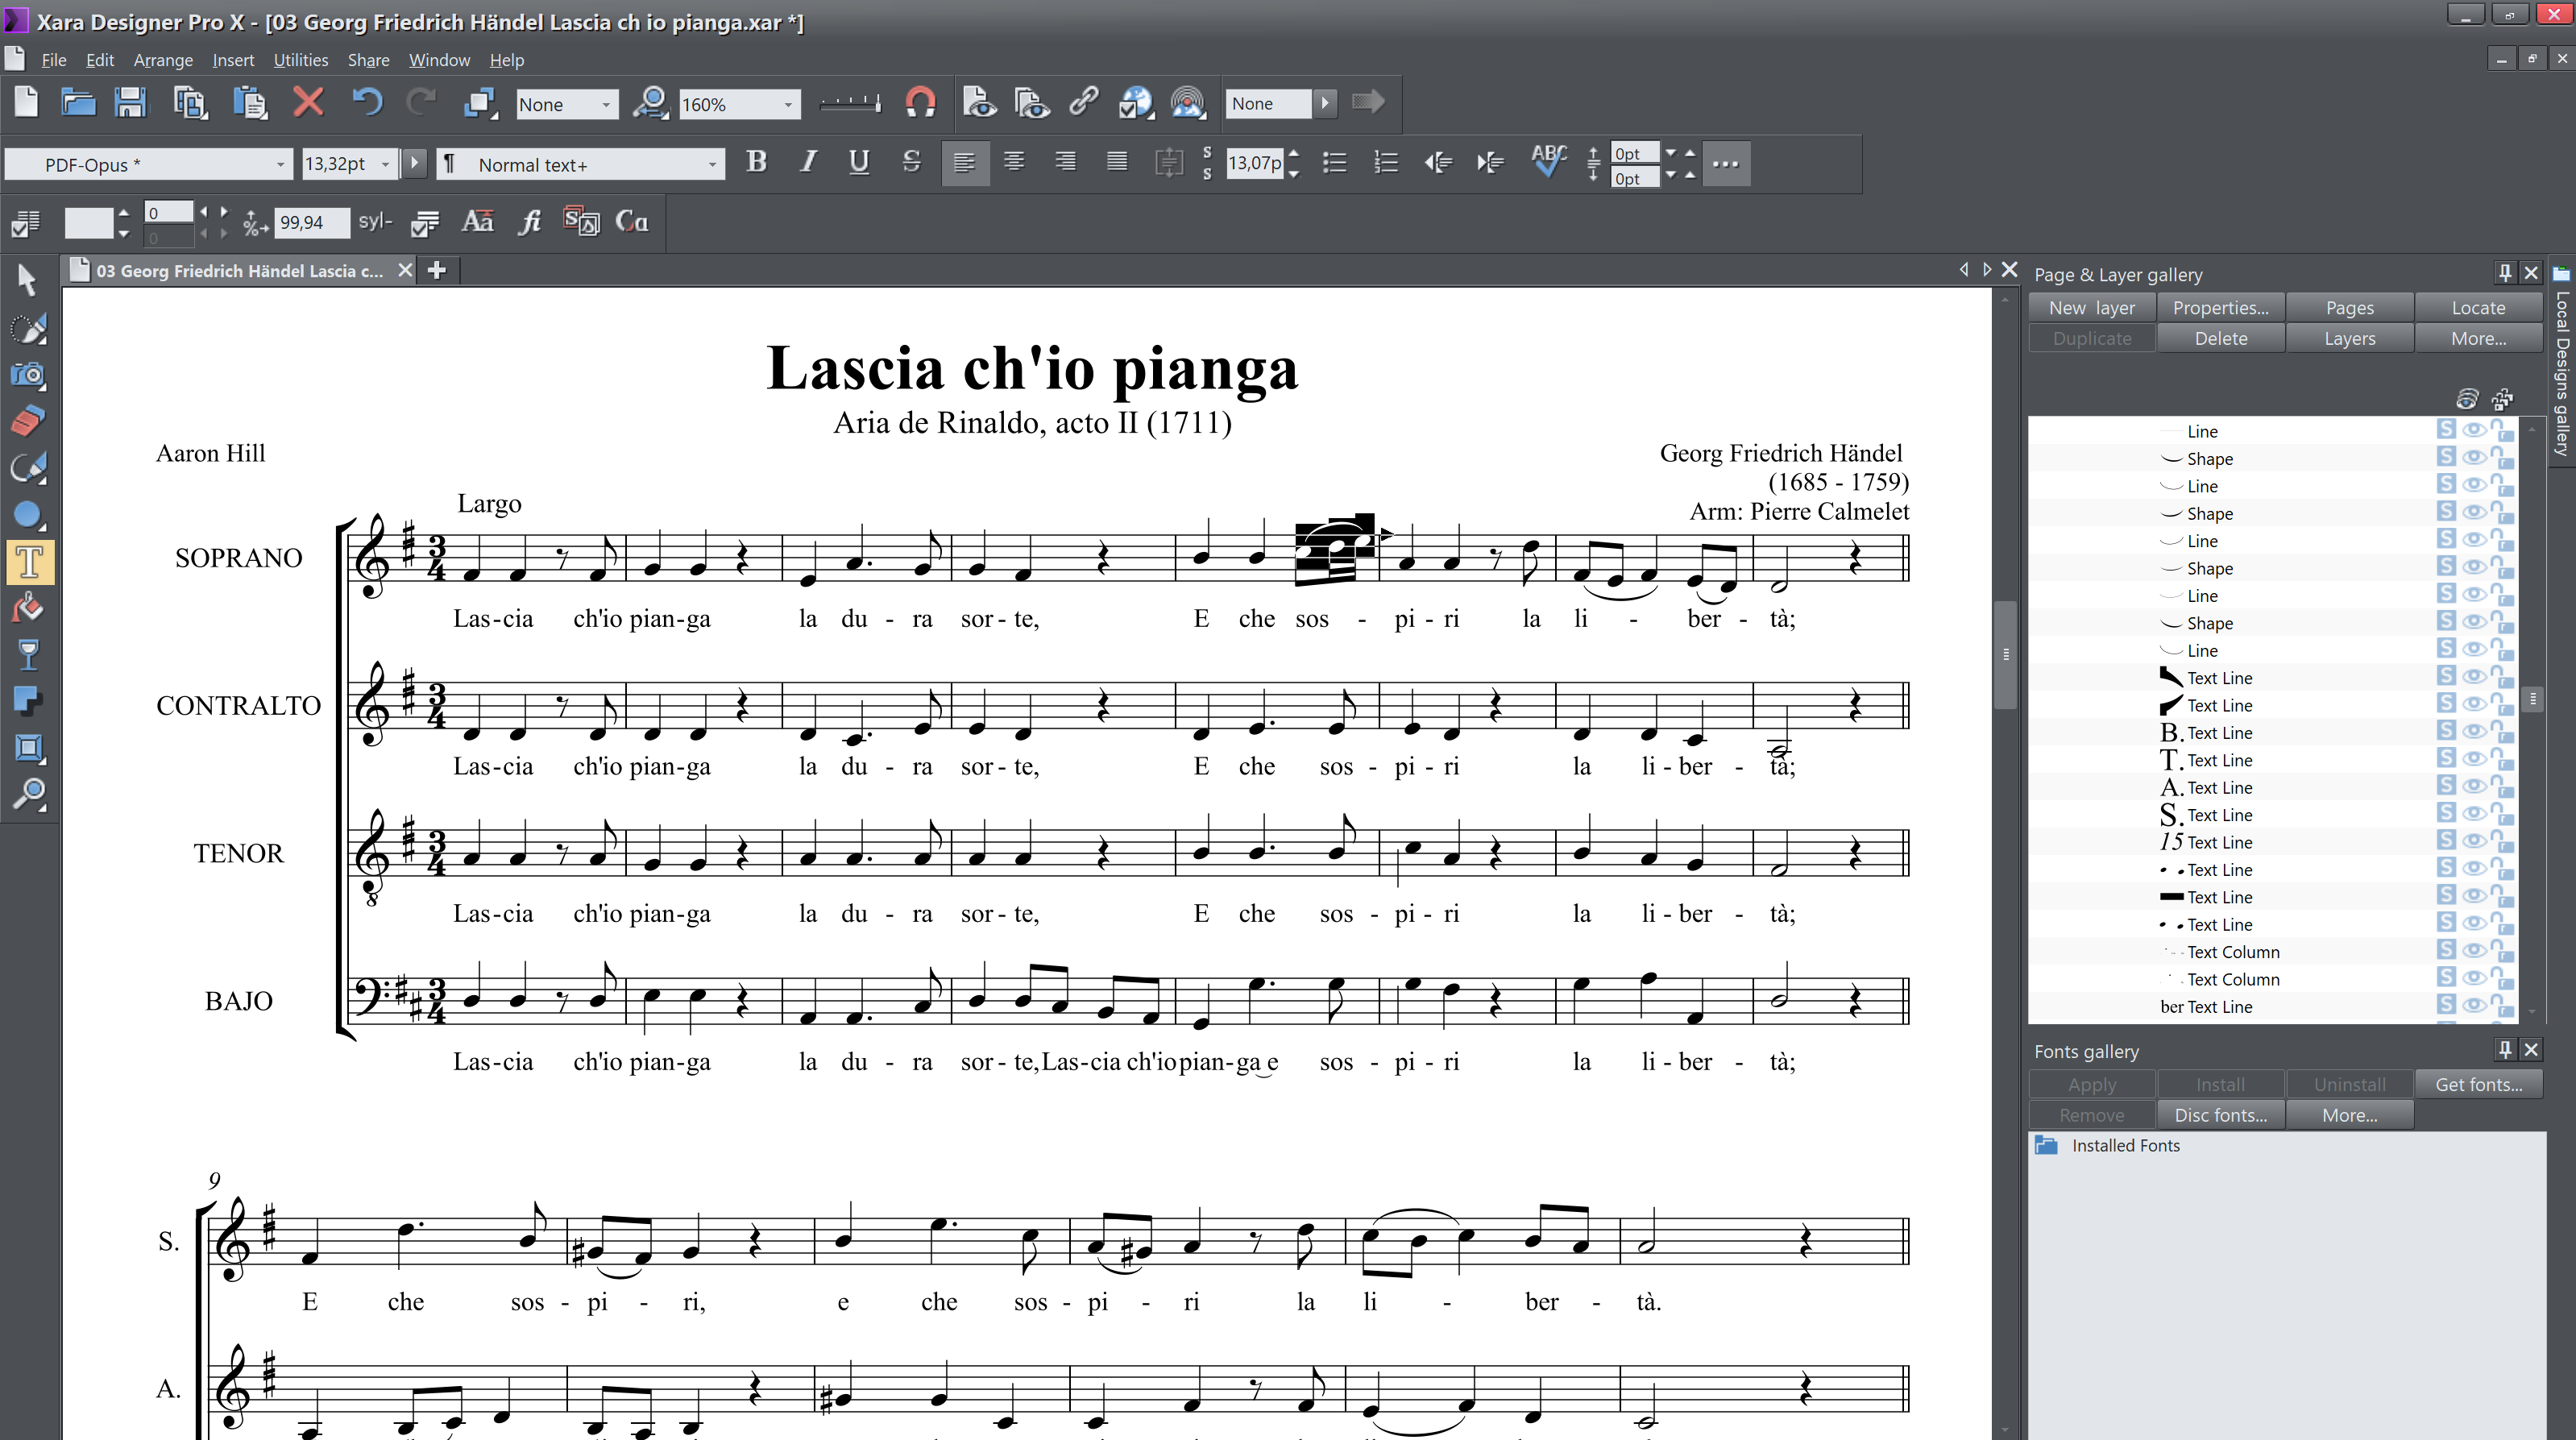
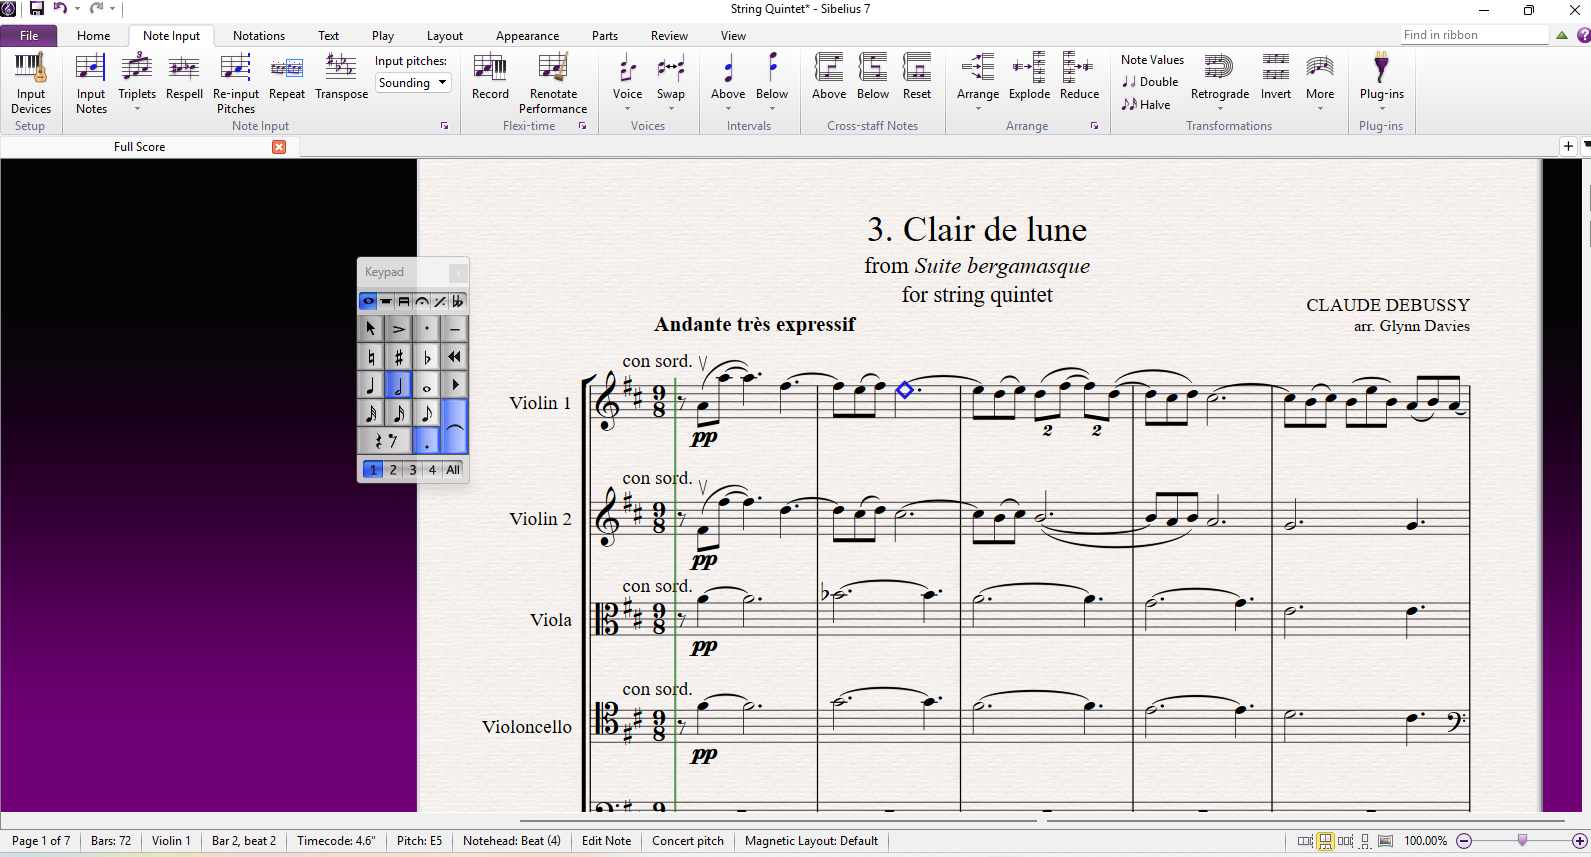
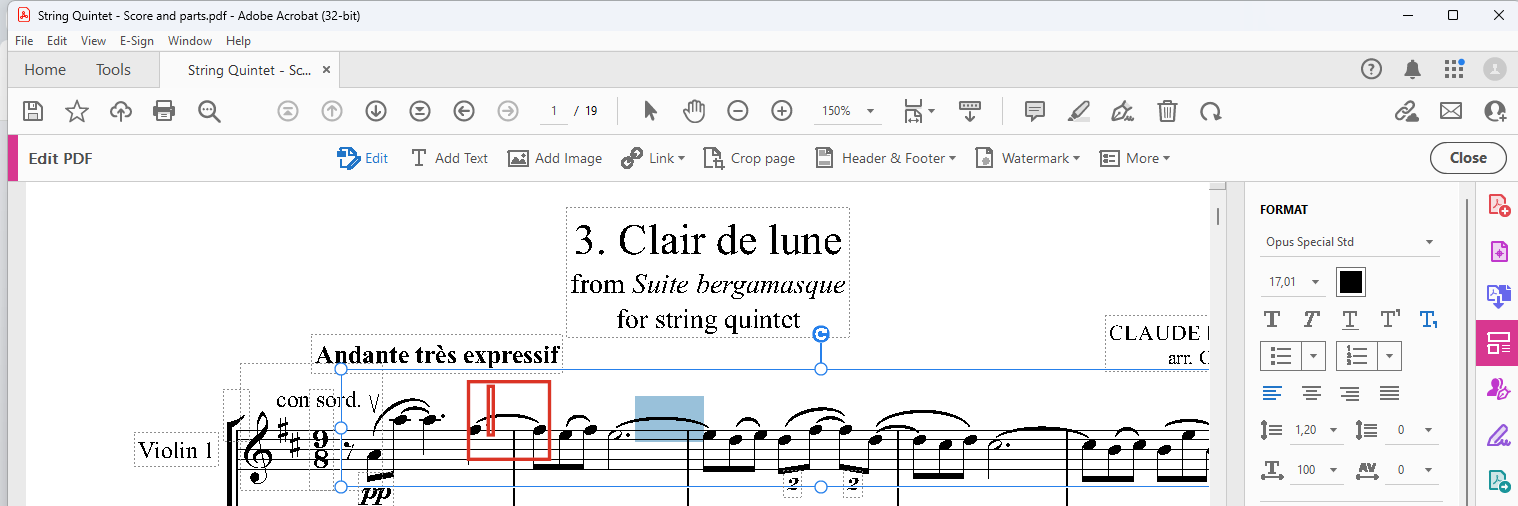
What you say "exactly" above is: ...which is not what I see: It is not at all mess, having 662 text objects mapped to more or less correct glyphs, having mostly just vertical bars and legatos as curves. Open it in e.g. Illustrator CC2025, and see what happens when glyph-mapping fails (is given up): ...or in Xara Designer Pro (here v19.01) to see what happens when embedded glyphs are used but not mapped to actual installed fonts (fidelity is good but editability very poor): Ties would initially be text (e.g. Opus Special Std) in original notation software and when exported to PDF: ...but they would also be "edited" with pretty different "text tools" and input methods (of course mapped to keyboard, but pretty customary): What I am saying is the Affinity apps do an excellent job in interpreting the PDF. But I see no much point in using Affinity apps to edit musical scores, in any other than some limited technical tasks, needing to fix some details when the original notation software is no longer available. UPDATE: As for comparison to PDF editing (with e.g. Adobe Acrobat Pro), this is of course the main choice whenever integrity of the original file is wanted to be retained, just making isolated changes. But imagine e.g. a task where you need to translate lyrics (remove the original, or set it in layers to be selectively turned on or off as per language), etc. The file would naturally be fully re-interpreted, and there are significant risks (possible failures when RIPped for commercial press), but that kind of job would also be very painful to carry out in true PDF editor.
-
Yes, but much is "editable" text (rather than curves), so as far as appearance is close to match, it may be worth an effort (to make some minor changes). One needs to have notation software to be able to actually edit notes, durations, legatos, staccatos, etc. so I am not sure to see the point of opening a score in an Affinity app. I am just saying is that they do the interpretation pretty well...
-
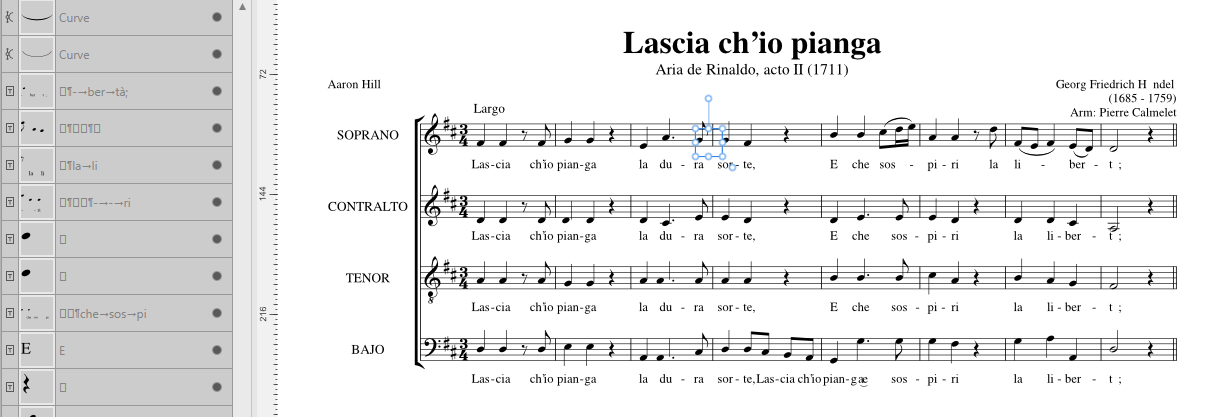
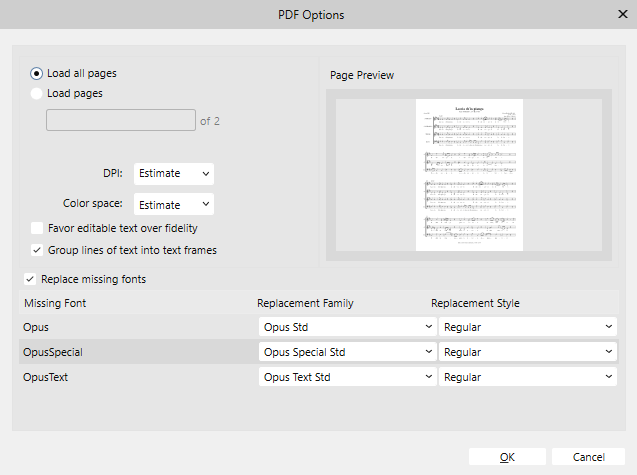
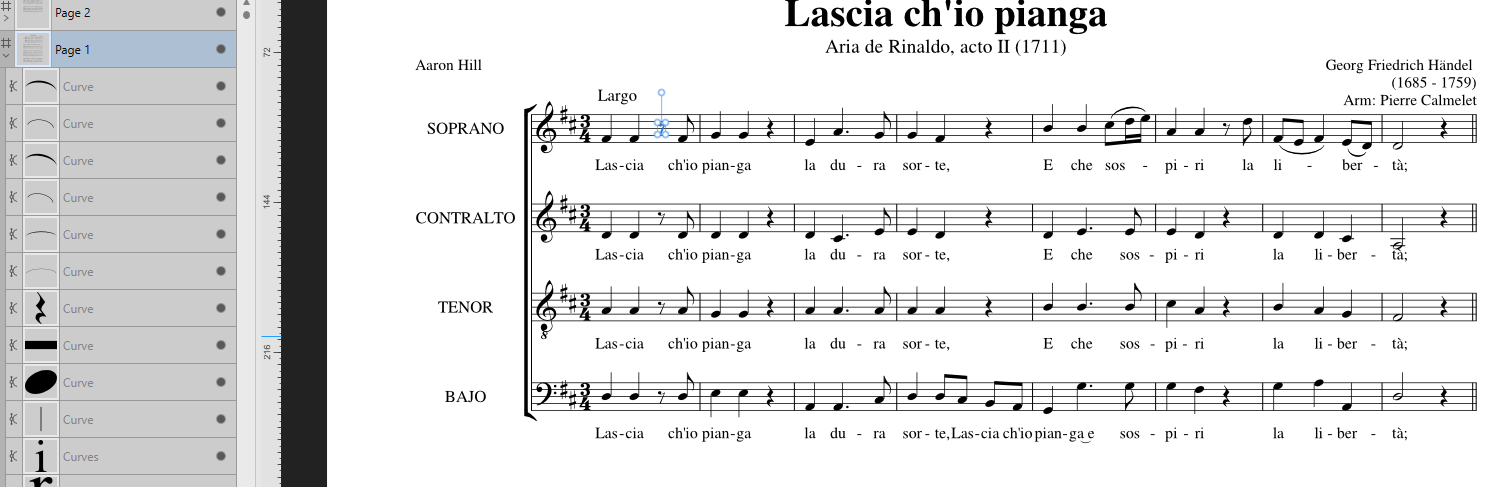
Publisher (or the other Affinity apps) map the embedded glyphs pretty well to ones of installed fonts so that the "text" remains editable, but there are prerequisites, like in this case having the Opus fonts (from Sibelius, total of 17) installed, and the old Type 1 version of Times installed (glyphs would be totally wasted if Times New Roman OpenType were used, which I suppose also makes this task inaccessible for modern macs): So, with the embedded fonts available (installed), one could get pretty usable "text": Depending on what needs to be edited, one plausible option would be to convert the embedded fonts to curves. This can be done e.g. with Adobe Acrobat Pro, or Ghostscript (which was used to create the PDF, in the first place), without having the fonts installed. When subsequently opened in e.g. Designer, the appearance is fine, but editability "symbol-wise" of course pretty much zero: 03 Georg Friedrich Händel Lascia ch io pianga_nofonts.pdf
-
Exporting to Webp color change
lacerto replied to Fookisan's topic in Desktop Questions (macOS and Windows)
At least in the Windows version (2.6.3) it is possible to drop the document profile when exporting to JXL. But then there is another bug where Affinity Photo (at least) adds a Color Profile meta data tag and marks it for sRGB, without making a conversion, so the result [whenever working with non-sRGB source file] would be guaranteed to be interpreted erroneously when the file is opened. It seems that it is not possible to omit this meta data misinformation for JXL files. -
Exporting to Webp color change
lacerto replied to Fookisan's topic in Desktop Questions (macOS and Windows)
You probably mean that Affinity apps simply just ignore any profile and just export to the .webp format ignoring the document profile, just saving the color values (causing significant distortion of color values whenever a wide-gamut document profile is used). They also drop any profile embedded in a .webp file and just read in the color values, assigning any profile the user has as an active working space profile in the Preferences. However, they can embed the active document profile within a .JXL file, and do also read in any embedded profile in a .JXL file. -
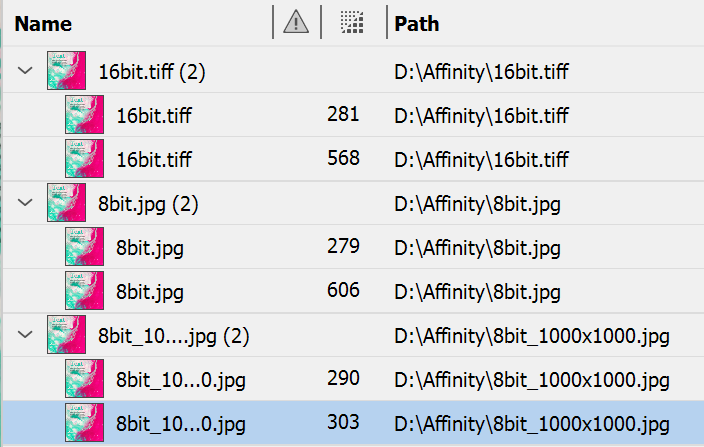
One problem might be that it seems that bit rates (16-bit TIFFs) do not get converted to 8-bit (unless "Everything" is rasterized). Is it possible for you to produce flattened images (if there is no need for retaining transparency) in 8-bit at DPIs which do not require downsampling? Those kinds of images should also be compressed effectively (but might then contain JPEG artifacts...) UPDATE: I ran a test using Publisher and InDesign where I had 16- and 8-bit TIFFs and 8-bit JPGs at varied DPIs and exported to RGB PDFs downsampling to 300dpi, using default compression rates, and noticed significant differences, especially if 16-bit TIFFs are involved. Publisher leaves them 16-bit while InDesign converts them to 8-bit (also when exporting to RGB). Files and placed PPIs involved: Export sizes: Quality-wise there were no significant differences, and texts looked fine in all files also when downsampled to 300. I have no experience of the effect of decreasing the JPG-quality (was the default 98) but as for InDesign, the image quality setting was "Maximum" and compression setting "Automatic (JPEG)", and the produced filesizes clearly smaller also when exporting (and downsampling) mere 8-bit JPGs.
-
Publisher not printing barcodes
lacerto replied to XYZ3D's topic in Desktop Questions (macOS and Windows)
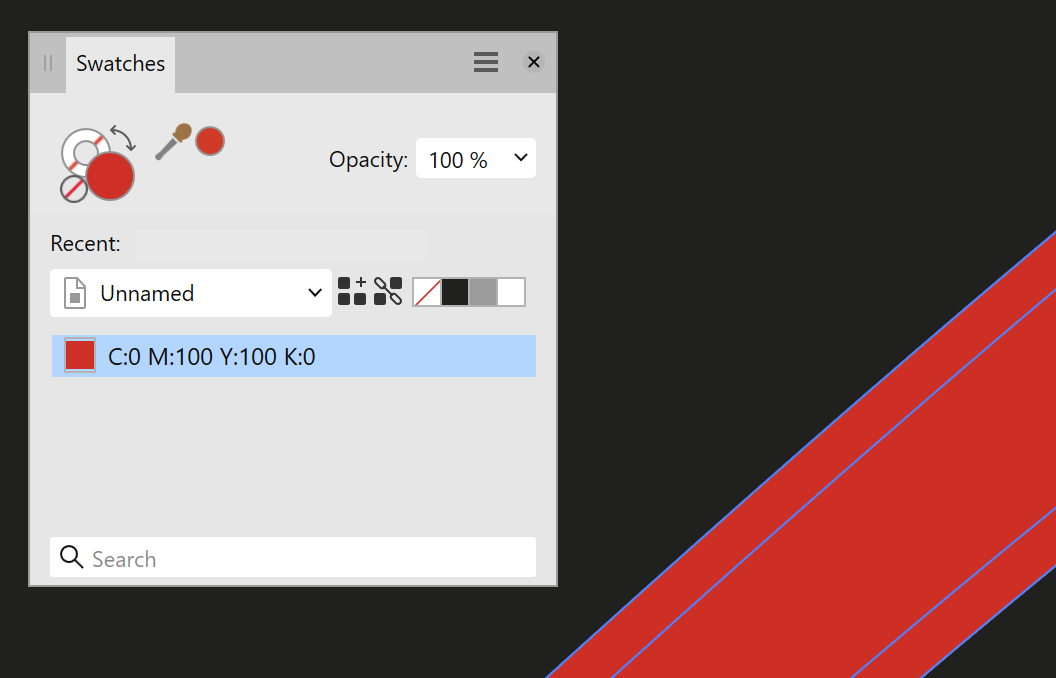
It is related to the peculiar way Affinity apps interpret and process grayscales. Your barcodes are grayscale PNGs which is perfectly fine. However, when placed / opened and interpreted, Publisher has assigned these grayscales "K-Only" attribute, which in a CMYK document allows an Affinity app to handle a grayscale image as black ink (K-Only, C, M and Y 0), which is how print industry typically processes grayscales. However, there is no such thing as CMYK PNG, or K-Only PNG, so when the document is printed, the "K-Only" PNGs are simply just ignored and will not be printed. In the following, I fix the issue by switching the color mode to CMYK so that K-Only button becomes available. I then turn off the "K-Only" attribute for all barcodes and switch back the document to RGB color mode so that the barcodes get processed as RGB images and will be printed: fixed_konly.mp4 The fixed Publisher file is also attached: Barcode_fixed.afpub -
Alphachannel in PNG - Color Change?
lacerto replied to sdaniel9h's topic in Desktop Questions (macOS and Windows)
You could also do something like this to simulate defining a matte hex color (meta data) for the transparent background of a raster image placed in Designer: changebg.mp4 -
CorelDRAW is actually pretty unique in its print capabilities, because it is one of the few that makes it possible to create fully professional (color managed) signatures and custom n-up print jobs, rather than being limited to RGB and printing to a local printer -- but these limitations are typically not significant in personal projects so users coming from e.g. Microsoft Publisher and the like (non- or semi-professional) software may expect to have these kinds of features in professional graphic design software. But in fact they are also missing from Adobe apps (or have limitations like the booklet feature of InDesign), so if something like this is needed and not given for a 3rd party (printer) to carry out, it would require e.g. duplicating and arranging pages in Adobe Acrobat Pro using a JavaScript (to avoid manual imposition workflow or tedious repetitive work when needing to make fixes or updates), or purchasing (subscribing to) an InDesign plug-in, or dedicated (typically PDF based) imposition software. So extra skills, or at least some extra money (not much, though) is typically needed... UPDATE: For Windows, there is a free imposition utility with limited features available at https://www.montax-imposer.com/download. Paid versions have less or no limitations but for simple jobs (including kinds asked in this thread) already the free version would be enough. I could not get the Acrobat Pro based plugin version of the utility save the custom templates I created, but the stand-alone version works without problems. It might take a while to learn to create more complex signatures but the utility allows manual editing so it is quite versatile. And as it operates with PDF source files, it has no problems creating color-managed output.