

lacerto
-
Posts
6,424 -
Joined
Posts posted by lacerto
-
-
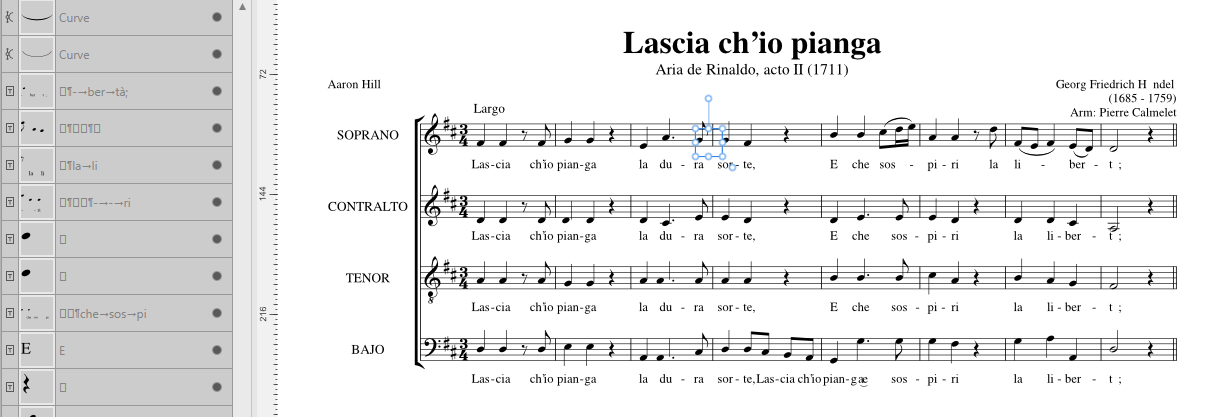
Yes, but much is "editable" text (rather than curves), so as far as appearance is close to match, it may be worth an effort (to make some minor changes). One needs to have notation software to be able to actually edit notes, durations, legatos, staccatos, etc. so I am not sure to see the point of opening a score in an Affinity app. I am just saying is that they do the interpretation pretty well...
-
Publisher (or the other Affinity apps) map the embedded glyphs pretty well to ones of installed fonts so that the "text" remains editable, but there are prerequisites, like in this case having the Opus fonts (from Sibelius, total of 17) installed, and the old Type 1 version of Times installed (glyphs would be totally wasted if Times New Roman OpenType were used, which I suppose also makes this task inaccessible for modern macs):

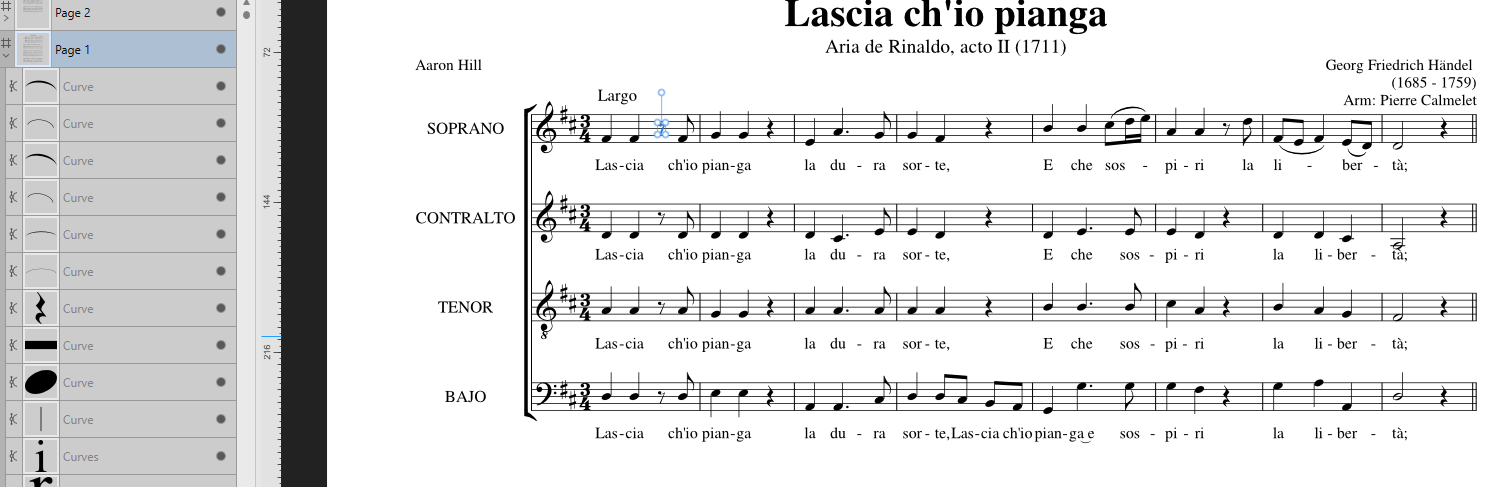
So, with the embedded fonts available (installed), one could get pretty usable "text":
Depending on what needs to be edited, one plausible option would be to convert the embedded fonts to curves. This can be done e.g. with Adobe Acrobat Pro, or Ghostscript (which was used to create the PDF, in the first place), without having the fonts installed. When subsequently opened in e.g. Designer, the appearance is fine, but editability "symbol-wise" of course pretty much zero:
-
5 hours ago, Markus Plutonika said:
Yes, JXL can – in fact must – be exported with embedded profiles. At least in my installation, I can’t uncheck embedding.
At least in the Windows version (2.6.3) it is possible to drop the document profile when exporting to JXL. But then there is another bug where Affinity Photo (at least) adds a Color Profile meta data tag and marks it for sRGB, without making a conversion, so the result would be guaranteed to be interpreted erroneously when the file is opened. It seems that it is not possible to omit this meta data misinformation for JXL files.
-
28 minutes ago, Markus Plutonika said:
It seems like AD silently converts WEBP and JXL to sRGB without embedding the profile.
You probably mean that Affinity apps simply just ignore any profile and just export to the .webp format ignoring the document profile, just saving the color values (causing significant distortion of color values whenever a wide-gamut document profile is used). They also drop any profile embedded in a .webp file and just read in the color values, assigning any profile the user has as an active working space profile in the Preferences.
However, they can embed the active document profile within a .JXL file, and do also read in any embedded profile in a .JXL file.
-
2 hours ago, Nightjar said:
I don't get why or why AP wouldn't downsample the TIFFs
One problem might be that it seems that bit rates (16-bit TIFFs) do not get converted to 8-bit (unless "Everything" is rasterized). Is it possible for you to produce flattened images (if there is no need for retaining transparency) in 8-bit at DPIs which do not require downsampling? Those kinds of images should also be compressed effectively (but might then contain JPEG artifacts...)
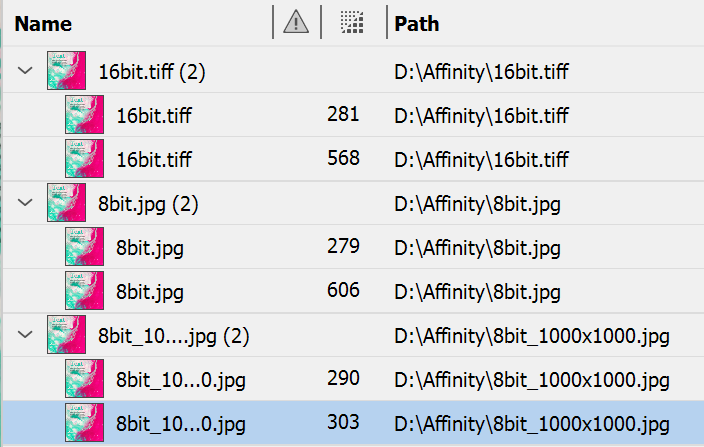
UPDATE: I ran a test using Publisher and InDesign where I had 16- and 8-bit TIFFs and 8-bit JPGs at varied DPIs and exported to RGB PDFs downsampling to 300dpi, using default compression rates, and noticed significant differences, especially if 16-bit TIFFs are involved. Publisher leaves them 16-bit while InDesign converts them to 8-bit (also when exporting to RGB).
Files and placed PPIs involved:
Export sizes:
Quality-wise there were no significant differences, and texts looked fine in all files also when downsampled to 300. I have no experience of the effect of decreasing the JPG-quality (was the default 98) but as for InDesign, the image quality setting was "Maximum" and compression setting "Automatic (JPEG)", and the produced filesizes clearly smaller also when exporting (and downsampling) mere 8-bit JPGs.
-
It is related to the peculiar way Affinity apps interpret and process grayscales. Your barcodes are grayscale PNGs which is perfectly fine. However, when placed / opened and interpreted, Publisher has assigned these grayscales "K-Only" attribute, which in a CMYK document allows an Affinity app to handle a grayscale image as black ink (K-Only, C, M and Y 0), which is how print industry typically processes grayscales. However, there is no such thing as CMYK PNG, or K-Only PNG, so when the document is printed, the "K-Only" PNGs are simply just ignored and will not be printed.
In the following, I fix the issue by switching the color mode to CMYK so that K-Only button becomes available. I then turn off the "K-Only" attribute for all barcodes and switch back the document to RGB color mode so that the barcodes get processed as RGB images and will be printed:
The fixed Publisher file is also attached:
-
You could also do something like this to simulate defining a matte hex color (meta data) for the transparent background of a raster image placed in Designer:
-
21 hours ago, thomaso said:
Yes, I agree, of course workarounds can be annoying and not very welcome.
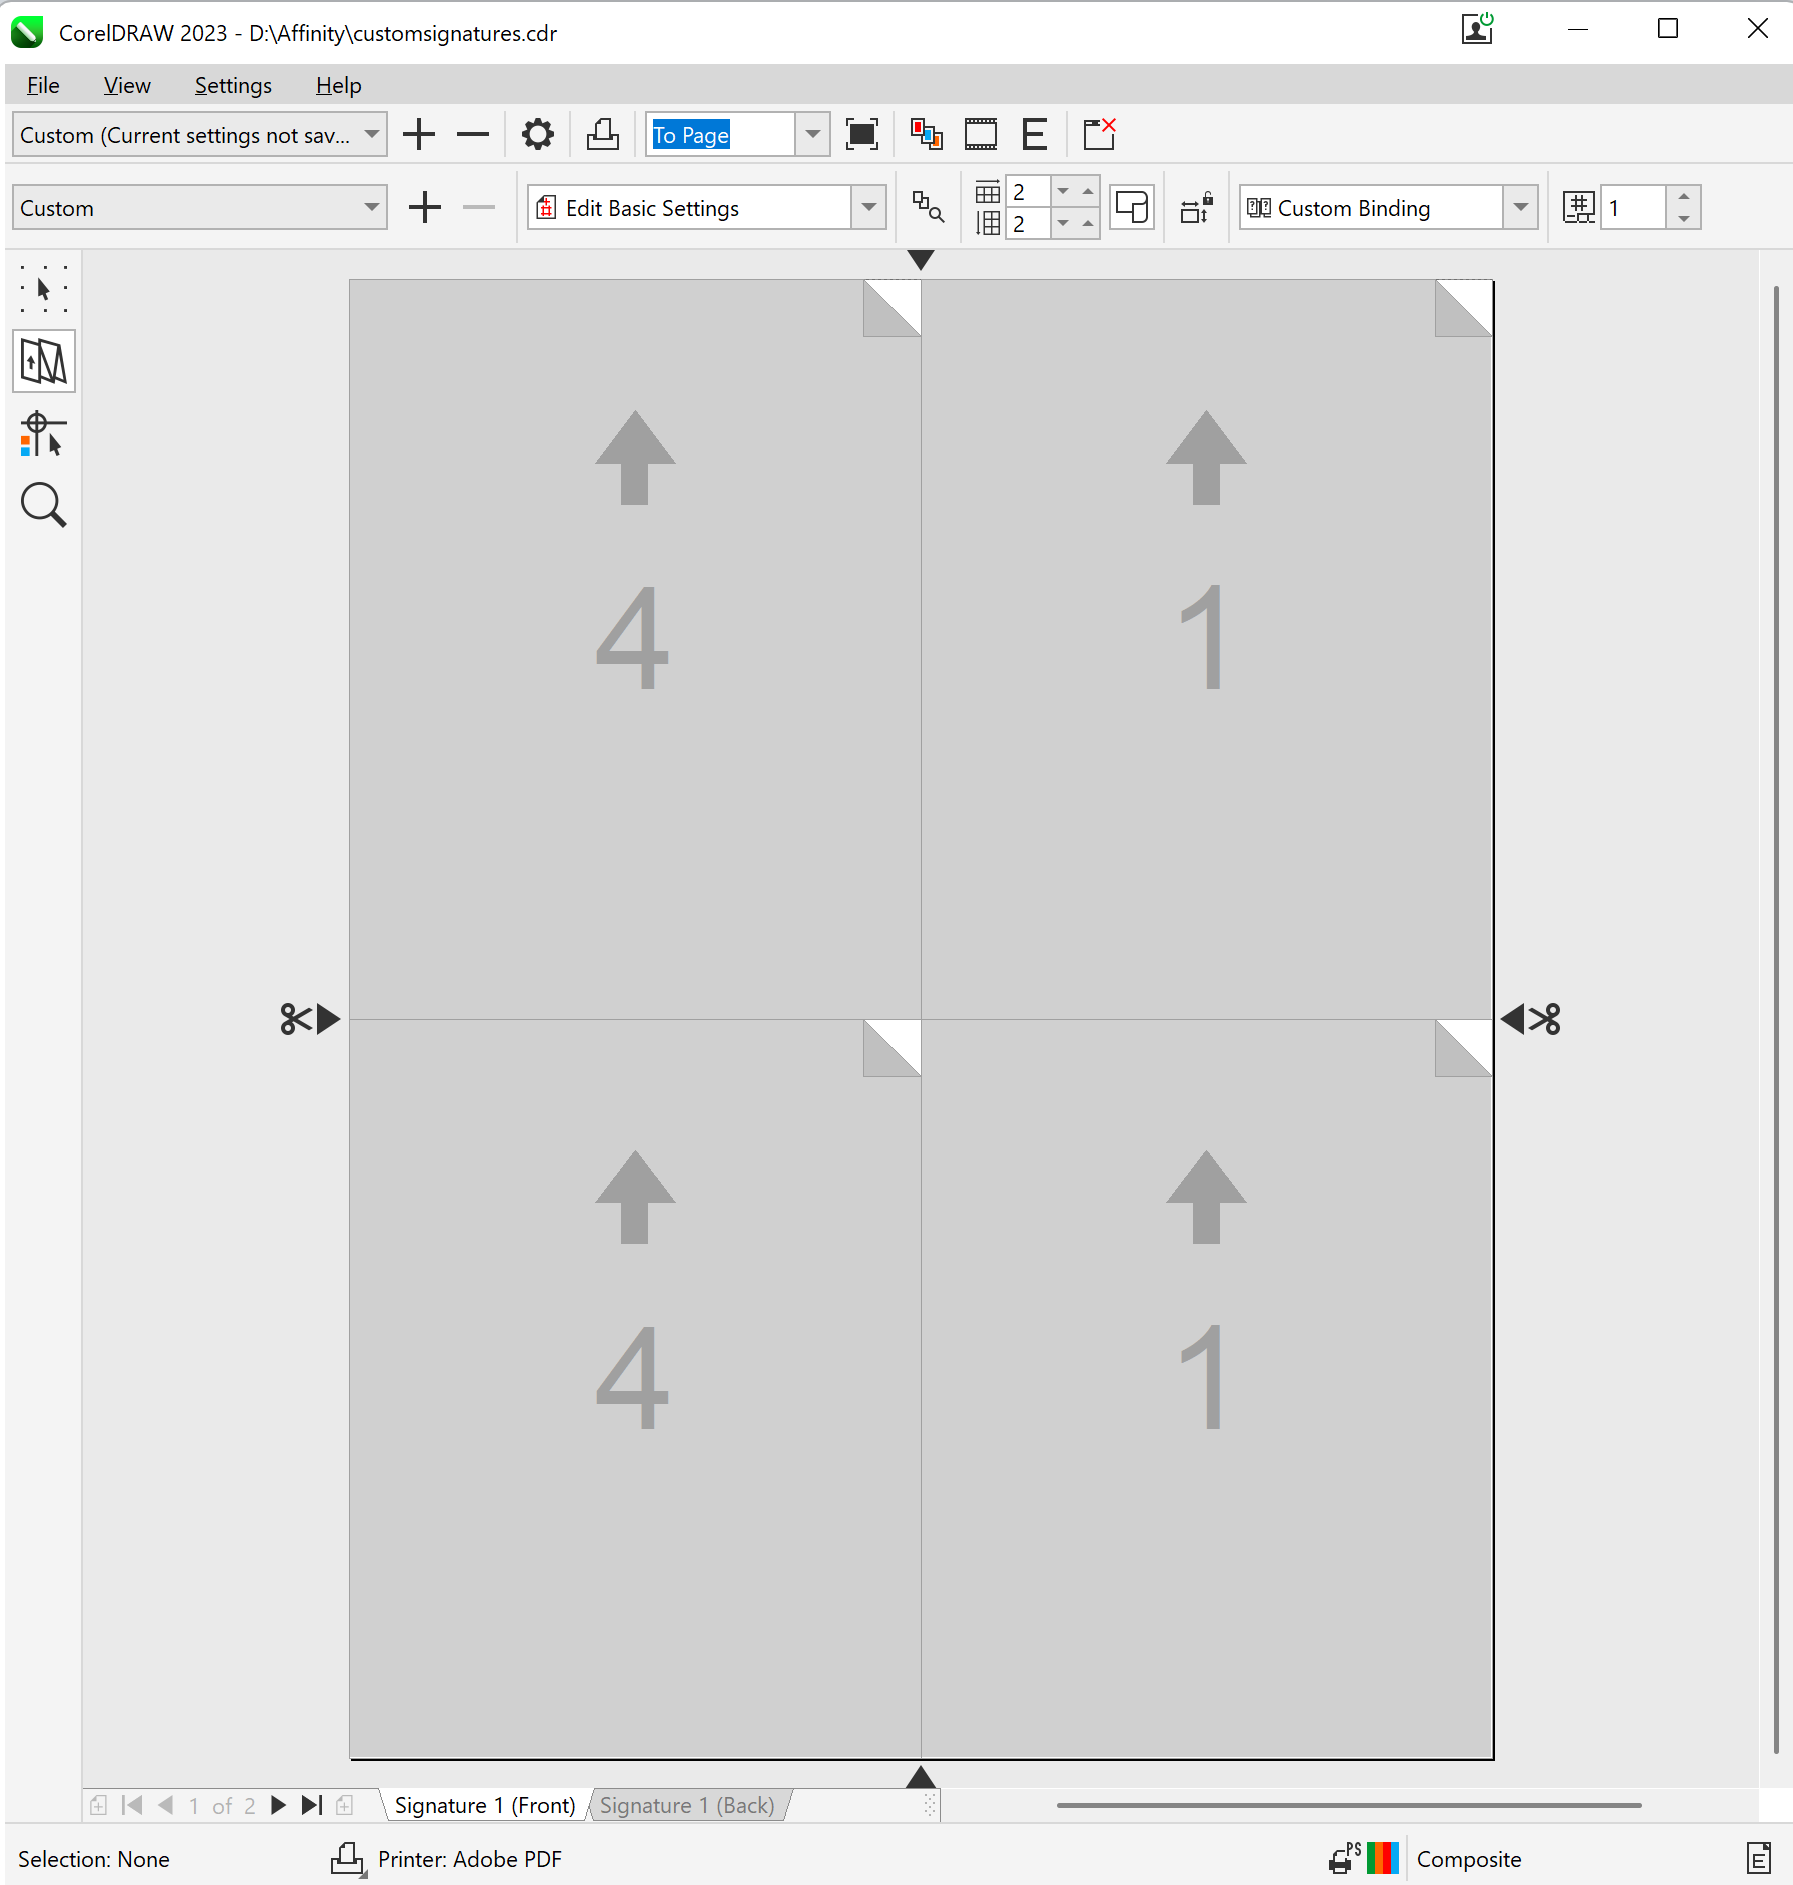
CorelDRAW is actually pretty unique in its print capabilities, because it is one of the few that makes it possible to create fully professional (color managed) signatures and custom n-up print jobs, rather than being limited to RGB and printing to a local printer -- but these limitations are typically not significant in personal projects so users coming from e.g. Microsoft Publisher and the like (non- or semi-professional) software may expect to have these kinds of features in professional graphic design software.
But in fact they are also missing from Adobe apps (or have limitations like the booklet feature of InDesign), so if something like this is needed and not given for a 3rd party (printer) to carry out, it would require e.g. duplicating and arranging pages in Adobe Acrobat Pro using a JavaScript (to avoid manual imposition workflow or tedious repetitive work when needing to make fixes or updates), or purchasing (subscribing to) an InDesign plug-in, or dedicated (typically PDF based) imposition software. So extra skills, or at least some extra money (not much, though) is typically needed...
UPDATE: For Windows, there is a free imposition utility with limited features available at https://www.montax-imposer.com/download. Paid versions have less or no limitations but for simple jobs (including kinds asked in this thread) already the free version would be enough. I could not get the Acrobat Pro based plugin version of the utility save the custom templates I created, but the stand-alone version works without problems. It might take a while to learn to create more complex signatures but the utility allows manual editing so it is quite versatile. And as it operates with PDF source files, it has no problems creating color-managed output.
-
On 6/28/2025 at 2:56 PM, thomaso said:
Though it suggests another than the requested workflow, it still achieves the desired result ...
Workarounds are the second nature of software with internal limits, and welcome in lack of anything better, and often just needing a bit of re-thinking and flexibility.
But having features like ones asked in this topic for ages in PC software like Microsoft Publisher -- possibly also in Serif PagePlus??? -- understandably causes frustration in users who are accustomed to create advanced projects and finish them without needing to settle with tricks and compromises (and often without help of 3rd parties). I think it was possible to create custom signatures already in CorelDRAW 1.0 in 1989 (but I might well remember wrong):
-
14 hours ago, thomaso said:
For file size reasons for instance. If an image is sRGB than a missing profile quite likely doesn't harm since it is the standard.
Well, as demonstrated above, Affinity apps often bloat the file size when meta data is omitted. And practically, it is enough to have this simple tag included, to have information on the color profile included and have the file properly color managed:
Certainly no need to drop this because saving some disk space.
But it is a different issue when full ICC profile is redundantly (and inadvertently and unnecessarily) saved just because the app cannot properly create a lean, DeviceCMYK PDF output (unless told so, using PDF/X-1a:2003, with all unwanted side effects). These are file size differences when exporting four different RGB TIFFs to press PDF using InDesign and Affinity Publisher, differences in practice consisting of (unnecessary) ICC inclusions:
...something confused like this:
UPDATE: The forum software is not color managed, so it only just takes color values, without conversion, which can be seen below, where two images, the left one having Pro Photo RGB ICC embedded, and the right one, with sRGB ICC embedded, would closely match if color managed:
First managing, then dropping is of course useful when there is no longer use for the profile (e.g. when creating DeviceCMYK files that need no further processing at RIP), to save disk space, but for general purpose there is no much point in being this frugal, since this may result in heavily distorted visual appearance when the image is used again in varied contexts...
-
I am not sure if I understood correctly your goal but if it is ok that the PDF stays in RGB color mode and placed images as small as possible, I would make sure that the document color mode is RGB/8 and not CMYK. Then you could export forcing rasterization of "Everything", and specifying downsampling to desired DPI (unless you can have placed images already at the desired resolution). This would reduce the bit depth to 24-bit (8-bits per channel), and avoid image-specific (typically redundant) inclusion of ICC profiles. You would not be able to extract anything image-wise from the PDF but you should have the end result at optimized file size and quality.
-
On 6/25/2025 at 5:08 PM, WeirdyBeardy said:
YES!! That's done it, I did that first registration thing four times and it prints perfectly
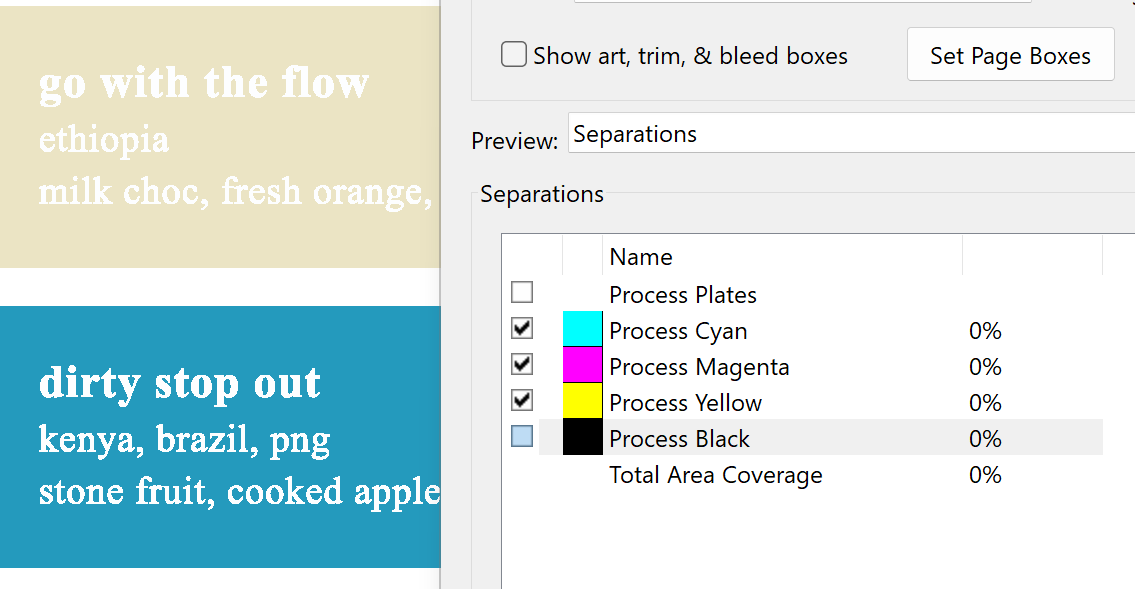
As mentioned, the initial cause of this behavior is that you have black text that knocks out other inks (Cyan, Magenta and Yellow), causing "holes" in them, and if you have any misalignment issue with print heads, it shows like this, minor white gaps between the ink edges.
In commercial press this is called misregistration, and the ways these issues are tried to be prevented is overprinting small black text on lighter colors, or adding trapping (e.g. specifying an outline that overlaps a bit with an underlying ink), or specifying a common ink for bordering objects so that there will be no paper blank between the objects when separating the job). Trapping is partially automatic in some apps (not within Affinity apps), or it can be applied by the printer or by the RIP software, but often it needs to be applied manually.
You might have been able avoid the problem without print head alignment routine also by manually applying overprint attribute for your text, like this:
Simply just having text as K100 would semiautomatically work when exporting to PDF, because Affinity apps by default overprint objects that have K100 applied on them. You had RGB 0,0,0 applied for text objects, which would typically be output as four-color black when printing or exportin [in which case you would not have experienced the problem in the first place], but as I mentioned, printing routine might result in the RGB black being converted to (near) K100 ink (in my test print to a virtual printer, it was rendered as containing 1% Cyan and 98% Black, and knocking out other inks, i.e., not overprinting), which is why I suggested that you try if defining the text as K100 would automatically make it overprint (as it does by default when exporting). But it did not work as expected when printing.
One step further would be adding C0M0Y0K100 as a swatch in a document palette, then making the swatch global, and finally applying it "Overprint" attribute, as shown in the screenshot above. This SHOULD guarantee that the text overprints also in context of printing so that any registration issues could be avoided (and it had been interesting to see if overprint attribute is truly noted in Affinity printing routines, since it might be that it is not, if Affinity apps send the printer driver converted and interpreted color data anyway).
Keeping the printer in good condition is of course always a proper thing to do, and helps avoiding all kinds of quality issues. The primary reason for the gaps might still be there in your job, so making sure that it does not occur when printing with another printer, I'd recommend making the above mentioned change (at least making sure that the text is K100 and other inks 0, which, as default, will cause that PDF exports will have black text as overprinting).
- matisso, Ldina, sfriedberg and 1 other
-
 4
4
-
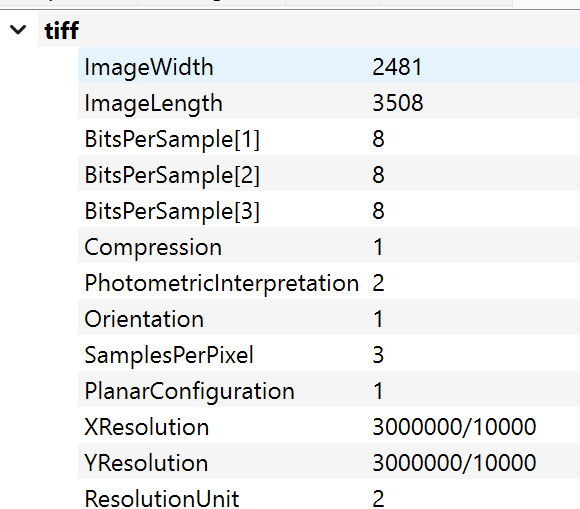
It might be that your software expects a specific metadata and tag. E.g., when saving a TIFF from PS, XMP data always contains the TIFF tag, like this:
while when exporting from Affinity apps (e.g. Designer), even when embedding metadata, this specific XMP tag is not created.
If so, you just might need to continue routing your exports using a 3rd party software (not necessarily PS).
-
10 hours ago, Nightjar said:
Why would AP keep the tiffs and put it into the PDF rather than converting it to JPEG?
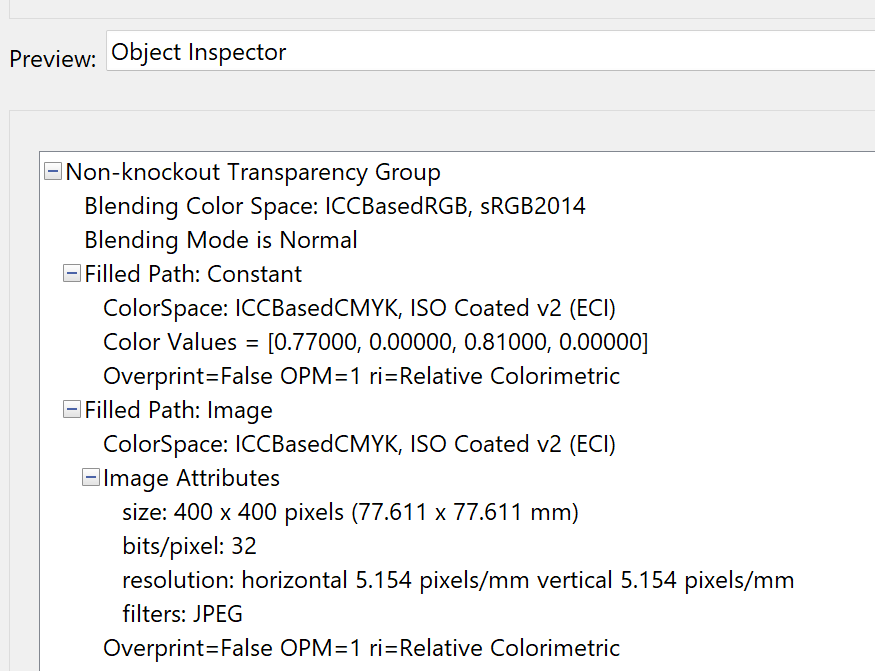
I am not sure if images get actually embedded as specific filetypes, or just as e.g. clip groups consisting of transparent or non-transparent images with specific width and height, bit depth, overprint fill/stroke state, ICC in case their color spaces have not been resolved, and compression method. When a PDF is opened and interpreted, transparent images get interpreted within Affinity apps as embedded TIFFs (as you cannot have transparent JPGs, nor CMYK PNGs, should the image be or interpreted in CMYK mode), while flattened images get interpreted as embedded JPGs (even if originally RGB TIFFs or PNGs). Another app, e.g. Illustrator, would unembed the same images as PSDs or TIFFs.
As noted above, the way images get handled (whether converted to CMYK, flattened, and their ICCs included) depends on the PDF export method. The lowest PDF version number Affinity apps supports is PDF1.4 which already allows mixed color modes so placed raster images can be left in RGB color mode even if interacting with native CMYK objects, and when this is done, in color managed environment the source ICCs need to be included. The only way that Affinity apps can automatically resolve mixed color spaces is using PDF/X-1a:2003, which forces CMYK and flattens transparencies and blend modes. Even in those cases, when you open and interpret a PDF, you can choose to interpret its elements in RGB or CMYK mode, and might get a mixed bag, depending on how they were treated when they were exported. Interpreting a PDF is a kind of an artform in itself, and Affinity apps are actually quite skillful in doing it and making PDFs editable again...
-
This is just guessing, but when I print this on Windows on to a virtual printer (Adobe PDF), the default color management is set for the app, and this results in RGB 0,0,0 black text being converted and rendered something like C1M0Y0K99, and the text knocks out. If print heads are not not fully aligned this would result in the kind of registration error described.
Currently out of office, I cannot test this on a physical laser printer, and when directed to a PDF on macOS, the text black is converted (pretty much expected) to four-color-black (in which case this issue would not happen).
It is probably much a printer specific workflow to determine how the document colors are printed, but if there are no options in the app user interface, or in the printer driver, to try with to have the current behavior changed (e.g., determining, whether colors should be managed by the app or the printer, or turning off ink saving, or direct option to force text to overprint, etc.), I would try if changing the text to K100 in the document (which you have in CMYK mode) would automatically result in black text to overprint (instead of knocking out).
-
To continue a bit more in the off-topic sidelines: I found the comment made by @lepr useful, because it led me to try to learn about the difference, e.g. from here: https://www.shadertoy.com/view/7sjBWD
This kind information is easy to find but technical in nature and not necessarily appropriate to present in this context, so I think it was ok to leave it short, as something that those interested in details can find out themselves. The link above is useful because it includes an example where it can be seen (provided that the user has appropriate environment) that the difference can be significant.
-
4 hours ago, boelens218 said:
Last, is there a way to remove the metadata from a jpeg other than using file>export?
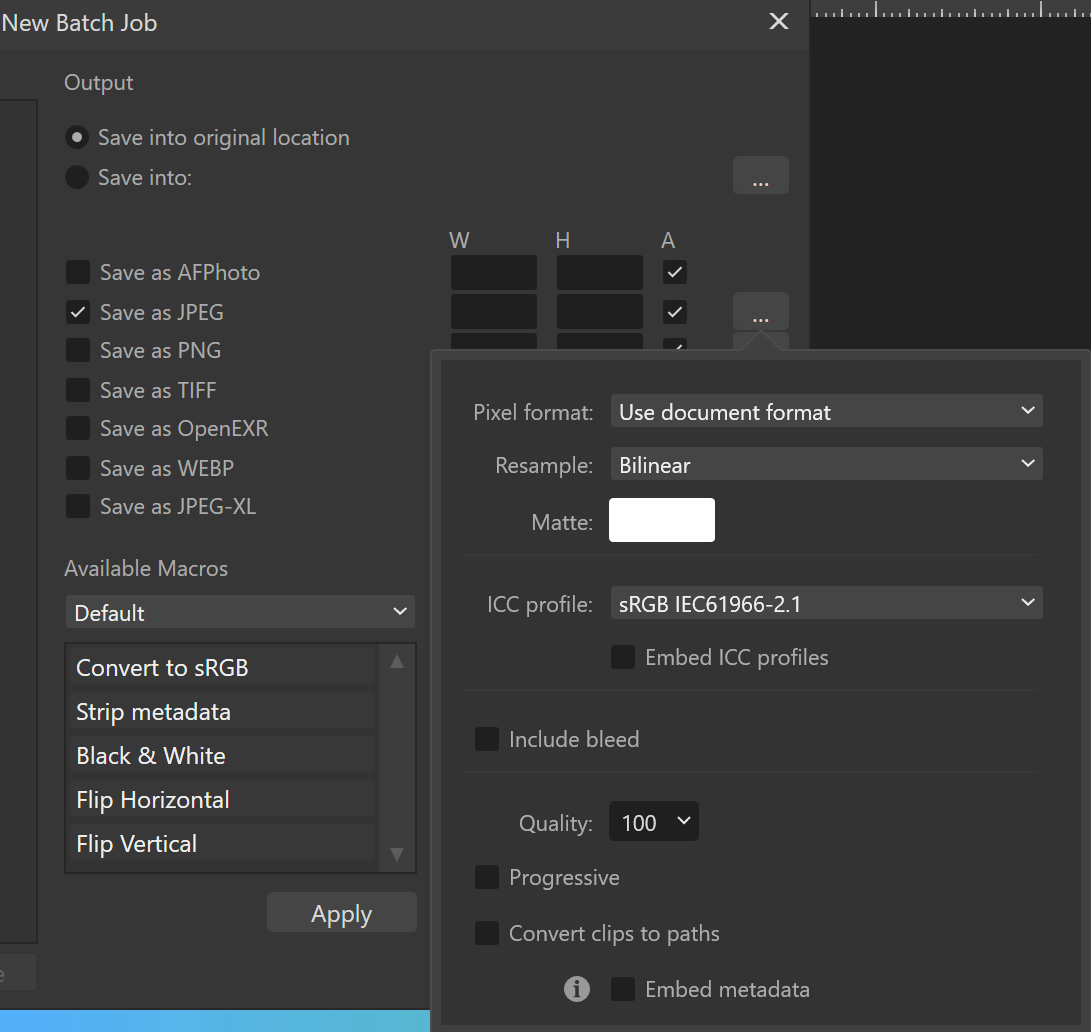
You can do this to any number of source files by using the File > New Batch Job command of APhoto, choosing to save into the original folder:
In format options, you need to leave both "Embed ICC profiles" and "Embed metadata" unchecked. The former drops the full ICC profile, and the latter will not add photoshop XMP tag, which otherwise would include information of the color profile of the file.
But as mentioned by @lepr, stripping metadata this way would in practice often result in increase of file size. E.g., below a JPG file exported from Photoshop and containing meta data, ICC profile and saved with maximum quality, results in increase of file size after having been saved/exported from Affinity Photo by using the above method, not embedding the ICC profile nor metadata:
UPDATE: Bloat may happen also when the source file is Affinity-saved, using otherwise identical settings when saving / exporting. When I first tested this with a small JPG file (around 60K), dropping the profile and metadata decreased the file size by a few kilos, but when testing with the file shown above, initially saved with Photoshop, the following happened:
-
Checking "ICC Profile" will include ICC Profile (full profile) property of ExifTool data, like this:
Checking "Embed metadata" will only include "photoshop" property of XMP data, like this:
UPDATE: Note that including this information will result in e.g. Photoshop considering the ICC is embedded (even if the full ICC profile is not)
Leaving both empty will include neither.
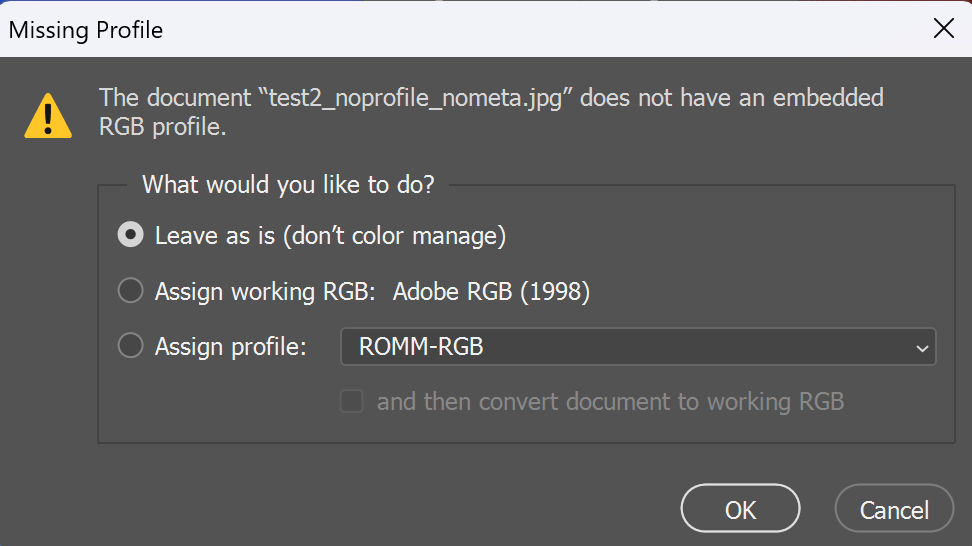
Both Affinity apps and Photoshop behave identically when assigning a working space profile to a file that has no embedded profile. You cannot have "empty" profile in a file that is being color managed. You might have been fooled by the Photoshop dialog box shown when opening a file that does not have an embedded color profile:
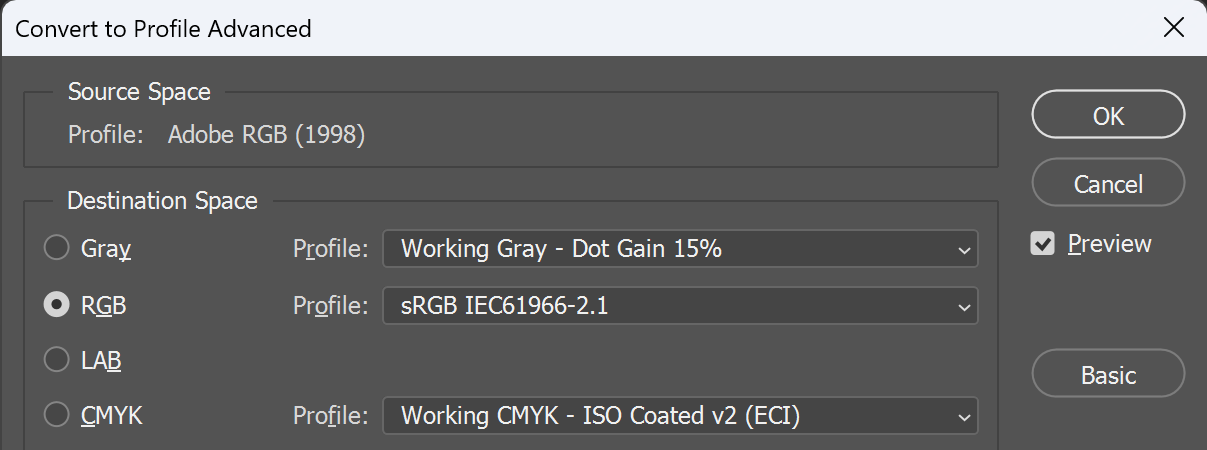
If you choose "Leave as is (don't color manage)", the file will be assigned the default working space RGB profile, which you would see e.g. if you choose Edit > Convert to Profile (here Adobe RGB (1998) because that is the default working space RGB profile in Photoshop, similarly as sRGB is in APhoto, and I have not changed it):
-
On 6/22/2025 at 8:51 PM, Ldina said:
Thanks, @lacerto. It could well be the result of different color engines, how different Operating Systems handle things, and rounding
It seems this really explains it, as when I now tested this on macOS (APhoto 2.6.3) with the same source image, I could not reproduce this. [UPDATE: On the other hand, choosing Apple CMM as the color engine in PS would result in similar differences than on Windows using Microsoft ICM.]
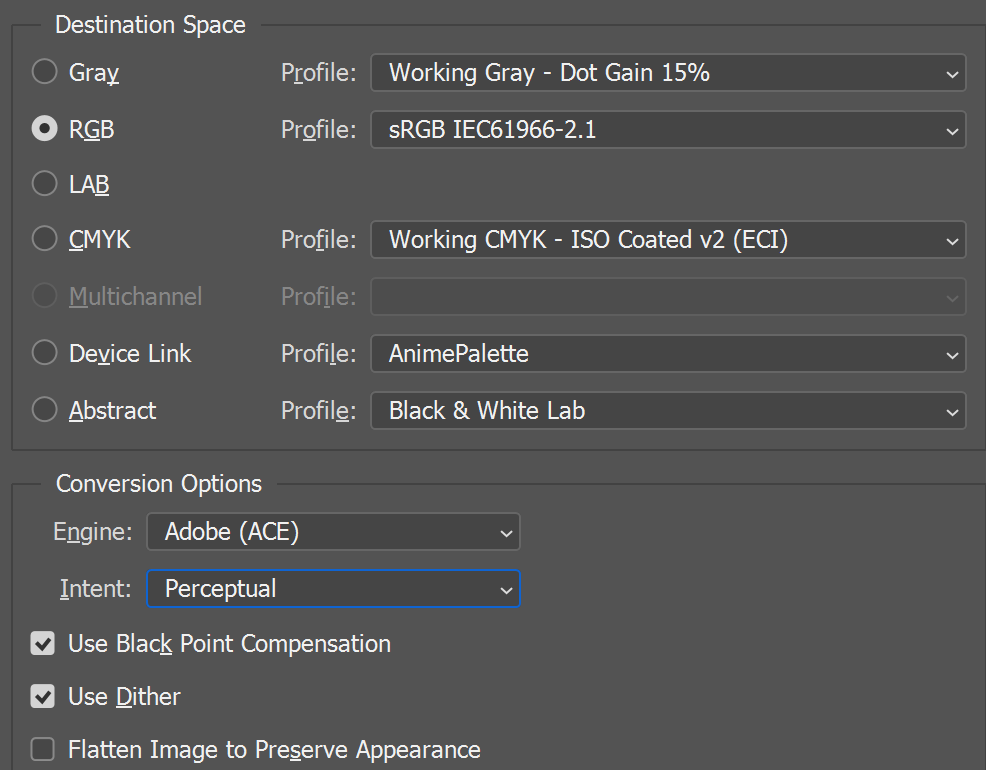
In respect of OS and color engine dependent differences, it seems that leaving rendering intent and other conversion options available (non-grayed-out) is meaningful, after all:
Anyway, considering that these options DO have significant effect in context of many if not most profile-based conversions (especially print-involved, not just RGB to CMYK but RGB to RGB-based media-specific conversions, for whatever purpose this might be useful...), perhaps graying out controls profile-wise would just be too much information and causing confusion, and much frustrated questions... Having the controls available, and seeing whether their use is meaningful or not, is in many ways more user-friendly (although it must be remembered that effect of all options cannot always be previewed realistically; within Affinity apps, though, preview is not even available).
-
4 hours ago, Ldina said:
I didn't see ANY difference in my tests, (using AP v2.6.3), a few posts ago, but that was admittedly a limited test using only one, wide-gamut P3 file converted to sRGB.
My tests did not involve but one file, either 🙂 Later I noticed that within Photoshop, selecting Microsoft ICM as the color engine (instead of the default Adobe Color Engine), also results in Absolute Colorimetric (which in PS automatically turns off BP) causing clearly different output, even when converting explicitly to sRGB [UPDATE: Later, using different image, it proved out that using Absolute Colorimetric would produce different results in context of conversion to sRGB also when using Adobe Color Engine]. I do not know what color engine Affinity apps use on Windows, but the difference we have experienced might be related to differences on Windows and macOS... More generally, I have no theoretic competence to explain anything related to color management, and my practical experience is much limited to commercial press.
-
1 hour ago, NotMyFault said:
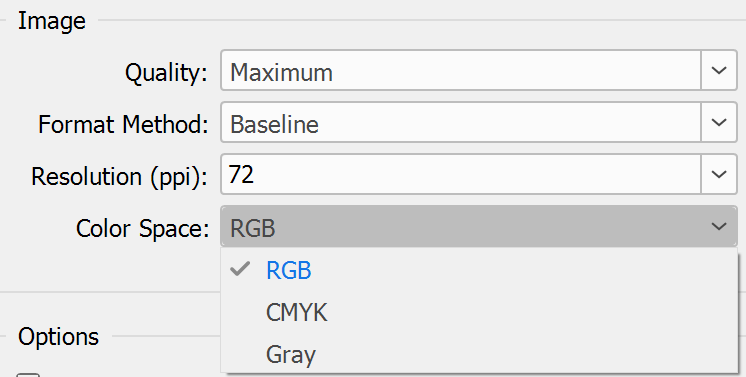
And this again is quite misleading.
In the PDF UI Affinity calls the selection of color mode a color space which is wrong.
Affinity apps are not alone. This is from Adobe InDesign JPG Export dialog box:
1 hour ago, Ldina said:Even if the interface provides selectable Perceptual or Saturation rendering intents, you will get Colorimetric rendering. So, there's no point worrying about whether rendering intents are available or not.
If the need is specifically to have color managed images from "near"-sRGB color space converted to specifically sRGB, these kinds of "problems" would probably be more or less illusory, but it is good to learn that sRGB implies this kind of conversion as a definition. The options are "unnecessarily" available also in conversion routines in context of Photoshop, but I noticed an interesting difference in that having black point compensation turned on or off DOES (often) cause different output in Affinity Photo, but no so in Photoshop, when converting to sRGB. Cannot say, which one does it "wrong".
My interest in OP's question was more generic so in practice something where creating a macro with specific ICC conversion options (including rendering intent with black point compensation option) would first be created and then applying that in a batch conversion to specific format -- which IMO would be the most pragmatic and accurate method to do such conversions en masse without (necessarily) doing it destructively. Definitely something to prefer over conversion file-by-file using the export feature (without user-selectable rendering intent options available in any case).
-
@carl123 -- I now tried batch conversion and saving to JPG and having embedding option turned off, but at least in connection of using a macro that first converts the file explicitly to the destination color space (with a specific rendering intent), APhoto still embeds the document color profile, no matter what. I initially missed the whole option dialog because the conversion was already done, so there was no need to specify profile options. Perhaps the option related to NOT embedding the profile only works if the routine actually does a conversion, but if the conversion is already done, does not have any effect [UPDATE:
No, at least on Windows the ICC is embedded also when conversion is involved, without using a macro for the conversion, so this can be considered a bugNo, the trick is to leave both "Embed ICC profiles" AND "Embed metadata" unchecked, and this works both when conversion actually takes place, and when the file is saved without needing conversion].If so, what I mentioned still seems to apply: if the user wants to have free choice of rendering intent in context of conversion, they need to use the ICC conversion routine, and then, the ICC embedding option cannot be turned off when subsequently saving the file.I have not checked if this operates differently on macOS [UPDATE: Have now, and it behaves the same on macOS].
UPDATE: The way to save a file without meta data related to color profile is to save it having both "Embed ICC profiles" and "Embed metadata" options unchecked. This works both in context of exports, and in context of batch saving, like below:
I was fooled by checking embedding of an ICC profile using Photoshop, which does not make a difference in whether a file has the full ICC profile embedded, or whether it just has been tagged as using a specific profile (e.g. sRGB) amongst it metadata, so when opening a file that has either property included, Photoshop considers the file having an ICC profile embedded (and color manages the file accordingly). I have no idea why such information would be harmful, but if no trace of profile is wanted to be included, this can be achieved by having the above mentioned options unchecked.
-
3 minutes ago, carl123 said:
What if you specified in the batch job not to embed it?
Correct, I missed the option.
-
1 hour ago, NotMyFault said:
the term color space is not used in UI within Affinity.
Sure it is, e.g. in context of PDF exports [EDIT: as shown by @carl123 in the preceding post]. There it is basically used to denote color mode (RGB, CMYK, Grayscale), which defines to which color mode native objects and text is converted, also, in the same dialog box, in context of optional conversion of image color spaces, that is, whether the placed raster images (disregarding in which color space they currently are) will be converted to the specified color mode, as well. The ICC selected will determine, which profile will be used for the conversion, and the embedding option determines whether the specified ICC will be included in the exported file.
---
As far as I understand correctly the presented question, the specific target OP wants to achieve, converting photos using diverse color managed but non-sRGB color space to sRGB, while retaining a user-defined option to select a specific rendering intent, AND, also saving the resulting files without ICC embedded, cannot be done with Affinity Photo. It would be possible to batch convert to sRGB with any of the available rendering intents, but the batch routine would have the conversion ICC embedded (I am not sure that I understand why having ICC embedded is an issue). And it would be possible to use export to convert to sRGB without ICC embedded, but that option would always use Relative Colorimetric rendering intent (with black point compensation on), and I also do not think that export tasks can be recorded as a macro.
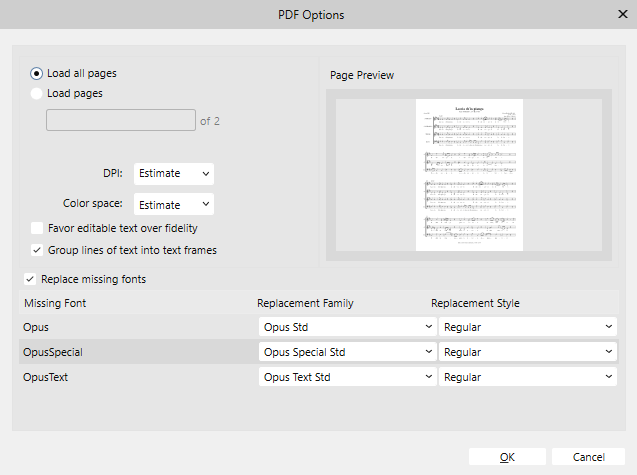


Musicscore notation Fonts required in publisher , which to choose ?
in Desktop Questions (macOS and Windows)
Posted
What you say "exactly" above is:
...which is not what I see:
It is not at all mess, having 662 text objects mapped to more or less correct glyphs, having mostly just vertical bars and legatos as curves.
Open it in e.g. Illustrator CC2025, and see what happens when glyph-mapping fails (is given up):
...or in Xara Designer Pro (here v19.01) to see what happens when embedded glyphs are used but not mapped to actual installed fonts (fidelity is good but editability very poor):
Ties would initially be text (e.g. Opus Special Std) in original notation software and when exported to PDF:
...but they would also be "edited" with pretty different "text tools" and input methods (of course mapped to keyboard, but pretty customary):
What I am saying is the Affinity apps do an excellent job in interpreting the PDF. But I see no much point in using Affinity apps to edit musical scores, in any other than some limited technical tasks, needing to fix some details when the original notation software is no longer available.
UPDATE: As for comparison to PDF editing (with e.g. Adobe Acrobat Pro), this is of course the main choice whenever integrity of the original file is wanted to be retained, just making isolated changes. But imagine e.g. a task where you need to translate lyrics (remove the original, or set it in layers to be selectively turned on or off as per language), etc. The file would naturally be fully re-interpreted, and there are significant risks (possible failures when RIPped for commercial press), but that kind of job would also be very painful to carry out in true PDF editor.