westlin Posted March 20 Posted March 20 HI All. I'm trying to put two black and white pictures together, but one is brighter than the other. but I can't figure out how to make them both the same in black and white. Anyone have any suggestions? dannyg9 1 Quote
Ldina Posted March 20 Posted March 20 @westlin Place a few sampler points (in the Info Panel) on the subject you wish to simulate tonally. This will give you target RGBA values to match. Then you can use Curves, Levels, Brightness/Contrast or other tools applied ONLY to the new layer (as a child layer) you are adding to your composite image. This will leave your original image untouched tonally, and just apply edits the the new layer. Once you have the two matching acceptably, you can then do further "global edits" to the entire image if desired. StuartRc 1 Quote 2024 MacBook Pro M4 Max, 48GB, 1TB SSD, Sequoia OS, Affinity Photo/Designer/Publisher v1 & v2, Adobe CS6 Extended, LightRoom v6, Blender, InkScape, Dell 30" Monitor, Canon PRO-100 Printer, i1 Spectrophotometer, i1Publish, Wacom Intuos 4 PTK-640 graphics tablet, 2TB OWC SSD USB external hard drive.
Taxicab Messiah Posted March 22 Posted March 22 There are lots of options. You can use the adjustments like "vibrance" and "black and white" and "recolor" to remove color and adjust color balance. You can also use "gradient map" and bring the colors from your desired black and white photo into the photo you want to adjust using the eye dropper to sample those colors. Another option is to draw a black box (or dark gray or something else) and play with the blend modes over the image - remember you can also adjust the opacity of the black box to tweak things. There is also a more advanced trick using layer ranges. Take a sample of a darker color from your preferred image and create a black box with that specific color behind the image you want to tweak. Now use the cog wheel to bring up the "source layer range" box. Then try adjusting the lower ranges of this graph which will add transparency to the darker parts of your image. This will allow the darker color from the box you created to bleed through as the darker parts of the image you are working on will become transparent. You can also play around with this and do the inverse for the lighter/white parts of your image. You might also want to play with gaussian blur if your goal is for the higher def image to match that more cartoon/comic book image. Maybe add some blur to his face before you start your color tweaking journey. Ldina and StuartRc 2 Quote
Taxicab Messiah Posted March 22 Posted March 22 This is how I started attacking the problem (assuming you are trying to match the real person with the comic image). I added a curve adjustment layer and inverted it. Then I brushed the layer back in over my subject (I only did half so you could see the difference) You can see my curve adjustment box is open - I lightened all of the darkest aspects. StuartRc 1 Quote
Taxicab Messiah Posted March 22 Posted March 22 This time I darkened the comic book character to match the real person (but only did half, just as last time). Quote
Taxicab Messiah Posted March 22 Posted March 22 Here I am using a blend mode with a black box to darken the comic character...remember you can adjust opacity and also duplicate the black box to change things further...all kinds of options. With this type of path you will obviously have to use a mask and paint out the square itself but something else to think about. Quote
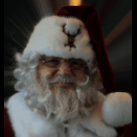
Taxicab Messiah Posted March 22 Posted March 22 Here is the source layer range option I mentioned. I added transparency to the darker areas on my primary copy of the image. And I added a black box underneath after stealing that black color from the darkest parts of the real persons jacket. This allowed that color to show through on the comic book characters darker parts. Then I added a duplicate of the original image as the top layer and painted it back in as needed since the source layer range adjustment influenced the entire image. StuartRc 1 Quote
Ben_Vandebrug Posted March 24 Posted March 24 I'd say the main issue on the real person comes from the lighting, and the contrast. Using the techniques explained so far, and with maybe just the plain contrast tool, first rework the contrast so as to make his shirt whiter, and to get more contrast on his face as well. Then, rework the lighting on its hat, face/neck and shoes to resemble the main character's. And add a matching shadow as well for the final touch. I'm sure you'll get good results! matisso 1 Quote
Storm88 Posted March 25 Posted March 25 On 3/20/2025 at 7:07 PM, Ldina said: @westlin Place a few sampler points (in the Info Panel) on the subject you wish to simulate tonally. This will give you target RGBA values to match. Then you can use Curves, Levels, Brightness/Contrast or other tools applied ONLY to the new layer (as a child layer) you are adding to your composite image. This will leave your original image untouched tonally, and just apply edits the the new layer. Once you have the two matching acceptably, you can then do further "global edits" to the entire image if desired. Thanks a lot! Ldina 1 Quote
Recommended Posts
Join the conversation
You can post now and register later. If you have an account, sign in now to post with your account.
Note: Your post will require moderator approval before it will be visible.