

VectorCat
-
Posts
1,014 -
Joined
-
Last visited
Posts posted by VectorCat
-
-
When you’re in the iPad version of Photo, how do you know when you’re zoomed-in at 100%?Found it. Navigator.
-
Ok…good to know. WYSIWYG, at 100% zoom.
thank you, NotMyFault
-
-
When I apply the Noise filter to an image in Photo for iPad, I see one level or amount of Noise in the preview…then, upon pressing “Apply,” the resulting noise is much less, and this is after selecting 100% Intensity. I’ve experimented with all of the controls for the Noise filter and I can’t get any better (to me) result than the one shown in the clip.
Can anyone share insights as to why the preview shows one thing, but the final result is so drastically different? The character of the noise itself is fine; I’d just like to end up with the same degree of noise I see in the Preview.
Thank you
-
If Affinity Publisher for iPad is coming soon, that is seriously excellent news.
”wibbly wobbly timey wimey” made me smile…thank you for that. I’d like to use that in future, with your permission, of course…
-
What’s more, I can’t get this file to export as PNG with that texture; the resulting PNG is the flat light blue color. I’ve tried flattening, rasterizing. Same result: flat blue without texture.
File is attached to this post. Thank you for looking.
-
This is weird to me…when I tap 1 time on the top layer in the clip, its noise becomes visible. When that same layer is not “active” the noise disappears. Is there a reason for this?
Thank you
-
My bad 100%. The illustration in question was rotated slightly…when I was working in it I could’ve sworn the illustration was squared in the viewport, or however you want to say it. Apologies for the for the false alarm!
-
Is there a preview or wireframe mode in iPad Designer such that you can view the art without stroke, fill…just the geometry itself?
Thank you
-
Any thoughts on what could explain this? Thank you.
-
Yeah that does sound pretty reasonable..Had a hunch it might be something like that. Other similar pairs of lines I can get to join, so I must have inadvertently done something to the ones I can’t join, like close them..
Thank you!
-
2 lines converted to curves. Unclear why I can't join the ends; join is greyed-out. Clip shows the problem.
Thank you!
-
Imagine making a shape, like a wooden plank. As you added shapes to make your plank, (parent layer named "Plank" - under this idea, rather than having:
Plank
curve
curve
curve
you'd instead get
Plank
Plank-1
Plank-2
Plank-3
Useful, or faff?
-
-
FYI, I was using a first-gen Apple Pencil.
Thank you for giving this attention.
-
I am sorry but I do not. I’ll get in the habit of being ready to take a screen movie from now on.
what usually happens when fails occur is that I’m fully in creative space. I look at the usual causes of whatever. But wanting to return to my work, I don’t think to grab a recording of what I want to do.
I shall incorporate screen movies as part of the troubleshooting process.
thank you
-
2 hours ago, DM1 said:
Unable to recreate your issue🙁
Thank you for taking the time to test my file.
-
Any sense of what could be interfering with the selection of unlocked objects on unlocked layers?
Thank you!
-
Soon into creating and working with this very simple file, I was unable to select the arrow objects in the drawing by using the selection tools in toolbar; I could only select them by clicking on them in the Layers Studio. Functional in the strict sense, but not productive workflow.
At some point I was able to select the objects. I don’t know what made the difference, but I can tell you that between being unable to select, then being able to select, I did not power down or restart the iPad, so there was no “clearing of the decks” in that sense.
The inability to select objects in a drawing is a problem I’ve experienced often, in various illustrations…some complex, some not. I’m not a software engineer, but I do know some things about these programs..that each object exists on its own layer, and has a bounding box or some sort of area which defines the space it occupies, and can therefore be manipulated.
This isn’t scientific, but sometimes it feels as though the program forgets what it means when a selection tool is used to touch or marquee an object. And this is in scenarios in which the object to be selected isn’t blocked by anything else, isn’t on a locked layer, isn’t in a cropping group, is under an unlocked parent. In other words, everything seems to be set to enable that object being selected.
Thank you for examining this case.
-
Why, as a matter of fact, I shut down my iPad after each session. Since yesterday’s selection problem, I’ve used and shut down the iPad two, perhaps three times. So, yes.
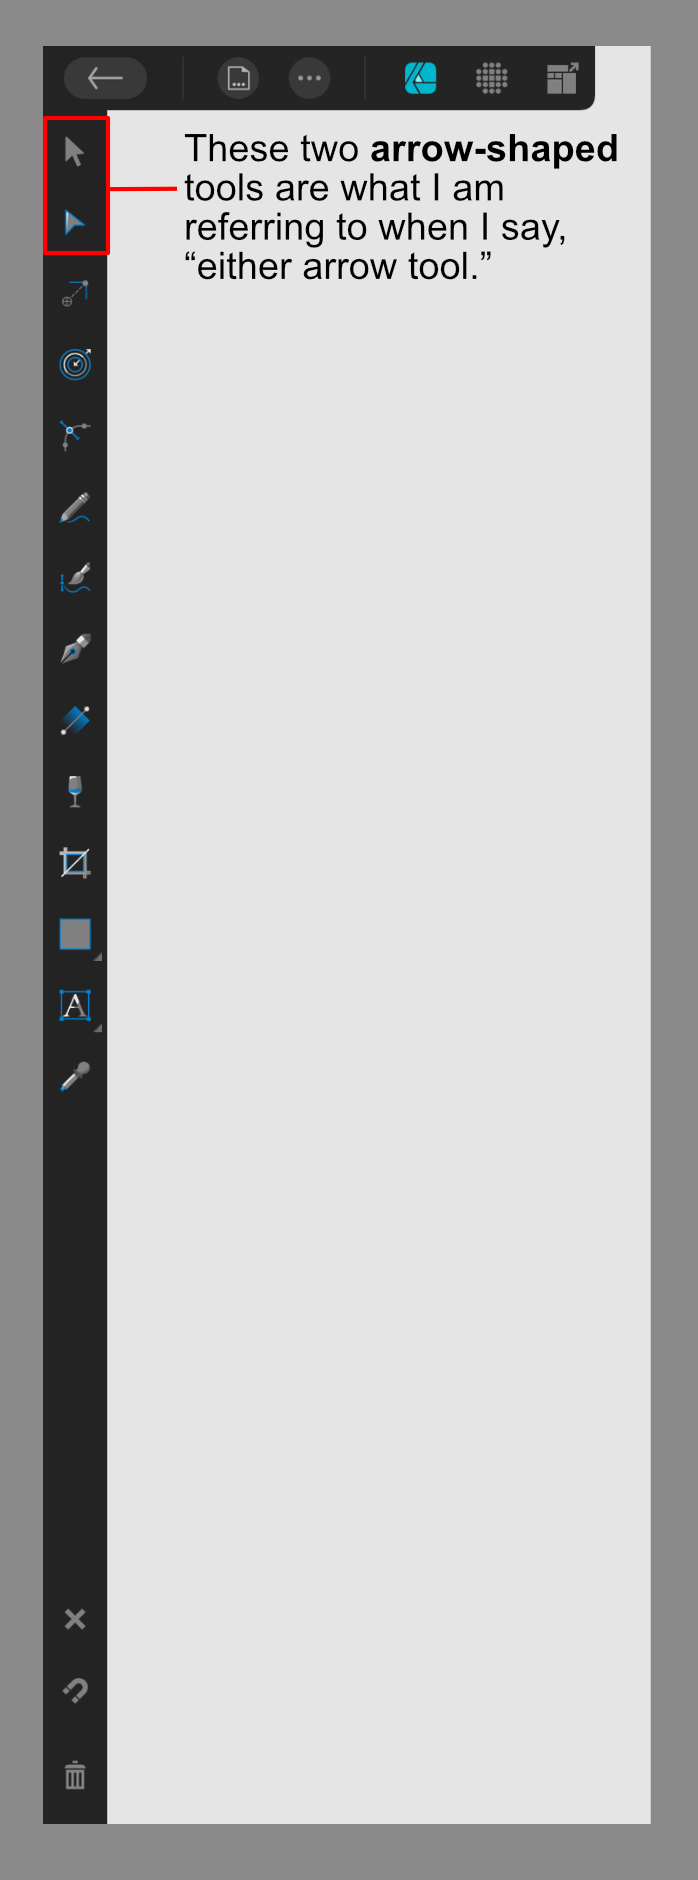
When I say, “either arrow tool,” I am referring to the tools in Affinity designer which look like arrows and which are used to select objects in the open file. They occupy the top two spots in the tool pallet. Screen capture attached for clarity.
Put another way, the inability to select objects with either of the tools in the program used for selecting things in the drawing, with the relevant layers unlocked, and with those layers’ visibility turned on, is problematic.
For my money, it feels like a bug, and I shall report it as such. Thank you for your help.

-
In point of fact, the rectangle in that file is not in front of the other objects (arrows) which I was trying to select; the arrows are in front / above the rectangle. Moreover, the rectangle has no fill.
So, provided that the layers controlling said object are unlocked, and the object itself is unlocked and on top, are there any other conditions which must be met to enable selection of that object?
As you can see from the file, it’s a very simple arrangement of few elements. Nothing tricky or complex is occurring in the file; nothing is clipping anything else.
So, can anybody weigh in on what other impediments there could be in selecting an object with the arrow tool?
Thank you.
-
18 minutes ago, walt.farrell said:
There are other impediments, though (e.g., when layers are under (covered by) other layers) which is why sample documents or screenshots are important.
Now that’s a statement that makes one sit up straight and pay attention. What are the “other impediments,” when objects and layers are unlocked and “Edit All Layers” is checked?
This sounds very mysterious, as though there’s some Unknowne Knowledge lurking about. I’ve been using software like Affinity products for a long time. In all of the software tools which employ either layers, or locking, having items / layers visible and unlocked is all that’s needed to then select those unlocked and visible objects with some sort of tool, often an “Arrow” tool.
There’s really no reason for a software environment to be coy about the process of selecting objects. Either something can be selected or it can’t, and the reasons for either need to be straightforward and identifiable by the User attempting to get work done. Maybe there’s a truly excellent reason for this, and I would like to know what it is for all of our sake so that the collective knowledge can be improved so that this great software tool can be utilized to its fullest potential.
Thank you -
actually, in my original post, I did mention parent layers, etc. My point in mentioning parent layers was to say that all layers involved were unlocked, and there was no apparent impediment to selecting objects using the arrow tool.
Thank you
-
I stated that I was unable to directly select unlocked objects on unlocked layers by using the direct selection or object arrow; I could select them only in the Layer studio.
File attached. Thank you in advance for any clues.

iPad Photo: Can straight lines of any angle be drawn with Brush tool?
in Pre-V2 Archive of iPad Questions
Posted
By holding shift on an iPad keyboard, you can draw horizontal or vertical straight lines with the brush tool. Is there a way to draw straight lines of any angle with the brush tool?Thank youNevermind again…holding the shift key then tapping seems to do it.