

vincentlepes
-
Posts
53 -
Joined
-
Last visited
Posts posted by vincentlepes
-
-
When working in Photo or Designer, on a pixel layer, using the command select all works on a new document but stops working as soon as I introduce an irregularly placed artboard. The same behavior with the invert pixel selection. I will attach a video and file to show the problem in action. It appears to happen as soon as the artboards are no longer aligned with each other but I am not positive, I just know it appears after creating new artboards that shift around in location.
As it stands now, the only workaround I have found is to make a mask, invert the layer directly, and then make a new pixel selection to get an inverse pixel selection. Similarly, I can workaround the select all by using a rectangular marquee with snapping. However, these workarounds are cumbersome.
While preparing a video to demonstrate this, I believe I have discovered that it all falls apart when an artboard is placed vertically higher than the initial document/artboard, suggesting that when the Y values shift to accommodate the new position is when the bug appears. There could be other factors, that's just what I observed.
Affinity Designer/Photo 2.2.0
MacBook Pro 2019 15"
MacOS 13.3.1, 2.3GHz 8-Core Intel i9
Radeon Pro Vega 20 4GB
32GB 2400MHz DDR4 -
There are appears to be a bug with the miter join setting. The results change unpredictably when moving nodes, and the results change even when simply zooming in and out without changing a thing. Video and file attached.
I'd like to be able to draw my outlines with the vector pencil tool using miter join to get clean lines with sharp corners, but my results differ greatly from what I saw in online tutorials doing the same thing. The corner often flies way off the curve, and the miter setting value doesn't make a lot of sense to me. Let me know if this is user error.
I have also confirmed this happens on a fresh, new file. Select pencil tool, draw a tight zig-zag/squiggle shape, turn up miter join until corners appear. Corners don't match the arc of the curve, and change at various zoom levels. I will add that file as well.
I've noticed this happens on sharper corners that have a curve coming into them, and it can be replicated using the pen tool. It just happens constantly with the pencil tool because it creates a lot of fluid curves. Even when I tweak and simplify the curves, the corner changes at different zoom levels.
Affinity Designer 2.2.0
MacBook Pro 2019 15"
MacOS 13.3.1, 2.3GHz 8-Core Intel i9
Radeon Pro Vega 20 4GB
32GB 2400MHz DDR4Screen Recording 2023-09-21 at 1.23.02 PM.mov
Screen Recording 2023-09-21 at 1.47.25 PM.mov -
I changed the group blending mode to "normal", and the result became consistent. I'm leaving this here in case someone can explain to me why this changed anything at all. From the help document: "Any layer or object can have a blend mode assigned. The default blend mode is 'Normal'—no special compositing is applied. For a group, the default is 'Passthrough'. When set, the group itself has no special blend properties of its own, and passes on the blend mode of its parent layer."
If the default is "normal", and the group has no parent, why is "passthrough" creating an unexpected result? If it isn't inheriting "normal" from the document default, what is happening here?
Thanks in advance for any insight!
-
Hi all,
I may be missing something here, but I have a pixel layer with a mask nested within a group. I want to move the mask to the group so I can add additional layers within that will obey the mask. However, when I move the mask from the nested layer to the group layer, I get a completely different result even though I believe the results should be the same since the only layer in the group is the pixel layer that has the mask. Can anyone see what I'm missing here, or is this perhaps a bug or inconsistency in the software? Attaching a video to demonstrate--look at the difference along the edge of his hair as I move the mask between layer and group.
-
@Dan C The upload finally finished, it's called 3.psb
-
48 minutes ago, Dan C said:
Thanks for this information, this shows that the ICC profile in use for the document is "Linear Colour Space" as Affinity Photo correctly reports, whereas Designer does not. I'm getting this logged as a bug with our developers but it would certainly help to have access to the original PSD also. Could you please upload this to the previously supplied Dropbox link for me?
As far as I understand it, that's correct
")
Will do, thanks!
-
Just to be safe, I will upload the old version again. I think I might have uploaded it in reference to a color issue I had on the same document in another forum post. I can share it with you, just not publicly as it was purchased.
-
10 hours ago, Gabe said:
@vincentlepes, if you cannot share the project, we would need the exact steps (from start to finish) to replicate the issue. I could not replicate the issue just by following your video.
I believe I did upload the files to the Dropbox link, let me know if I am remembering wrong and I will upload again. I sent you a previous revision from around the time of the video with a filename "Book Design (OLD VERSION).afdesign". The "old" version is because I had made changes since, that version is from Google Drive version history so it may not be 100% match but it does demonstrate the behavior. I also uploaded the latest, same filename without the parenthetical.
I'm happy to send again, if needed, just let me know!
Thanks!
-
1 hour ago, Mark Oehlschlager said:
In summary, Assigning a color profile preserves RGB numbers and remaps the apparent color to the larger or smaller target color gamut, whereas Converting to a color profile changes the RGB numbers and attempts to preserve the apparent color of the source file in the new file with its larger or smaller color gamut. Correct?
I believe this is truth
-
9 hours ago, Dan C said:
Thanks for your files, screen recordings and information provided, it's certainly useful.
I agree, opening the file in Affinity Photo reports the following -
Converting the document to sRGB will always convert the colours in your document to match the colour space, assigning a colour space will not, so assigning is the right choice here for you, but that doesn't change the fact the colour space isn't being reported correctly.
Could you confirm, as I note this file was converted from a PSD - what colour space/profile was used in PS please?
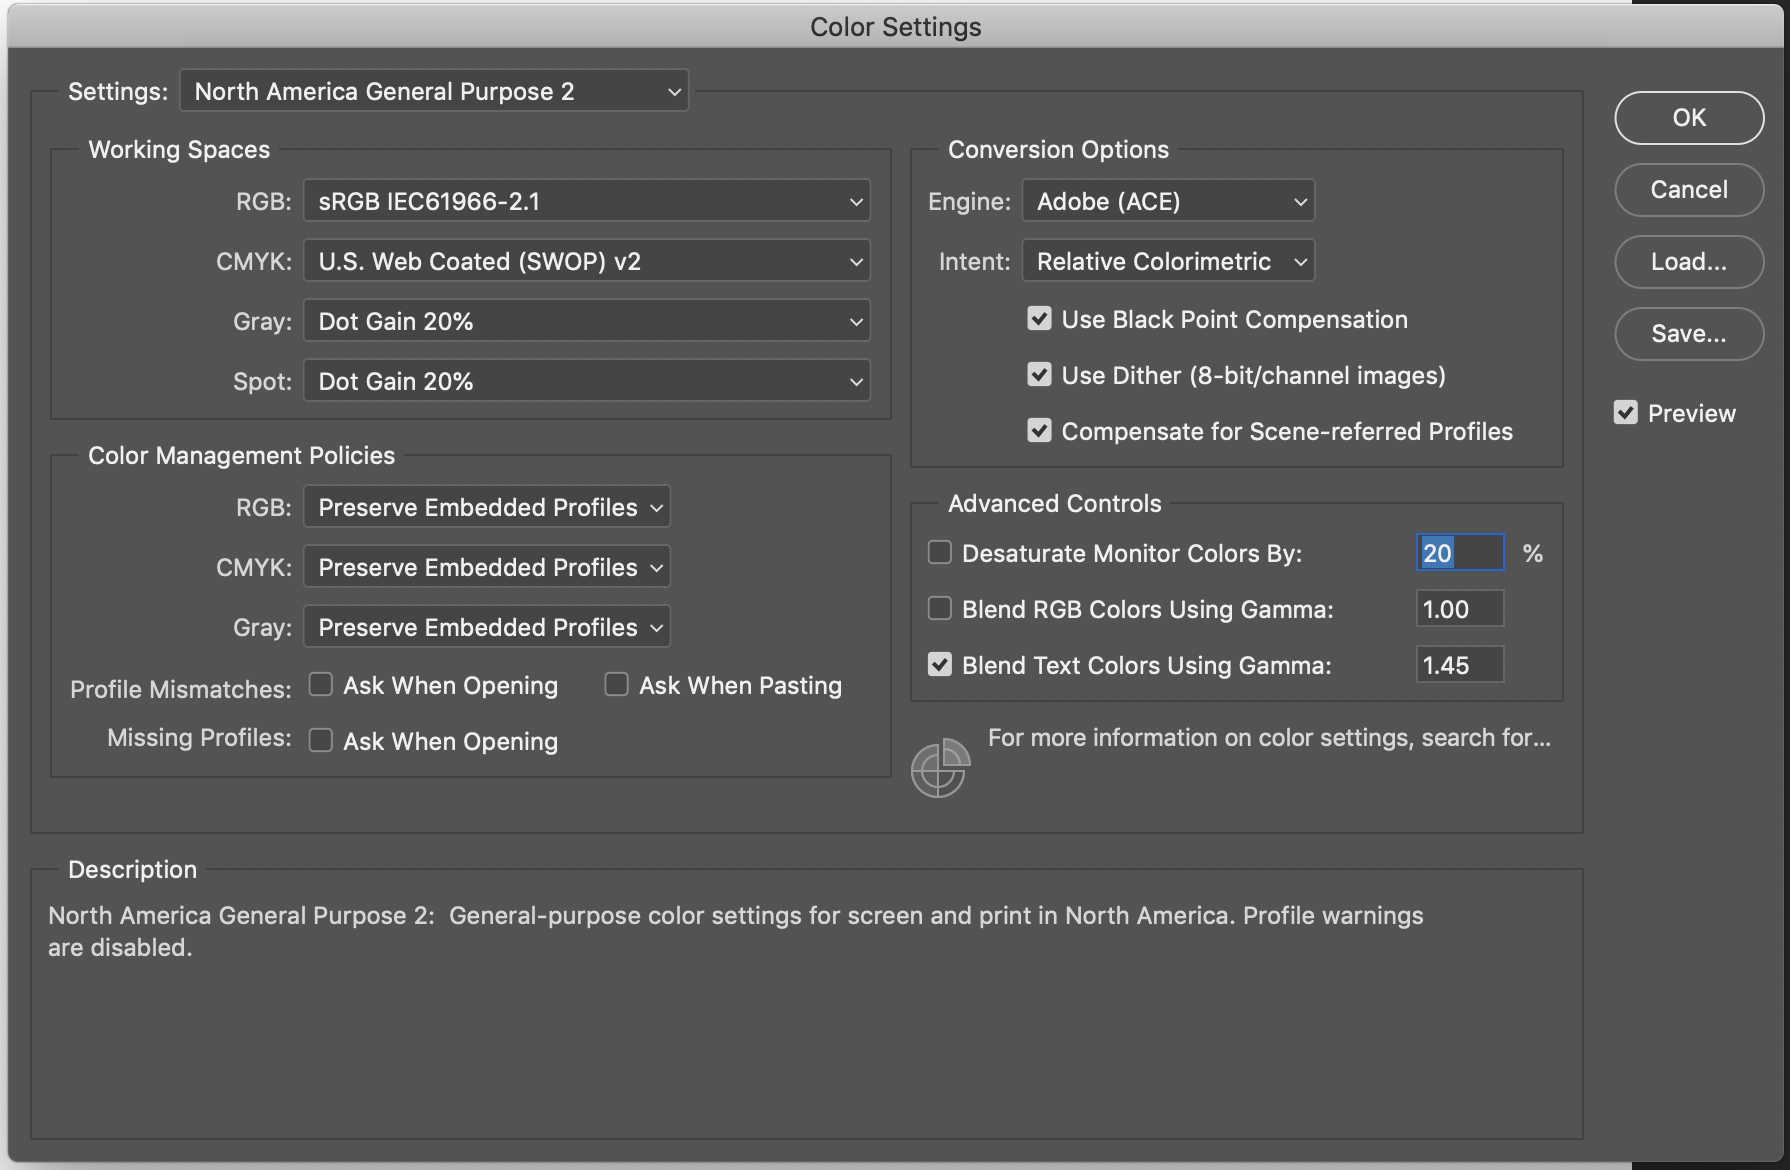
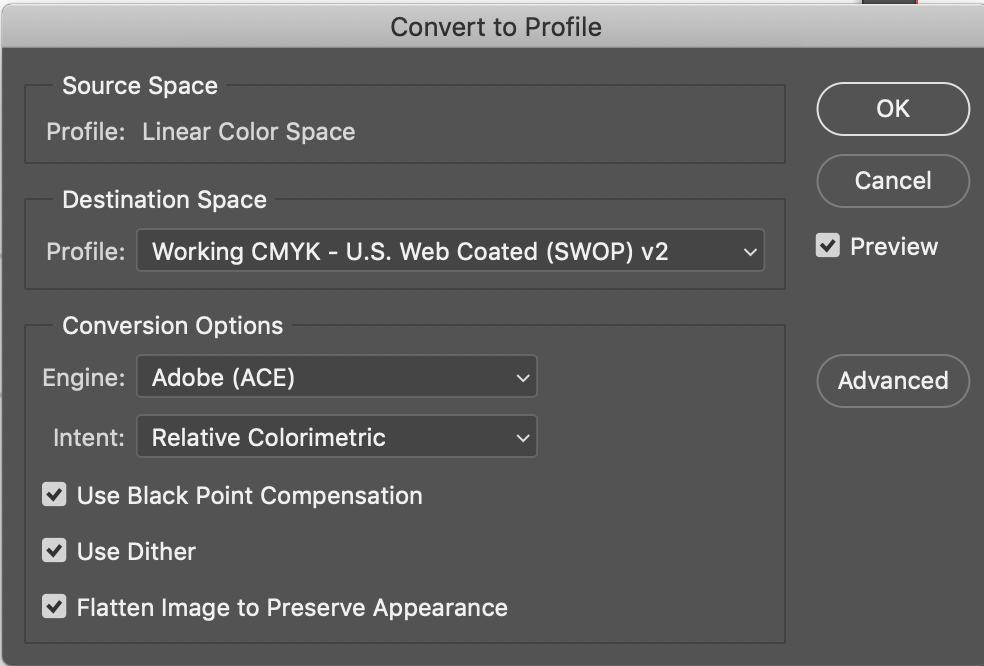
The original PSD in Photoshop is set to RGB/8 (according to the mode setting), sRGB-IEC61966-2.1 (according to the color settings panel) and "Linear Color Space" (according to the convert colors dialog). If there is a better place to check, please let me know, I've been getting rusty on Photoshop as I've been making the switch over the past couple years. I thought it was in the info window, but they have changed the UI recently and if it was there before, it isn't anymore.
-
Also if I change the setting away and back, and then save, with the toggle still on "Convert", it converts as expected. It is only by opening the dialog, making no changes, and pressing "OK" that nothing happens.
It would seem what is in error is what color space Designer reports the document is in before making changes, perhaps?
-
It would seem that if I select "Assign" in the Designer Document Setup > Color tab, when I submit, the document updates correctly. When I choose "Convert", it updates the color space and converts all the colors to what they looked like in the incorrect color space. If I leave it alone and choose ok, it still shows the incorrect color space and does not update.
See what I mean:
-
On 10/18/2019 at 5:06 PM, Mark Oehlschlager said:
I would begin a careful trial and error investigation in an attempt to isolate the problem.
1. Start a new Designer document and fill a shape with your color formula, just to eliminate the possibility that this is at all connected to your application preferences or some other application specific issue. (I don't expect there to be a problem there.)
2. Working with a copy of your PSD mock-up opened in Designer, delete all of the layers and artboards except the front cover artboard and it's child layers. Does the problem still exist?
3. Isolate the orange rectangle by dragging it out of the artboard group. Does the problem still exist?
Anyway, you get the idea. Eliminate surrounding groups and layers until the color problem disappears. Then slowly include more and more of the source file layers and groups (via copy and paste of layers from duplicate file) until the color problem reappears.
Good luck.
1: works as expected
2: Problem still exists
3: Problem still exists
I messed around and the problem persisted, but I think the document setup color settings tab is the source of the issue, I will follow up with more details.
-
@- S - great catch! The document setup dialog showed 2.1, so I thought they were the same. Photo sees it differently. I went back into the dialog, and discovered if I toggle between "Assign" and "Convert", the document updates to the correct color space. Very weird, but now I can create in the correct gamut again, so that's a win!
I will try the other troubleshooting exercises as soon as I have a chance and report back. I have fixed it for my needs, but there still may be a bug at play with that dialog or perhaps the file.
Thanks all!
-
@Mark Oehlschlager - Thanks for the troubleshooting steps, I will try them out shortly!
@Dan C - The file is uploading but taking forever...internet is less than stellar tonight.
-
I am having this same issue in basically the same scenario. I am trying to convert a PSD mockup I purchased into a usable Designer file, manually replacing the smart objects with symbols from neighboring artboards. I used Edit in Photo to go apply a perspective filter, and not only is the display getting weird and distorted but also my computer starts going on overdrive and heating up, presumably running the graphics card really hard.
This is a template I cannot share here but I am attaching a screen recording.
-
@Mark Oehlschlager thanks for the idea, I hadn't checked there.
I took another screen recording, this time manually entering the RGB values between documents. I checked every layer within the artboard and non of them had any advanced blend options applied. Unfortunately, that isn't it. I am wondering if it's something weird with opening a PSD, but there could still be some option I'm not aware of.
Thanks for the help! Let me know if you have any other ideas
-
Hi all,
I recently imported a PSD mockup to convert it to a usable Designer file by replacing the smart objects with symbols. But when I copy colors from one document to the other, it looks faded in the PSD. In fact, the sliders for color selection don't even show the level of saturation of the original color as a possibility.
My first thought was that each document was in a different color mode, but in document setup they are both RBG/8 and sRGB 2.1. Then I checked the opacity, effects and styles to see if something was applied to the layer in question, but it's a simple rectangle layer and there are no effects present.
Does anyone have any ideas what I might be missing that would cause a color mismatch like this? I really need to get things consistent as this is a branding project, any ideas are appreciated.
I will attach a video demonstrating. Thanks!
-
On 10/16/2019 at 8:40 AM, Gabe said:
Hi @vincentlepes
Thanks for spotting this. I've logged it with our developers.
Gabe.Thanks, @Gabe. Anywhere I can keep an eye out for this? I know you guys nixed the roadmap. I want to update the nanosecond this is fixed
-
I just figured out that the entire toolbar was hidden, not that the option was ever in the context menu. I went looking for a screenshot online and realized snapping and other thigns had disappeared as well. Not sure why the update changed a setting like that on me, but I will leave this topic here in case it happened to others.
-
I updated AD the other day and now when I select multiple objects, with the move tool active, the context menu at the top only has alignment options where it used to have a dropdown that included options like aligning to the spread and spacing equidistant. Where did that move to?
-
-
Hello there,
I put together a design comp to try out various logo and tagline variations for a documentary film I am creating. The logo is a symbol, as is the tagline. From each of those, I created various thumbnails with different backgrounds and nested the symbols into new thumbnail symbols. Those resulting thumbnails are then used in a design comp on another artboard that shows them in the context of a webpage, in this case a mockup of Netflix so I can compare against the branding of other films and see how my ideas stand out in context.
So far, so good. I update the logo, the change cascades into the thumbnails, which in turn cascade into the comp.
To save each variation, I created a snapshot (Logo 1). I then updated the logo in the source symbol, adjusted it's size and position in each thumbnail, and saved a snapshot (Logo 2). My intention is to create snapshots for each logo so I can recall them, export them, and compare the comps side-by-side to decide which logo to move forward with. This is my workaround until Designer has something akin to Layer Comps. Works great...
...EXCEPT that when I restore any of the previous snapshots, nothing changes. The symbols do not go back to their previous state, rendering this workflow useless.
I believe this to be a bug, but I am open to it being user error if you can show me what I am doing wrong! I am happy to provide anything you need as far as examples. I really need this workflow so I don't have to create a new document every time I want to try out a different logo variation! I personally tend to do a lot of variations and iterations.
-
Oh and I also updated Drive and made sure I am on the latest iOS update. No change, still doesn’t save. How frustrating! At least an error would let me know to use iCloud or Dropbox as a go between, rather than the software giving zero feedback as I move forward and lose progress.


Select all and invert pixel selection don't work properly when using artboards
in V2 Bugs found on macOS
Posted
Thank you both, I was unable to find that thread when I was searching but am glad it is documented. I felt I had seen this issue before v2. Seems like an easy thing to fix, since it appears to always be an unexpected Y offset when things are recalculated as new artboards are created, but I know sometimes there's more to it .
.
Some developer forums have an area where users can vote on bug fixes and feature requests, do we have something like that here?