.png.e7630a08ee6e1c84d06141c3a5feb319.png)

Frozen Death Knight
-
Posts
1,361 -
Joined
-
Last visited
Everything posted by Frozen Death Knight
-
 At least you are able to reproduce the issue. I get the same problem with picking a white colour instead, but it happens every time.
 -
Merging layers, booleans, converting shapes into curves, creating linked layers into assets, just to name a few. I also have had some instances where a link has been broken without me knowing why that happened. Usually happens to vector layers after making edits to them. I know how it works, but it is not efficient to do it this way when you can have several duplicates of the same layer and you have to check a bunch of them to see that they are properly linked. I think there should be a better way to achieve this by warning the user when a link breaks and allow the user to re-link on the fly.
-
Okay, so what is your solution then when a link breaks? There are several things you can do to break a link and there is no way to quickly re-link them. Having to redo the duplication every time this happens is a lot of extra unnecessary work. I know, but I mentioned it because it helps get a better idea of how a reworked panel would work in practice. That's where the copying of a layer's attributes comes in. You can't link unless you have a source, so simply make the Links panel remember the source by simply selecting one layer, have a copy attributes button that you click in the Links panel, and then you simply click the link icons in the Links panel to start linking. To quickly link you just add the operator in the R click menu as well which links all attributes for the sake of simplicity. If you want more advanced settings you use the Links panel as usual. If you haven't specified a source then the operator is simply greyed out until it is done.
-
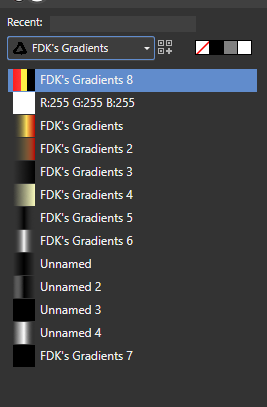
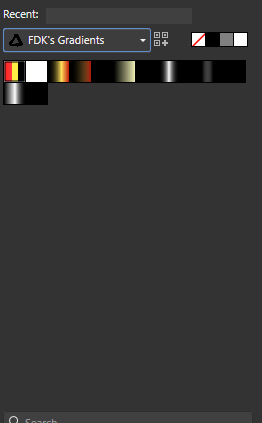
It actually helped. Though, it is very odd that the large versions of these swatches don't show any hint of transparency when you have Show as List toggled off. The colour icons are rendered differently depending on the mode despite them being of the same sizes. Notice especially FDK's Gradients 3 and Unnamed 2. They are drastically different in each version.

-
You also can't link multiple layers at the same time. I think the feature would be more intuitive if you could copy the attributes of a single layer to the Links panel. Afterwards you would select all layers you want to link and then you are given the option to toggle on and off links for the attributes copied from the first layer. I think that would solve a lot of the unintuitive problems by removing the need to drag layers. Also, creating an R click menu operator that would link layers together would be nice.
-
Was trying to colour pick with my tablet pen using Windows Ink and I noticed that it didn't work in places like the Colour and Stock panels. Desktop 2021.05.15 - 05.45.41.03.mp4
-
It is currently impossible to tell the difference between black gradients with transparency or no transparency. All of them have pitch black icons. Desktop 2021.05.15 - 05.38.56.02.mp4
-
You're welcome! Glad it worked out!
-
On Windows you can do this using ctrl+L click drag. Not sure which shortcut it is on Mac, but it should work there too. Desktop 2021.05.13 - 21.31.49.06.mp4 Agreed. Though, it is possible to copy paste global colours to a new object by pasting the style, which is how Illustrator does colour picking as I recall. Desktop 2021.05.13 - 21.28.17.05.mp4 What's stopping you from doing this in the Guides Manager and the Grids and Axis Manager? Go into the View menu and you can change the colours. You can also create a shortcut to these for easy access. The only thing you can't do is change the colour of the manual guides, which I agree would be good if they added it in (honestly weird that there is no option for that). However, the rest of the functionality is right there. Hope the devs address the issues mentioned in here in future releases.
-
You selected it just before dragging it. If your layer is highlighted with a blue colour then it is selected. You have to drag the layer that is not highlighted blue or it will not work (remember to hold down the mouse button the entire time when dragging the non-highlighted layer).
-
You are still doing the same mistake. Drag the layer above the one you tried to drag instead. It will work then.
-
@loukashOne way I think they could improve this is by adding a "Link Layers" operator in the R click menu while selecting multiple layers. It would simplify the basics of linking, but the Links panel would then allow for more advanced settings.
-
I can agree that it wasn't very obvious how to use it when I first saw it. Not until I saw a video demonstration did it click for me. To be fair to the devs, the feature is pretty new. Don't really know many photo editing programs that have this functionality. It's probably my most used feature in 1.9 because of how powerful it is.
-
Desktop 2021.05.13 - 20.44.38.04.mp4
-
@Bruno Henrique You are supposed to select one and then drag the other layer into that panel. What you showed at the start of the video is you trying to link the layer to, well, itself.
-
That's nice and all, but the Outliner is also a Photo feature, so it would be an upgrade for that program as well.
-
Well, sure, but in my case I like to do freeform cutting, painting, and erasing because I use vectors as a base for silhouette painting and colouring in my drawings. If they can make something like the Pencil Tool that works as a cutter with the option to create straight lines for jagged edges then I will be at least satisfied.
-
Sure, but in my case it doesn't matter too much that it is pixelated since the project was going to be a rasterized thumbnail anyway. It would still be a nice feature to have.
-
Agreed on all points. I would also like to add a blob brush, an eraser brush, and a knife tool to that list as well.
-
I wanted to make a thick outline with appropriate sharpness to the corners, but I noticed that Outline lacks a bunch of settings present in the Stroke panel. It would make creating a thick outline that wraps around every object inside a group a lot easier if more settings were available for this specific effect. Desktop 2021.05.13 - 15.26.09.01.mp4
-
@cayenne You already can. Just tap where you want and it will pick whatever colour is beneath. The big difference between Photo and Photoshop is that Photoshop has a colour picker icon when you tap the canvas, but Photo does not. Here's an old thread I made discussing the problem along with a couple of other artists. I hope the devs will add a colour picker icon among other improvements to colour picking in the future.
-
"After a long and bloody battle over the main capital, the female barbarian Helga ascends her throne as ruler over the kingdom. All shall tremble before her iron rule!" Got inspired to make this piece after helping someone with anatomy. Was a lot of work to transform the original sketch into this, but I feel pretty satisfied with how it turned out. https://www.artstation.com/artwork/3dYBlE
-
affinity designer Swamp Crawler
Frozen Death Knight replied to Frozen Death Knight's topic in Share your work
Thanks! Didn't specify the gender, but I guess it's a he. I think I'll call him Larry. Glad you like it! Try not to pet one if you wish to keep your fingers. Been working on cutting down on the time I put into a piece without sacrificing quality, so it has been a long journey to get this fast. XD -
While I was art streaming last night I made this quickly for fun. Felt pretty happy with the art considering the short time put into it. https://www.artstation.com/artwork/Ooev1k
-
I was trying to select every layer inside a group/vector layer in Designer by tagging them with a colour so that all the layers inside got the same tag colour. Visually all the layers inside show that they have a colour, but in practice that is not the case. If you try selecting them using Select Same Tag Colour it will not select the layers inside the group/vector layer, but instead select any layer that is not tagged. Despite this they still look like they are colour tagged, thus being very confusing. Desktop 2021.05.06 - 19.59.26.01.mp4

.png.ab931ba2a37b157a9d11c409cf723f38.png)
.png.c4391bd1a45464c7feec4e29ce2f1000.png)