toltec
-
Posts
3,560 -
Joined
-
Last visited
Everything posted by toltec
-

Photoshop Text Layers
toltec replied to Clayton King's topic in Pre-V2 Archive of Desktop Questions (macOS and Windows)
You can change this setting in Preferences
-
Business card print document
toltec replied to Scappiello's topic in Pre-V2 Archive of Desktop Questions (macOS and Windows)
Hi @Scappiello Hard to be exact without more details, two colours, four colours, bleed etc ? The easiest way to set up a larger page with a 4 x 2 layout. Put in your own crop marks, colour marks as necessary. See attached .afdesign file. You can use Power Duplicate to step and repeat the cards. Search the help for 'Power Duplicate' for more info on that. You might need to allow for bleed ? in which case set a space and double crop marks between the cards. Set guides to align the cards and crop marks to. I had several templates for this, so whenever I needed, I just had to set one card then duplicate them each time, businesscards.afdesign
-
You can adjust the brush size in several way. 1. As @firstdefence suggests, using the mouse wheel. 2. Use the [ ] keys on the keyboard. 3 Press and hold down the Alt key, then press down both mouse buttons and drag left or right. There is a Flood Select Tool (aka Magic Wand) immediately below the Selection Brush Tool
-
Affinity Designer : Boolean operations
toltec replied to Guiem's topic in Pre-V2 Archive of iPad Questions
Hello @Guiem I assume you started with two shapes like this? overlap them and select both shapes. then in the edit menu, (3 dots ...) under where it says ‘Geometry’ tap on Add. That is what is called a Boolean operation and turns the two shapes into one shape.
-
Having spent years making countless selections, I normally end up using the Pen tool to create a path because the Selection Brush Tool isn't always up to the job. On many selections, Snap to Edges is just too "Snappy" or if you turn Snap to Edges Off, trying to paint along edges is very hard with a mouse. A bit better with a pen but still awkward I have recently become a big fan of your Brush Stabiliser so, could you not add the Stabiliser to the Selection brush? Considering how often people have to make selections, that would be a truly great (and unique?) Photo feature !!! I tried it using a paint brush and it worked really well, so much better
-
Very good. I have noticed that Linux users chose the OS and then desperately try to get software to do the job. Most people with a professional attitude (like you) do the opposite. Choose software that does the job, and ignore the OS. I have been trying to get that point across for months, but Linux users never seem to listen. p.s. I might steal your reasoning
-
It has been answered by Serif, more than once, by one of the top guys at Serif. It would cost a lot of money to develop and the returns are unlikely to justify the expense. Serif staff are also very busy developing and updating their apps for existing customers, so don't have the manpower at the moment. As I said, its all in the posts about Linux, if you care to look.
-
Hi @dronecrasher If you don't mind a bit of a workaround, you can make your own split-screen. Place one image on top of the base image. Create a rectangle to cover the page. It must have a fill colour ! Right click on the layer, then choose Mask to Below, so it ends up like this. You can then drag the mask handles (your rectangle) to hide or reveal the bottom layer as you want, horizontally, vertically or a bit of both
-
My mistake. Ignore me. p.s. I wonder if you clicked anyway
-
Make sure you Ctrl + click on the Mask Layer thumbnail, not the name.
-
Is there any reason why you can't just tap on the History studio then tap on the step before you started painting? or if you are trying out a brush, just tap with two fingers to remove the stroke/strokes by using undo. Either will keep all your settings etc, unless you go too far, but then, you can redo with three fingers.
-
Showing layers of a re-opened file.
toltec replied to TdB's topic in Pre-V2 Archive of Desktop Questions (macOS and Windows)
Hard to say without knowing what program you are using, what OS you are using, what filetype you saved the files in or how you opened them! At a rough guess, you Placed them, using File > Place rather than opening them by going File > Open (or just double clicking). Supply some information and I'm sure someone can help you. -
Pixel Tool. A picture (or two) is worth a thousand words.
-
cropping a layer in affinity photo
toltec replied to arikw's topic in Pre-V2 Archive of Desktop Questions (macOS and Windows)
Several methods. Perhaps the easiest is to make a pixel selection and Press Ctrl + J (duplicate). That places the selection area (only) on a new layer. Just delete the old layer, or not if you want a non-restrictive method. You could make a selection, invert the selection, and press Delete. or as Alfred suggests, use a shape to clip or mask it. If you rasterise the shape afterward it removes the clipped parts. -
photoshop replacement
toltec replied to stumblebum's topic in Pre-V2 Archive of Desktop Questions (macOS and Windows)
Indeed, the lack of decent channel editing (I used them to make sometimes 10 or 12 colour separations for silk screen printing). But I certainly could have used Photo for pretty much everything else that I can think of, ATM. Multi colour separations is pretty specialised stuff though. What's missing most from your point of view? Anyway, we had pretty much every program under the sun, trying to do it all in one program never works, lots of things Photoshop was pretty rubbish at (especially 20 odd years ago). Although at the moment, I seem to be able to do everything I need in Photo and Designer plus the odd free app like Faststone (scanning and organising) and Riot (compression). -
Far too many steps and some are wrong and why are you creating a new mask layer when you already have a mask image ? 1 Load Image 2 Load Mask Image (i.e. File > Place) 3 Position it. Use snapping (the magnet) to position it exactly. 4 Layer > Rasterise to Mask There is a big difference between Rasterise and Rasterise to Mask.
-
No, afraid not. The vendors are two completely separate companies and don't share information about who bought what. It's like buying a book directly from the author, or from Amazon. They don't compare notes!
- 1 reply
-
- 1
-

-
Perspective/warp tool
toltec replied to ravinat's topic in Pre-V2 Archive of Desktop Questions (macOS and Windows)
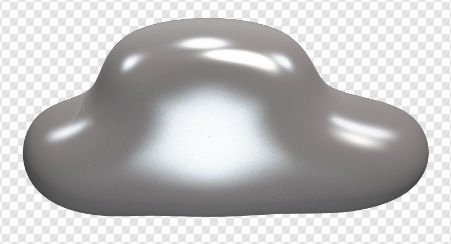
Use the Mesh Warp Tool to finish off. Get it as close as you can with the normal Perspective Tool, then use the Mesh Warp Tool. Double click on the image to add control points. You can do some pretty amazing transformations that way. Note: I'm a bit tired and haven't tried very hard to get it straight, but you can see the process and how the nodes are added.
-
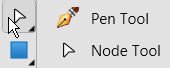
Move Tool General controls Top Left: Reset Rotation Box. If you rotate an object, this resets the selection box to the page. Top Right: Set Rotation Target. Rotate around a different place other than the image centre. Bottom left: Lock Children. Locks the image inside the shape, etc. Bottom Right: Hide Selection Box while dragging. Hides the box so you can see what you are doing when aligning. Node Tool (and Pen Tool) These control snapping of nodes as you draw. Top Left: Align to nodes of selected curves Top Right: Snap to geometry of selected curves (currently selected) Bottom left: Snap off-curve handles Bottom Right: Snap all selected nodes when dragging Align to nodes of selected curves Snaps the node to another node on the path or shape and applies to drawing or editing (Node Tool). As the node aligns, Designer displays red horizonal and green vertical alignment guides. Snap to geometry of selected curves Snaps nodes to a path outline or nodes, indicated by a yellow node appearing over the path. If you are using the Node Tool, select another path and it will snap to that. A yellow node and outer line will appear. Snap off-curve handles Move a node handle with the Node Tool and this will align the node handle to the next (adjacent) node on the path. The handle will turn purple when it is aligned, and a purple line displayed between the handle and node. Snap all selected nodes when dragging With the Node Tool selected, if you select multiple nodes by dragging a marquee around them and move the selected nodes together, this option causes all the selected nodes to snap. Otherwise, although all the selected nodes will move, only the node you drag will snap.
-
Use the Pen Tool to draw a path around the image, then on the Context Toolbar, click on Mask. That places the image inside a clipping path, which you can edit with the Node Tool. It keeps the path too.
-
photoshop replacement
toltec replied to stumblebum's topic in Pre-V2 Archive of Desktop Questions (macOS and Windows)
I was a professional in the (pre-press) print trade for thirty years before I retired, using Photoshop every day. Apart from a few specialist printing needs (colour separations) I would have had no trouble using Photo all day. In fact I prefer it. There are differences, so it is a matter of spending some time learning it. -
If you have both, you could always go File > Edit in Photo... even set a shortcut.
-
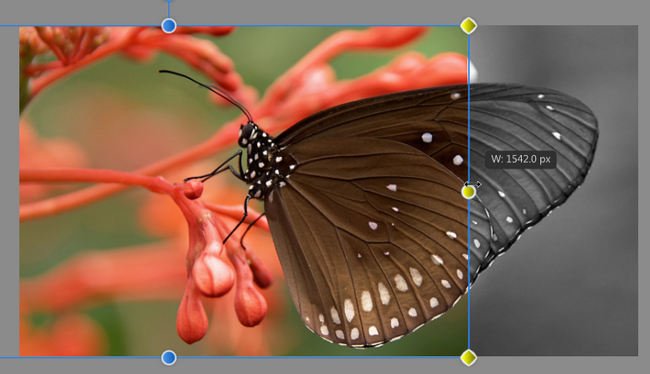
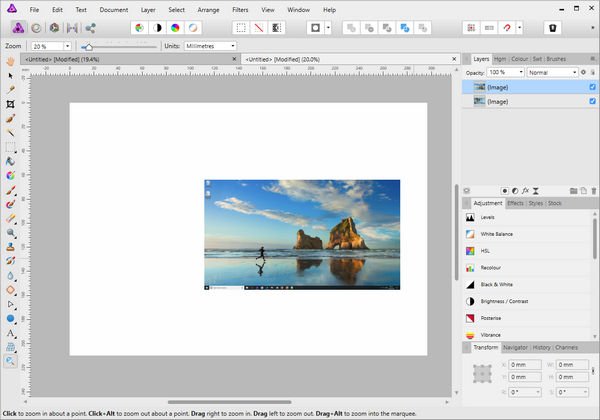
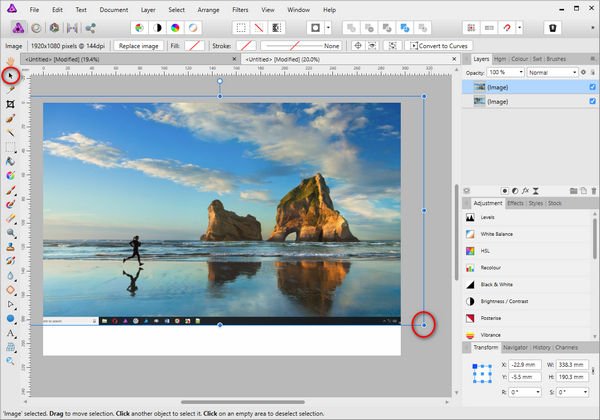
The easiest way to do what you want is to make a page 11 x 8.5. Paste your captured screen inside Then use the Move Tool and drag the captured screen bigger than the page. That crops it to the page boundaries. See the blue selection box of the original image outside the page as it is being cropped ? Just keep dragging until it is cropped the way you want. Simple
-
No There is no tolerance setting. Photo has the equivalent of a magic wand, the Flood Select Tool, but then Photo is designed to be a bitmap editor.
-
@DM1 Did convert the help files into a PDF.