GarryP
-
Posts
14,681 -
Joined
-
Last visited
Everything posted by GarryP
-
 I’m happy to leave this for Serif to decide whether it’s a bug report or a suggestion for change as only they will know what the software was designed to do.
- 10 replies
-
- 1
-

-
- affinity photo
- merge selected
- (and 1 more)
-
I think that’s similar to the suggestion of grouping the Artboards as mentioned above. So there are at least four ways to do it: group the Artboards and export the Group; put the Artboards in a larger Artboard and export that; export the Export Persona “background” layer; add a manual Slice in the Export Persona and export that. There might be more ways but until the OP gets back to us we can’t know if any of what’s been suggested is right for their needs.
-
As I said above, some people might interpret “whole document” in different ways. Some people might think that they should get one Artboard to a page, while others might think that they they should get what they can see on the screen. Since there are a number of ways to get what the OP wants it’s probably not something that needs to be discussed at length.
-
One control – in the Colour Panel, and elsewhere – is for the Opacity of the Fill/Stroke (whichever is selected) while the other control – in the Layers Panel, and elsewhere – is for the Opacity of the Layer as a whole (including its child layers, if any). They are used for different things and if you are using either of them then you need to learn the difference between them and use them appropriately. Removing some useful creativity possibilities from all users just because some users want a simplified user interface would be a sub-optimal solution. If you want to keep things simple for you then I would recommend using only one of the controls.
-
I’ve attached an example document which exhibits the issue in Designer 2.6.3 on Windows. When exporting to “PDF (digital – small size)” (haven’t done exhaustive testing) only one artboard is shown in the preview, which makes it look like you only get one Artboard exported, and each of the Artboards is exported as an individual page in the exported PDF. However the OP wants, I think, to be able to export the whole document as a single page which includes all of the Artboards, as they can see them on-screen, which can be done via the Export Persona instead (as mentioned above). I don’t know if the current situation is the expected behaviour but it’s maybe not what everyone might expect depending on how they interpret “whole document”. Similar things to this have been asked about and reported before but I don’t know if they are the exact same issue. export-whole-document-with-artboards.afdesign
-
I’m not sure why the software is doing what it is doing, it’s doing the same thing for me with a quick test document, but I’ve never tried to export multiple Artboards at the same time via the Export Dialog. Have you tried to export the whole document via the Export Persona instead? The “background” layer should incorporate all of the Artboards.
-
Sharing/Linking brushes between AP and AD
GarryP replied to CaroleA's topic in Desktop Questions (macOS and Windows)
From the Help:
-
Random dots appearing, which cannot be undone, is not something that I’ve seen before. Can you record a full-screen (whole application UI) video showing us what happens? In the video, once the dots have appeared, can you then zoom in and out of where the dots are so we can get a better idea of what they look like. Also, make sure that we can see both the Layers Panel and the Brushes Panel.
-
Visible Vector Seams/Bounds Removal?
GarryP replied to thinkerstjames's topic in Desktop Questions (macOS and Windows)
Thanks for the extra information and the screenshots. For the red/black design, the ‘gap’ between the red areas could either be because the shapes aren’t perfectly ‘abutted’ or it could be just a consequence of how the Affinity applications draw things on screen. Someone who examines the document should be able to figure out which it is and advise further. For the teal design, from the layers I can see in the Layers Panel, the design seems to have been constructed using lots of small parts, each black ‘curve’ being made up of various smaller black ‘areas’. Again, someone who looks at the document itself should be able to understand what the situation is but they might not be able to understand how the situation arose as they don’t have the original (pre-PDF) document to work from. When the original designer created the design they will have had their own methods of doing that, and when Illustrator exports to PDF it has it’s own methods of doing that, and when the Affinity applications import the PDF they have their own methods of doing that. Trying to figure out how all of these different methods brought about the end result from the original design could be tricky. -
Unfortunately, at least with Designer 2.6.3 on Windows, the Arrowhead Sizes can only go up to 500%, not the 2000% which you have used.
-
Can you rotate a Brush tip 270 degrees?
GarryP replied to CaroleA's topic in Desktop Questions (macOS and Windows)
The fact that we can set a specific numerical value which can’t be specified by the slider is something that happens in various places in the Affinity applications. Limiting the slider range to less than the actual possible range is usually a decision made by the developer to give the user an easy way to select ‘usual’ values via the slider without the ‘steps’ of the slider becoming too small for the user to be able to use the slider easily. In other words, it’s easier for the user to set value via the slider if the gaps between each slider ‘step’ are bigger. The larger the range of possible values the smaller the step will have to be and that makes it more difficult to set any specific value (tiny mouse movements required) via the slider. For example, a slider which is 400 pixel across with 200 ‘steps’ would mean that each slider ‘step’ would only be around 2 pixels across, which would make it difficult for the user to make adjustments to the value. In the specific case of the Rotation slider which you mentioned, a slider range of 0% to 100% wouldn’t make it too difficult for the user to use as it would be the same as the Flow slider, which the developer thought was okay. -
A related problem: Removing an item from Recent Dialog, then switching to the List View (from the Thumbnails View), then switching to “Pinned”, then switching back to “All” crashes the software with no crash report. I’ve managed to replicate this a few times in Designer 2.6.3 on Windows 10.
-
Confirmed, and it doesn’t seem to matter how many items are removed before the switch between “Pinned” and “All” and back, they are all returned to the list. However, as carl123 said, they do seem to be actually removed when the Dialog is opened again.
-
add layers name as a label/text inside the drawing?
GarryP replied to Zeltak's topic in Desktop Questions (macOS and Windows)
No, there's nothing like that. -
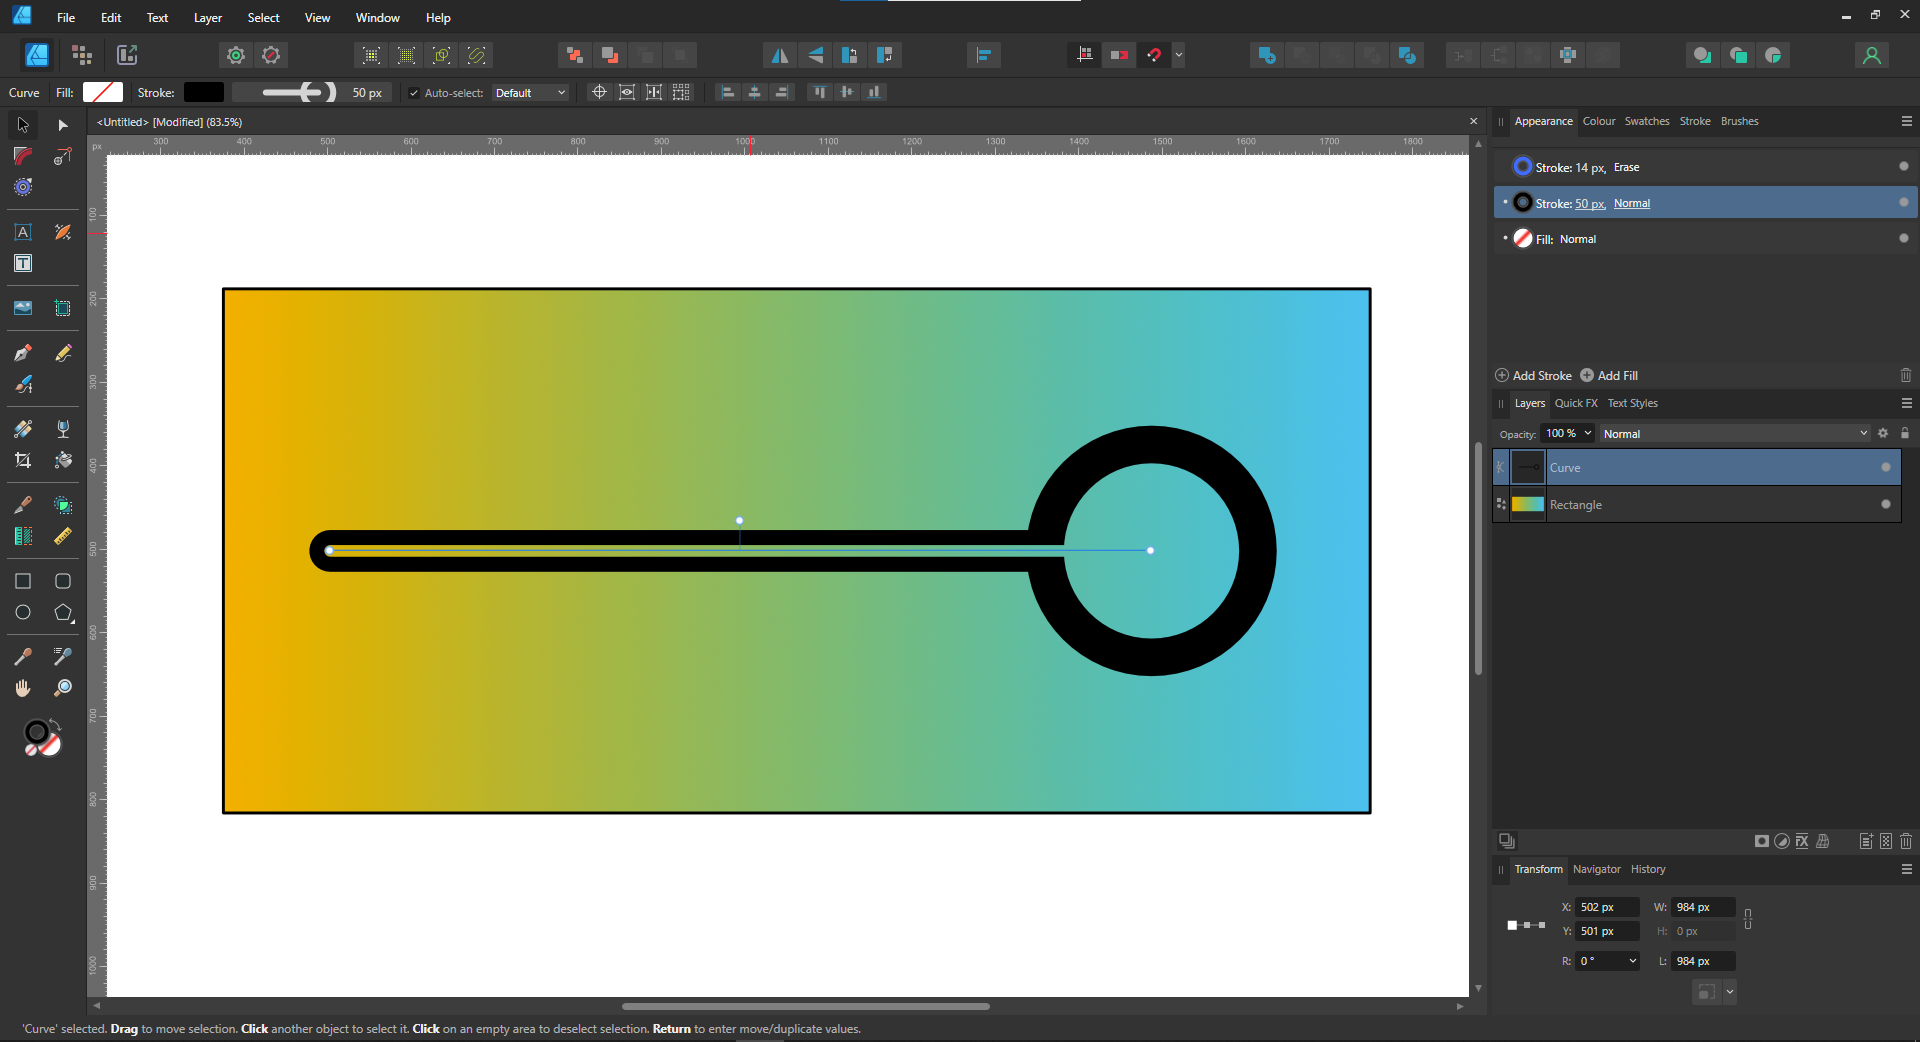
Unfortunately I can’t think of a way to use the “Origin” arrowhead and not get the curve ‘coming through’ the hole. The best I’ve been able to come up with so far is by adding an extra Stroke via the Appearance Panel with some strange settings – Erase Blend Mode, thinner stroke, Circle arrowhead at 500% Size – but that still leaves me with a line through the curve, see attached image.
-
The question of whether something is visible or not visible is very relevant to the situation. If it wasn’t relevant then I don’t think that you would be bringing it up. I was checking to see whether your description of the problem matched reality. If you have visible layers in a Group which is not visible then that would be a different, stranger, issue. Anyway, I’m assuming that the description was partially wrong and I’m seeing the same result as you, but I don’t know if that result is what is to be expected. I think I would expect “Merge Selected” to merge the selected Image Layers as if they were visible – in the same way as I can perform a Geometry operation on multiple non-visible vector layers; their visibility or otherwise shouldn’t matter, as it’s not “Merge Visible” – but I don’t know if that is what the developer(s) intended. If the developers intended it to work the way it’s working then it’s not a bug but an opportunity for a feature request.
- 10 replies
-
- 1
-
-
- affinity photo
- merge selected
- (and 1 more)
-
How can the Image Layers be visible if the Group that they are in is not visible?
-
Visible Vector Seams/Bounds Removal?
GarryP replied to thinkerstjames's topic in Desktop Questions (macOS and Windows)
Welcome to the forums @thinkerstjames The PDF import functionality isn’t perfect, and the Affinity applications don’t have like-for-like functionalities/concepts for everything that can be in a PDF, so some things cannot be imported exactly. I’m having trouble figuring out what the problem is that you are having because I don’t know what you are starting with, or what you are doing with it. For instance, I don’t know what “When I went in to color the teal and gray one” means. Did you import the PDF, or did you place it in a document and then copy the contents somehow, or something else? I also don’t know how the original PDF is constructed, or how it was ‘brought into’ the Affinity application, or how you are editing it, or even which Affinity application you are using. The more details we have the better we can help you. Full-screen (whole application UI) screenshots – preferably including the Layers Panel – are better than limited-size screen-grabs, and example files are also generally useful so we can experiment with what you are using rather than guessing. -
There is a ‘discrepancy’ between where certain arrowheads are drawn in relation to the end of the curve. For example, when “Place arrow at the end of the line” is ON: the “Circle Solid” arrowhead is drawn centred on the end of the curve but the “Circle” arrowhead is drawn continuing from the end of the curve; the same sort of thing goes for “Square Solid” and “Square”. You can use the “Origin” arrowhead with a Size larger than 100% to get a non-filled circle drawn centred on the end of the curve but then you still have the curve inside the circle to deal with. I’m fairly sure that this sort of thing has been discussed before but I can’t find the thread(s).
-
If you aren’t going to share a document which contains even just one single layer then I can’t help you any further with this as I would need to be able to experiment with the layer to see how it’s constructed.
-
If we can’t experiment with the thing you are having a problem with then it might be difficult for us to know exactly what’s happening. And if we don’t know exactly what’s happening then it might be even more difficult to figure out a way to stop it happening, if a way exists. Can you supply a document which only contains a single layer of the type you are having a problem with?
-
“Rasterise and Trim” seems to be working for me in the way that I think you want it to work. However, in your example image there seem to be some slightly-non-transparent pixels around the ‘shape’. Can you supply a document containing a layer which isn’t being trimmed as you would like?
-
photo 2, lost right side panel
GarryP replied to phredy's topic in Desktop Questions (macOS and Windows)
Glad to help. That sort of little thing is very easy to overlook. -
photo 2, lost right side panel
GarryP replied to phredy's topic in Desktop Questions (macOS and Windows)
You have Hide Studio checked (ticked). Uncheck (untick) it and it should come back. -
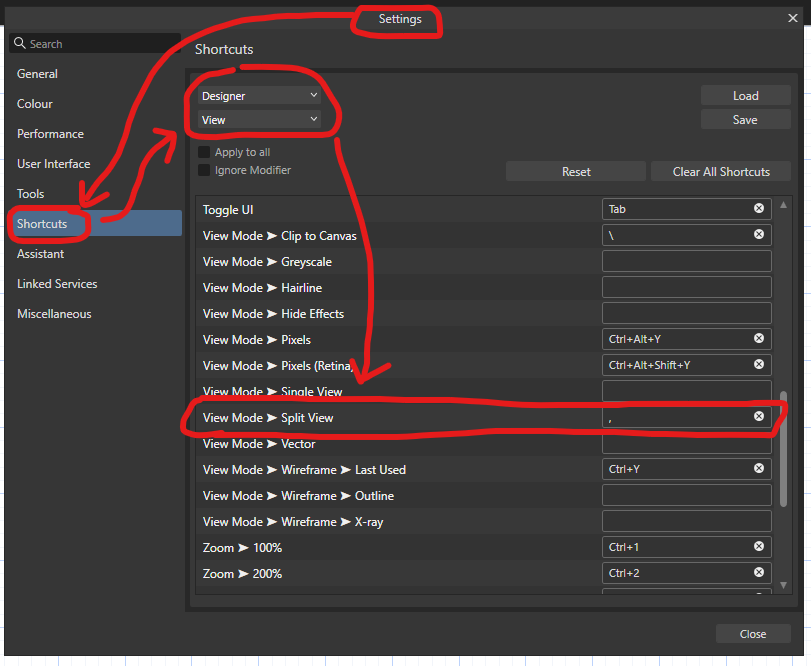
We users don’t have the information to answer that other than giving our own personal, and very limited, view of things and I think it’s unlikely that Serif records its usage (but it might). Even if Serif did record its usage, and told us what it was, it's probably not of much use to us users. If you don’t want the Split View to show when you press “,” then you can remove the Keyboard Shortcut via Settings / Shortcuts. This particular shortcut can be found in the View sub-section of the Application shortcuts. For example, in Designer: