

BiffBrown
-
Posts
82 -
Joined
-
Last visited
Posts posted by BiffBrown
-
-
Just the kind of thing I've been looking for.
One question, however: for Colour Film - due to the processing, won't the grain be composed of dye particles and therefore not monochrome?
Cheers,
Alex
-
I think part of the problem here is that Fuji RAW Studio shows the "developed" RAW image: i.e. the RAW file with the in-camera settings applied (film simulation, Dynamic range Range, etc.), whereas Affinity Photo doesn't know anything about these settings. This is because Fuji RAW Studio uses the on-board processing of your camera (which has to be connected to your computer) to process the RAW file.
If you want the two to match (sort of), put the following settings on your camera:
1. Set FILM SIMULATION to PRO NEG. STD.
2. Set HIGHTLIGHT TONE to -2
3. Set SHADOW TONE to -2
These will reduce the contrast of the JPEG (and processed RAW file). It will also mean that the Live View and live histogram will match the RAW file.
It may also be best to set the DYNAMIC RANGE to DR100. I find that with settings DR200 and above, the RAW file is underexposed at least 1 stop. This is the way Fuji cameras seem to work, the idea being to prevent any overexposed highlights.
(Source: Rico Pfirstinger in "The Fujifilm X100F: 101 X-Pert Tips", pg.80).
Then agin, I'm no expert.
Biff
-
I've noticed that the Blemish Removal tool in the Develop Persona has changed in V2. In V1, the blemish was circles and a link was made to the area used to "correct" the blemish. This allowed the user to move the link to a more appropriate area if V1 got it "wrong".
In V2, no link is shown. It still gets it "wrong" occasionally. This may, of course, be by design.
More worryingly, the Blemish Removal is not always carried over when applying the Development. Going back into the Develop persona (assuming the "Embed" option is set), and reapplying the Development seems to work.
Persevering,
Biff
-
Good Afternoon.
I have just purchased Affinity Photo V2 from the Apple App Store (£35.99). This has been confirmed by Apple. I have not been given a License Number. How do I register my application without having to fork out a further £35.99?
At the moment I'm having to use V2 in Trial mode.
Regards,
Biff
-
Maybe a DAM .......
-
-
Firstly, apologies for reporting this on the Windows Bug Report: I was searching for information on the artifacts I've been finding.
It is a recent occurrence, I'm getting the same lines appearing on an exported image. They appear to be random: subsequent exports have lines in different places. I may have traced the fault to the Recolour Adjustment layer - remove the Recolour and the export lines do not appear.
Details: iMac (Retina 5K, 27-inch, Late 2015), running OS 12.2.1. Using Affinity Photo 1.10.4

-
Hi.
I seem to be getting the same problem: random bars on the exported image: using Photo 1.10.4 on an iMac (Retina 5K, 27-inch, Late 2015) running OS 12.2.1.
Biff
-
I was looking for some answers on the forum and on Google. Found the video which answered a query others had made, so I posted it.
You're welcome.
-
-
Check out this YouTube video. It may help:
-
-
What would be useful is a Zone Scale, perhaps incorporated into the Navigator Panel, that could be used to highlight a selected Zone in the image. Pretty much like the one found in Silver Efex, from Nik.
Biff
-
11 minutes ago, walt.farrell said:
Supplying the original TIFF file and a list of the adjustments that were made in the Develop Persona, and a version of the .afphoto document before and after using that persona would be useful, Biff.
Serif won't be able to log it as a bug without enough information to recreate the problem to allow debugging.
Will do - when time allows.
Strangely enough, the problem doesn't occur with the Inner Glow effect.
Regards,
Biff
-
10 minutes ago, anon2 said:
Since your Layers panel is not shown and an Affinity document has not been provided, I will guess that the pixels of the Pixel object have been made sightly transparent somehow. Try using Channels panel to fill the alpha channel of the Pixel object. If that doesn't restore the correct outline effect, then I think you'll need to attach the document.
The Layers Panel was not shown as it only had the one layer - the Background pixel layer.
Filling the Alpha Channel of that Pixel Layer did work - Thank You. I suspect that Tone Mapping is clearing the Alpha Channel. Perhaps this needs flagging as a "bug"
Cheers. And Happy New Year.
Biff
-
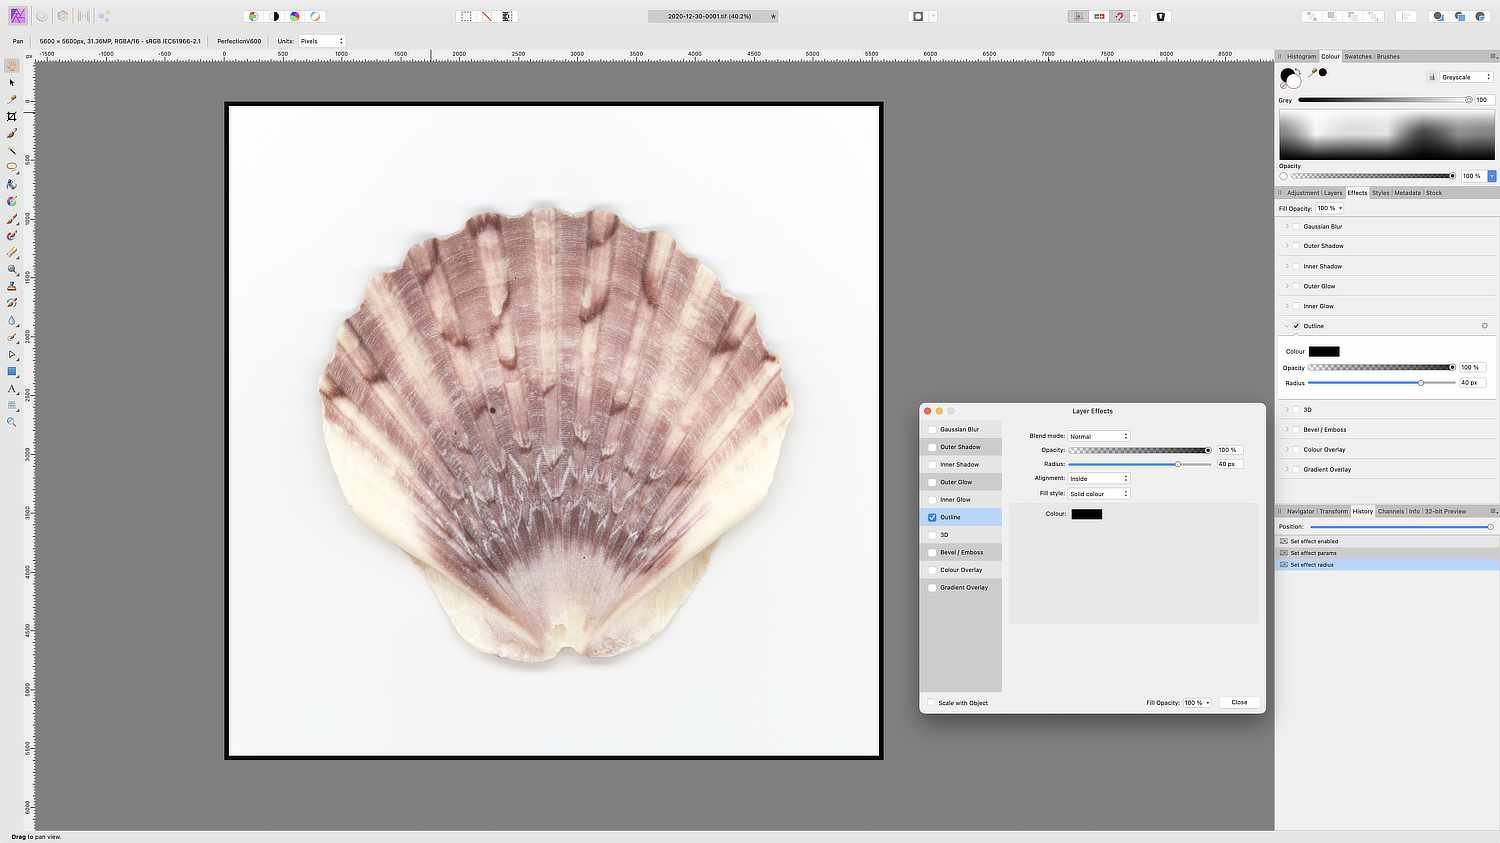
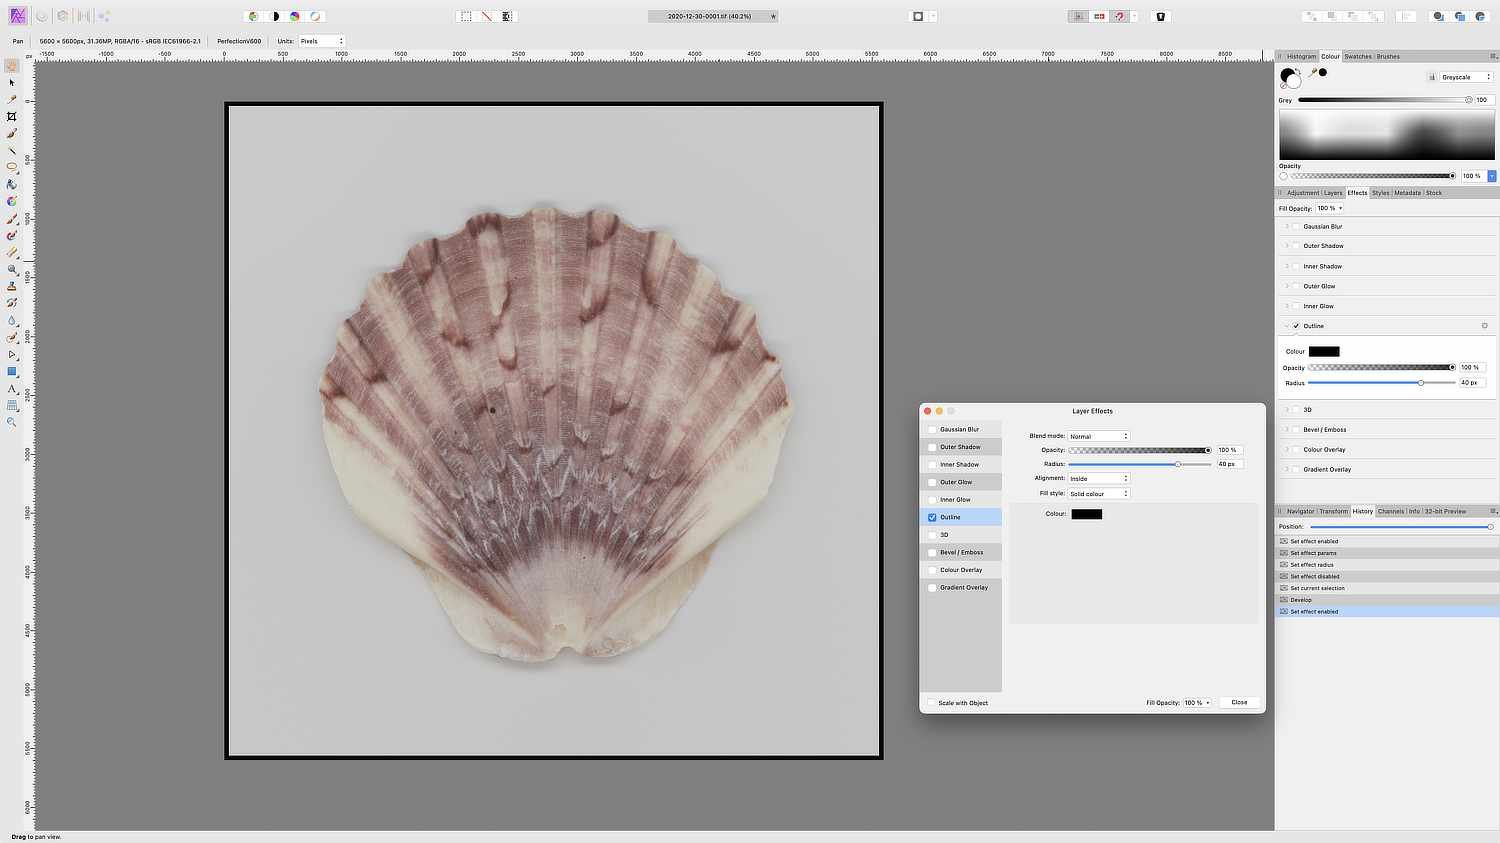
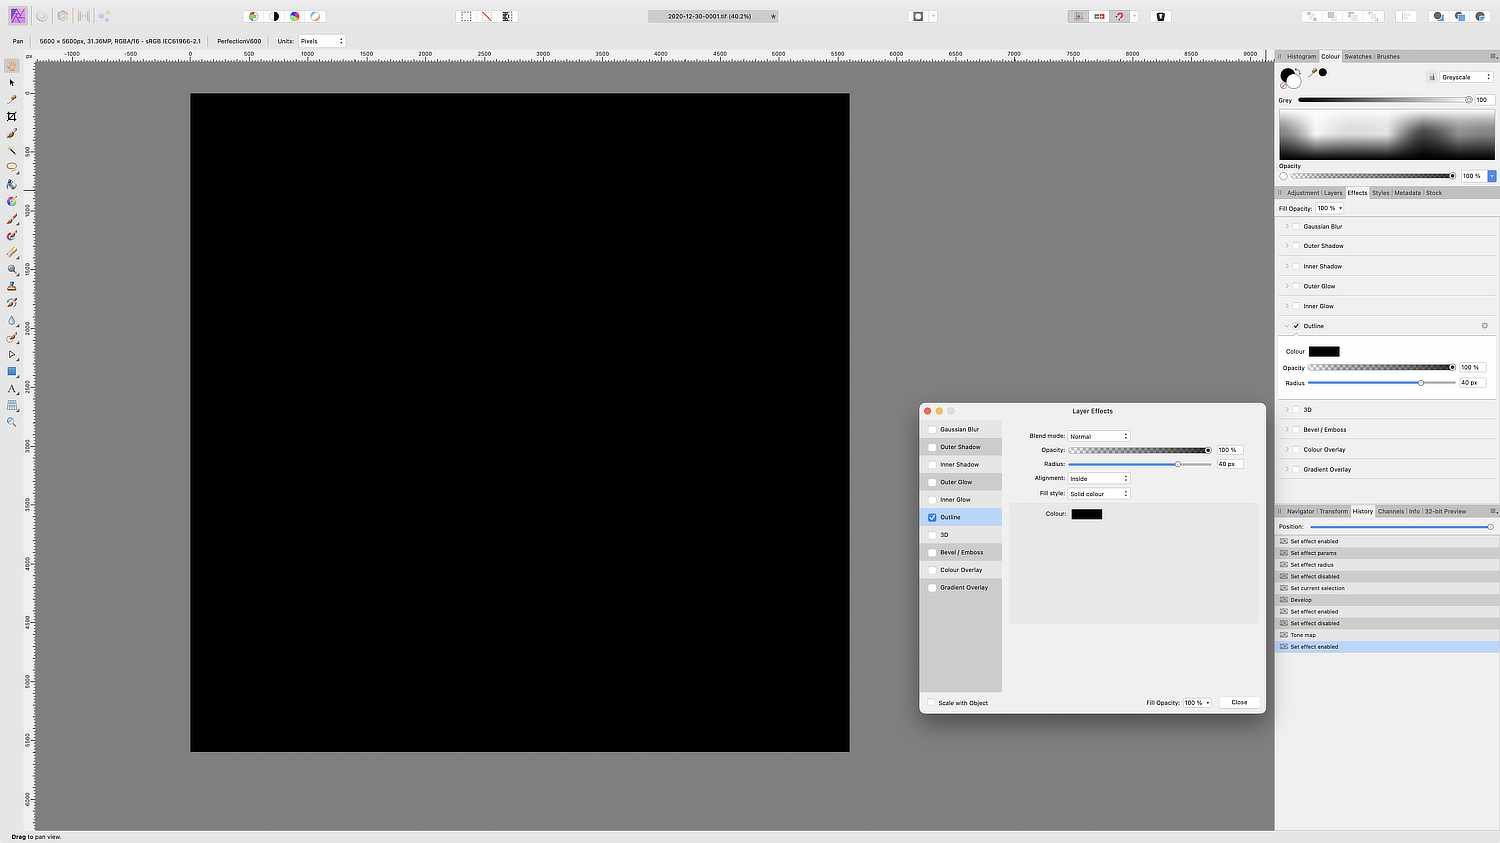
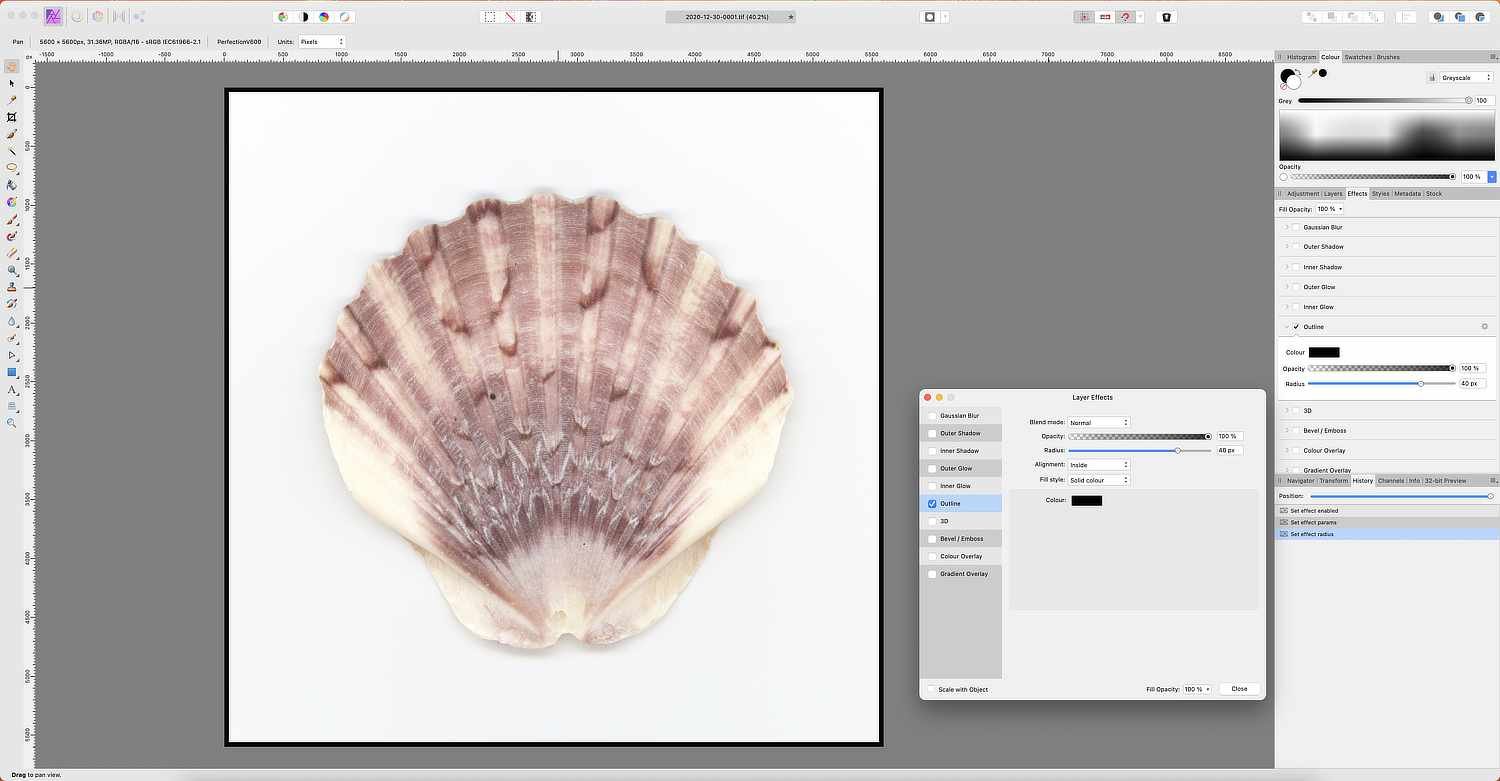
Adding an outline to an image is relatively straightforward: using the Effects Panel. However, some Strange Behaviour has been noticed:
I opened a 16-bit Tif file (from a Scanner), which opens into the Photo Persona. An outline (inner) can be applied:
I initially opened a TIF file (from a scanner), and applied an Inner Outline:

Using same file, after being sent to the Develop Persona for some adjustments: still behaving itself:
The same file, sent to the Develop Persona, then to the Tone Mapping Persona. This is where the problem lies:
Opps!! Now, why??
In Frustration, regards
Biff
PS: Happy New Year
-
On 12/29/2020 at 1:44 AM, wjb said:
FWIW, I restored version 1.8.1 of Publisher (overwriting 1.8.6) from Time Machine and it is still fine w/ my Pro-10 profiles under Mojave. And of course, it doesn't play well with the rest of the 1.8.6 suite, but that I can work around. I am guessing you could restore the rest of the suite to 1.8.1, but haven't tried. Also, I haven't tried this under Big Sur. Is anyone using Big Sur that doesn't have to (ie. has "Apple Silcon")?
As far as I know, my iMac (late 2015) doesn't have "Apple Silicon". I upgraded to Big Sur about a month ago (now running OS 11.1) and I'm having no problems with Affinity Photo.
The problem with the ICC Profiles is, as I've pointed out previously on this thread, a matter of filepath: on older versions they were stored in /Library/ColorSync/Profiles/. However, by accident or design, they are now found in /Users/Me/Library/Containers/Affinity Photo/Data/Library/Application Support/profiles. That, at least, works for me.
Regards, and a Happy New Year,
Biff
-
22 hours ago, lisalynn01 said:
I am having the exact same problem!! I don't know what to do!! please help me!! I have a big order and I stupidly updated to Big Sur. BIG MISTAKE! I've tried to download a new icc profile and the download doesn't even open like it normally would. What do I do??!!!
See the posts above ...
-
6 minutes ago, walt.farrell said:
Yes, but Lars was looking for a place to put them manually so they don't have to be imported one-at-a-time using that menu item
That's what I did at first. I then did a Spotlight search which turned the directory path I gave in a post above (/Users/Me/Library/Containers/Affinity Photo/Data/Library/Application Support/profiles), so I just loaded the rest of them manually.
Biff
-
20 hours ago, walt.farrell said:
Perhaps, if the Mac versions of the Affinity applications work the same way, you could find a similar "profiles" directory. If the profiles you've added are in there, then that's the place you could probably paste the rest of them. And perhaps they would work
There is, under the File menu, an "Import ICC Profile..." option, which should put your profiles in the "correct" location.
At least, there is on the Mac version. I can't speak for the Windows version.It would, of course, be nice and logical if Colour Profiles were stored in the same place as Printer Profiles.
Live long and Prosper 🖖🏼
Biff
-
Hi.
It looks like the problems lies in the file path to the Profiles folder. In the updated version it is now /Users/Me/Library/Containers/Affinity Photo/Data/Library/Application Support/profiles and not /Library/ColorSync/Profiles/ as in the older versions. You can use File -> Import ICC Profile in the Photo Persona to import your profiles: this will put them in the correct folder.
Biff
-
3 hours ago, Christhephoto said:
turning off the soft proof layer before printing. I know that one's caught many people out!
Aye - been there, done that. I'll probably get a T-shirt next time. 😁
All the best,
Biff -
A printed image will never look like the screen image - you see them differently (reflected light of a print versus transmitted light of the screen).
The Soft Proof layer will show how the image it look like when printed. To print, you need to turn off the Soft Proof layer. You use the Soft Proof to make correction so the image gamut matches (as best as possible) the paper gamut. Check out the video https://player.vimeo.com/video/152413642/
Regards,
Biff -
Hi.
It looks like the problems lies in the file path to the Profiles folder. In the updated version it is now /Users/Me/Library/Containers/Affinity Photo/Data/Library/Application Support/profiles.
You can use File -> Import ICC Profile in the Photo Persona to import your profiles: this will put them in the above folder.
Biff

Add Film Grain (free macros)
in Resources
Posted
I did try editing your macro as you suggested - the results are useful: the Grain Intensity should be lowered.
The other problem I'm finding, in both colour and monochrome grain, is being able to vary the grain size (intensity doesn't quite do it). Although grain intensity can vary with tone, the grain size will also vary - darker tones can have larger grain then in the lighter tones; midtones can show a higher grain intensity.