

Irrgeist
-
Posts
20 -
Joined
-
Last visited
Posts posted by Irrgeist
-
-
Hey,
is it possible to select a brush without it resetting the brush size? Every time I change the brush it gets reset to the default size the brush comes with (Designer 2). And yes, I don't want to duplicate the brush and set it.
-
3 hours ago, Lee D said:
Hi @Sangoma Welcome to the forums.
Please see the following FAQ article in relation to apps locations for creating shortcuts in other apps.
It says "Sorry, we can't show this content because you do not have permission to see it".
Also why not allow to set our own installation path. As a power user I try to keep my Windows drive clean, Windows tends to add garbage to it over the time.
Also where does Affinity 2 put the Add-Ons like bruhses? I guess in AppData too? -
Thanks for the advice. I already feared that I will have to do something like this x_X But the idea of a vanishing point is nice.
Since this is not the only object, this is a lot of work to do.

Thank you very much for taking your time
-
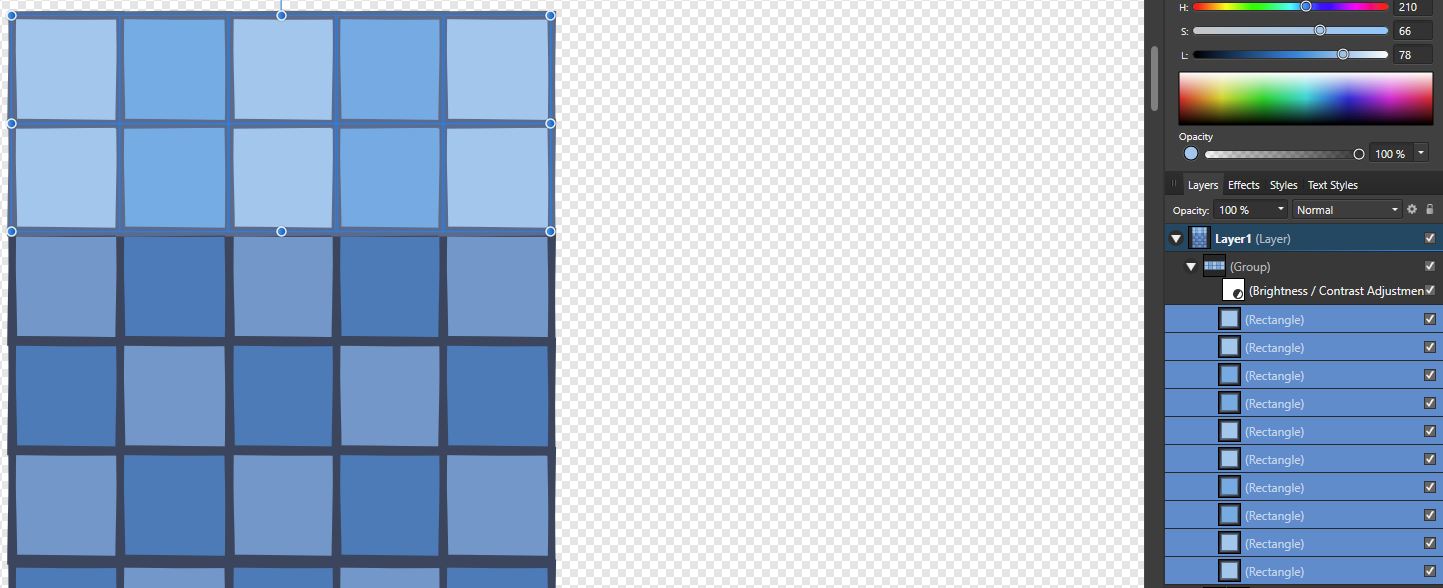
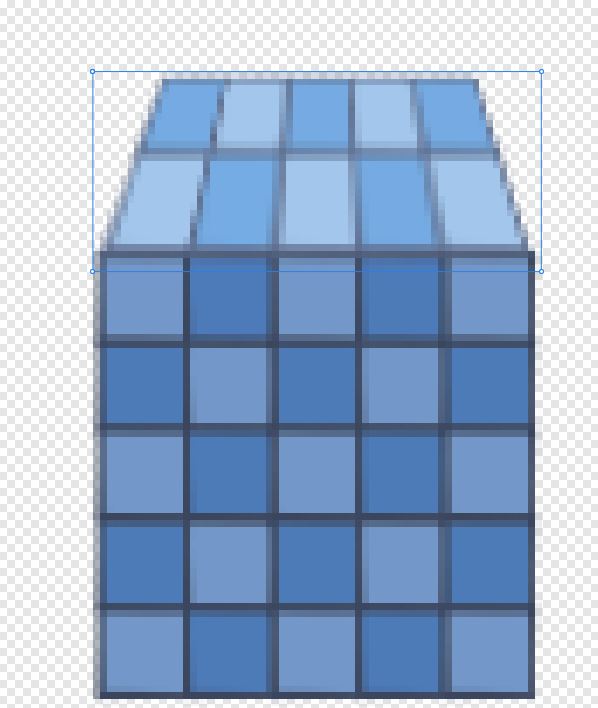
Hi,
I have this small setup:
I want to add a little perspective to the top two rows. Since there is no perspective tool I tried merging all the rectangles, but this obviously messes up my borders.
I want to achieve this:
Is there any trick to achieve this with little effort in Designer?! I think the perspective tool for Designer is in the making since 2016. Or did I miss something?!
-
I just wanted to thank you for developing such a great software. Using it on and off and today I figured out that Affinity Designer even provides a Spine exporter! Really Awesome, that will help me save even more time! Keep up the great work! I get more and more used to the software and still find amazing features :D
Edit:
Another cool feature is the Assets feature! So easy to use! :wub:
Edit 2:
Just a small feedback for the Spine exporter. It would be cool to place the root node somehow (maybe naming a slice "spine_root" will act as the offset provider for the JSON generator?!). :)
- Mithferion and Callum
-
 2
2
-
Hi,
is there some kind of clone layer in Affinity Photo/Designer that simply duplicates another layer with the possibility to transform it (Edit: And changes to the source layer are applied on the fly)?
Regards,
Irrgeist
-
Hi MEB,
thank you very much for clarification. I didn't know about the differences of image and pixel layers! Hope the shotcuts for selection are changeable in the future. But I figured out, that it's possible to switch the selection mode via the buttons, so this will do it for me atm :)
Edit:
Just a short question. When I take a screenshot via the print key (Windows 10), the pixel data from the clipboard will get pasted as an image layer (via New image from clipboard), but when opening a png via the file menu, it will be loaded into a pixel layer. How come?!
Yesterday I added a small png as a new layer in Photo. It looked quite pixelated after applying rotation etc...I opened the file in Designer, and the PNG I used looked really sharp. I was quite surprised ... I wonder what happened here. Maybe I can reproduce it.
Edit 2:
This is what I mean, it still looks the same in the pixel persona...of course, in the exported image, it will be rendered to 2-3 red pixels...
-
-
Hi,
how do I copy and paste a selection made with the marquee tool?! I am trying to duplicate some parts of an image and also try to copy a part and paste it as a new image (ctrl+alt+shift+n)
Edit:
Is it possible to switch the shortcuts for the Marquee tool?! I couldn't find it in the settings. Subtracting selection with Right+Left Mouse seems to be rather weird to me, especially since I have to make sure I release the left mouse button first, otherwise a new selection will be created. I would like to exchange it with DRAG+Ctrl since moving the layer is something I never did :huh:
Edit 2:
Okay, just found out about "Copy flattened" ... what is the difference to Copy?!
-
Hi,
I just tried the feature to edit a Designer document in Photo via the File menu. I recorded a GIF and reproduced the crash two times, see here:
I don't know if it's related to Designer (1.5.0.36 Windows 10, 64 bit, licensed copy) or Photo (1.5.0.37 beta), Designer is crashing in this case. Is there a log file I could provide?! I then would reproduce this error once again and upload it.
Regards
Irrgeist
-
Thank you guys! :D
-
-
Hi,
I just downloaded Affinity Photo (and also bought Affinity Designer), hopefully a good replacement for the horrible PP Pro and Inkscape :)
I would like to know if it's possible to turn off the brush preview, I just need the outlines of my brush tool (its annoying that I can't see what's underneath my brush, especially while using my Cintiq 13HD with pressure controlled brush sizes). Using the pressure controlled brush always shows a full black circle, then, upon drawing with minimal pressure, I can draw a thin line, but upon releasing my pen, the preview for my brush tool is the whole size again (especially bad, when using biiiiig brushes).
Another question:
I tried to make a screenshot with the print key. How do I paste the result from the clipboard into Affinity Photo (as a new image). CTRL+P is disabled. Tried another photo software and it works just as expected.
And finally:
As of now the software works great with my Cintiq, unlike the other double P painting software ... awesome :)
Regards,
Irrgeist


Stop setting brush size when switching brush.
in Affinity on Desktop Questions (macOS and Windows)
Posted
Thanks, works like a charm. Would be cool if there was a way to make it the default behavior, though.