

dominik
-
Posts
2,925 -
Joined
Posts posted by dominik
-
-
Hi Dominik,
That is indeed a bug I'll get that reported - thanks
pauls,
thankyou for coming back to this post. I realised that I originally posted this topic in the wrong (Beta) forum and that's why I reposted it in the release version bugs forum. There Sean P. confirmed that this is a know issue.
In other words, it is on the list already :)
d.
-
You have to go to the Library panel (not to the Macro panel
Hi MEB,
this made my day. I didn't read the install PDF carefully enough and was struggling in the Macro panel with no results.
Thank you.
d.
-
When I have someting selected, how can I add more stuff?
holding shift and selecting new area, forgets the previous area
Hello Morne,
in Windows the Right Mousebutton is used as a modifier key. So, if you want to add something to an existing selection you would first click and hold the Right Mousebutton, then click hold and drag the left Mouse button.
It works the other way around, too: first click and hold the Left Mousebutton, then click hold and drag the Right Mousebutton.
It needs a litte to get used to it and it is not as common as the Shift plus Left Mousebutton. But it works quite well.
Another thing: when you are in select mode like the Rectangular Marquee Tool there is a 'Mode' toolbar at the top left of the window where you can switch to 'Add', 'Subtract' and 'Intersect'. See here:

I hope this helps.
d.
-
I think I got it now: That is how it worked for me: 1) Make a new layer (empty pixel) 2)Make a ellipse selection in this layer 3) go to the Move-Icon , select the selection (here I can transform iz (thank you DesignMeister) 4) select background as active layer 5) Make a now layer with a mask out of the selection Thanks to all for help
Hi voronwe,
there is another way to transform a selection:
1) Make rectangular or circular selection with the Marquee Tool.
2) Hit 'q' and turn on quickmask. Everything not selected is covered by a ruby overlay.
3) Hit 'v' to switch to the Move Tool.
Now you can transform the selection in any way you know from vector shapes.
I hope this helps.
d.
-
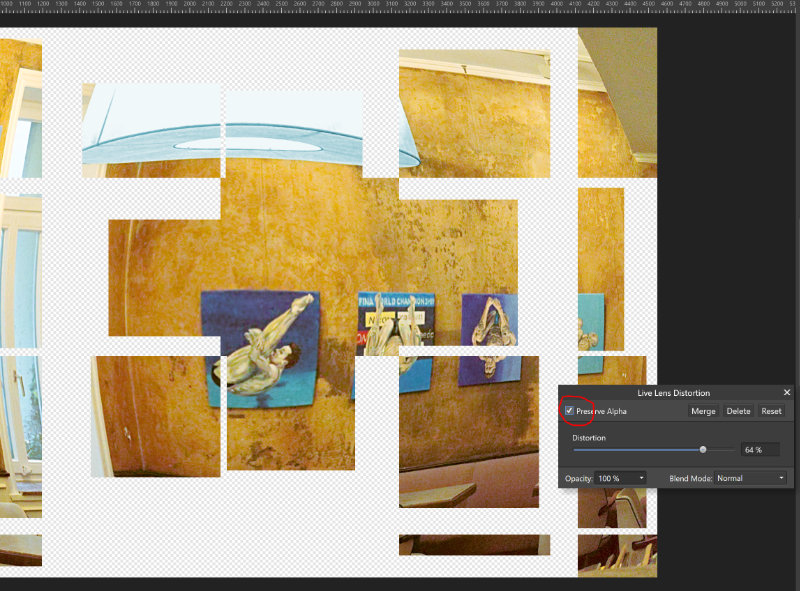
I am in the process of exploring live filter layers and came across what I only can show with the attached screenshot:
By turning on 'Preserve Alpha' the photo turns into this fragmented version.
Is this supposed to work that way? To me it seems to be a bug.
d.
-
I also need to import old Corel Draw files - I no longer have this program but used it alot, so now am stuck as far as editing them goes.
Hello finolajc,
welcome to the forum.
There are now some online services that let you convert from and to different file types. One of them is zamzar.com and you could try their free service how they perform for you.
Of course they do not convert to Affinity format but PDF could be a good choice, too.
d.
-
-
Hi Dominic,
It will import them to a folder in the C: drive (C:/Users/*USERNAME*/AppData/Roaming/Affinity/Designer/1.0/user/assets.propcol).
We don't link to the assets.
Thanks for the explanation.
d.
-
The file will be imported as a new category (DAUB Papers) to the Assets panel.
Hello MEB,
I have placed the DAUB Papers in a folder on the second harddrive in my notebook.
Will this 'import' copy those files to another location on my C: drive or will it create some kind of a link to the original files?
I just try to understand how assest are working.
Thankyou,
d.
-
Have I checked a wrong box somewhere?
I doubt so.
Sorry to hear that the program made things worse. As Ablichter writes this can be fixed.
Also perhaps the next update to AP will fix it during install?
A little clueless :(
d.
-
Nope! I enclose a screen take about how it looks like, both by windows (enclosed) or through the Affinity viewer.
Changing the type of viewing (big, small, details etc.) does not change anything...
There was a similar thread a while ago about Affinity Designer icons not showing properly (see here). For the original poster the problem could not be resolved but I myself was able to fix the problem with this small utility.
d.
-
I think it looks a bit unusual.
One can call it that way :D
Thanks for passing it on.
d.
-
Thanks, Dominik. I was just not sure Mesh warp/distort would have the free stransform function.
You can play with the mesh warp/distort tool in Affinity Photo. I assume it works in a somewhat similar way as the tool will work in Affinity Designer. This is just a guess from my side, I haven't read anything about it...
d.
-
Thanks, Jonopen.
Sadly, I don't the find free transform tool.
Jonopen most likely referred to the 'Mesh warp/distort tool'.
d.
-
Hey dominik,
I think it probably should ask. Perhaps even if we had 1 message stating that multiple artboards are going to be deleted. I'll pass it over. Thanks :)
Thank you!
d.
-
1) Create a new document
2) Create two artboards
3) Place some objects on each artboard
4) With artboardtool select one artboard and hit DELETE > messagebox shows up and asks, if I want to keep the objects on this artboard.
5) With artboardtool select two artboards and hit DELETE > artboards get deleted instantly including all containing objects.
I would expect that the same messagebox shows up as well...
d.
-
I created a screenrecording of a behaviour that I find a little strange, see linked file.
Note: at 35 seconds the mouse moves to the top right end of the window. This did not get recorded correctly. In this section I enable 'Lock Children' to fix the vector crop layer.
What I find strange is the way the top layer is displayed that I am moving around. The image is much larger and I would think that the original size should be shown with the blue handles.
The file is at Dropbox, since the size was too big as an attachment: ADrecording.mp4
d.
-
There are thousands of details I wouldn't know where to learn except for other users sharing them.
Hello DavidW,
a good starting point are the many 'Inhouse Affinity Video Tutorials' which are listed on this page. They cover quite a bit and are free to watch.
d.
-
Another question:
I tried to make a screenshot with the print key. How do I paste the result from the clipboard into Affinity Photo (as a new image). CTRL+P is disabled. Tried another photo software and it works just as expected.
Hello Irrgeist,
welcome to the forum.
Look for 'File > New from Clipboard'. That should do the trick :)
d.
-
I load Background pixel layer, I select the FST.
I set Tolerance to 4%. Mode as Add.
As I select the area (drag the mouse) the Tolerance value rises as I move. It makes selection impossible.
If I just Click into each area the Tolerance remains the same!
Any ideas?
Thanks, Paul
Hi Paul,
this seems to be a feature as explained in this tutorial (starting at about 30 seconds).
It takes a little to get used to it but is helpful :)
d.
-
On my PC with German keyboad and Windows 10 the installer for Affinity automatically installs Affinito Photo for Windows in the German Language.
I only have this PC because I am used to german Keyboards due to my job.
Is there a way to change the language used to English (or Dutch) after the installation of Affinity Photo Windows ?
Hello PCH,
welcome to the forum.
You can change the language at 'Edit > Preferences > General'. You have to restart the program but you get a message telling you so.
d.
-
Hi guys
Gradient options are missing. Only linear gradient available at the moment?
Many Thanks
E
Hello Eeric,
welcome to the forum(s). This is a known issue and they are after it, already.
d.
-
Affinity has now become officially cross-platform with the launch of Affinity Designer for Windows.
My congratulations to this accomplishment :)
Not much of a problem but the language chooser is still visible during install.
d.
-
I had the same problem ... seriously wondering, why "Import PSD text as text" is not the default setting :-(
Actually I don't know and haven't read a comment on this from the devs. Perhaps the idea is to make sure that missing fonts do not distort the original design.
d.


about resize selection area
in [ARCHIVE] Photo beta on Windows threads
Posted
Hello r91085,
I answered this a while ago in this thread:
1) Make rectangular or circular selection with the Marquee Tool.
2) Hit 'q' and turn on quickmask. Everything not selected is covered by a ruby overlay.
3) Hit 'v' to switch to the Move Tool.
Now you can transform the selection in any way you know from vector shapes.
I hope this is what you are looking for :)
d.