thomaso
-
Posts
13,563 -
Joined
-
Last visited
Everything posted by thomaso
-

v531 Preflight ... v535
thomaso replied to thomaso's topic in [ARCHIVE] Publisher beta on macOS threads
Thanks, it clarifies the idea some more. The toolbar icon should be red or yellow ONLY if the button "Live" is pressed, correct? – I still wonder about "live check" and it's meaning here: Although the tooltip for the toolbar icon says "Live ... disabled", it is currently not clear whether a preflight that was activated in accordance with the export settings at the time of selecting File> Export isn't a "Live" action, too, because then it updates the content of the preflight panel live (= at this moment) whereas it keeps the content unchanged until the next live action – even if the preflight problems have been fixed – either by reusing File> Export or by pressing the "Check Now" button. So, the term "live" (in button & tooltip) is actually supposed to express "permanently" or "all the time"? -
v531 Preflight ... v535
thomaso replied to thomaso's topic in [ARCHIVE] Publisher beta on macOS threads
Yes, the yesterday video shows the errors. – Now, with new v532, the warning window pops up as expected. In the following video I select File > Export first, you see the warning entries appear in the panel at the moment when I get the warning message window. I move it into the visible video area ... Now I would expect to see the toolbar icon as red, according to the panel entries. Instead the icon still stays gray, and doesn't change even when I click "Check Now" (different to v531). – However, it is a major improvement to get the warning message window. But it is still a little confusing that the toolbar icon & the panel content can show different preflight results. preflight in toolbar v535 red.m4v The difference between toolbar icon & panel entries also appears with yellow warnings only. As expected I don't get a message window when using File > Export – but again the toolbar icon stays gray even though the export command makes the yellow panel entries appear at the beginning of this clip. The toolbar icon switches to yellow only if I select "Live": preflight in toolbar v535 yellow.m4v -
Since some Beta versions (ca. since 1.8.x) the beta app dock icon appears not to work properly. It starts working when a new beta was installed but after a few days it shows a ? on the icon and doesn't open the app again (though it still shows the recent item list on right click). Then I drag the beta app for a new icon into the doc, which works but creates on click a further, third, icon at the end of the dock. Now a click on the manually dragged icon (most left in the screenshot) still appears to be linked to the app – but somehow also does not and forces an additional icon to appear. Both these icons are linked to the app when I cmd-click them. Then I delete the manually dragged icon + set the newest created via right-click > options > keep in dock. It works for a few days ... then it starts as mentioned above. I don't have at any time another then the current APub Beta version installed. Is there any idea how to solve this dock icon issue? (the APub Beta icon is the only app icon which behaves that way to me)

-
In v531 I get the Preflight Panel now even in Separate Mode. But it now I don't get the warning window on export (– which I had got in v523 / without having the Panel). • Also I wonder how the preflight icon in the toolbar is meant to work + appear. To me it has only two states: gray or green. It is never red, correct? (different to the panel entries) I would expect it to appear red e.g. when I have set preflight for "Export" only – otherwise this icon wouldn't warn at all but just illustrate if live preflight is activated, totally regardless of preflight errors. – So, how is this toolbar icon meant to work? And when should a warning window on export appear, if export is selected in the panel and a missing image is noticed there. • The interaction of the 3 "Check" buttons in the panel and the icon in the toolbar appear a little confusing. For instance when I change form "Live" (icon shows green) to "Export" or "Never" the icon remains green – until I click "Check Now". In this video I do switch between this 3 buttons a few times to show the equivalent toolbar icon color. It confuses me that I can see the green icon + "Check Never" + red list entry simultaneously all at the same time. • At the end of the video is another question: the empty column left of the page numbers and the no-margin between page numbers and panel edge. – Is it meant to look like this? preflight in toolbar.mov
-
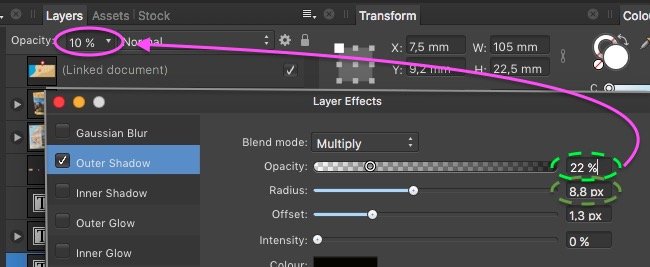
Tab key in value fields were already discussed quite a few times, mostly when they do not work to jump to the next field at all. But in Layer Effects the use of a tab has a very unexpected result: it always moves the cursor into the Layer Panel > Layer Opacity and changes that value instead of the next value in the current Layer Effect window. It is even more confusing because the UI does not show this tab key use, as e.g. with a blue highlight and a cursor, so it is done without visual feedback.
-
This appears buggy. – When exporting a PDF with such two different page sizes from APub as JPGs then I get the 'current' page in correct size but the other page a little stretched (a few % horizontally +), regardless which page is 'current'.
-
Affinity Photo and Affinity Publisher color codes don't match
thomaso replied to mpoday22's topic in V1 Bugs found on macOS
Are you using in both apps the same colorspace / profile?- 1 reply
-
- 1
-

-
- affinity photo
- affinity publisher
- (and 1 more)
-
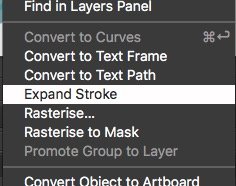
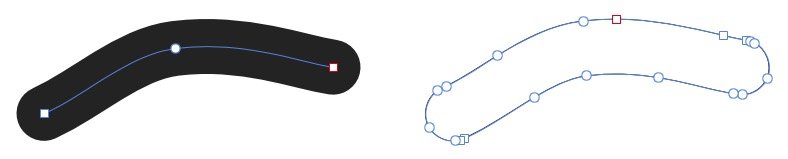
1) As @R C-R mentioned all text objects created in Affinity apps are vector by default. Exporting them to PDF will keep their vector attitude, exporting to JPG, PNG, TIGF etc. will convert them to rasterized pixels. If you assign an Affinity effect to text then text can get rasterized on export, depending on the effect, and will loose its vector attitude even on PDF export, depending on the PDF version. The most commonly used are from PDF 1.4 – PDF 1.7, whereas a higher number offers more vector abilities. If you do not apply an effect and use just text and colors then you don't need to care about that. 2) When you say "foil print" it might also mean foil cut-out plot. For the cut-out plotter the text must be converted to curves. Then they are still vector but no letters/charactrs any more but rather just shapes, like the letter O will be just a torus. I recommend to ask your printer if the text you deliver as vector shall be converted to curves. To convert text to curves you have two options: – either before export with the button in the toolbar: – or for export only in the Export > "More" options: If you choose the toolbar button then the text will be converted to curves within your document and makes it almost impossible to change text content, font and other typographical properties, also mentioned by R C-R above. So it is more flexible to convert to curves only during export. If you convert text to curves even if the foil print doesn't demand it, there will be no disadvantage for the print process or the resulting quality. Some print shops even demand curved text by default, regardless of the used printing technique. This way any issues which can occur with not-curved texts and their font files become prevented. (because a PDF with non-curved text either has font files embedded or needs the according fonts on the receiving computer). Finally, for your foil print: – avoid effects with/on text – export as PDF/X-4 – convert text as curves on export.
-
Not able to edit layers
thomaso replied to ArtistJaime's topic in Pre-V2 Archive of Desktop Questions (macOS and Windows)
FWIW, you can also right-click on that layer in the Channels panel & delete it. The "Pixel Selection" layer in Channels Panel seems to be compulsory and a non-deletable item. I am just able to change its content but not to get rid of this layer object. As far I understand, the "Pixel Selection" layer continuously auto-updates according to any current selection in the document window or layers panel. It enables me to invert or save a selection as extra layer (alpha channel) within this panel, display a selection on canvas as colored mask or release all selection (to have nothing selected = strg/cmd D). So, for the OP, it would solve the issue simply to hit strg-D to have access again to edit the coffee steam. @ R C-R, was this "deselect" what you meant with "delete it"? Layer > Rasterize & Trim... Isn't there a way to Trim without rasterizing? Rasterizing is destructive + also can increase file size depending on the rasterized content. What if I want to crop without loss within the cropped area? As for instance in this thread to upload a part of the .aphoto file, e.g. to prevent delivering the entire illustration and avoid kind of misuse. When using this command I would expect a dialog window because it is labeled with ellipses... / instead it just rasterizes. Is that how it is meant to work? Or are there specific needs to get a dialog window? – I can't find an Help article for Rasterize & Trim... , just for Resize Canvas and for Rasterize. In my experience it doesn't trim, neither to a selection nor to a active area done with the crop tool. Also I wonder why this command is in the Layer, not in the Document menu – as if it would apply to specific layers only, e.g. selected ones, and not to the entire document?
-
Not able to edit layers
thomaso replied to ArtistJaime's topic in Pre-V2 Archive of Desktop Questions (macOS and Windows)
Reading the Help ( https://affinity.help ) as kind of a reference manual might help to understand how the app thinks & works. ( I wish Serif would offer it as printed brochure, or PDF at least ) I guess you talk about the "Pixel Selection" layer. Possibly you hit a layers icon with the Strg/cmd key pressed. That would change the content of the default "Pixel Selection" layer.
-
Written tutorials
thomaso replied to AndyH1's topic in Pre-V2 Archive of Desktop Questions (macOS and Windows)
I do appreciate to read, too, and do prefer, in particular at the beginning, a reference manual rather than tutorials. The quite rich Help content ( https://affinity.help ) unfortunately is neither available as print nor as PDF yet. -
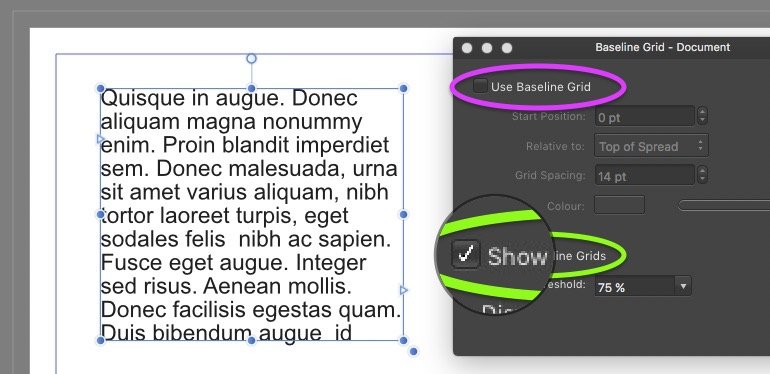
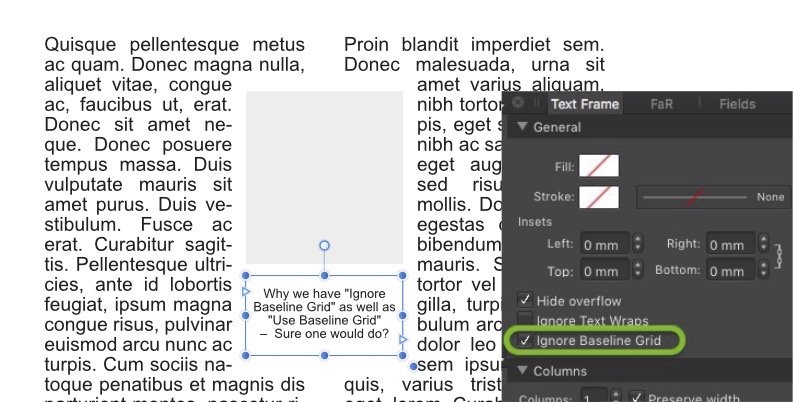
The "Use Baseline Grid" option is rather a general setting, it works for the entire document. Whereas "Ignore Baseline Grid" additionally enables you to exclude detailed, particular text frames from using the grid while all others still use it. Note another possibly unexpected behavior: The "Baseline Grid Manager..." enables you to activate "Show Baseline Grid" without getting it displayed. It just doesn't work unless having "Use Baseline Grid" ticked. Also you can activate the grid without showing it.
-
Change of PC (Affinity Design)
thomaso replied to takhoso's topic in Pre-V2 Archive of Desktop Questions (macOS and Windows)
In case you want to transfer your current custom settings and preferences to the new PC this post might give info – Note that files/folders in this description relate to a beta version according names. -
Not able to edit layers
thomaso replied to ArtistJaime's topic in Pre-V2 Archive of Desktop Questions (macOS and Windows)
Interesting & good to know. I haven't been aware that .aphoto is this kind of nondestructive when cropped. I think what we see is a work in progress with content of various previous states, in particular the masks seem to have been painted for a former layer content. (A pity that the shiny fork layer is hidden behind the plate.) By the way, how would one 'really' crop = get rid off exterior parts + reduce file size? -
Not able to edit layers
thomaso replied to ArtistJaime's topic in Pre-V2 Archive of Desktop Questions (macOS and Windows)
Old Bruce, consider that the uploaded .aphoto contains only a cropped area of the entire OP document, so some layers content might have been outside this area before cropping. -
Not able to edit layers
thomaso replied to ArtistJaime's topic in Pre-V2 Archive of Desktop Questions (macOS and Windows)
Your issue appears to be related to the pixel selection layer: After clicking its "invert" icon I am able to brush-erase the coffee steam.
-
Not able to edit layers
thomaso replied to ArtistJaime's topic in Pre-V2 Archive of Desktop Questions (macOS and Windows)
Could you upload the .aphoto file (or a cropped area around the coffee cup)? -
What you see at before vs. after is the same text content but with its characters in different order. If you set both samples to the same font the similarity will be more obvious. Arabic language uses Right-To-Left ("RTL") which isn't supported in Affinity yet. There are some threads about this, in one some months ago somebody posted a website link which switches a pasted text for your further use. Unfortunately I don't remember the forum and thread, possible someone else would tell or you might find it via forums search for "arabic" + "html:\\". Edit: it's in this post by @Areeb: www.arabic-keyboard.org/photoshop-arabic/
-
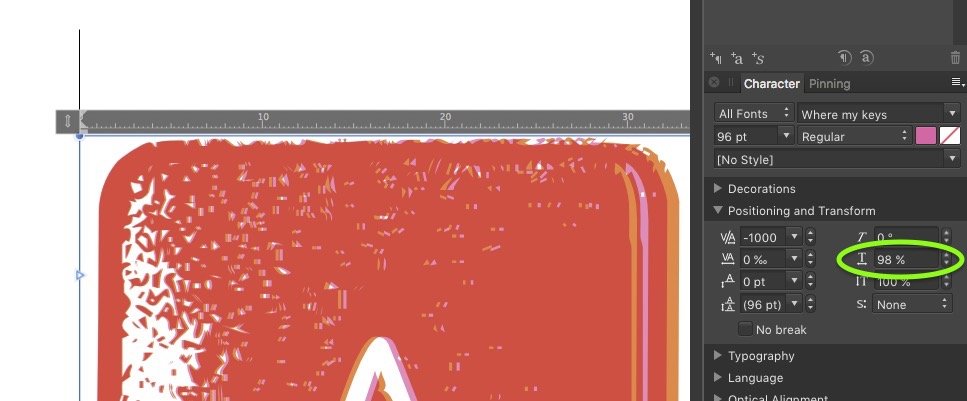
I wonder if the OP's offset in kerning results from the assigned font width. Unfortunatly Affinity says "99 %" for a selected text frame even if only the first character is stretched that way. It can result in a visual offset of 1000 ‰ kerning:
-
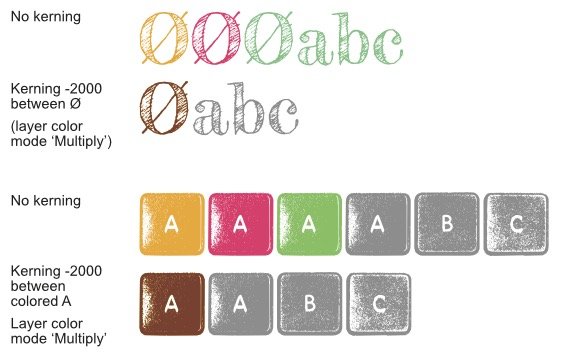
Possibly a value above 1000 ‰ would not make sense if 1000 ‰ is a max as are 100 % of a color channel, like 100% in a circle diagramm or coffee in a cup, which is just full once it's 100% filled. So a kerning (or tracking) value would not define a distance from 0 to x pts, mm or pixels – but a limited percentage of covering of two chars on each other. Whereas this dimension of a char is defined within the font file ('width', 'flesh') and sets this 100 % limit. – So possibly the 3 layers of the letter H in the OP aren't defined correctly?
-
I obviously had misunderstood the OP's issue in my posts above, Sorry! Concerning alignment & perfect fit it appears to work for me, at least in these two sample fonts (which aren't layered like the one in the OP). So possibly it *IS* the specific font file of the OP which prevents a correct alignment with kerning?
-
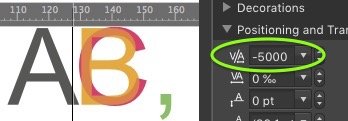
Ah, thank you, Old Bruce, for this hint. I had tried kerning before only with characters selected. Now with just placing the cursor between B and C I can assign custom values. And again it appears there is no numerical but only a visual limitation: the left edge of the first affected character (like for tracking).
-
In my experience I still can't apply a custom value for kerning but for tracking only. There I can apply diffefrent values within a paragraph and/or word. In this sample the second line shows two different values (–400, –3500) assigned to the characters BC when they were selected. The third line shows the same pair of values but assigned with the cursor just placed between B and C (and no character selected). I don't experience a limit for the numerical value – instead the limitation is the position of the first affected character: no char can be moved further left than the first affected char. That means, above a particular value, though I can increase the value it won't change the char positions. I also noticed, that the given value in Character panel > Tracking can show wrong values if more than 1 value exists in the selected text frame. This, I guess, is still the already reported issue with value fields and their lack of an UI which makes clear if more than 1 value is active (e.g. by showing a value in gray color or brackets). Also it appears to happen occasionally for high values (I can't detect a rule) that I get different visual result in the text frame depending on whether value is either typed into the field or set by the arrow up/down triangle buttons.
-
Word Balloons
thomaso replied to Deadmoond's topic in Pre-V2 Archive of Desktop Questions (macOS and Windows)
In case you need to do many of those it might be easier to use circle shapes (not Callout...) + draw the connections in ADesigner with brushes (with the connections width) + convert these strokes to shapes. Finally you can use again Geometry > Add to merge circles with connections.
-
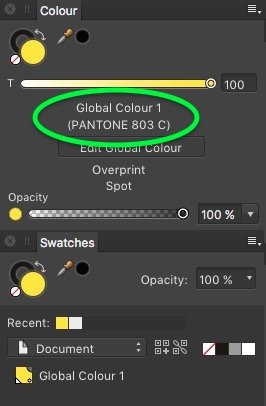
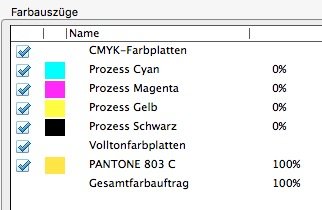
Pantone colors?
thomaso replied to Gutshot's topic in Pre-V2 Archive of Desktop Questions (macOS and Windows)
Ah, the naming issue. Yes, the auto names of swatches, not only Pantone, is not helpful in Affinity. Especially with Pantone it appears unnecessary weird since the real PANTONE name is shown as spot color name in the Colours panel and also named correctly as printing channel/ink. >> I assume this auto-naming is a 'leftover' from ADesigner, where colors are expected to get custom named related to graphic objects ("sunny yellow" ;•) Whereas in APub color definitions could be more useful as names.