leshido
-
Posts
73 -
Joined
-
Last visited
Everything posted by leshido
-

Adjustment Group causes underlying text to render different
leshido replied to leshido's topic in V2 Bugs found on macOS
@NathanC Thanks for handling this so quickly. Your example also illustrates the issue affects other types of layers - the Star shape in your document. I tested and can confirm the same behaviour on Pixel layers as well. For some reason I only noticed it on text initially, but please make sure your bug report logs it basically for any layer type. After some experimentation, I realized why I only found it now: It only applies to any layer that's overlayed against transparent pixels. A quick workaround for my case was to add a white rectangle in the background, though I assume that's not a viable solution for everyone. -
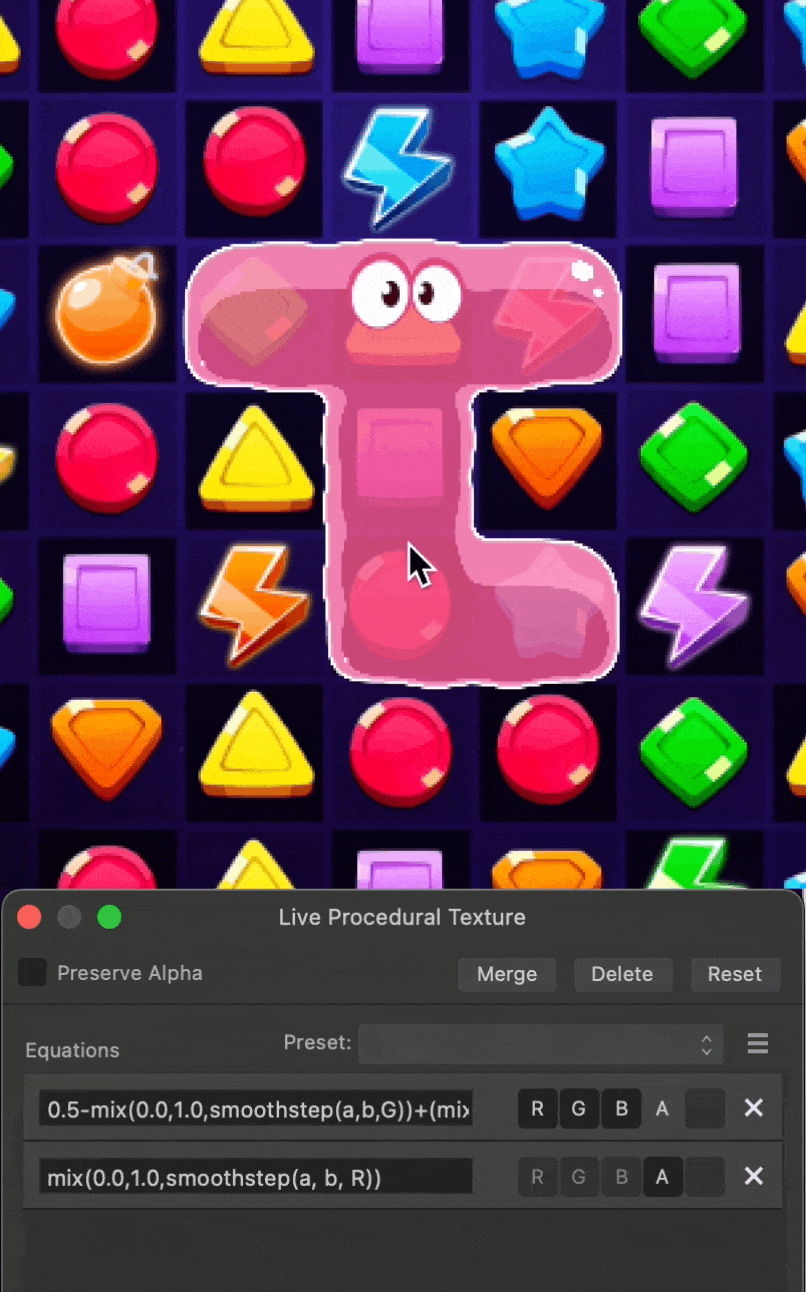
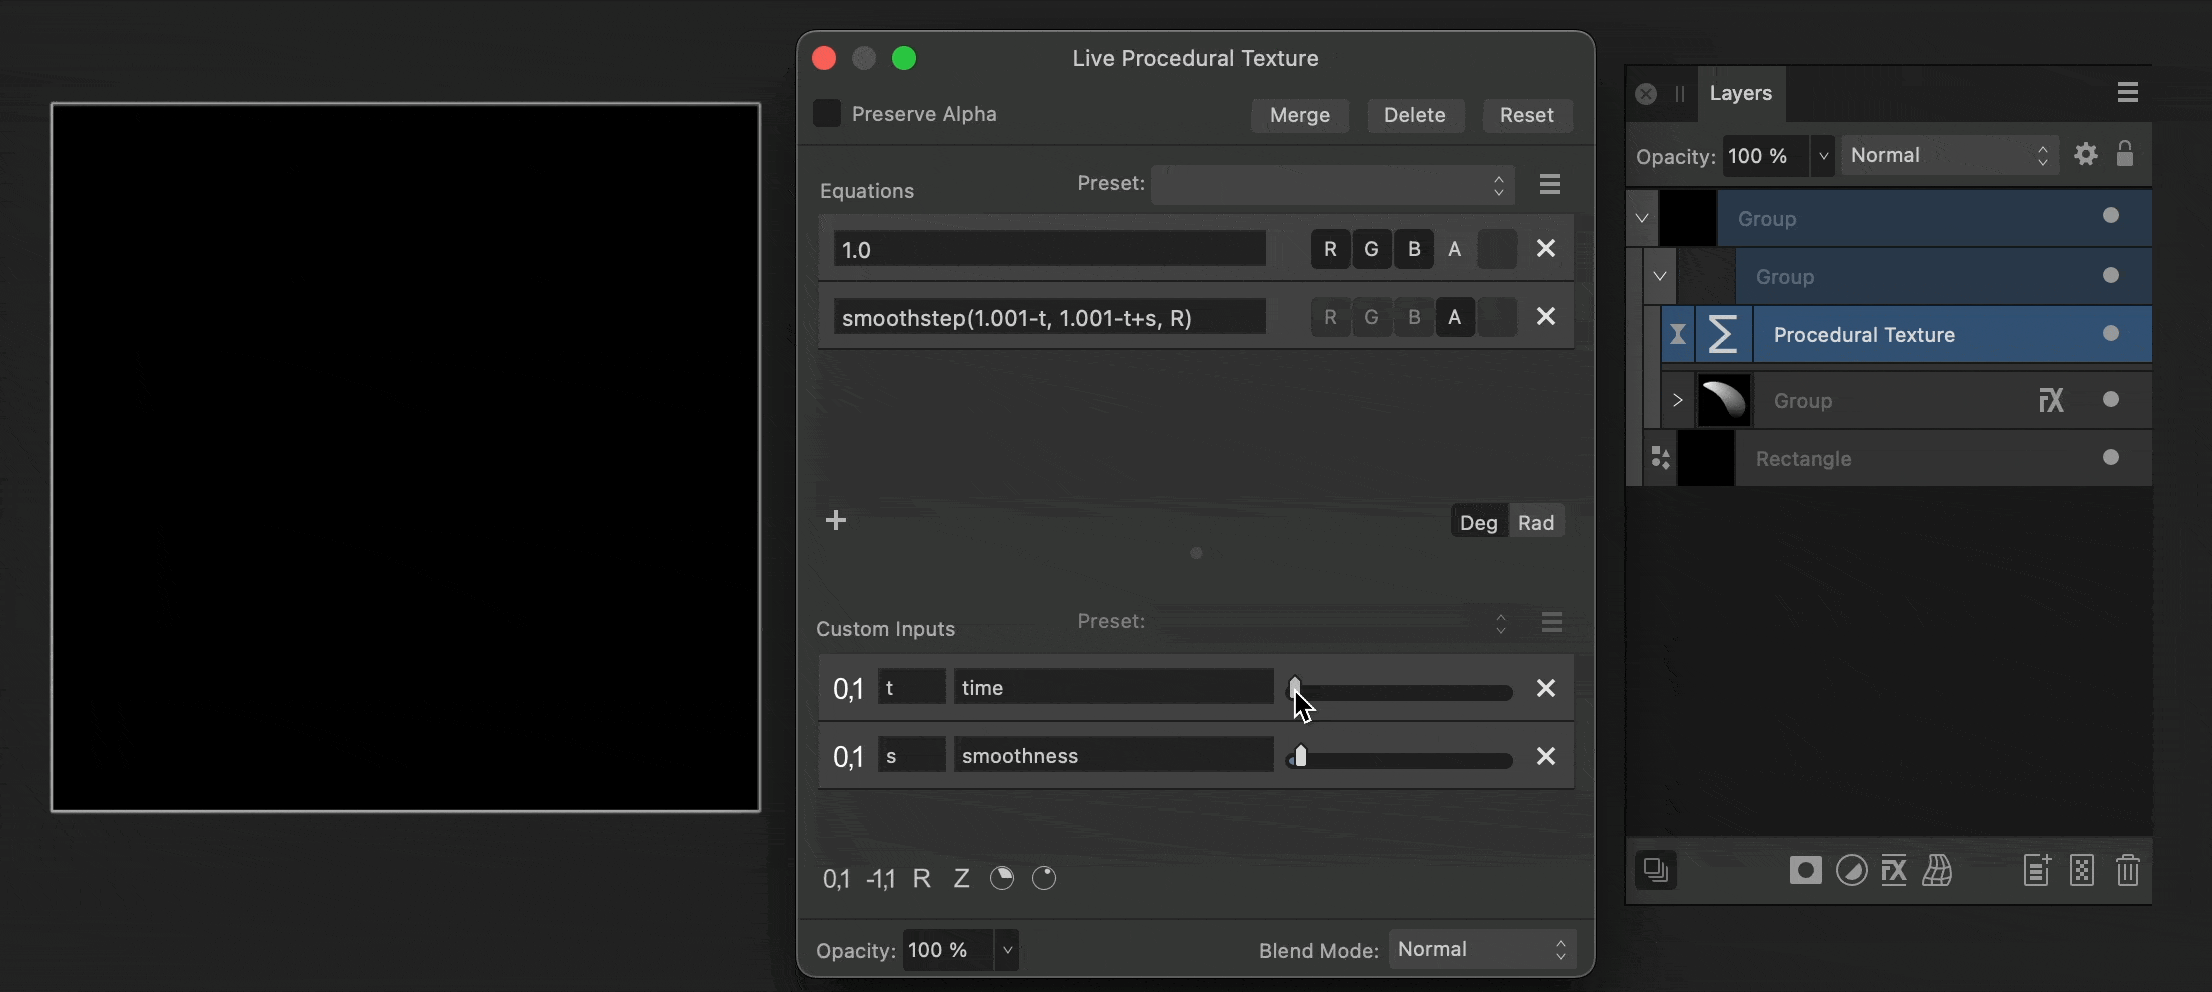
Of course @bobdobbs, happy to explain what's going on here. It might make more sense in a game-development/tech-art context, but basically most game engines (i.e Unity, Unreal, Godot, Defold, etc.) offer some sort of functionality called Shaders. These mini-programs often use a programming language called GLSL to write functions that manipulate or otherwise determine how things are drawn to the screen. Affinity Photo has this unique Live Filter called Procedural Texture. It is admittedly quite advanced and intimidating at first glance, but it allows one to write these equations and use them to manipulate channels (Red, Green, Blue and Alpha) in roughly the same way shaders do. In this example above, I used the filter to achieve a very specific use-case for an effect in a game we're working on — basically the equivalent of running a Thershold adjustment with increasing input over time (if that makes sense, hopefully you're familiar with the Thereshold adjustment). With this shader, we're able to use a single image and apply this sort of effect first to it's Red channel (for the first part of the animation) and then to the Green channel (for the closing part of it). It is a very specific and limited effect, aimed at a niche use case. So, while I'm not sure it's very useful as-is, my hope was to help users get more curious and familiar with the Procedural Texture live filter as I think it can be used to create/simulate many types of animated VFX.
-
I often use groups that contain only Adjustment layers or Filter layers to organize my document and easily switch on/off multiple canvas effects at once. However, I noticed a strange occurence when text layers are placed below such groups. The text becomes "crisper", almost aliased, even if the adjustment itself does nothing. I wonder if there's a setting or a workaround to that phenomenon, or if it's a bug that is aimed to be fixed? Notice in the video I am able to change the look of the text by just grouping/ungrouping a single Adustment layer (default Levels): Screen Recording 2025-06-24 at 2.34.21.mov And it's not only a preview issue — I exported the file both with and without the group, then overlayed the outcomes with a difference blending mode applied: Steps to reproduce: Open a new document in Affinity Designer / Photo. Insert a text frame layer and fill with placeholder text or any other string. Add a new Adustment layer - i.e a Levels adjustment. No need to make any edit with it. Group the Adjustment layer into its own group. See the text rendering changes. I think users don't expect merely grouping adjustments should cause anything to look different as opposed to having the same adjustments ungrouped.. Thank you for your hard work and consideration!

-
Live pixelate filter (almost)
leshido replied to NotMyFault's topic in Tutorials (Staff and Customer Created Tutorials)
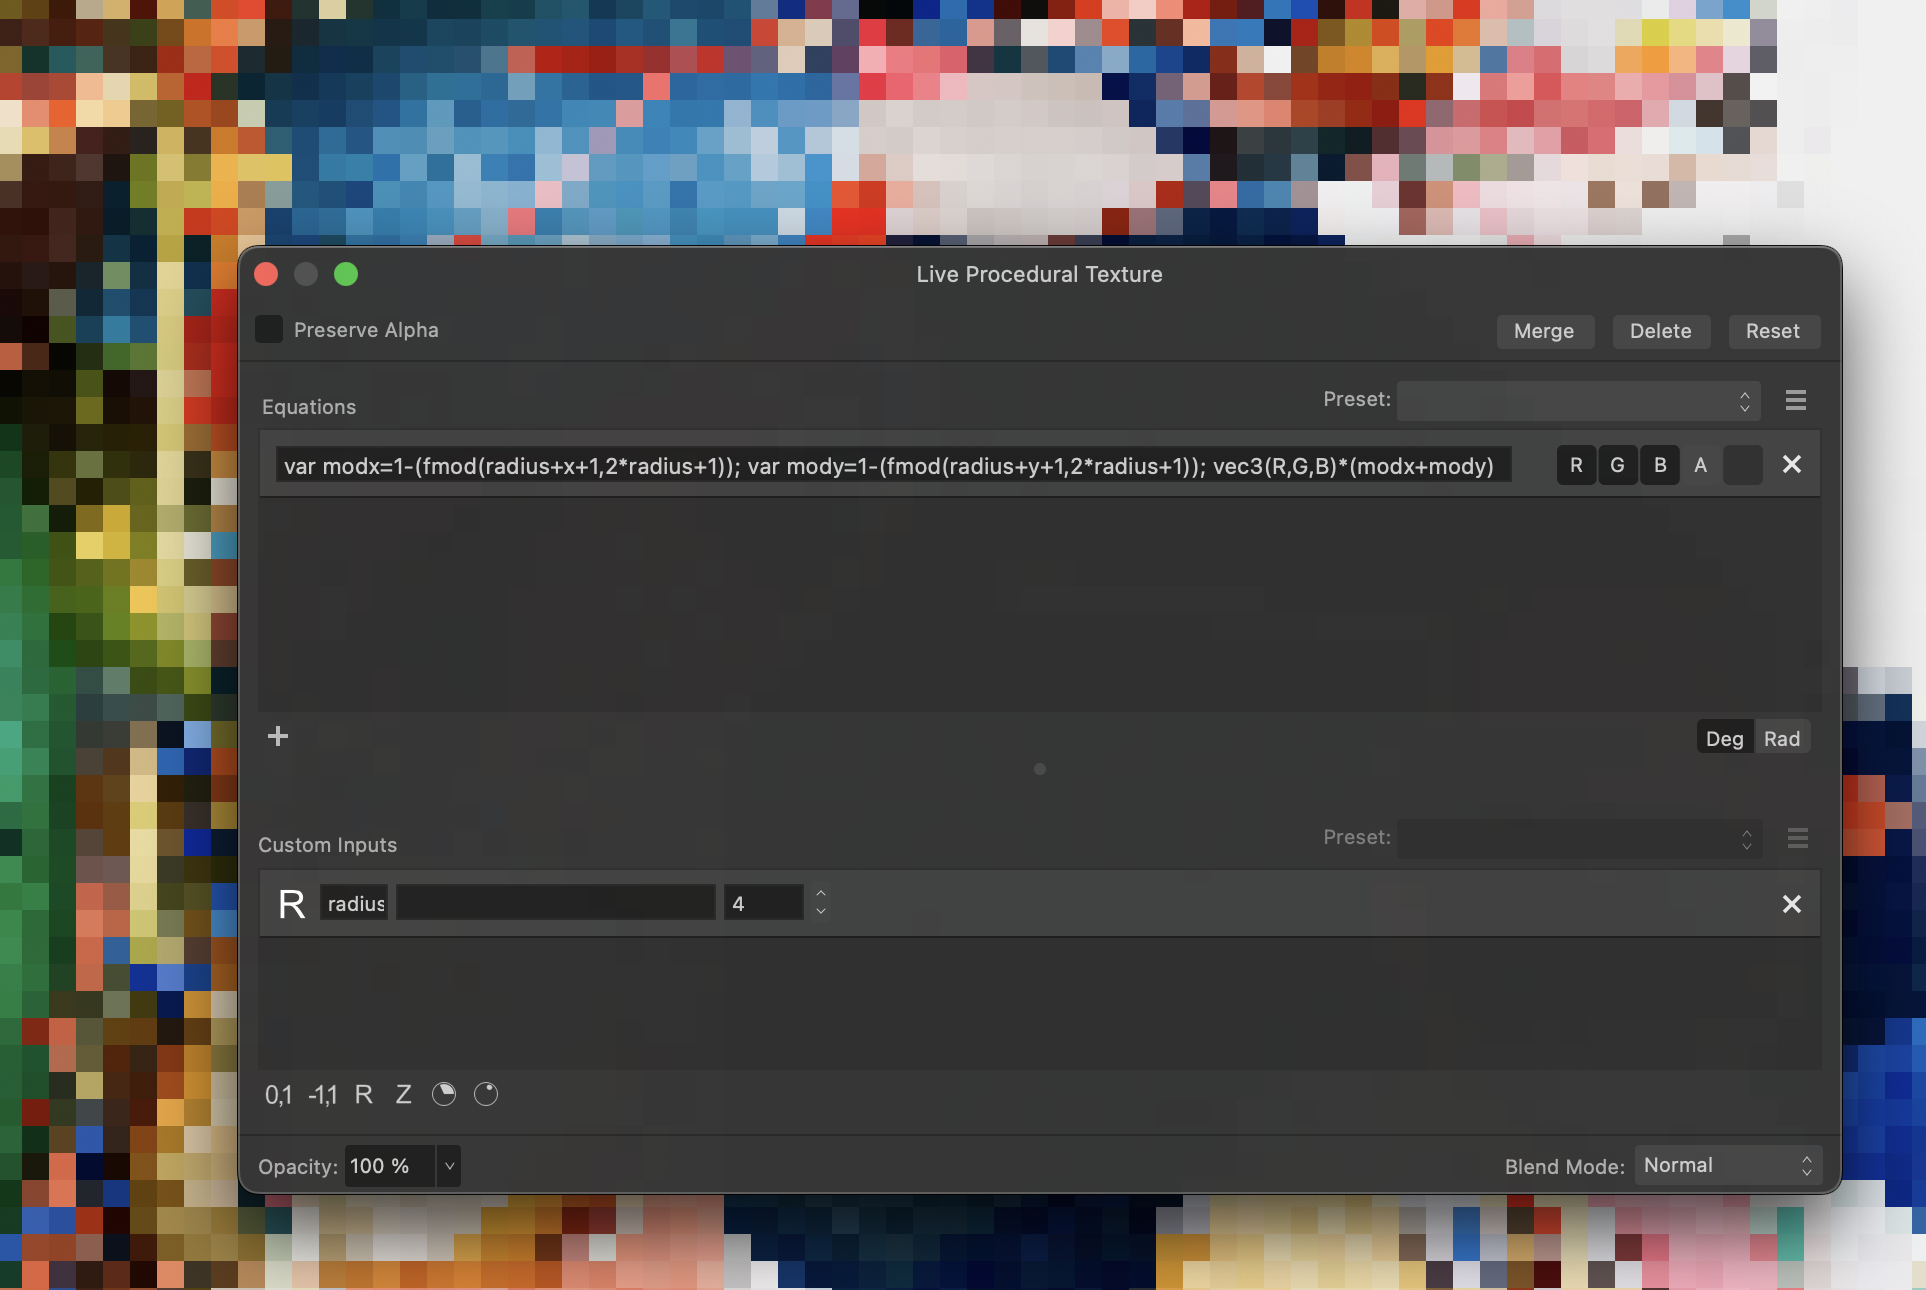
Thanks @NotMyFault! I like the idea here and honestly was a little surprised this specific filter didn't have a live version. Solid solution. Since you didn't end up providing a formula I went ahead and wrote one. It now makes the process even easier: var modx=1-(fmod(radius+x+1,2*radius+1)); var mody=1-(fmod(radius+y+1,2*radius+1)); vec3(R,G,B)*(modx+mody) Set this to output RGB and add a custom real number input (variable) called "radius". Use same radius as the input of the Maximum blur.
-
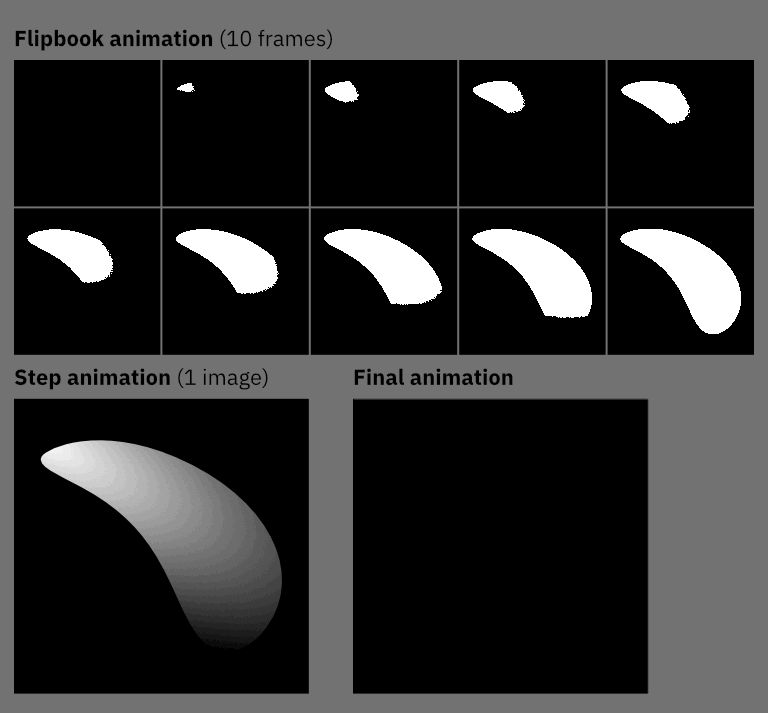
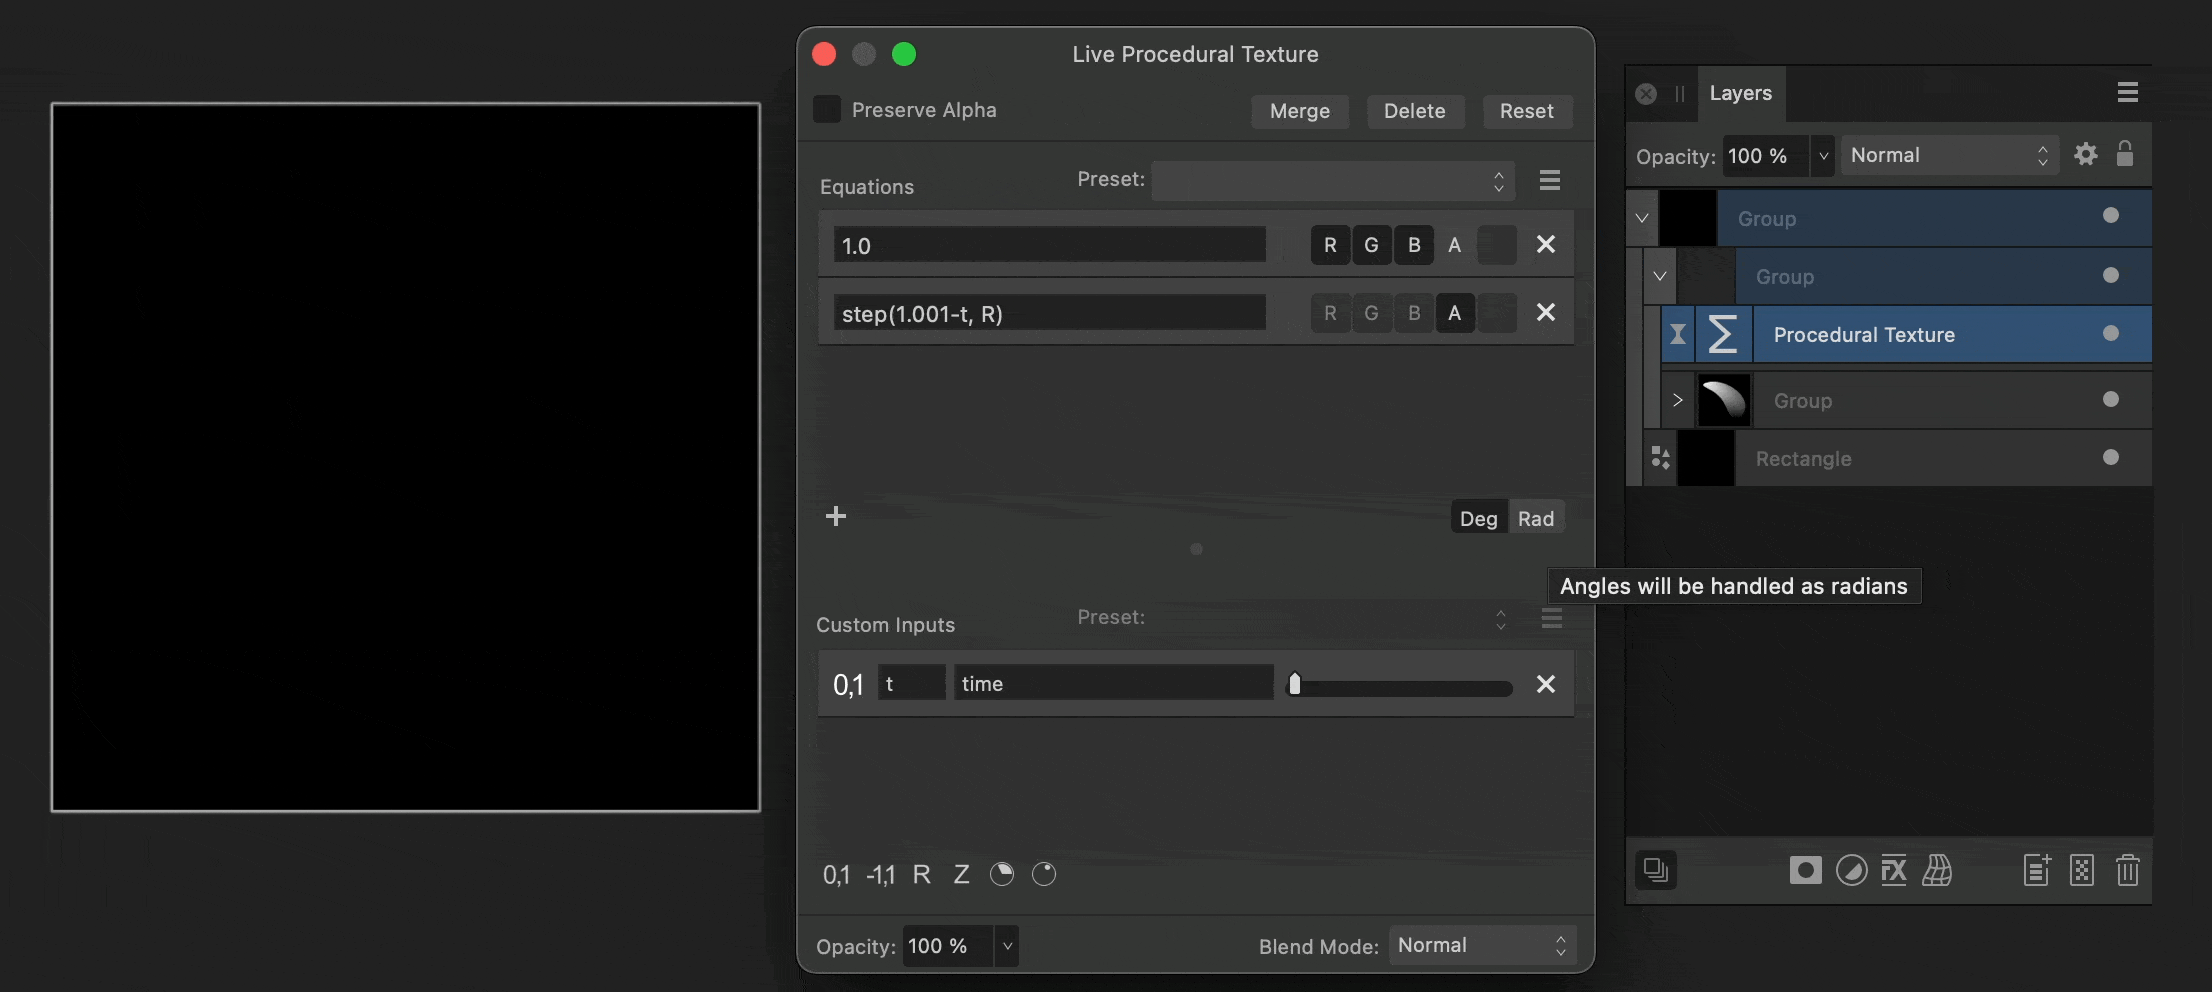
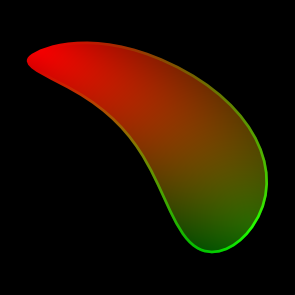
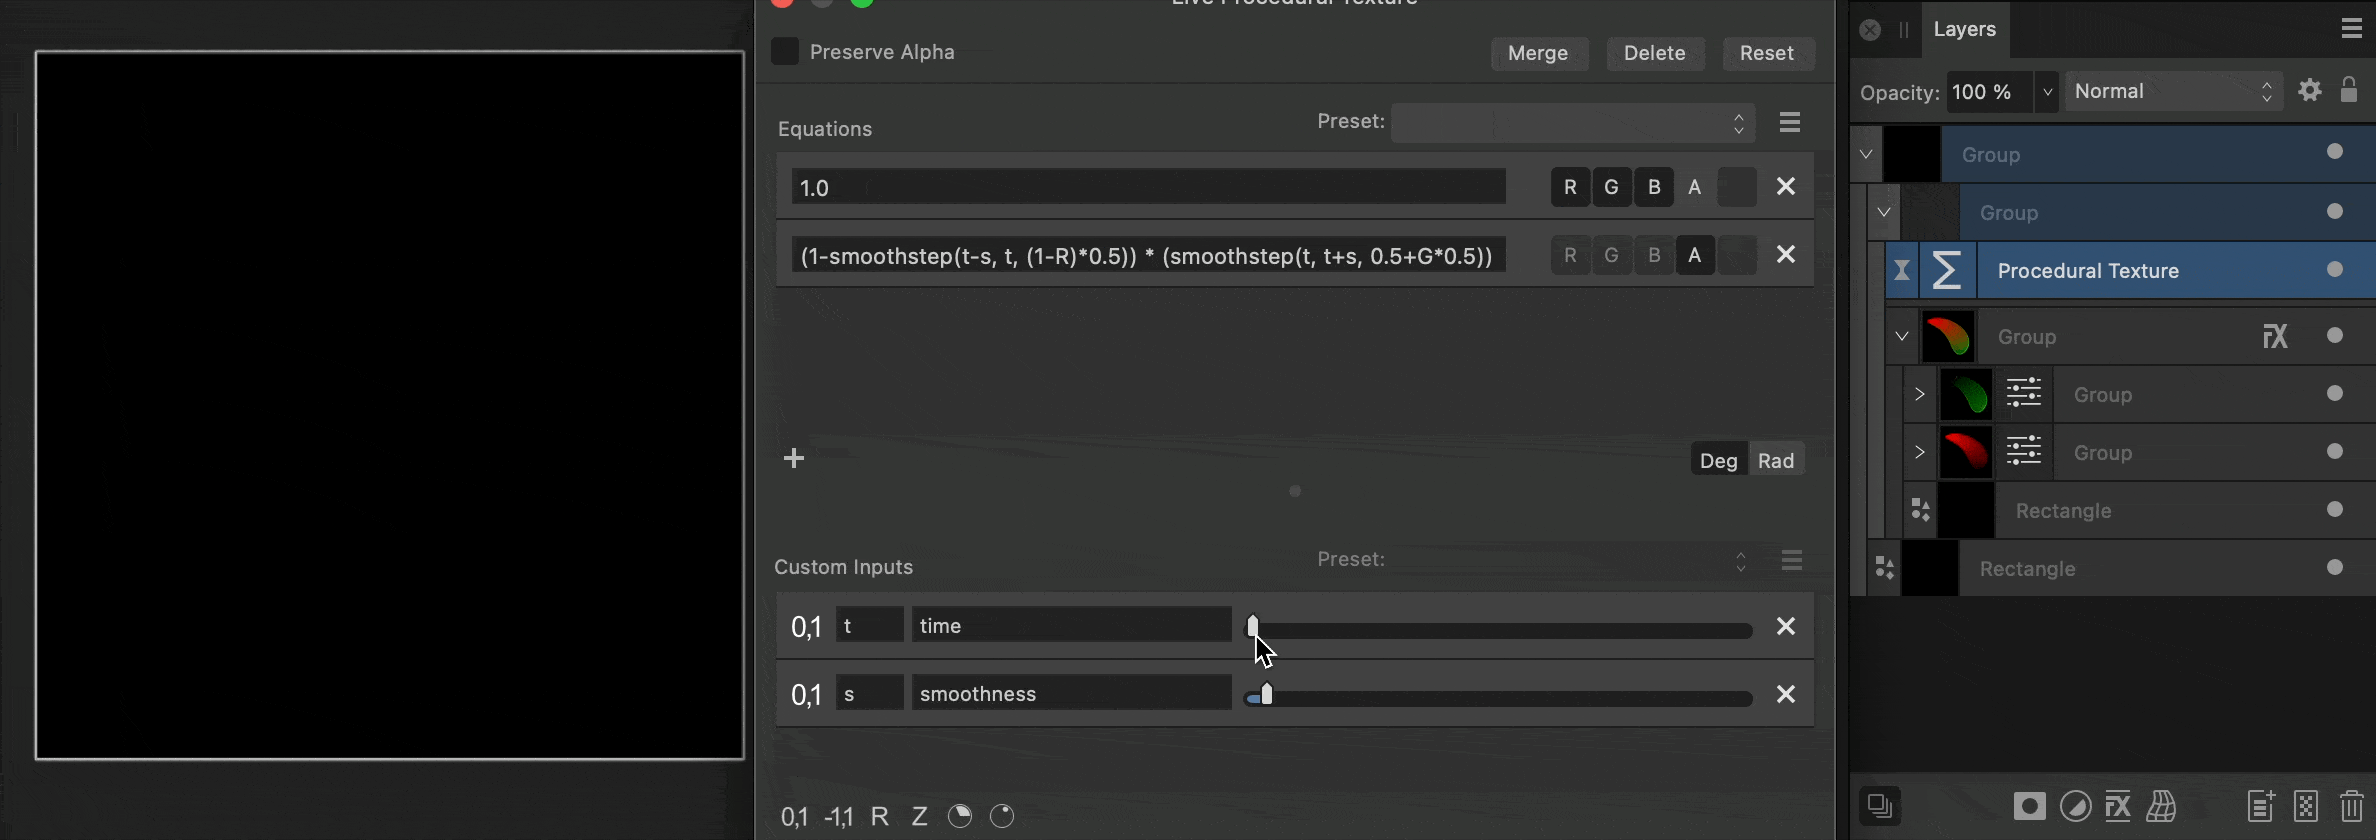
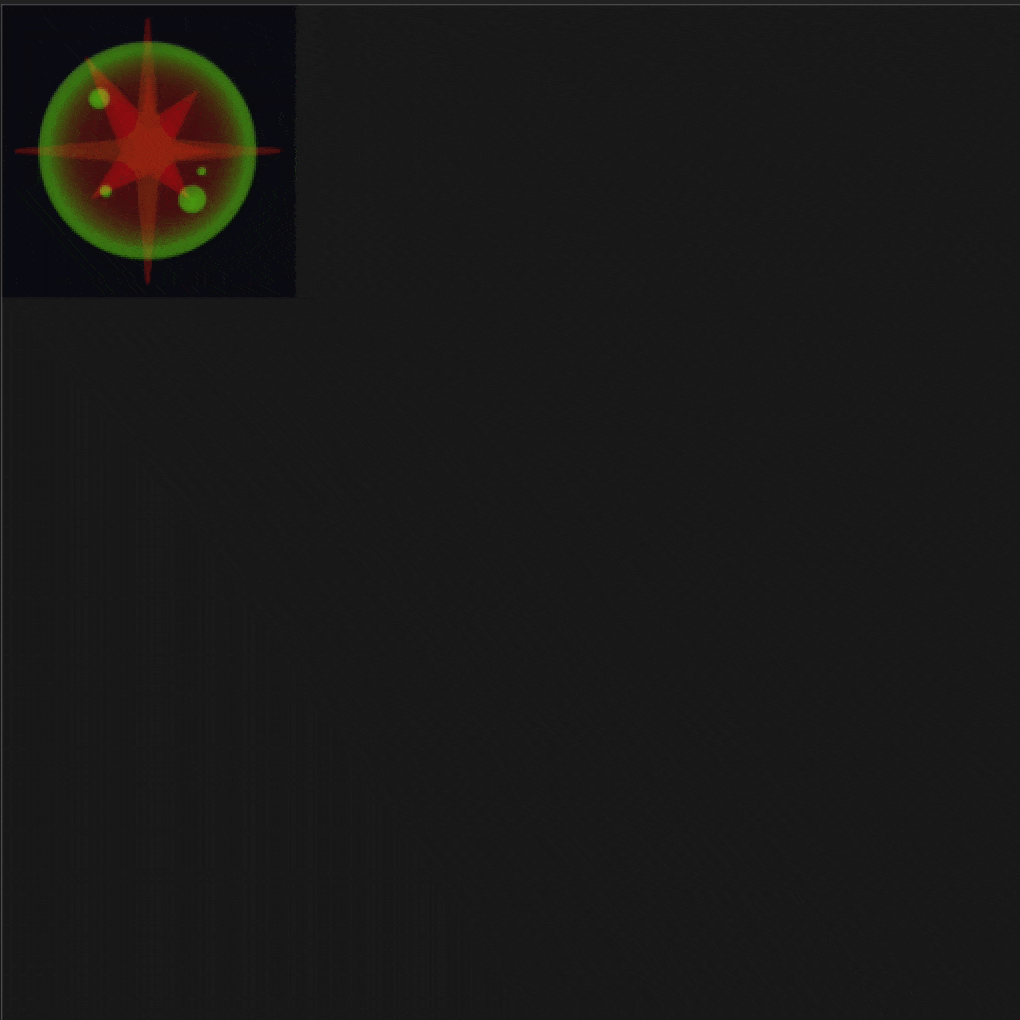
I consider Affinity to be one of the best software for game art in general and specifically game UI design. While Figma/Sketch may be great for general UI, games often benefit from a richer style, with textures and effects that are hard to accomplish in modern design tools, making many companies opt for Photoshop instead. Affinity, in my view, offers the best of both worlds. Lately though, I started experimenting more heavily with Affinity for game VFX and found this seemingly minor but hugely powerful feature—the Procedural Texture live filter. It basically allows direct non-destructive manipulation of channels using GLSL-like functions. For example, I used it to create a jelly effect by writing a simple “Metaball” shader. More recently, I’m using this powerful filter to produce “step animations” and I’d like to share this method here for anyone who might be interested. Step Animation Process First, what is a step animation? It’s basically a way to pack certain kinds of effects into a single image. Traditionally, animations would use a sequence of images and loop through each one to simulate movement, like a flipbook. A step animation is similar, but instead of multiple images it uses a single texture and a basic passthrough test to display each frame. While this method has its limitations, it can be perfect for many effects. If you ever used the Threshold adjustment you can probably see how it works. Now, let's see how to approach this. With one greyscale image in Affinity Photo, we can add our Live Procedural Texture filter and write our own custom formula. Here, we pass 1.0 as the value for RGB making it completely white, and let the brightness of the Red channel determine the Alpha (opacity) over time. The lighter a pixel is, the earlier it appears. At this point, it’s not that different from a Threshold adjustment. We can get a little fancy if we replace `step` with `smoothstep` and add a parameter to control the “smoothness” of the transition, basically making it less aliased. This only covers the IN part of the animation, how it appears. We still need an OUT. Luckily, we’re only using greyscale here, and any single image actually contains 4 different greyscale images, one in each of its RGBA channels. So, we’ll use the Red channel for the IN and the Green channel for the OUT and modify our shader to reflect that change. Nice! With 0.5 both the IN and the OUT parts of the animation should each take exactly half of the total time. In my final iteration I decided to actually use the Blue and Alpha channels to control both the timing and smoothness per pixel. My current effect I'm working on looks something like this. Hopefully this was interesting to some of you. Affinity truly has some great yet undervalued features, and this little exercise helped me learn more about some of them. Thanks for reading!
-
Thanks @Patrick Connor, glad you were able to identify the issue and find reproducible steps. Hope to see a quick fix for this soon and not have to wait for another major release. 🤞 I also wish a new "Paste in Place" option was introduced, which, regardless of alignment settings, pasted exactly where the original object was (as it used to prior to 2.6). This would allow interested users (myself included) to set a shortcut for it (cunningly Cmd+V perhaps?).
-
I think it's worth noting that if an object is aligned to the pixel grid, but has a decimal width/height, it gets pasted to a different location. Its size however stays the same regardless (as should!).
-
Happens to me on AD and AP, apologies if this has been posted before, couldn't find it mentioned. Issue is with any of the shape tools (cog, polygon, star, etc). Happens every time in any document. If I try to set the shape parameters by dragging on the parameter label, it appears to be changing the value alright. However, as soon as I move to another parameter the previous setting is reset in the shape itself, though interestingly not in the parameter UI value. Attached a video of this issue in action. Changing the values by entering numbers manually and committing with ENTER, or by using the orange control knobs on the shape itself seems to work fine. Thanks! Screen Recording 2024-07-09 at 9.07.39.mov
-
[V2 regression] Some curves behave weird inside compound
leshido replied to leshido's topic in V2 Bugs found on macOS
They were created long time ago so unfortunately I can’t remember exactly how. Can’t imagine it was anything out of the ordinary though, and admittedly most other compounds do behave correctly. I’ll try replicating it myself and provide steps if I happen to succeed. For now as a workaround, if I break the compound and re-apply it things look right again. Not ideal but at least it’s viable. Appreciate you taking the time to test it. Thanks 🙏 -
Is this the official answer? I searched but couldn’t find it being mentioned anywhere. If so, that’s unfortunate. In any case, current inplementation *feels* buggier in my view. If I can create pinned graphics in designer by pasting them in text why not let me control their settings as well?
-
When designing UI I often paste graphics (usually icons) in text frames to have them "pinned" as part of the text. In V1 I was able to fiddle with the settings of this via clicking the little icon in the layers panel and opening the Pinning panel, allowing me to control spacing, offset, scaling etc. Honestly, one of my favorite features in Affinity. Great for UI and so many other stuff too. The first time I discovered it felt like magic In V2 I'm still able to paste graphics in text frames, however clicking the (now considerably smaller) icon in the layers panel does nothing. It reacts to the click but no panel opens. I can open the file in Publisher where the feature is working as expected, but it's such a nuisance to have to do so... If this was an intentional change (maybe in deciding which features should be available in what software, the impression was that pinning isn't useful in Designer context?) I'd like to cast vote for the opposite. In any case, current implementation - with the clickable icon in layers panel - feels like a bug to me. Besides, I'm able to open Photo-only features (e.g if I've added live filters, etc) in Designer via the layers panel, so why not this specific panel? Appreciate your consideration!
-
Notice these 2 files. Originally created in V1, the left B ligature is expanded from a font and placed in a subtract compound. The right one was made later in V2 using the same method. With V1, both look fine: However, in V2, the first B is punched in reverse somehow (?) What's the cause for this? We want to start using V2 for some time now, but we have many files created in V1 that seem to be affected and keep us locked in the old version. Hope to see it fixed soon Thanks! B-test.afdesign
-
Any chance this will get fixed soon? It's the little quality of life regressions that keep me on Affinity 1 instead of finally committing to version 2... Edit: I'm on a Mac so this isn't limited to Windows alone just for the record
-
As I'm migrating to v2 I came upon this regression compared to v1, where Outline effects essentially erase pixels along their AA pixels. Steps to reproduce: Create a new document, any size. Create a rounded rectangle (or any other shape). Add layer effect: Outline, inside, any radius. Result: pixels along the curved paths where the outline meets the shape are transparent. Switching to pixel view mode illustrates the problem better. It's not limited to viewing only, the artifacts remain in exported PNGs. Here is the same file screenshots in both V1 (no issue): and V2 (buggy): Hope this can be fixed soon, as I have hundreds of files affected by this and cannot currently use the new version (though I purchased it nonetheless, great update otherwise! ) Thanks
-
I totally forgot I posted about this long ago and just now ran into this issue again. So just to let you know this still exists in 1.10.
-
Before there was a yellow warning triangle when 2 or more slices use the same name. But now I see no warning sign, though the actual filename is marked with a yellow tint when expanded. Was this an intentional change? If so, please bring the warning icon back.
-
Hi Sean, Thanks for trying to test this. It turns out I had the assets set to half scale on export (@0.5x), which I guess messed things up for the JSON builder as the coordinates are understandably not scaled as well. In any case, once I configured the export without scaling everything was back in order, so I'm guessing there's no regression there. Would be fun if we somehow had more control over the Batch Builder feature and were able to customize the JSON to our needs/workflow... but anyway feel free to close this issue
-
Export from Designer using Batch Builder set to Spine JSON. In Spine (I'm using 3.8.95): File>Import Data Imported assets don't align exactly as placed in Designer. I am certain previous versions worked perfect, it's only now that I'm seeing issues. (If a work file is needed for testing, I can share one privately) Thanks!
-
I'm a senior game artist at Candivore, where we make the mobile game Match Masters (iOS/Android), a multiplayer match-3 game played by millions around the world. I do most of my work using Affinity Designer, which I think is an incredible tool for creating 2D game assets. For the recent October update we introduced a new Booster - Monkey Joojoo: Mandatory app screenshot: And finally this is how everything looks in-game: monkey-joojoo-gameplay.mov
-
- 4
-

-
Magic Wand selection in Pixel Persona
leshido replied to leshido's topic in Feedback for Affinity Designer V1 on Desktop
Thanks, but none of these methods quite do the trick in my experience. Dragging with the flood fill tool just changes the tolerance value, and selecting the brush strokes isn't really what I'm wishing to achieve. -
Hey, I'm missing the Magic Wand selection tool from the pixel persona in AD. A common illustration technique I see many use (myself included) is to draw the lineart with a brush, select the outside of the object using the Magic Wand and then inverse the selection to quickly be able to color the inside of the lineart. Unfortunately, ATM this method isn't particularly possible with the current toolset (the Selection Brush tool, which is included, isn't suited for this). Sure, I can use APh to do this, but my understanding (and personal preference) is that AD is meant to be the illustration tool and APh is more focused on photo manipulation. Please consider!
-
User variables in Export persona don't seem to work
leshido replied to Stokestack's topic in V1 Bugs found on macOS
Just FYI, you din’t actually have to go into each export line and change them individualy. Instead I find it easier to define the export settings in one slice and use the copy/paste buttons at the top of that panel to apply these settings to the rest of the slices. -
Just updated and tested again with the same file. It now opens with no problems and looks very true to the original PSD file. Amazing, thanks!
-
As far as I can tell, it works the same as it did in the previous Beta, meaning it does not crash (which is good!) but it's still awkward to use.
-
Thanks @Dan C , I've just uploaded the file. Hope you'll find the culprit!