winfried_z
-
Posts
31 -
Joined
-
Last visited
Everything posted by winfried_z
-
I can confirm this (with Sharpen AI). For some reason, the output from the Topaz plugin is partially transparent, and in this case, the inside outline does not work correctly. If you are interested in a workaround: duplicate the layer and apply a "merge down"; this makes the partial transparency vanish.
-
This also happens when creating a preset in the Tone Mapping Persona, but not only for leading underscores, but also somewhere in the middle. For instance, when attempting to create the preset DSC_1234, the name will be DSC1234. I'm in AP 2.0.4, not sure about 2.1 ...
-
Michael: It appears to be a combination of the small overlap, the waves, and the rocks where the overlap is difficult to find. I think with a lot of handcrafting one could obtain a result (see below), but this is far from being optimal, and if it's possible to do the series again, this is certainly preferable. Winfried

- 12 replies
-
- 2
-

-
- affinity photo
- panorama stitch
- (and 3 more)
-
Michael: You could also check by selecting pictures #4 and #5 only for creating the panorama and see if AP can stitch these two. Winfried
-
I don't know what the root for this behaviour is, but when I merge the three images without de-ghosting, the result looks neat: And as another point, if only 3560 and 3561 are used as sources, but with de-ghosting, the result is very similar to the one using all three pictures with de-ghosting switched on; thus, 3562 cannot be the villain: Winfried
-
Dan: Here come the source TIFFs, and these are the settings: For demonstration, I chose a high local contrast and reduced the brightness, but you can see the effect already in the merged picture without tonemapping. NotMyFault: The centre picture has already an exposure bias of -2/3 stops; still the sky is overexposed. And further reducing the exposure would create additional noise in the shadows. Maybe +/-1 stops would have been enough, but in any case, the artefacts should not be there. Winfried DSC_3560.TIF DSC_3561.TIF DSC_3562.TIF
-
Peter: I think the the problem here is not the quick but the slow motion of the person, causing partial overlaps in all five pictures. In addition to what NotMyFault suggested, If you wish to fix your final picture (the one with the red boxes), you could simply copy a rectangle of the +1 stop picture containing the person over it and and adjust this a little via clarity, tonemapping, brightness, ... to obtain a seamless transition, just like that: NotMyFault: In this case, I agree. but I found much less challenging cases where artefacts occur, which I definitely would call a bug, e.g. here (3 TIFFs, 16bit, -2/0/+2 stops, "Automatically remove ghosts" on): Winfried
-
Peter Michael: As a general remark, I have often observed that the option "Automatically remove ghosts" creates artefacts. I think this is worth to be considered by the developers. As a workaround, it sometimes helps to generate two versions of the HDR-merged image, with this option on and off, and eventually mask out the artefacts. Concerning your pictures: The person's position is so different in the individual pictures of the series, that it is very problematic, if not impossible, to create a good alignment. My advice in this specific case: I think it is not necessary to merge the pictures. I suppose the pictures with nominal exposure or +1 stop include enough details in both shadows and highlights, so you can apply a tonemapping on the single pictures, if this is desired. General advice: Shoot in RAW, develop to 16 bit TIF, then you have much more information in the pictures than with JPG. Winfried
-
Sorry for interfering. I am a bit confused: stokerg wrote: "...the crash is happening in opencl-clang64.dll which from a quick search, appears to part of the Intel Graphics card drivers." Phil_rose wrote: "I can't find a way to download the drivers because it's all handled by some kind of Nvidia app." Phil_rose: May it be that you have both Intel onboard graphics and an Nvidia graphics card active? If so, there might be a conflict between the corresponding drivers. I would suggest, in Affinity Photo you go to Edit -> Preferences -> Performance and select your Nvidia graphics as renderer. Alternatively, you could try and disable OpenCL acceleration. Winfried
-
Wrong EXIF time displayed for Nikon D5600 NEF file
winfried_z replied to winfried_z's topic in V2 Bugs found on Windows
High Callum, good to hear this and sorry for being late. Just as an additional info: for a picture taken with my Nikon Z5, AP2 (2.0.4) displays the correct EXIF time, while again, AP beta 2.1.0.1781 does not display the EXIF date/time. I just realized that other than in the "EXIF" tab, in the "details" tab the times appear to be correct, but you probably noticed this. Winfried -
For pictures taken with with a Nikon D5600, an incorrect EXIF time is displayed. Here is a snapshot: The time zone was UTC+1, daylight saving time on. The true time (12:32) is shown correctly in NX Studio, AP2 is off by two hours. Some more observations: - For pictures taken in winter (daylight saving time off), the difference is only one hour. - Same time differences occur for pictures taken with other cameras of the D5X00 series. - AP1 displays the correct EXIF time. - AP beta 2.1.0.1781 displays no EXIF date/time at all. Win11 pro, 22H2; AMD Ryzen 7 5800X 8-Core, 3.80 GHz; 32GB RAM; NVIDIA GeForce RTX 3060Ti, studio driver 528.49
-
App installation failed with error message
winfried_z replied to Jim.S's topic in V2 Bugs found on Windows
Just an idea: If not yet done so, you could try and use the .exe installer (the error message appears to refer to MSIX). -
HSL adjustment for 32 bit image
winfried_z replied to winfried_z's topic in V2 Bugs found on Windows
Here it comes - Winfried hsv-32bit-v2.afphoto -
HSL adjustment for 32 bit image
winfried_z replied to winfried_z's topic in V2 Bugs found on Windows
Hi Lee, Thanks for your patience, but unfortunately, for me this does not work, see below. Winfried
-
HSL adjustment for 32 bit image
winfried_z replied to winfried_z's topic in V2 Bugs found on Windows
Hi Lee, I am afraid I was not sufficiently clear in describing my problem. The point is that an HSL/HSV adjustment for a certain colour does nothing when applied to a 32-bit image. I provide you with two .afphoto files, one in RGB/16, the other in RGB/32 format, both containing the same pixel layer and and the same HSL shift adjustment layer. You can see that with the RGB/32 file, the HSL adjustment has no effect. Winfried hsv-16bit.afphoto hsv-32bit.afphoto -
HSL adjustment for 32 bit image
winfried_z replied to winfried_z's topic in V2 Bugs found on Windows
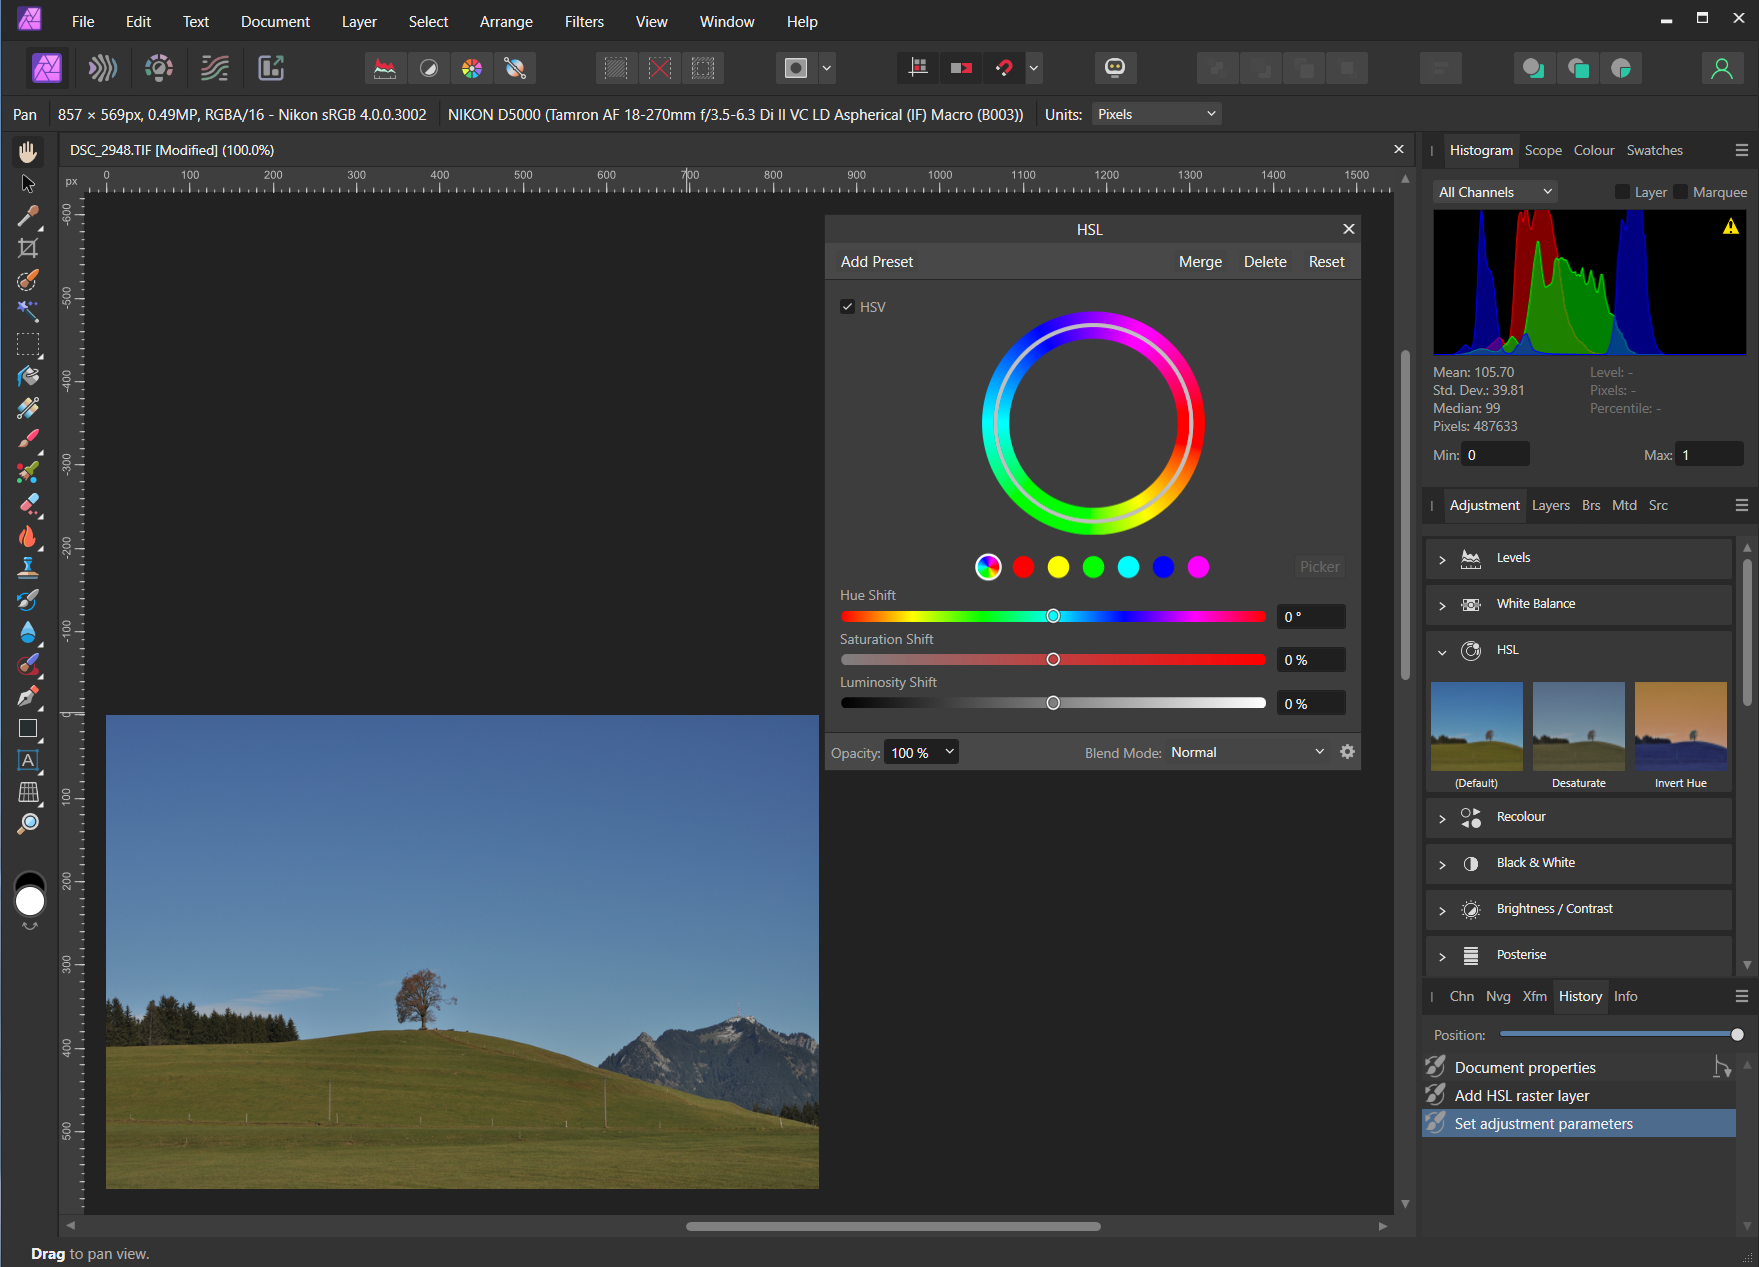
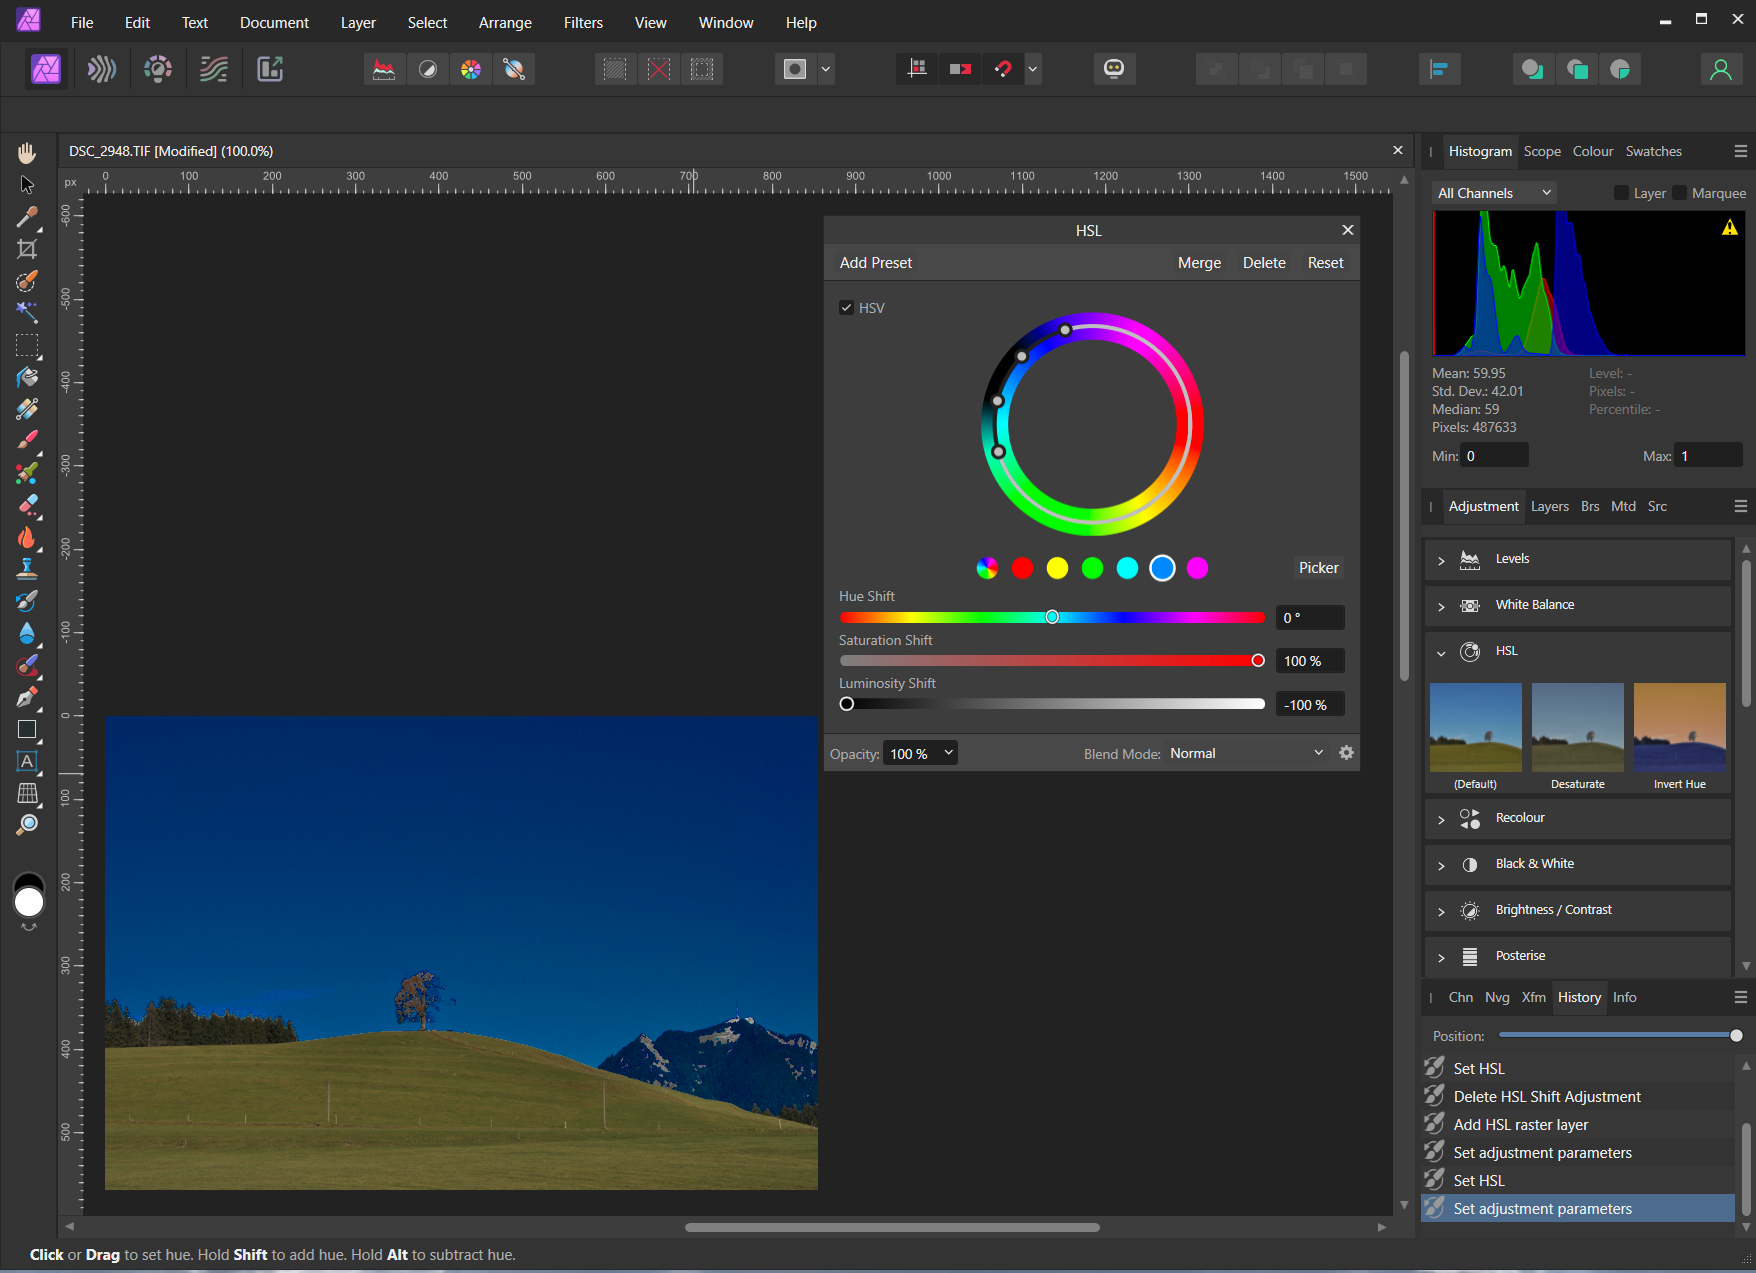
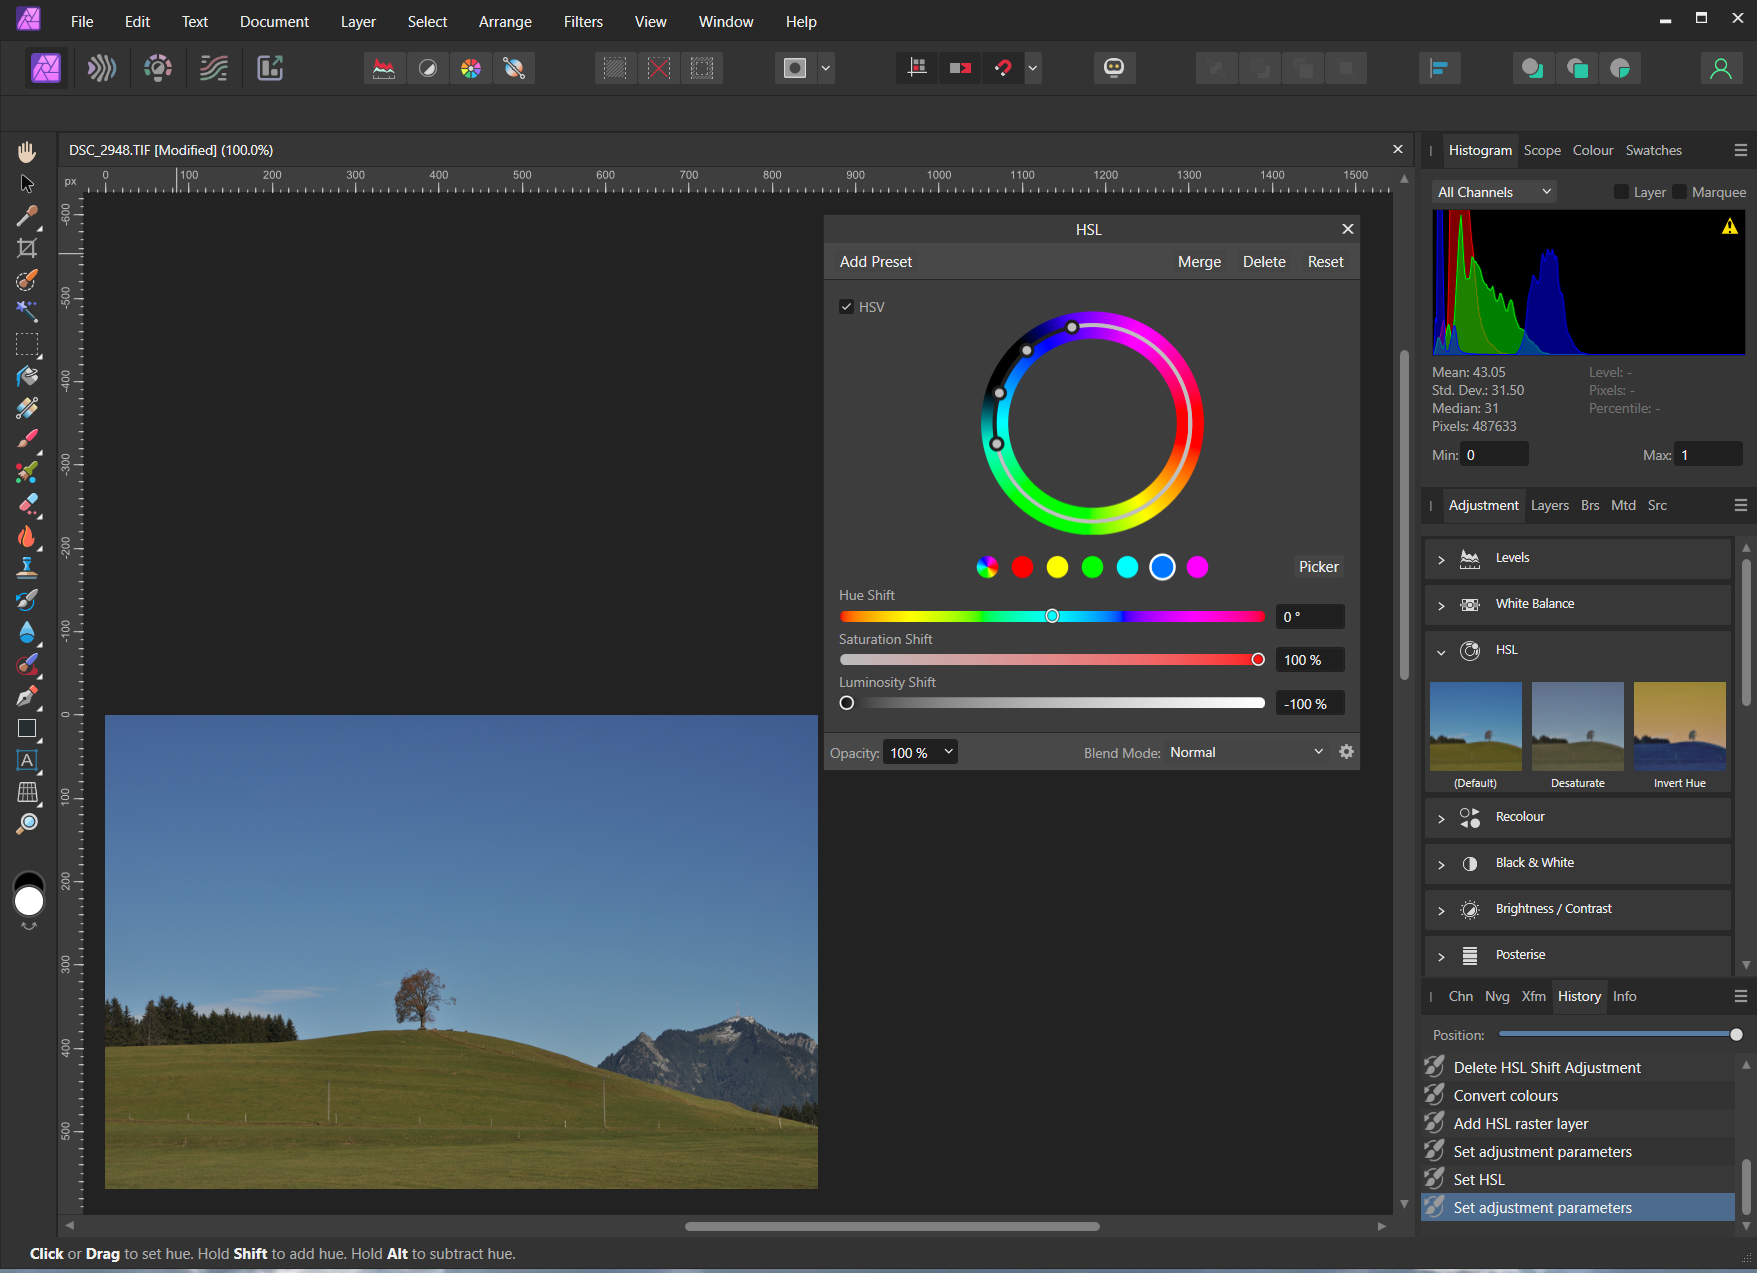
Hi Lee, Thanks for taking care. I apologize, I am not so familiar with taking screen videos, but I think I can show what I mean by some screenshots. As a demonstration, I have chosen a picture with a blue sky, and I want to darken the sky while increasing its saturation via HSV. Original: RGB/16, HSL/HSV adjustment: RGB/32, HSL/HSV adjustment: While with RGB/16, the effect is clearly visible, there is no effect with RGB/32. Winfried
-
Applying an HSL adjustment in HSV mode to an RGB/32 bit image has no effect. Same with beta 2.1.0.1742. Win11 pro, 22H2; AMD Ryzen 7 5800X 8-Core, 3.80 GHz; 32GB RAM; NVIDIA GeForce RTX 3060Ti, studio driver 528.49
-
Occasionally, I have seen the same behaviour.
-
I am not certain if there is a "real" difference between hardware acceleration on and off in this case. I performed some tests with one of my pictures with a live unsharp mask filter applied. Results: (1) Export to jpg: identical from hardware acceleration on and off. (2) Screenshots from pictures open in AP, 1:1 (100%) representation: identical from hardware acceleration on and off. (3) Screenshots from pictures open in AP, representation other than 100%: visible differences from hardware acceleration on and off. Bottom line: rendering in AP is only approximate for representations other than 100%, screenshots are not really suited for comparisons. You should export your pictures with hardware acceleration on and off and see if the results are different. Win11 pro, 22H2; AMD Ryzen 7 5800X 8-Core, 3.80 GHz; 32GB RAM; NVIDIA GeForce RTX 3060Ti, studio driver 528.49
-
Canon RAW files displayed too dark in develop persona
winfried_z replied to DW52's topic in V2 Bugs found on Windows
I am a bit confused. I observe significant differences for Nikon Z raw files developed with Affinity and NX Studio (provided by Nikon), both applied with default settings. Affinity yields softer pictures, similar to the comparison above by DW52. And Nikon says about NX Studio: "NX Studio is always up-to-date with the latest and most precise Nikon camera information for RAW .NEF and .NRW image files so you always work with the purest image data without interpretations or alterations of file information, meaning you will always get the best out of your .NEF or .NRW files." Thus, even without interpretations, there seems to be ample room for differences in the results. -
Here, it is even weirder. If I manually input a figure, say 64000, then it goes to half of this value, 32000. But this is not the whole story: Each time I start Affinity Photo anew, it sets the value to half of the previous value, here 16000, and so on. 2.1.0.1709 (EXE version) Win11 pro, 22H2 AMD Ryzen 7 5800X 8-Core, 3.80 GHz 32GB RAM NVIDIA GeForce RTX 3060Ti, studio driver 528.49
-
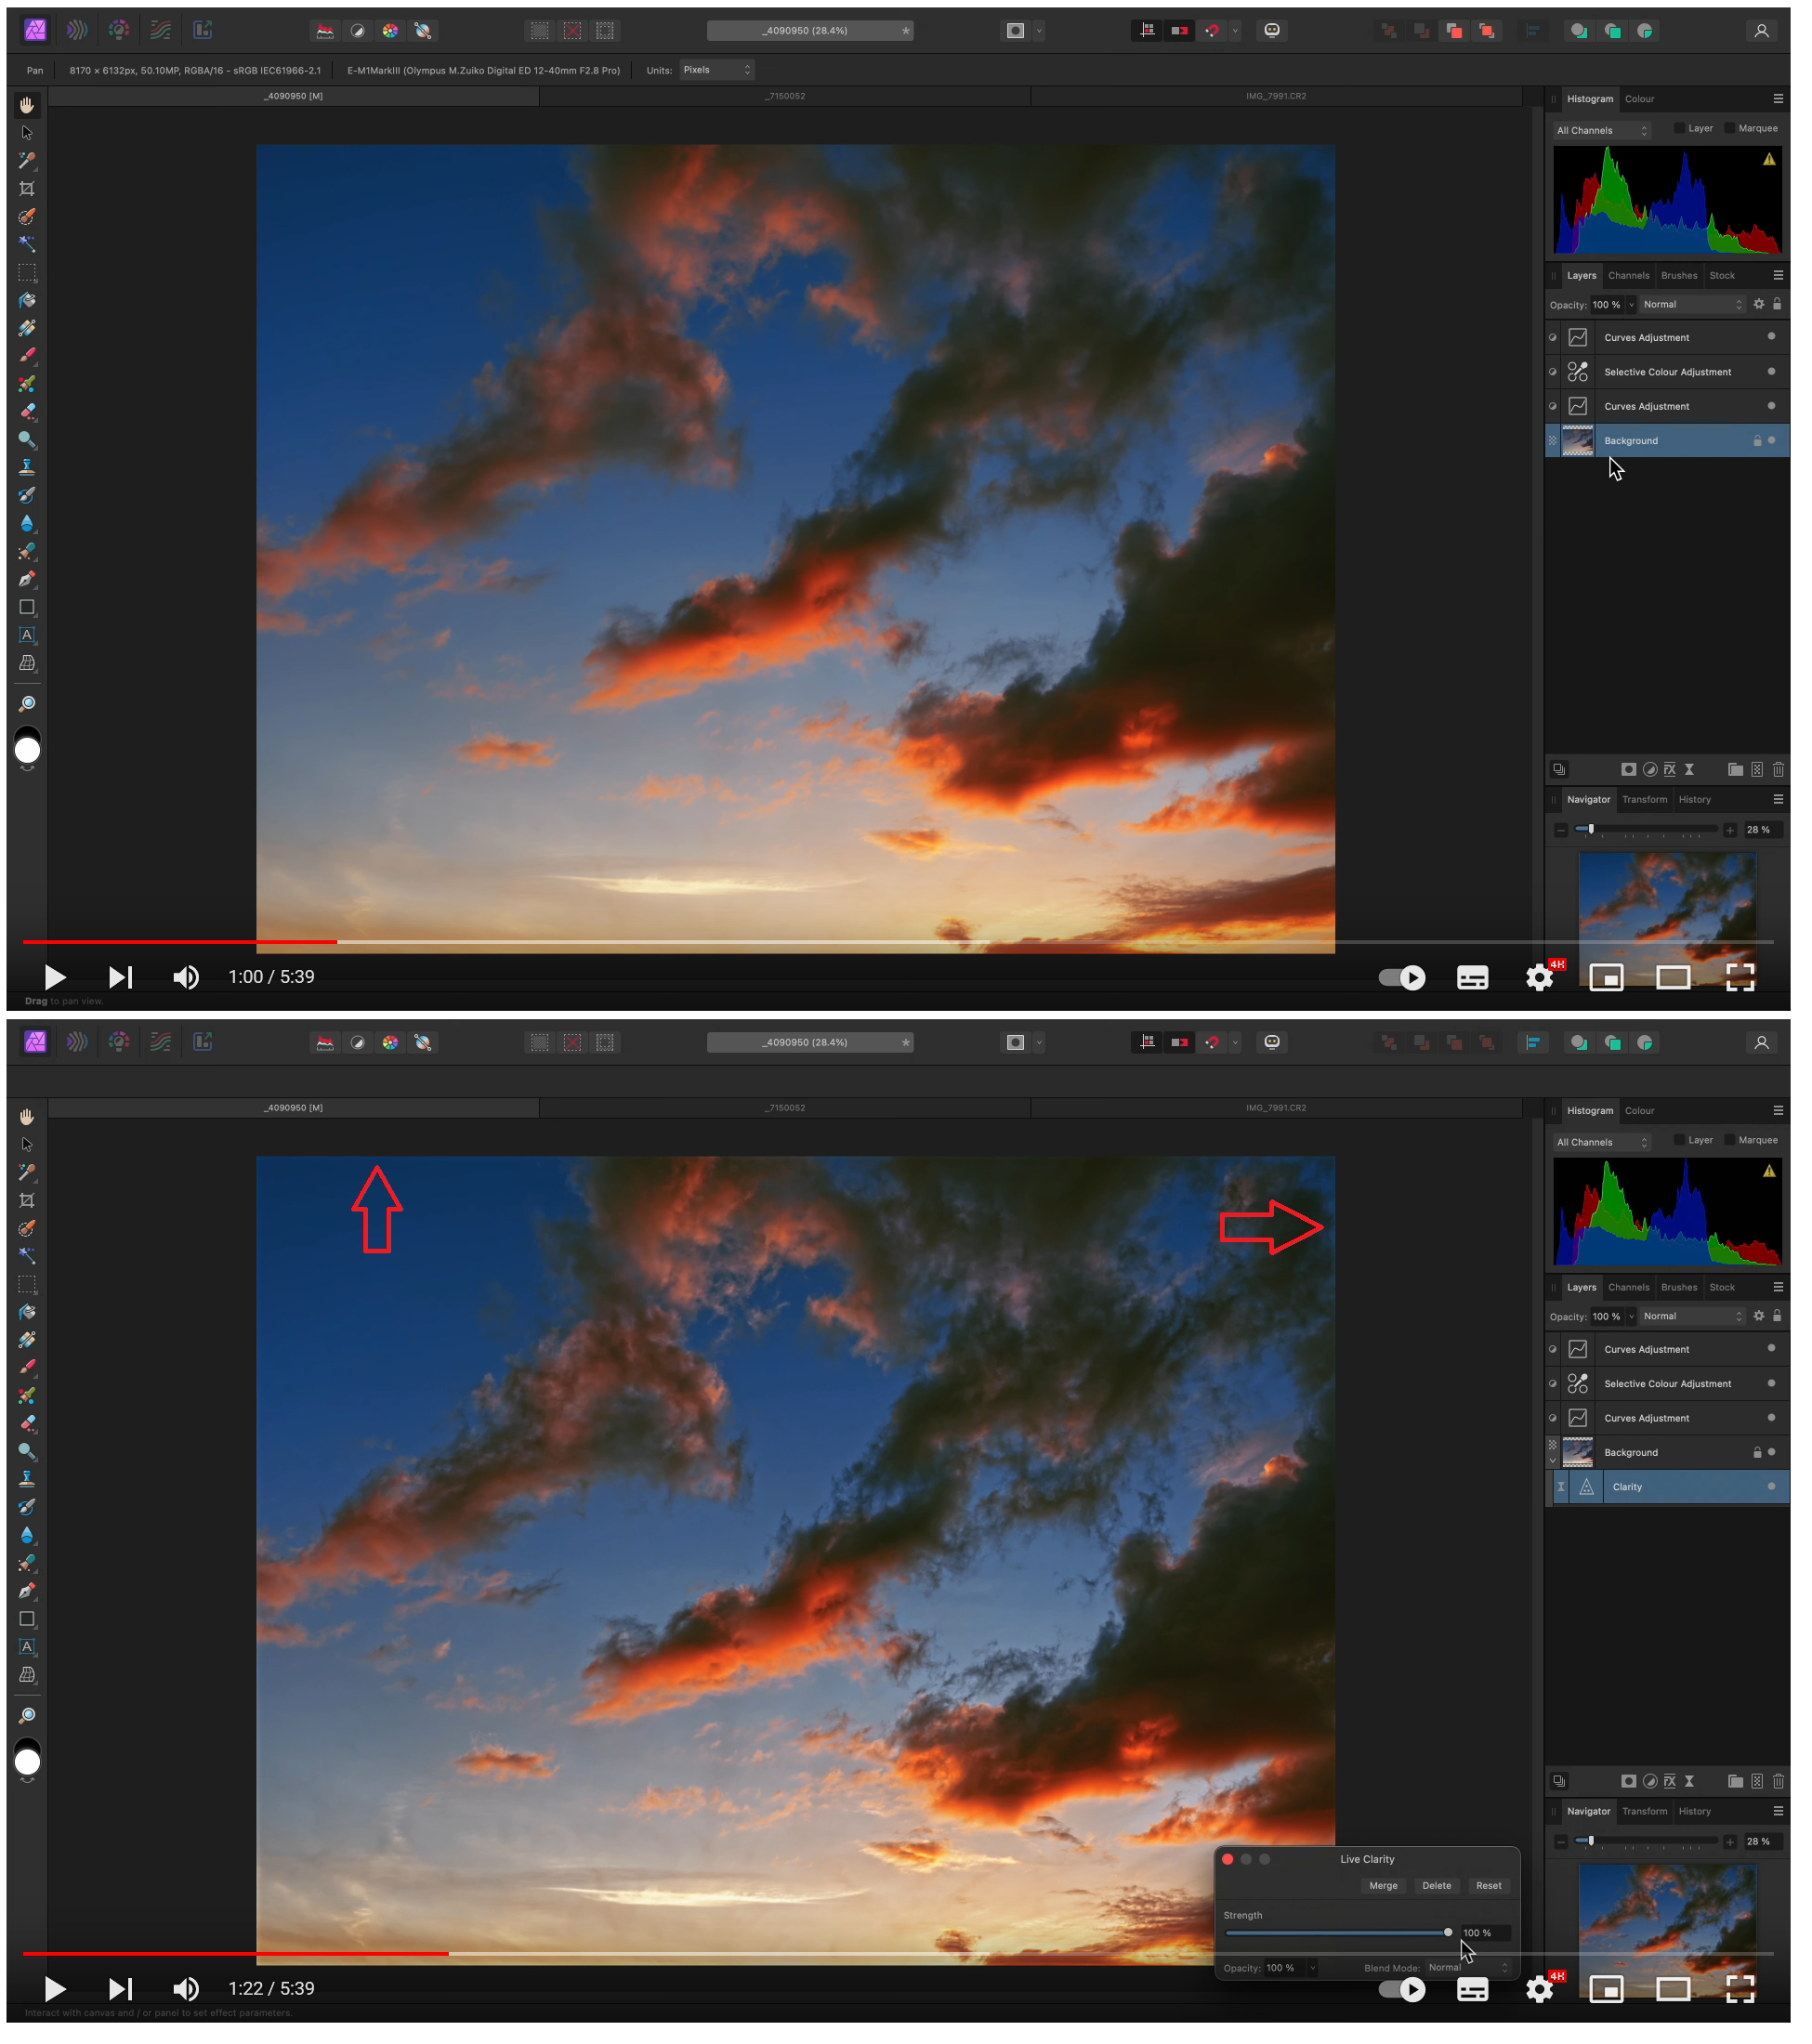
I just realized that the said effect can even be seen (if one has a very close look) in the Affinity tutorial video on applying the clarity filter. Two snapshots, without (top) and with (bottom) live clarity filter:
-
Debra: Thanks for this insightful topic. If it is of interest, here is another comparison with my rather old, but still useful equipment, MSI-EXE (left) version vs. MSIX (right): Win10 home, 22H2 Intel(R) Core(TM) i7-6700 CPU (4 cores) @ 3.40GHz 32GB RAM NVIDIA GeForce GTX 1080, studio driver 528.24 Display 2560 x 1440, 100% Raster Single GPU: +13% MSI Combined Single GPU: +3.6% MSI
- 8 replies
-
- 1
-

-
- gpu acceleration
- sandbox
- (and 5 more)
-
N.P.M.: Thanks again, but I'm afraid this did not appear to remedy the problem. I constructed a mockup of your .afphoto file, with the image completely replaced by a grey image exactly filling the canvas, see the uploaded file. When looking at the histogram, one recognizes that the image with the live clarity filter applied is not completely homogeneous; there is a brighter border in the left part. This can be seen even more clearly by looking at a small marquee, e.g., at the upper left corner. Anyway, I believe the problem could by easily fixed by Serif, because it does not show up with the destructive clarity filter. grey2.afphoto
-
Thanks N.P.M., I will try this with one of my images.