i5963c
-
Posts
96 -
Joined
-
Last visited
-
I'm facing the same issue with Affinity Designer 2.6. Next to circles (or ellipses), also rectangles are apparently not processed as curves when exporting to SVG. Remark #1: the problem exists also with Affinity Photo 2.6 and Affinity Publisher 2.6. But the 3 programs likely share the same code for the SVG export funtionality, so this may be 'expected'. Nevertheless, it's obviously a bug in all Affinity apps. I have no idea about the situation on iPad, as I don't have or use one. Remark #2: on an older, 'obsolete' PC, I still have installed a version 1.10 of the Affinity suite. I did a quick check with these versions, and they expose the same faulty behaviour. Thus, this seems to be an old bug. Thanks to get it fixed. I use other software that relies on the SVG format, and that expects curves/paths as input, so ellipses/circles are lost in the transition from Affinity to the third party SW. The workaround that is suggested above, may work for simple drawings, but is extremely annoying (actually unworkable) with files that contain hundreds (or thousands) of rectangles, circles and/or ellipses.
-
If you want to print a 6000 * 4000 pixel file (as provided by your 24 MP camera) at a 7*5 size, you don't have to 'resize' (downscale or upscale) your image file. However, you should 'convert' your native file (with a 3 by 2 form factor) into a document with a (custom) 7 by 5 aspect ratio. You achieve this conversion by using the 'crop' tool. This way you keep full control about which part of the image will be 'dropped' when translating between both aspect ratios. The crop tool will convert your original 6000 * 4000 pixels into a (at maximum) 5600 * 4000 pixel document. The crop tool maintains all information that is available in the original file, the tool is also non-destructive. The 'reduction' of the number of pixels is not necessary for print purposes. The 'resizing' towards a particular physical output size is, in general, better handled by the print command. The print driver of your particular printer will take care of this (by using all the data available in the original file, and by adjusting the dpi). The resizing of an image (through a reduced number of pixels) is mainly relevant for e.g. web publishing where smaller file sizes may (still) be more important.
-
 walt.farrell reacted to a post in a topic:
About custom brushes
walt.farrell reacted to a post in a topic:
About custom brushes
-
About custom brushes
i5963c replied to Adas50's topic in Pre-V2 Archive of Desktop Questions (macOS and Windows)
PNG also allows to have transparency. JPG doesn't. This is a further reason why you may prefer to create brushes based on PNG files. -
If you want to visualize RAW images for free in Windows Explorer, you can easily do so by downloading the 'Raw Image Extension' app from the MS Store. It's the 'standard' extension from Microsoft (unfortunately not included in Windows itself). As such, what you request is not a functionality that you should expect to be delivered by Serif (as part of one of their Affinity products), but it could be considered as being a component of the Operating System (Windows in your particular case). As mentioned, it's not included in a standard Windows installation, but Microsoft offers this functionality as a downloadable app from the MS Store.
-
You don't provide a lot of information in order to know what happens exactly. However, what you describe is 'standard' behavior when you hit the 'TAB' key. This key switches to a kind of 'full screen' mode. Hitting the 'TAB' key once more, returns to the 'normal' Affinity user interface with tools and panels.
-
Hello @rvsf, I don't fully understand what you want to achieve. If you want the same behavior as shown in your video for Photoshop (i.e. moving the complete layer without leaving 'traces'), there is no need to use CMD/(CTRL)+click on thumbnail. Simply select the layer in the layer panel, and use the Move tool to move everything. There will be no 'traces' visible. With CMD/(CTRL) + thumbnail, you actually create a selection, based on the layer's transparency (similar as menu option Select | Selection from Layer, or CTRL-SHIFT-O shortcut). For layers that have pixels with (partial) transparency, this transparency translates into 'partial' selections of pixels. Because each transparent pixel is thus partially selected, you'll have remaining traces visible when you move the selection. This explains what you see in the video for Affinity. If you want to select the full set of pixels that have no or partial transparency, you can achieve this, via the menu command Select | Alpha Range | Select Fully Transparent, and then invert this selection. It's maybe a bit more complicated, but this is how it works in Affinity... You may consider to create a shortcut to select the fully transparent pixels, and then apply CTRL+SHIFT+I to invert this selection (or use the button for this in the toolbar). Hope it helps... Kind regards.
-
I believe that this post is identical to another one that you raised? I don't know the forum rules, but it may be best include a link here to that other thread.
-
What do you mean exactly with this 'shrinking selection'? I think that you misunderstood this element of the tutorial. Basically, what happens (according to my interpretation of the tutorial): You select a part of the background layer (i.e. without grass), and refine it. Then you move this part of the background layer to the top of the layer stack. This selection will overlap with (and thus hide) a part of the grass layer. So, the visible grass area seems to 'shrink' (because it's partially 'hidden' behind the top layer with a selection of the original background layer). But the selection itself doesn't 'shrink'.
-
Hi @TonyB, I think I see what you're doing 'wrong', based on the screenshot that you provided. When you try to make your second and third selections, you still have the copied layer of your first selection active (cf. the layer panel in your screenshot). This first selection layer only covers a small part of the canvas (on the right hand side). When you try to make a new (second and third) selection (on the left hand side), such selection is normally applied to the currently active layer (i.e. 'Copied selection that shrunk'), but this layer's area doesn't 'exist' at the location where you try to make your new selections (LHS). Therefore, prior to making any extra selections, you should first (re-)select your background layer in the layer panel. I hope this will work. It would be nice if you could report back whether it actually does. If not, a video with your precise actions may help in identifying what's going on. Kind regards.
-
Strange memory management with Hardware Acceleration ON?
i5963c replied to i5963c's topic in V1 Bugs found on Windows
@Callum, Thanks for the feedback. I checked the other thread that is linked to the same apl number (apl-758). It refers to an old message of February 2021 that describes a similar issue with a beta of Affinity Publisher. This message has 1 reply from Serif. In this reply it is stated that the 'RAM Usage Limit' is only applicable for raster operations, and that Affinity Publisher (contrary to Photo and Designer) can use lots of memory for 'other things'. I don't know what these 'other things' could be. But, please be aware that the findings of my message above refer to Affinity Photo, and that I notice this memory behavior while I only use rasterized features in Affinity Photo (i.e. no fonts, no shapes, no curves,... -> so, nothing 'vectorized'). I really hope that the developers can identify and fix the root cause of this issue. It's basically the only major problem that I have with Affinity Photo, and it prevents me from activating hardware acceleration. Indeed, when HA is active on my system, I encounter no 'crashes', which is different from what many other users are facing with recent versions. I only have system 'freezes' from time to time, and these freezes are in almost 100% of the occurrences linked to exhaustion of the available memory. -
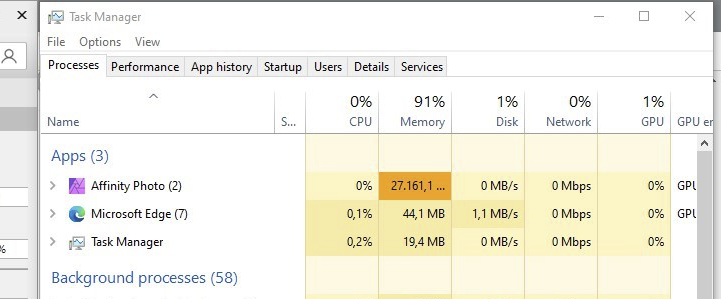
After upgrading to Affinity Photo 1.10.3. yesterday, I (temporarily) reenabled hardware acceleration on my machine, to verify whether some freeze problems that I encountered recently were solved with the latest release. The findings of my earlier tests with previous releases are documented in detail in a different thread (https://forum.affinity.serif.com/index.php?/topic/150705-affinity-photo-hangs-after-doing-some-hdr-merges-panorama-stitching-memory-leaks/). Unfortunately, the freezes are still there😡... While I'm testing problems with AP, I focus particularly on how AP manages memory, because my feeling (suspicion) is that something is broken there. During my latest tests after installing the 1.10.3 release, I noticed something strange. In my AP Preferences, the 'RAM Usage Limit' is set to 16383MB (see screenshot below): In total, I have 32 GB of physical RAM (and 12 GB of VRAM). When running some test cases, I verified the memory consumption via the 'Processes' tab of the Windows Task Manager. There, I saw that the memory consumed by Affinity Photo raised till levels above 27 GB (see screenshot below): How is this possible, when the parameter in the AP Preferences (Performance tab) restricts the RAM usage to 16 GB?? The reason why I find this bizarre (and why I report it separately) is that such situations with high RAM/VRAM usage are typically (i.e. very often!) a precursor for system freezes shortly afterwards. PS: When I disabled hardware acceleration later on again, it appears that I can't reach the same levels of excessive RAM usage. Then, AP rather obeys the constraint of the Preferences parameter, although sometimes with a small surpass. From my earlier tests (see also link above), I've learned that there appears to exist a mechanism that kicks in once the RAM limit is approached. That mechanism seems to release RAM. Indeed, With HW acceleration switched OFF, AP behaves (in general) relatively stable. With HW acceleration ON, such memory release mechanism doesn't seem to happen (or at least not always in a timely manner)...

-
Have blocks appearing as I zoom or move tool
i5963c replied to JustOneQuestion's topic in V1 Bugs found on Windows
I upgraded to 1.10.3 yesterday. HW acceleration is still OFF on my machine, due to some intermittent system freezes (no crashes, therefore, also no dump files). Today, I notice something similar when I zoom in & out on an image. A video recording is attached below: I never witnessed this before... Affinity Photo 1-10-03 - 2021-10-27 14-19-16_Blocks in UI.mp4 -
i5963c reacted to a post in a topic:
Having more than 2 samplers in the Info Panel (Affinity Photo).
-
Oh, I find 2 samplers a bit limited. I don't know why, but I very much like to have always 2 color models in parallel for each sampler point (RGB and LAB, the latter especially for the luminance). If I want to bring two areas 'in balance' with local filters and/or dodge & burn brushes (e.g. after having done some inpainting, which often results in some unwanted color/luminance differences), I want to compare the values of both color models for a couple of points (at least 2), which necessitates to have at least 4 samplers. If I could have more than 2 by default in a persistent way, I would setup my system with at least 4, or even 6 samplers, and thus avoiding the need to recreate them all the time. Just one of my use cases for (multiple) samplers...
-
In the Info panel of Affinity Photo, there are by default 2 samplers. It is possible to add more samplers. But, as soon as a document is closed, the application always returns to 2 samplers. Without open documents, all samplers are removed. Is there a way to enforce that extra added samplers are persistent across multiple documents, and across consecutive AP sessions? Many thanks.
-
Just something that came to my mind when considering the need to scan A3 or A2 sized documents with an A4 scanner. Not to downplay this feature request, but probably just a practical suggestion / option(*). I believe that scanning an A3 document will require at least 3 A4 scans, for each A2 document it's even 9 scans. In the end, it might be much simpler to just take a picture with a digital camera of the A3 or A2 document. Of course, some specific requirements (e.g. special resolution specs, but unknown to me) might still enforce the use of a scanner? With a good prime lens and e.g. a high-res camera, you get tack sharp images of the documents in a fraction of the time spent on scanning and stitching. Even a moderate lens and 'normal' resolution camera will most likely provide sufficient detail in the final image. (*) I'm currently in the process to digitize my archive with +3000 old color slides. Originally, I started this project with a photo scanner, but the scanning process took way too long (also considering the required scan resolution). A while ago, I did some research on the topic, and discovered that it could also be done with a camera, a macro lens, a tripod and a light box. Because of the repetitive, high volume work, I also made a temporary 'construction' to freeze the relative positions of camera, light box and slides. For low volume work, this is of course not needed. For larger documents (like A3/A2), a camera and a lens could be sufficient. I could easily process +150 slides per hour (including blowing away some occasional dust). Such throughput was simply impossible with my scanner... Currently, still busy with post processing the bunch of pictures😠... But, this effort would be the same with stitched scans.