i5963c
-
Posts
95 -
Joined
-
Last visited
Everything posted by i5963c
-
If you want to print a 6000 * 4000 pixel file (as provided by your 24 MP camera) at a 7*5 size, you don't have to 'resize' (downscale or upscale) your image file. However, you should 'convert' your native file (with a 3 by 2 form factor) into a document with a (custom) 7 by 5 aspect ratio. You achieve this conversion by using the 'crop' tool. This way you keep full control about which part of the image will be 'dropped' when translating between both aspect ratios. The crop tool will convert your original 6000 * 4000 pixels into a (at maximum) 5600 * 4000 pixel document. The crop tool maintains all information that is available in the original file, the tool is also non-destructive. The 'reduction' of the number of pixels is not necessary for print purposes. The 'resizing' towards a particular physical output size is, in general, better handled by the print command. The print driver of your particular printer will take care of this (by using all the data available in the original file, and by adjusting the dpi). The resizing of an image (through a reduced number of pixels) is mainly relevant for e.g. web publishing where smaller file sizes may (still) be more important.
-
About custom brushes
i5963c replied to Adas50's topic in Pre-V2 Archive of Affinity on Desktop Questions (macOS and Windows)
PNG also allows to have transparency. JPG doesn't. This is a further reason why you may prefer to create brushes based on PNG files. -
If you want to visualize RAW images for free in Windows Explorer, you can easily do so by downloading the 'Raw Image Extension' app from the MS Store. It's the 'standard' extension from Microsoft (unfortunately not included in Windows itself). As such, what you request is not a functionality that you should expect to be delivered by Serif (as part of one of their Affinity products), but it could be considered as being a component of the Operating System (Windows in your particular case). As mentioned, it's not included in a standard Windows installation, but Microsoft offers this functionality as a downloadable app from the MS Store.
-
You don't provide a lot of information in order to know what happens exactly. However, what you describe is 'standard' behavior when you hit the 'TAB' key. This key switches to a kind of 'full screen' mode. Hitting the 'TAB' key once more, returns to the 'normal' Affinity user interface with tools and panels.
-
Hello @rvsf, I don't fully understand what you want to achieve. If you want the same behavior as shown in your video for Photoshop (i.e. moving the complete layer without leaving 'traces'), there is no need to use CMD/(CTRL)+click on thumbnail. Simply select the layer in the layer panel, and use the Move tool to move everything. There will be no 'traces' visible. With CMD/(CTRL) + thumbnail, you actually create a selection, based on the layer's transparency (similar as menu option Select | Selection from Layer, or CTRL-SHIFT-O shortcut). For layers that have pixels with (partial) transparency, this transparency translates into 'partial' selections of pixels. Because each transparent pixel is thus partially selected, you'll have remaining traces visible when you move the selection. This explains what you see in the video for Affinity. If you want to select the full set of pixels that have no or partial transparency, you can achieve this, via the menu command Select | Alpha Range | Select Fully Transparent, and then invert this selection. It's maybe a bit more complicated, but this is how it works in Affinity... You may consider to create a shortcut to select the fully transparent pixels, and then apply CTRL+SHIFT+I to invert this selection (or use the button for this in the toolbar). Hope it helps... Kind regards.
-
I believe that this post is identical to another one that you raised? I don't know the forum rules, but it may be best include a link here to that other thread.
-
What do you mean exactly with this 'shrinking selection'? I think that you misunderstood this element of the tutorial. Basically, what happens (according to my interpretation of the tutorial): You select a part of the background layer (i.e. without grass), and refine it. Then you move this part of the background layer to the top of the layer stack. This selection will overlap with (and thus hide) a part of the grass layer. So, the visible grass area seems to 'shrink' (because it's partially 'hidden' behind the top layer with a selection of the original background layer). But the selection itself doesn't 'shrink'.
-
Hi @TonyB, I think I see what you're doing 'wrong', based on the screenshot that you provided. When you try to make your second and third selections, you still have the copied layer of your first selection active (cf. the layer panel in your screenshot). This first selection layer only covers a small part of the canvas (on the right hand side). When you try to make a new (second and third) selection (on the left hand side), such selection is normally applied to the currently active layer (i.e. 'Copied selection that shrunk'), but this layer's area doesn't 'exist' at the location where you try to make your new selections (LHS). Therefore, prior to making any extra selections, you should first (re-)select your background layer in the layer panel. I hope this will work. It would be nice if you could report back whether it actually does. If not, a video with your precise actions may help in identifying what's going on. Kind regards.
-
Strange memory management with Hardware Acceleration ON?
i5963c replied to i5963c's topic in V1 Bugs found on Windows
@Callum, Thanks for the feedback. I checked the other thread that is linked to the same apl number (apl-758). It refers to an old message of February 2021 that describes a similar issue with a beta of Affinity Publisher. This message has 1 reply from Serif. In this reply it is stated that the 'RAM Usage Limit' is only applicable for raster operations, and that Affinity Publisher (contrary to Photo and Designer) can use lots of memory for 'other things'. I don't know what these 'other things' could be. But, please be aware that the findings of my message above refer to Affinity Photo, and that I notice this memory behavior while I only use rasterized features in Affinity Photo (i.e. no fonts, no shapes, no curves,... -> so, nothing 'vectorized'). I really hope that the developers can identify and fix the root cause of this issue. It's basically the only major problem that I have with Affinity Photo, and it prevents me from activating hardware acceleration. Indeed, when HA is active on my system, I encounter no 'crashes', which is different from what many other users are facing with recent versions. I only have system 'freezes' from time to time, and these freezes are in almost 100% of the occurrences linked to exhaustion of the available memory. -
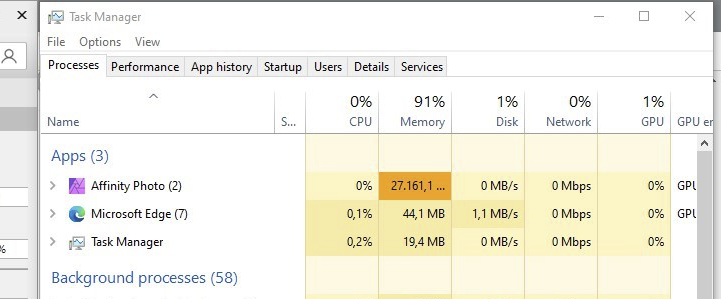
After upgrading to Affinity Photo 1.10.3. yesterday, I (temporarily) reenabled hardware acceleration on my machine, to verify whether some freeze problems that I encountered recently were solved with the latest release. The findings of my earlier tests with previous releases are documented in detail in a different thread (https://forum.affinity.serif.com/index.php?/topic/150705-affinity-photo-hangs-after-doing-some-hdr-merges-panorama-stitching-memory-leaks/). Unfortunately, the freezes are still there😡... While I'm testing problems with AP, I focus particularly on how AP manages memory, because my feeling (suspicion) is that something is broken there. During my latest tests after installing the 1.10.3 release, I noticed something strange. In my AP Preferences, the 'RAM Usage Limit' is set to 16383MB (see screenshot below): In total, I have 32 GB of physical RAM (and 12 GB of VRAM). When running some test cases, I verified the memory consumption via the 'Processes' tab of the Windows Task Manager. There, I saw that the memory consumed by Affinity Photo raised till levels above 27 GB (see screenshot below): How is this possible, when the parameter in the AP Preferences (Performance tab) restricts the RAM usage to 16 GB?? The reason why I find this bizarre (and why I report it separately) is that such situations with high RAM/VRAM usage are typically (i.e. very often!) a precursor for system freezes shortly afterwards. PS: When I disabled hardware acceleration later on again, it appears that I can't reach the same levels of excessive RAM usage. Then, AP rather obeys the constraint of the Preferences parameter, although sometimes with a small surpass. From my earlier tests (see also link above), I've learned that there appears to exist a mechanism that kicks in once the RAM limit is approached. That mechanism seems to release RAM. Indeed, With HW acceleration switched OFF, AP behaves (in general) relatively stable. With HW acceleration ON, such memory release mechanism doesn't seem to happen (or at least not always in a timely manner)...

-
Have blocks appearing as I zoom or move tool
i5963c replied to JustOneQuestion's topic in V1 Bugs found on Windows
I upgraded to 1.10.3 yesterday. HW acceleration is still OFF on my machine, due to some intermittent system freezes (no crashes, therefore, also no dump files). Today, I notice something similar when I zoom in & out on an image. A video recording is attached below: I never witnessed this before... Affinity Photo 1-10-03 - 2021-10-27 14-19-16_Blocks in UI.mp4 -
Oh, I find 2 samplers a bit limited. I don't know why, but I very much like to have always 2 color models in parallel for each sampler point (RGB and LAB, the latter especially for the luminance). If I want to bring two areas 'in balance' with local filters and/or dodge & burn brushes (e.g. after having done some inpainting, which often results in some unwanted color/luminance differences), I want to compare the values of both color models for a couple of points (at least 2), which necessitates to have at least 4 samplers. If I could have more than 2 by default in a persistent way, I would setup my system with at least 4, or even 6 samplers, and thus avoiding the need to recreate them all the time. Just one of my use cases for (multiple) samplers...
-
In the Info panel of Affinity Photo, there are by default 2 samplers. It is possible to add more samplers. But, as soon as a document is closed, the application always returns to 2 samplers. Without open documents, all samplers are removed. Is there a way to enforce that extra added samplers are persistent across multiple documents, and across consecutive AP sessions? Many thanks.
-
Just something that came to my mind when considering the need to scan A3 or A2 sized documents with an A4 scanner. Not to downplay this feature request, but probably just a practical suggestion / option(*). I believe that scanning an A3 document will require at least 3 A4 scans, for each A2 document it's even 9 scans. In the end, it might be much simpler to just take a picture with a digital camera of the A3 or A2 document. Of course, some specific requirements (e.g. special resolution specs, but unknown to me) might still enforce the use of a scanner? With a good prime lens and e.g. a high-res camera, you get tack sharp images of the documents in a fraction of the time spent on scanning and stitching. Even a moderate lens and 'normal' resolution camera will most likely provide sufficient detail in the final image. (*) I'm currently in the process to digitize my archive with +3000 old color slides. Originally, I started this project with a photo scanner, but the scanning process took way too long (also considering the required scan resolution). A while ago, I did some research on the topic, and discovered that it could also be done with a camera, a macro lens, a tripod and a light box. Because of the repetitive, high volume work, I also made a temporary 'construction' to freeze the relative positions of camera, light box and slides. For low volume work, this is of course not needed. For larger documents (like A3/A2), a camera and a lens could be sufficient. I could easily process +150 slides per hour (including blowing away some occasional dust). Such throughput was simply impossible with my scanner... Currently, still busy with post processing the bunch of pictures😠... But, this effort would be the same with stitched scans.
-
Thanks for reply. OK, I understand better now. In the meantime, I did some quick searches, and I noticed indeed that some panoramic tools seem to provide such 'flat image' functionality as well. As I said, the internals of the panorama stitcher in Affinity are unknown, and there is currently (almost) no way to influence the process. I was preparing a feature request for some other enhancements of the panorama tool, hence I was interested in your thread as well.
-
Hello @PaulEC, Unfortunately, little (actually nothing) is known about how the internal stitching algorithms in Affinity Photo work (projection system, ghosts removal, lens corrections, exposure equalizer, perspective, masking, parallax corrections, ...). In Affinity Photo's panorama tool, all this is processed fully automatically, without user defined parameters. Of course, this is one of the strengths of this tool. At the same time, it's also one of its weaknesses... I'm unsure about what you mean precisely with 'flat images'. However, if the purpose is just to 'stitch scanner images', I wonder whether that can't be achieved manually by 'precisely positioning the different scans' on a larger canvas? I fully agree that such manual procedure is less user-friendly than something that works automatically, but you might probably reach your results faster with such manual process than via 'trial and error' with an automated tool?
-
I raised this bug in early August when version 1.10. was initially released. I retested this bug once more with the most recent version (1.10.3.1191) of Affinity Photo. I can confirm that it's fixed now👍! So, this thread can move to the 'Resolved bugs' section. Many thanks for fixing it! Kind regards. PS: I've noticed that since this bug was initially raised, also some other users have initiated threads about the same problem. Also these threads can now move to the 'Resolved' section, I assume?
-
Hi @footeg, Thanks a lot for your feedback, and especially for the video link! If the panorama persona is designed to work as shown in this video (i.e. the 'Erase' brush is only a kind of 'global undo' of earlier 'Add' brush strokes), then, what I described above in this thread, should indeed not be classified as a bug. But, let's then agree that what's described in the official Affinity Photo help file is 'buggy', confusing and not at all clear... I hope that the text in the help file will be updated to reflect what the panorama brushes actually do, and how they should be used. Ideally, also the 'official' Serif video on panoramic stitching should be enhanced to include the functionality of the 'Erase' brush. As a final remark, I believe that there are multiple enhancements possible to the panorama stitching functionality in Affinity Photo. Therefore, once I have some spare time, I'll document some of these ideas in the appropriate forum. Kind regards.
-
Hi @DWright, Thanks to provide this link. This video describes the use of the 'Add' brush. This brush works how I would expect it. However, it doesn't provide an explanation or guidance about how to use the 'Erase' brush. Unfortunately, the use of this specific brush is problematic. Btw, I've logged a bug report for that (https://forum.affinity.serif.com/index.php?/topic/151437-bug-in-panorama-persona/&tab=comments#comment-848627). Despite all this, I still find the wording in the official Affinity Help files w.r.t. the Panorama brushes very 'confusing', and not at all clear... (for the 'Add', as well as for the 'Erase' brush). Maybe, it's unclear to me, because English is not my mother tongue (but there are many Affinity users like that...🙂) As mentioned in the 'bug' thread, I hope it will be solved soon. Also the suggested usability improvement would be a great addition (i.e. a customizable mask color and opacity i.s.o. the often almost invisible grey mask). Many thanks. Kind regards.
-
Thanks for bringing this to the developers' attention.
-
After trying to understand the topic in Affinity Help, and after searching on the web (including this forum), I believe that there is a bug with the panorama stitcher in Affinity Photo (at least on Windows, don't know on Mac). Once the initial panorama has been stitched, and you want to apply some corrections to the masks with the Add and Erase brushes, it appears that the 'Erase' brush is basically unusable. I assume that the use of both brushes is similar. With the Add brush it is possible to select the source image on which you want to paint. Indeed, a single click on a specific point in the canvas cycles through all the source images that overlap with the point on which you've clicked. With each click, the border of the 'active' source image is shown (similar as when the Transform tool is used). This way, you know at least on which source image the brush strokes will be applied. 'Painting' with the Add brush is also restricted to the area of the active source image. All this makes sense. With the Erase brush, however, you basically have no clue what you're doing. No source image is selected. It's NOT possible to cycle through the source images, and there is no border around an 'active' source image. Even if you select e.g. a specific source image with the Transform tool, just before activating the Erase brush, this selected source image is apparently 'unselected' when you start using the Erase tool, and you can paint all over the canvas. In addition to restricting the painting to the boundaries of the (invisible) 'active' source image, I would also expect that painting with the Erase brush is only possible in areas where there is overlap with at least one other source image (to prevent that all overlapping areas are completely erased). One final remark: in its current implementation, the grey overlays are (by their nature) often almost invisible, also depending on the 'main color' in the panoramic image. In many cases it's just guesswork, pixel peeping and trial and error... Usability would greatly benefit if there was an option in the toolbar at the top whereby the user could easily modify the overlay color and its opacity. This way, you could select complementary colors of the 'main color' and the visibility of the mask and where to paint would improve significantly. Kind regards.
-
From the official Affinity Photo help w.r.t. panorama stitching: Transform Source Image—manipulate the corners of each stitched image to manually align them. Add to Source Image Mask—add an area to the current image mask that will reference the surrounding stacks. Erase from Source Image Mask—erase an area from the current image mask; this will use the original image's data rather than referencing from the surrounding stacks. Can somebody clearly describe what this actually means (preferably be real live examples? What is meant by 'source image'? What is meant by the 'source image mask' and by the 'current image mask'? What is the purpose of 'adding' or 'erasing' an areal to the current image mask? What is meant by 'reference the surrounding stacks'? What is meant by 'use the original image's data rather than referencing from the surrounding stack'? As you see, the request is basically to explain everything, because what is written now is totally not clear. Many thanks.
-
@RobWu, Thanks for your feedback. Based on one of your earlier messages, whereby you indicated that you changed the 'RAM Usage Limit' in your Preferences, I decided to execute some additional tests of my 'panorama test scenario'. Initial remark: the following applications are active when I run my tests: Windows 10, Capture One, browser (MS Edge), Task Manager and Affinity Photo. Hardware Acceleration (HA) in AP is switched OFF for this new test run. With this setting, my VRAM usage remains 'stable' throughout the test execution at 1.6 GB (i.e. way below the 12GB VRAM available on my system). Despite HA being switched off, I notice nevertheless that one of the GPU graphs in the Task Manager (i.e. the chart labeled as '3D') shows 'activity' whenever I perform actions. I don't know what triggers this GPU activity without hardware acceleration... Probably just rendering the screen?? As described in previous messages, with HA switched ON, it's reproducible to stall the AP application. I suspect that the exhaustion of VRAM is the culprit for those freezes. My new test aims to 'stress' the RAM usage (with HA OFF) to see whether it can also be forced to trigger an unresponsive system or a crash. The system load is generated by creating and editing a panorama in the Panorama Persona. The panoramic image is based on 8 TIFF files of +/-250MB each. The editing of the panorama is achieved via the (repetitive) use of the 'Add' and 'Erase' mask tools, in combination with the 'Transform' tool. This Transform tool triggers a re-rendering of the panorama. It's actually this rendering step which seems to generate most of the system load (in conjunction with an increase of the RAM usage). My test scenario basically consists of 3 test cases, whereby each case has a variable 'RAM Usage Limit' in Affinity Photo's Preferences. This limit was set to: 8191MB (TC1), 16383MB (TC2, my default), and the maximum value of 65536MB (TC3, although my system has only 32GB of physical RAM!). Prior to each test case, I close and relaunch AP (i.e. steps 1 and 2 respectively). The table below shows the RAM usage throughout the test case execution for each of the test cases: Some findings: I did not 'succeed' to let AP crash, or even force it to freeze (*)👍😃! The values for the RAM usage during step 6 represent the maximum that was reached. Actually, during this step the RAM varied, according to an increasing graph (see figure below for an example). This chart clearly demonstrates that RAM usage accumulates during the test execution. As said, this happens mostly during the rendering process. After the rendering is finished, the RAM usage decreases a bit, although less than the initial memory increase. In my tests, RAM usage went up on average by 1.7GB during each rendering action, with a memory release afterwards of around 0.7 GB. This leads to a net increase of +/-1GB for every rendering operation. As a consequence, this results to a constantly growing RAM usage. It is strange that the difference between the RAM usages in steps 6 and step 1 exceeds the 'RAM Usage Limit', as specified in the Preferences parameter. This finding seems to indicate that AP can use (slightly) more RAM than 'allowed'? When the amount of 'RAM Usage Limit' is reached, it appears that there is indeed a memory release mechanism that kicks in, in order to prevent further memory usage. Whether this strategy to release memory only when needed (i.e. at reaching the RAM limit), is optimal, remains a topic for debate. It might indeed be better to perform this memory release as soon as possible (i.e. when the memory is no longer necessary). Such 'ASAP' strategy would certainly keep a larger chunk of memory available at all times. In addition, for TC1, and to a lesser degree for TC2, not all memory is released when canceling the Panorama Persona (step 7 vs step 2). (*) Although, I didn't manage to force a 'freeze' of the application while I was running the tests, something strange happened (at the end of my test run). After testing step 6 of TC3, I was documenting the findings of the tests, and didn't use AP for a while. When I returned to AP, I noticed that the memory usage had (automatically) dropped in a significant way. When I then tried to cancel the Panorama Persona (i.e. step 7), the application froze (i.e. the 'famous' message appeared in the title bar), the memory usage started growing again (in a linear way) with high disk (SSD) usage, but after a while the memory consumption returned to normal values (see screenshot below). Shortly after that, the 'freeze' came (automatically) to an end. Not sure what happened, but I've seen a similar behavior already in the past (i.e. AP sometimes behaves unresponsive after a period of 'inactivity'). In TC3, with a theoretical 'RAM Usage Limit' of 64GB (and despite a physical RAM of only 32GB), the system behaved correctly, and started to release RAM memory as soon as the physical limit was (almost) reached. As a general conclusion so far: Without hardware acceleration (HA), VRAM doesn't play a critical role. I therefore focused specifically on RAM for my most recent test cases. Irrespective of the 'RAM Usage Limit' parameter, I was NOT able to freeze the application (in a structural way). Thus, this RAM parameter seems to effectively prevent overallocations of RAM memory. However, it should be noted that this conclusion may only be valid for the combination of: the specific type of test scenario and test steps, as described in this thread, the set of concurrently open applications during the test, the particular test data used (e.g. image files), and the key configuration characteristics of my machine (RAM, VRAM, etc... - cf. signature). On the other hand, with a similar test scenario, I can stall AP once HA is switched ON (see previous messages). I assume VRAM exhaustion to be the culprit. I also notice that no equivalent parameter ('VRAM Usage Limit') exists in AP's Preferences. I wonder whether the absence of such dedicated parameter may impact the freezes when HA is switched ON?
-
Hi @RobWu, Thx for sharing your experience. Most of our findings are very similar: i.e. high levels of memory accumulation (often for 'simple' actions), and no (or only very limited / partial) release of memory once it is no longer required. This ultimately leads to application freezes. I notice that you seem to focus on RAM, while I had the feeling that my issues with the application freezes were rather VRAM related. But, as mentioned in one of my last messages, I may be wrong because I have a 16GB RAM limit specified in my Preferences (= default value when I installed AP). One of the reasons why I focused on VRAM was because my dedicated GPU memory reached a much higher usage level (in %) than my RAM (based on the amount of physical memory available). Furthermore, I didn't encounter problems since I deactivated hardware acceleration (HA). I'll keep my fingers crossed for that... Without HA, my VRAM usage was almost zero. Although, I must also admit that I haven't done the same level of stress tests with HA switched OFF. Can you therefore let me know whether you did your tests with (or without) hardware acceleration switched ON? If it was switched ON, can you reproduce the same freeze (or crash) problems when you switch HA OFF? You also refer explicitly to application 'crashes'. In my cases, my system becomes (almost exclusively) 'unresponsive' (i.e. I don't have 'crashes', only 1 so far, and even not sure that it was related to the same 'freeze' behavior). Therefore, I wonder: do you have 'real application crashes' (with dump files in the Affinity user directory) or does your Affinity Photo application just become unresponsive? Many thanks. Kind regards
-
@RichardMH, Yes, prior to the freezes, RAM usage increases as well. However, much more RAM (versus VRAM) remains available at the moment of the freezes. On the other hand, I'm aware that the 'RAM Usage Limit' (for AP's usage) is restricted to 16GB (as defined in my AP preferences). Thus, it might be that the constraint associated with this parameter kicks in, prior to the exhaustion of the total available RAM on my system (32 GB). But all this is speculation, because I don't know how AP implements memory management. So, for now, I'll leave it to Serif to have a more in-depth look into this strange VRAM (/RAM?) accumulation, into the freezes and into the root causes of a recent system crash that I've encountered. I've provided more info to Serif to analyze this behavior (panoramic source files and a dump file of a recent crash). For now, I wait until they have been able to do a more in-depth analysis of this information (and I'll switch hardware acceleration OFF again...).