MoonaticDestiny
-
Posts
506 -
Joined
-
Last visited
Everything posted by MoonaticDestiny
-
increase 100pt standard
MoonaticDestiny replied to MoonaticDestiny's topic in Feedback for Affinity Designer V1 on Desktop
Right. I dont want to enter larger numbers because i want to increase that default 100pt limit. So how do I increase it? I dont want to enter them manually. I want to increase this slider 100pt max. -
increase 100pt standard
MoonaticDestiny replied to MoonaticDestiny's topic in Feedback for Affinity Designer V1 on Desktop
Ugh. And then when you enter a number in the slider above 100pt, and you come back to change that slider, the slider goes back to 0pt to 100pt. It ignores the number you had entered. So if I enter 300pts. My slider should go from 0pts to 300pts. No. If you move your slider it goes back to 0pts to 100pts. Its so annoying. Just let me enter a max value for the slider pt and let the slider go from 0pt to that max value pt I entered. -
How do I change the 100pt standard for everything? The max stroke width is 100pt. The radius in fx goes up to only 100pt. Everythings 100pt. How do I increase it? I hate entering a number automatically because Im limited by 100px. I need more than 100pt. Im being limited. I want to go into the preferences and increase that 100pt to like 200pt or 300pt so that next time I change my slider the max pt is what i had set it to. I can just slide the slider from 0 to the number i put in withouth being limited to 100pt. Its so frustrating. Let users increase the pt to sliders in preferences.
-
"Tool Handle Size" rename
MoonaticDestiny replied to MoonaticDestiny's topic in Feedback for Affinity Designer V1 on Desktop
no. thats not it. -
"Tool Handle Size" rename
MoonaticDestiny replied to MoonaticDestiny's topic in Feedback for Affinity Designer V1 on Desktop
I shouldnt have said "bounding box." Im aware it also changes the size of the curve nodes as well. I think my issue was it being called "Tool" because I was looking at the tools in the toolbar. Its not tool related. its object related. -
I was playing with the preferences when I came across the preference "Tool Handle Size" under Tools in preferences. Theres different sizes that you can choose from, but I never understood what it changed because nothing happened when you pressed each size. Nothing was happening in the toolbar because its "Tool" related. It wasnt until I realized that its actually changing the size of the "bounding box handles" of an object. This was so confusing to me because of what its called, "Tool Handle Size." I dont know what that means. I get its gonna change the size of the handle of those tools but what tools are we talking about here? The tools in the toolbar? Its so confusing. I dont think it should be called "Tool Handle Size" because its not referring to the tools in the toolbar. Its referring to the handle size of the bounding box of your objects. Its always been called a "bounding box." So I think it should be renamed from "Tool Handle Size" to ----> "Object Bounding Box Handle Size" to prevent user confusion because it just happened to me. Had I read "Object Bounding Box Handle Size" I would have know that Im changing the size of my objects bounding box handles. Please change this. Don't use the word "tool" because it refers to the tools in toolbar. Come up with something shorter if youd like but make sure its "Object Bounding Box Handle Size" related.
-
Where in the settings do I go to set it so that everything I draw is already in curves. i dont want to be hitting "convert to curves" all the time. I just want to draw shapes and have them be in curves already. I want to edit their nodes. I dont want to do this extra step of converting them to curves.
-
Light Mode UI for iPad
MoonaticDestiny replied to mackleys's topic in Feedback for Affinity Designer V1 on iPad
😪 -
Just give Serif their flowers 🌷and enjoy AD on ipad my friend. 😊
-
@Mark Freemanjust read this whole post on why integrating rulers is funny
-
Duplicate layer?
MoonaticDestiny replied to evtonic3's topic in Feedback for Affinity Designer V1 on iPad
I misread your comment and agreed with you. I actually disagree with you. "Duplicate layer" should be its own button. It should not be in any burger menu. Thats too many touches just to get to it and a slow workflow. It needs to be its own button next to the delete, group, and new layer button in the layer studio. I wouldnt say all over the place. Theres 3 workflows in the app. The canvas, the layers studio, and the edit menu at the top left of the iterface. A duplicate button should be in all 3 of these workflows but its only available in 1 workflow, the edit menu. There should be a duplicate button in the layer studio while you work inside the layers studio and there should be a duplicate button in the long press clipboard menu while youre building your design on the canvas. -
Duplicate layer?
MoonaticDestiny replied to evtonic3's topic in Feedback for Affinity Designer V1 on iPad
What Ive been saying but youre gonna have to wait years for that. -
Im leaving these forums. I think these forums are a complete joke. They honestly need to be shut down because theyre not doing anything. They're pointless. You got the serif development team not listening to its customers on here. You got users who requested features from 2018 that still havent been implemented in this app. Features like rulers. RULERS!!! Something so basic. Or even a light interface instead of the dark interface we have right now. Its so bad. Very bad. I went through all 33 pages of these forums, wrote down every feature users requested, and the list is LONG!! Its ridiculous. So many basic features that are not in the app. Im angry. Im really angry, Do you know what this means? its means that instead of using 2018-2022 to work on these features and put them into the app, youve neglected them, pushed all these features back, and now all these features are going to take 2-5yr for them to be put in that app so now were not going to see any results from this app till 2024/25. We could have already had a good working app with all these features. And thats not including the new ones that are coming in. Now the new features that are being requested right now have to be added to the other features that everyones been asking for and now the serif team has all this BIG piled up work they need to do thats not going to get done right now. We are all going to have to wait 2-5yrs for results. I cant believe it! This next update, what ever youre working on, is going to be a joke. A big clownery joke. Im gonna look at that list of fixes that the serif team has been working on and just laugh because its not going to be any of the features on these 33 pages from 2018-2022. Like, what are they even working on? What were you working on from 2018 that youre so busy right now that you cant work on the app? Its just nonsense. And these moderators are pointless. Their responses were "we'll pass this down to our development team to see if they'll decide if they want it. theyre busy right now." You can not be THAT busy for 5 yrs that you cant put rulers or a white UI in the app. Its baffling. Im angry. Im very angry. Im angry because these features are not being put into the app, the dev team isnt working on this app, youve wasted 5 yrs of work, you wasted every users time on here, and nothing has been done. Nothing! This app is dead to me and any future update is a joke. Nothings going to get worked on right now. Nothing. If youve ever requested anything on these forum, its not gonna happen. Im leaving. I just wasted a whole month of leaving feedback to the serif team only for them not do anything right now with my feedback because theyve got all this other back up feedback to work on. Im just so angry and disappointed. Youve wasted everyones times here. @MEB@stokerg@Gabe@DWright@Chris_K @Dan C @Callum@Sean P@Patrick Connor
-
Yeah. I just got onto these forums about a month ago. Ive been leaving several posts about issues with the app. i went back to the first page of the forums to read what issues other users had with the app and there are some basic issues that were requested 5yrs ago that havent been fixed in the app. 5yrs! Thats not ok. I think the last update was a year ago. I dont know if theyre going to release an update soon but it feels like nothing is getting done for AD on the app. Ive been leaving my feedback on here. I sometimes feel like nothing is going to get done. I do get replies from moderators saying thank you for my feedback. Im patiently waiting. My feedback is not going to happen overnight. Ill continue to post feedback because I really want to make this app better but it does feel like issues from yrs ago that I had to repost are going unheard. I figured Id just patiently wait to see if Serif is actually listening to my feedback and will eventually release an update soon because its been a year since the last. I am frustrated because it doesnt look like anythings getting updated. Ive noticed other app companies release an update every now and then for their app so I wonder why serif hasnt done the same. Nothing from serif yet. I dont know if Im at the point where I want to post a concern about to the serif team to Apple. Im am frustrated. It does feel like a joke. I just dont know whats going on on the other side to post a concern. IDK whats going on on serifs ends. I want answers from them first before I post a concern to apple.
-
Notice how in my previous comment I put those pause dots ("......") between the serif employees words "I can also change............the color............really easily." These pause dots "..........." show how her workflow is being slowed down and stopped. Her workflow was interrupted because her objects properties are being divided into 2 studios and having this rule where only 1 studio can be opened at a time. She had to slow down. She had to do some thinking. She was interrupted. She had to toggle into another studio. There has to be an acception, an override, an accommodation, to combining these 2 specific and only studios because of the program being an ipad device, because of the small screen real estate the ipad has, and because of studios being opened 1 at a time in the app. Combine the studios.
-
Heres a video of a serif employe explaining vector brushes. At the 0:48 mark she wanted to change her strokes color. So she has this impression that ok, I want to change my strokes color so let me go to my stroke studio. Why? Because her stroke has a color and anything stroke related is done in the stroke studio. So when she goes to the stroke studio to change her strokes color she realizes that the color to her stroke isnt there. So she has to pause and do some thinking. She realizes, oh yeah, the serif team likes to divide my objects properties so now im forced to go to the color studio to change my color. It slowed her down. She had to toggle into another studio. She had to do an extra step/tap. Why cant it all just be in 1 studio? It also doesnt help that the stroke studio icon is in the color of her stroke. It was purple. So by making the stroke studio icon the color of her stroke, purple, it confused her because it made her think her "color" of her stroke was in the stroke studio. It wasnt. Its in another studio. Sigh. This just shouldnt be happening. The color studio and the stroke studio truly need to combine. The irony is at the 0:48 mark she says " I can also change......the color......really easily." No. It wasnt easy. It forced her to stop, do some thinking, realize that color isnt in the stroke studio (even though her stroke studio icon changes color), slow down, do some thinking, and then realize changing her stroke color is in her color studio, not her stroke studio. Her objects properties are divided because of this ipad app rule where only 1 studio can be open at a time. Please combine the color and stroke studio for better workflow. https://affinity.serif.com/en-us/tutorials/designer/ipad/video/272750449/
-
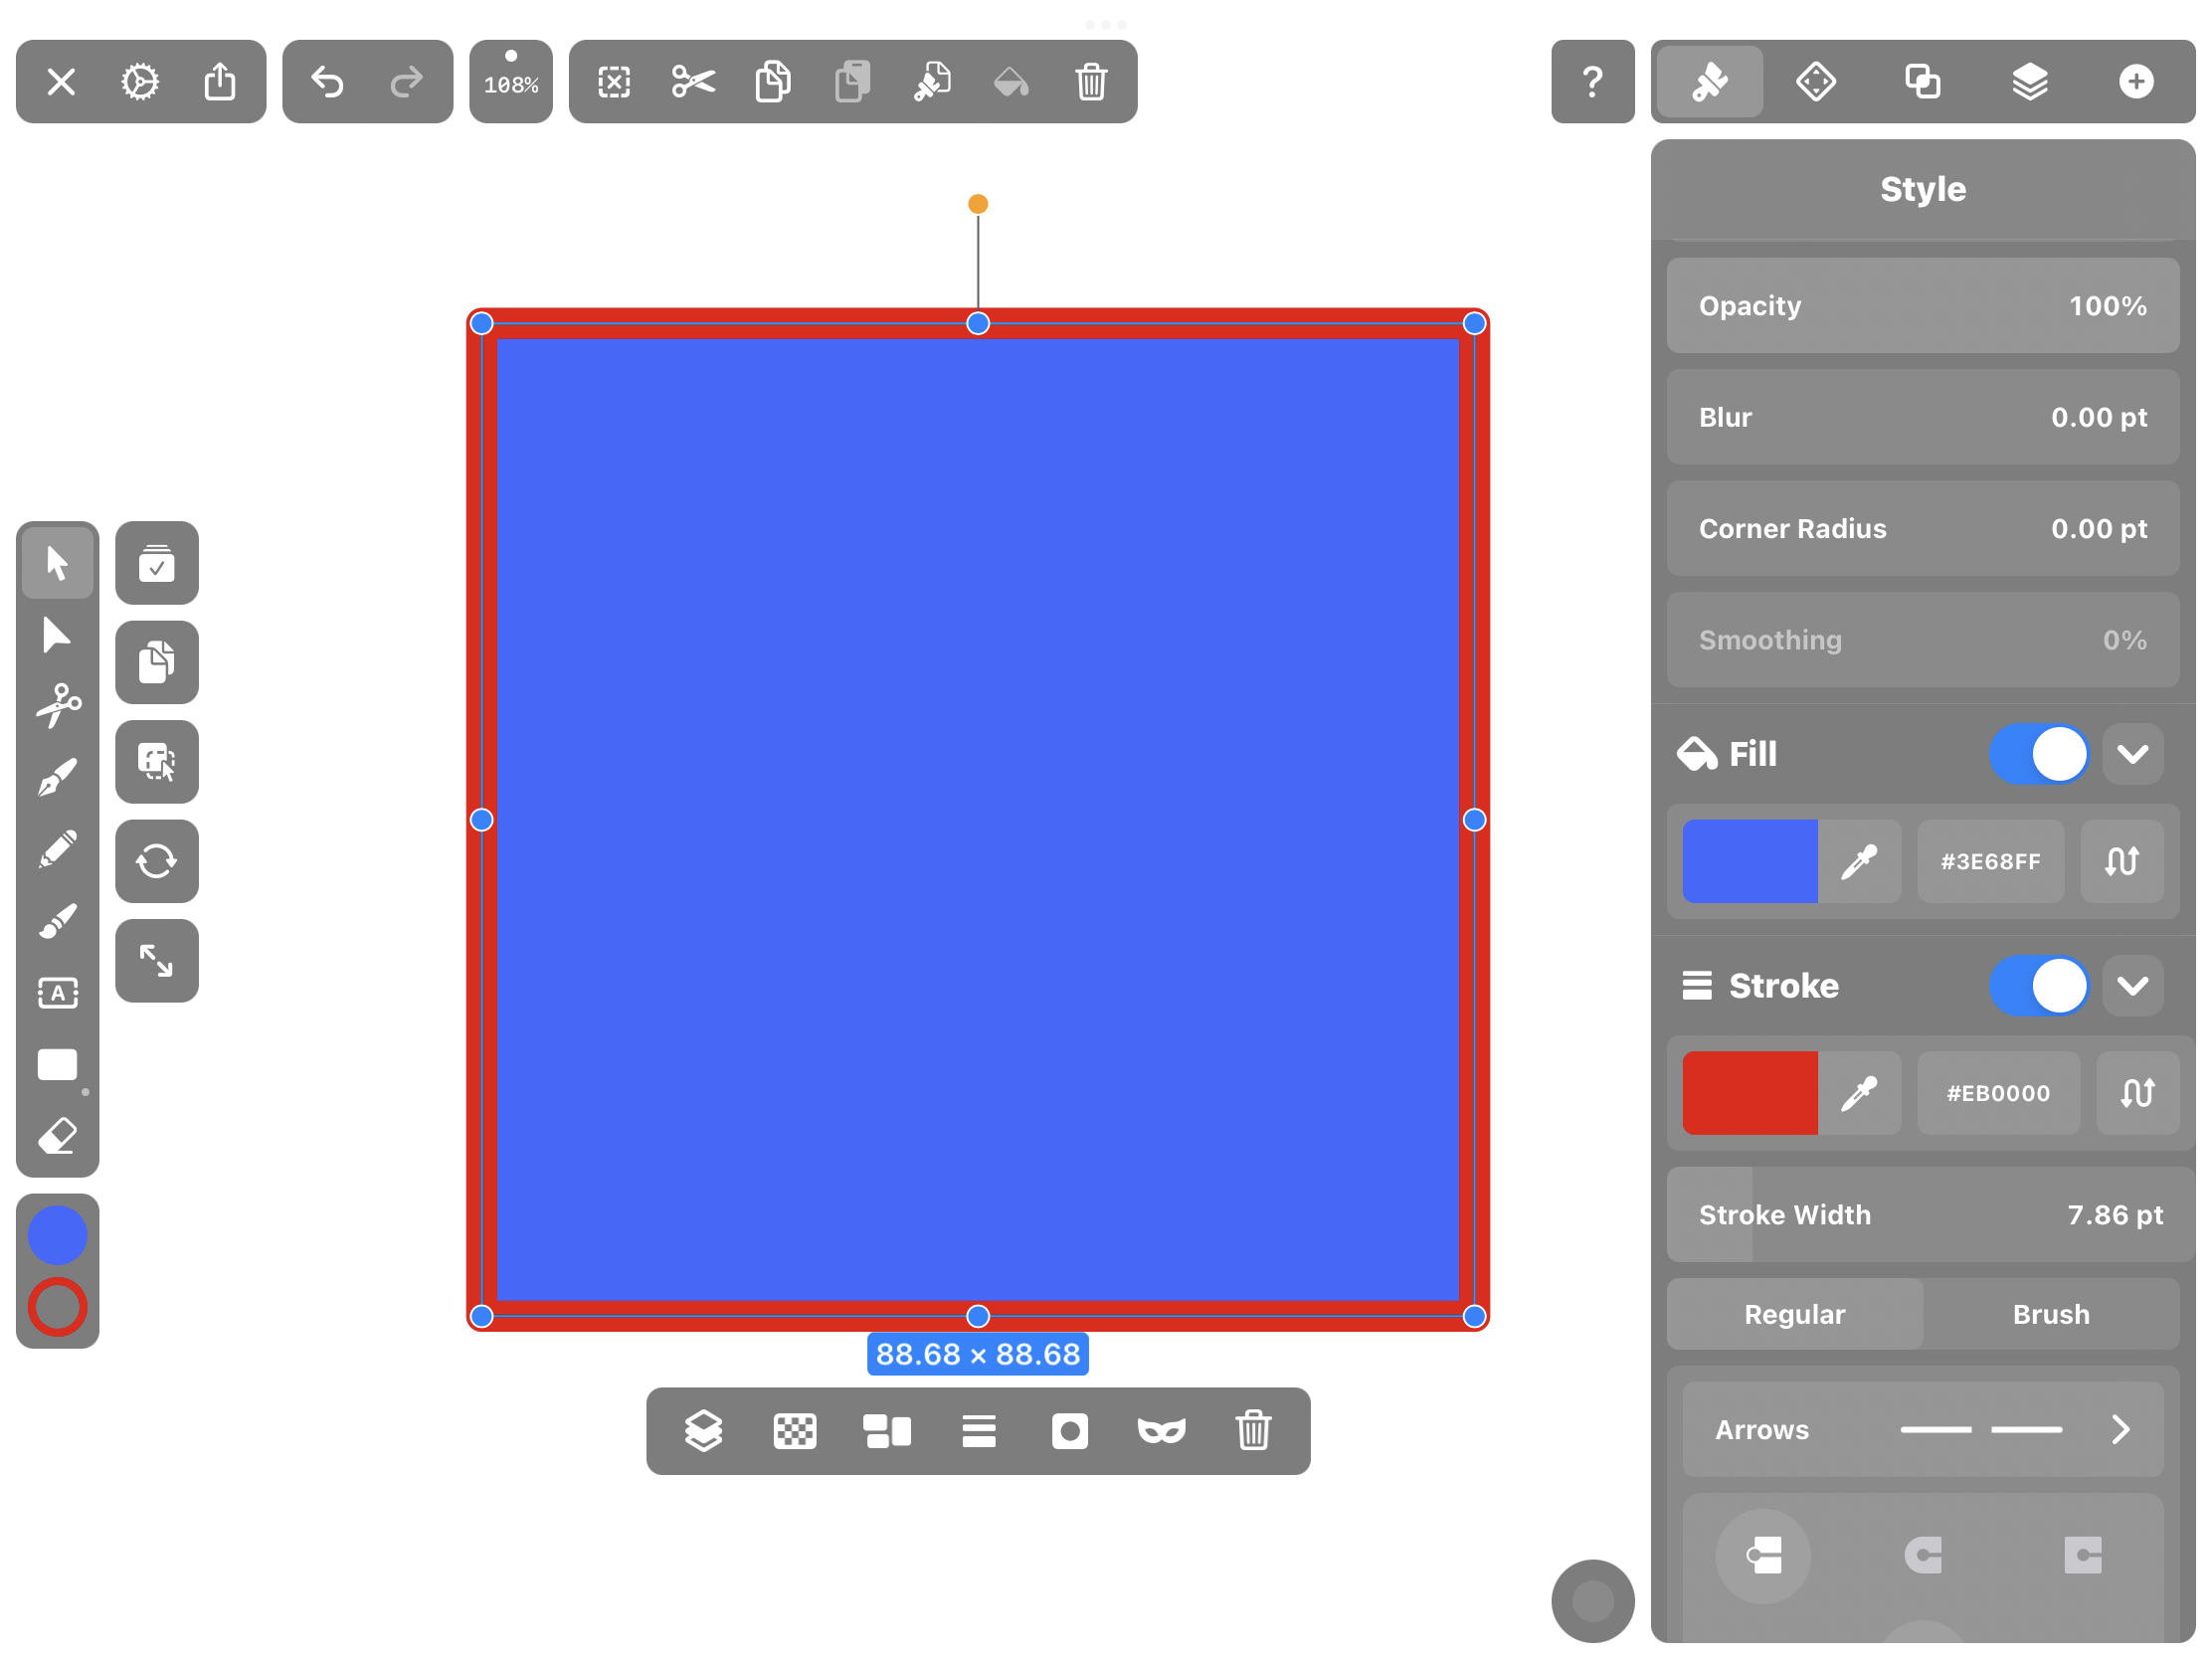
Here I am now in the stroke studio. I have my blue fill and red stroke square. I can finally change my stroke width because Im in my stroke studio. Ok. But now i want to change my strokes color, maybe its fill color, and lower the opacity of my stroke. Well, I cant do that. I have to toggle to the color studio. Its all this toggling. My properties are divided. I dont want to enter the color studio. I need my color studio and stroke studio combined because they share properties of my square, my object. This why I need the color studio and stroke studio to combine because all this toggling would save me time, speed up my workflow by a bit, and it would just make building my illustration easier. Users can not be doing all this toggling between these 2 studios. Serif should not be diving object properties into 2 studios. Users should be able to select their object and have 1 studio that has their color and stroke properties in it. Its simple. Just how vectornator does it. Just how AD for the desktop version does it.

-
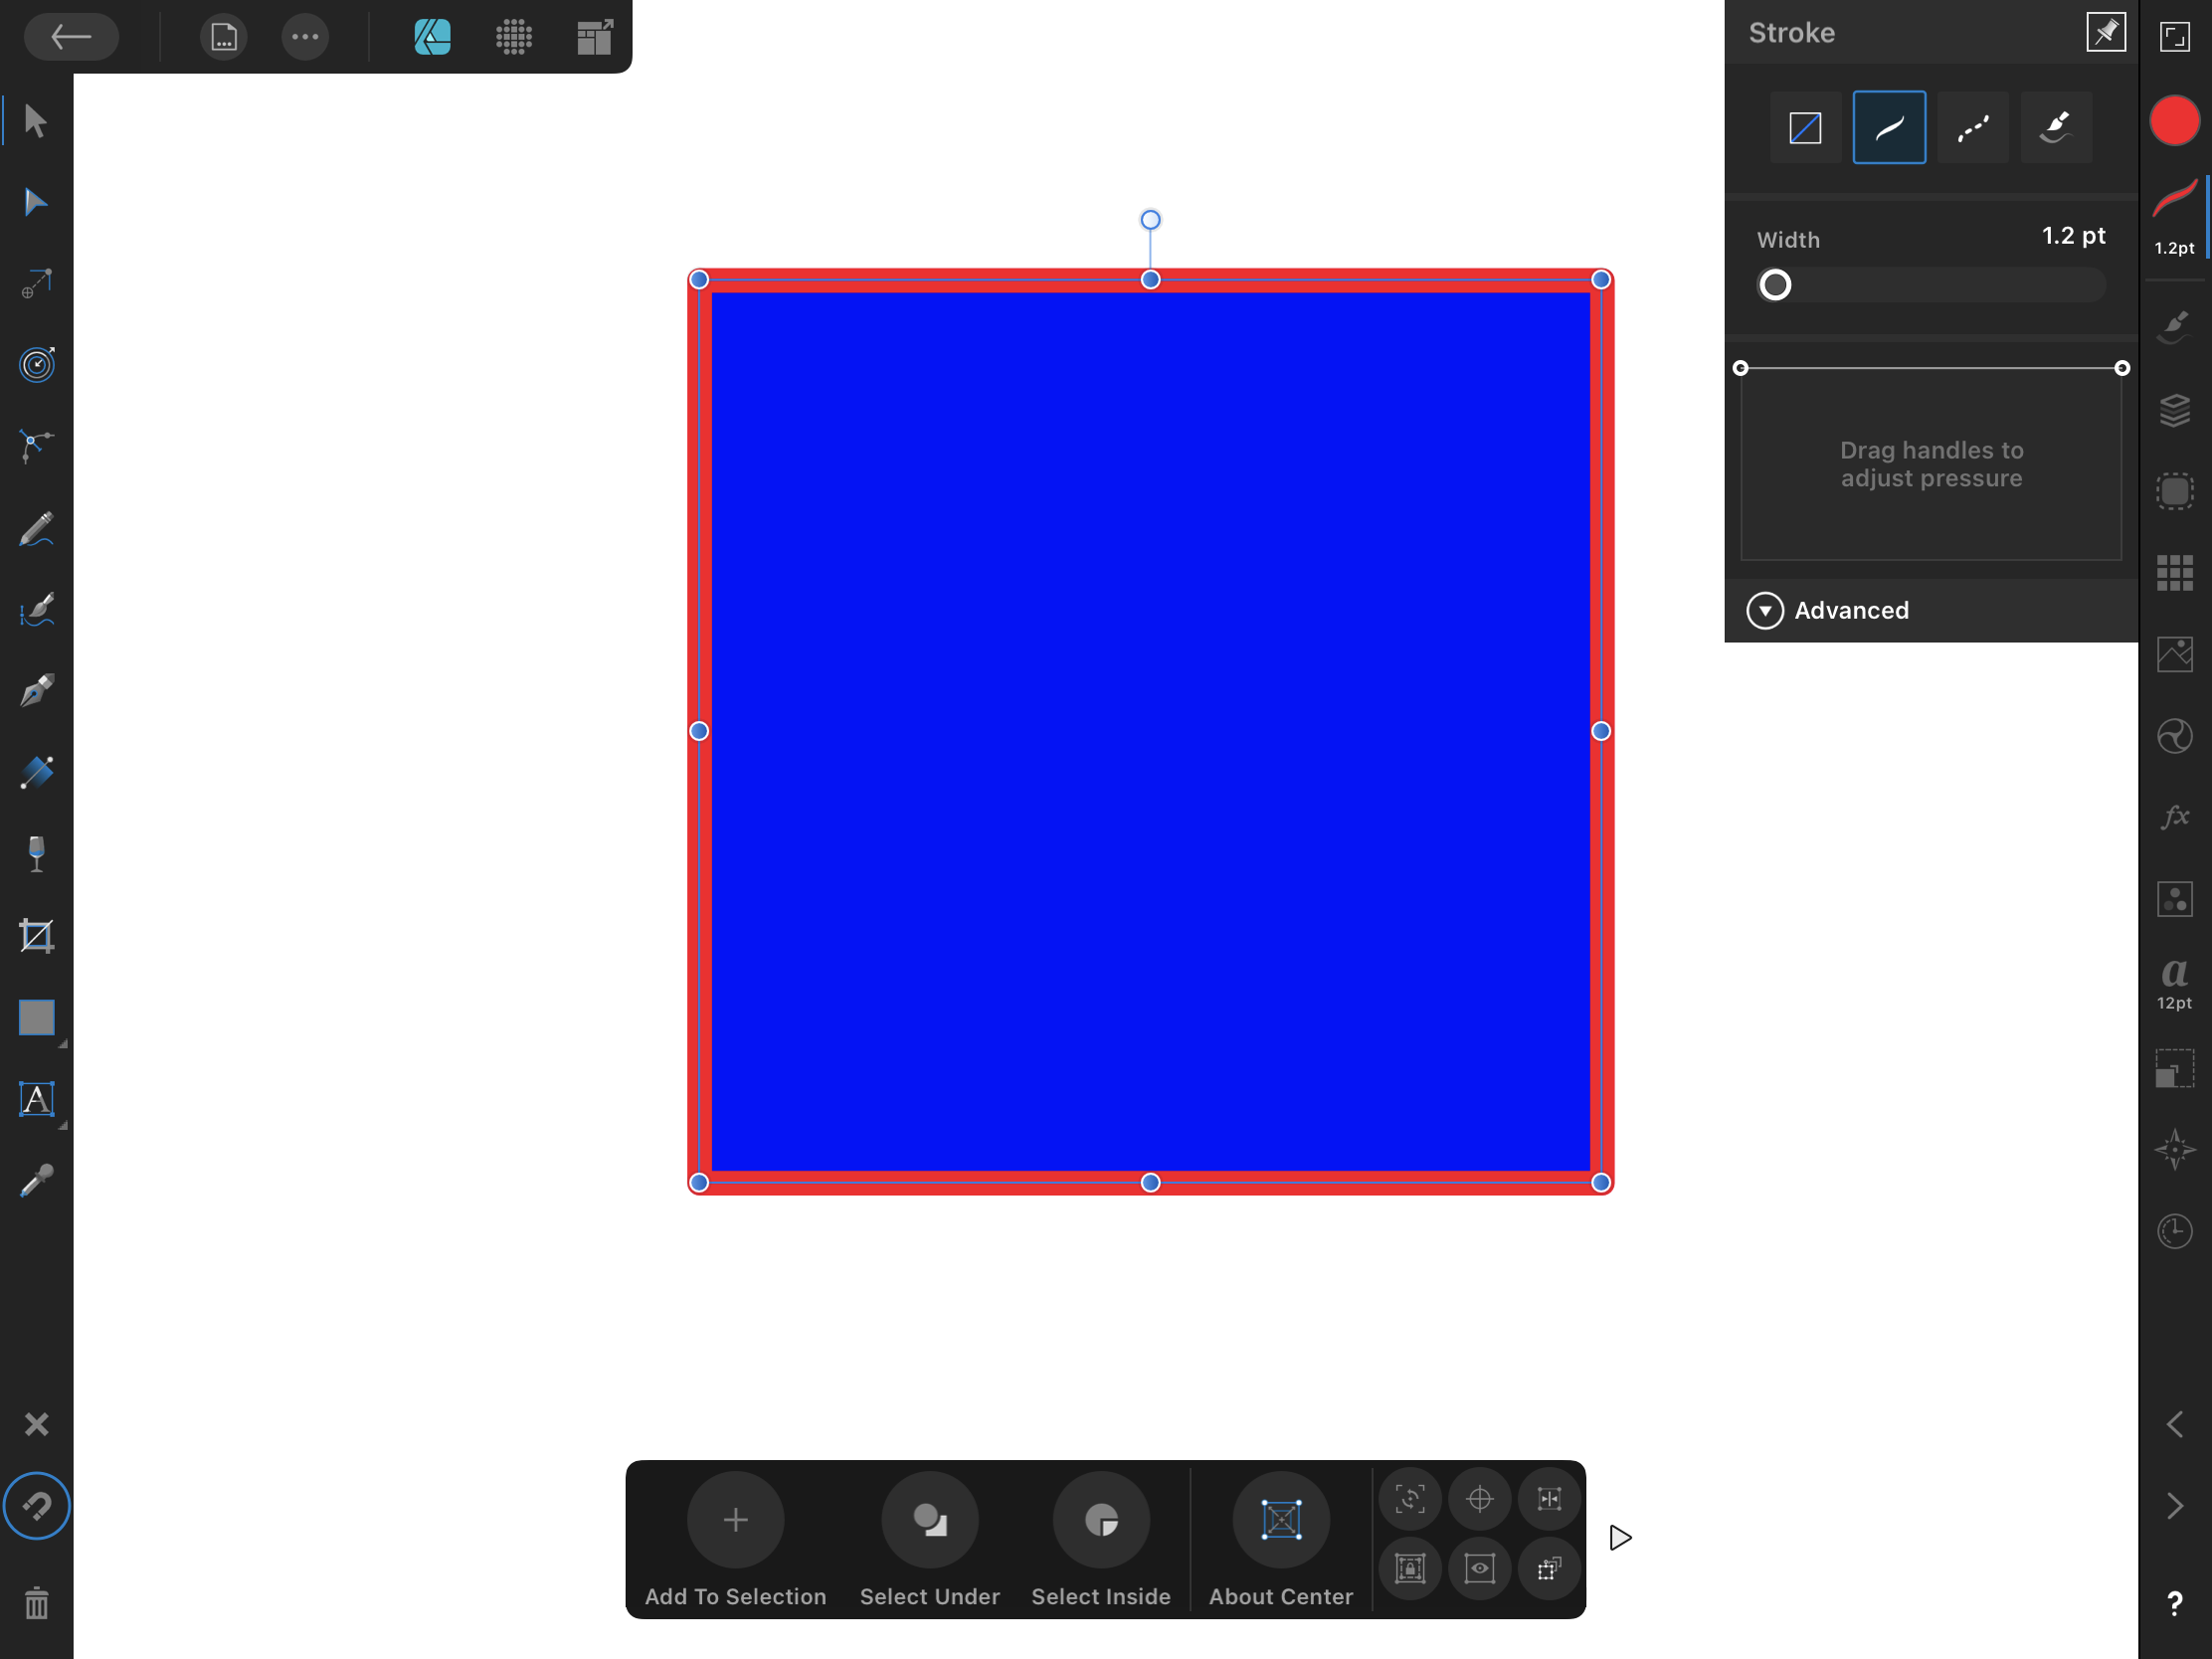
In the ipad app of AD you have the color studio. I created a square with a blue fill and red stroke. But what if I wanted to change the stroke width of my square. Now i have to go to the stroke studio to change that. Its not all in 1 studio. My properties are divided and its making me do extra steps just to get to something so basic. I dont want to go to the stroke studio to change that. I wish the stroke width was here in my color studio so I can change it and not do extra steps of slowing down my workflow. I dont want to toggle between studios because I have my object selected and I want to change everything fill and stroke related in 1 studio. Just how i can in vectornator and AD for the desktop.
-
Below is an image of the ipad app vectornator. I created a square with a blue fill and a red stroke in the app. Notice how to the right of the square they have their own "studio" called "style." There you can change to square's fill or stroke. Theres no toggling to a different studio. Theres no opening a different studio. Properties are not divided into 2 studios. Everything relating to that square is here in this 1 studio called "style" in their app.
-
Below is an image of the desktop version of AD. I created a square with a blue fill and a red stroke. To the right of it are several studios. You can have any studio open in the desktop version of AD. To the right I have the color and stroke studio. Notice how theyre freely open on the screen and if you wanted to change your fill or stroke you could easily do so by going to that studio. No toggling between studios. No needing to open a studio. Properties are not separated. Both studios are there for you to change the fill or stroke.
-
I madly believe this. The color studio and stroke studio need to combine. They need to combine. I don’t know how but they REALLY do need to combine. Its not a debate. They need to combine. Before I go into any further details, the main issue for this reason of these 2 studios combing is because multiple studios can NOT be opened at the same time in the app. Only 1 studio is allowed to be opened. Its this rule in the app where only 1 studio can open at a time due to the iPad having less screen real estate and not being able to have every studio open. Thats the real main issue here. Please let me explain. An object. We work with objects. You create it and then you can change 2 things about it. The fill of that object or the stroke of that object. This object that you created has 2 properties. A fill and a stroke property. Remember that. Whats happening in the app is my properties are being divided into 2 studios by the serif team, the color studio and the stroke studio. You can only open 1 studio at a time in the app. You can only edit 1 property of your object at a time. It shouldn’t be like this. It shouldn’t be like this because its limiting. Its slow. Its too much toggling back and forth between these 2 studios and its slowing my workflow down. Its making me do extra taps when it could be less taps in 1 studio. This workflow of having 2 studios is splitting my brain up into 2 sides. 2 work flows. What do I mean by this? If I have an object, my brain splits that object into 2 studios. My brain is saying “ok. If I want to edit the color of this object I have to go to the color studio. If I want to edit the stroke I have to go to the stroke studio.” It shouldn’t be like that. I should look at my object as a whole and say “ok. I have my object selected. Now I can edit the color and stroke in this one studio that holds my color and stroke properties. I don’t have to do any toggling. All my object’s properties are here in this 1 studio.” So everything is being changed inside this 1 studio that has combined the color and stroke studio. On the desktop version of AD its a different workflow. Theres more screen Real estate there so you’re able to have all your studios open. Theres no limit to just having 1 studio open. Everything is wide open. Everything is there. There are no rules. Its this whole studio of several studios in it. The screen is a studio and you have all these studios open inside your studio. You can have layers, fx, color, stroke, and other studios all open at the same time. Its awesome because you’re not limited to 1 studio being open like in the app. You’re free. You can have any studio open. So when you have the color and stroke studio open on the desktop version you pretty much have these 2 studios combined into 1 studio because you can freely have them open. If you need to change the color you go to the color studio. If you need to change the stroke you go to the stroke studio. Theres no toggling or opening up these studios. They’re already open and you can go into them with no issue. On the app, you can’t have that. You can’t have them both open. You can only open 1 studio at a time and its so annoying. I have no issues with the other studios. My issue is specifically with the stroke and color studio because these 2 studios are IMPORTANT. They relate to my objects and I need to have them both open at the same time so I can make my changes to my object. I can’t be toggling between them. They need to be combined. They need to work together. I need to be able to click my object and change its stroke and color easily. No toggling. No opening 2 studios. Just going into this 1 studio and changing everything there. I can do that on the desktop version with ease but not the iPad app because the iPad app forces me to open up the color and stroke studio individually and its all this toggling and closing. Its really slowing down my workflow. Its limiting. I should be able to click my object, tap 1 studio, and have my color and stroke studio inside this studio. I don’t know what to call this studio. I was thinking the Properties Studio, a studio that has the color and stroke studio combined inside of it where you can change your objects properties with ease and not toggle between 2 studio. Its all done inside this 1 studio. Heres why I bring this issue up. Lets say you want to change the color of your STROKE. Ok. So If Im working with my STROKE then I need to go to the STROKE studio and change it there. Nope! You have to go to the color studio to change your STROKE color there. Ok. Now lets lower the opacity of your STROKE. Ok. Let me go to my STROKE studio to change the opacity of my STROKE there. Nope! You have to go to the color studio to do that. …….Ok. You finished changing your color and opacity for your stroke. Now I want to change its width. Is it in the color studio? Nope! I have to go to the stroke studio and change it there. Its like why? Why are my properties divided? Why am I toggling between these 2 studios. Why are my stroke related properties in the color studio? Why aren’t they in the stroke studio? Why are you diving my properties, serif? This is why they need to combine. Its all this toggling. Properties are every where. Users are being forced to work like this. Its not ok. Its not. The color studio and stroke studio REALLY need to combine. They need to combine. Users should be able to click their object and change anything fill or stroke related to that object inside this 1 studio that has combined the color and stroke studio. The serif team needs to break this rule of having only 1 studio open at a time in the app SPECIFICALLY AND ONLY for these 2 studios. Like, the whole serif team needs to all raise their hand up in the air and say, "We, the serif team, break this limiting ipad app rule of studios being open 1 at a time by combing the color and stroke studio so that users have a better workflow." They slam their hands on the desk and the rule has been broken for users. An override is need for this rule, for the color and stroke studio. The color and stroke studio need to combine. You know what else? For some reason the color studio and the stroke studio are specifically grouped together and are divided from the other studios. Its almost as if they work together. Like they should combine. You can not separate these 2 properties. They correlate to each other. They work together to make up an object. This is not a computer. This is an ipad we're working on. They need to be combined. Also, you know how you can 1 finger gesture over the icons of the studios? Like, if you 1 finger gesture over the color studio you can change the shade range of your color. or if you 1 finger gesture over the stroke studio you can change the width of the stroke? Okay. Since youll be combing these studios that 1 finger gesture wont be available since it will now be 1 studio with a different icon. Dont worry about this 1 finger gesture feature. Its a cute feature. It would just be better to trade in this feature for a better workflow for users. Maybe you can even keep this feature by putting it some where inside the newly design combined studio? I will upload some images to show what I mean below.
-
Oh. Yeah. Youre right. I would have never known it was there. Its too hidden. I still think Noise shouldnt be there. It should be its own noise fx effect.
-
Why is Noise in the color studio? I think it so weird to have it there. Noise isnt a property of color. Its an effect. Its an effect that can be applied to an object to give it a grainy, noise effect. Noise isnt even in the color studio of AD on the desktop version. Why even have it here in the color studio? Ive never needed to add noise to my color and its never been of THAT importance to add noise. I get that some artists may want to add noise to their object but they really should be going to the fx studio for that. Noise is an effect. Its not a property of color. It dosnt relate to color. Its like gaussian blur. Gaussian blur is an fx effect. It blurs your objects and it can go from 0 pixels to 100 pixels. Noise works the same way where you can add noise to your object and go from 0 to 100 percent. So noise just shouldnt be in the color studio. Its an fx and it needs to be turned into one. The serif team needs to remove "Noise" from the color studio, turn it into an fx effect, and add it to the fx studio. I did the work for you. Below is an image showing what I mean.
-
This is how adobe illustrator cs5 does it. Ive always loved it. I wish they would add all these lock icons to each layer that you can just toggle on and off.