Glyphs
-
Posts
174 -
Joined
-
Last visited
Posts posted by Glyphs
-
-
Yes, sorry, I meant "Text Styles".
-
2 hours ago, dominik said:
Hi @Glyphs,
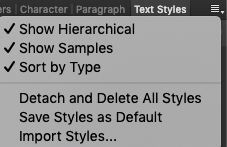
look at the top right side of the Styles tab. There is a little menu (three horizontal lines with a small triangle pointing downward). This is where you manage Styles Catogories. Those are the equivalent to groups.
Cheers,
d.Here is a screenshot of what I have. Is there a way to create a folder or a new category to put specific styles in it?
-
For now, I am only using Publisher to paste text I already created in a text processing application, but it would be easier if I could create the text directly in Publisher. For this, I would need a text processing environment directly in Publisher, like in Adobe PageMaker. Is it possible to implement such a function in a future release?
-
I am trying to sort the styles I created, group my own styles, and separate them from the default ones, but I don't seem to understand the logic behind it. Is there a way to create a Styles folder and put styles into this folder in the Styles tab, for example?
-
5 hours ago, walt.farrell said:
I don't know what InDesign has, but Publisher already supports Styles for Text Frames.
Set up the Text Frame the way you want (font, font size, alignment, any other Text Frame properties you want). Make sure it's selected in the Layers panel. In the Styles panel create a new style based on the selection.
Rename it to something appropriate, and later you can drag that Style onto any other Text Frame to give it those same characteristics.
I have been trying this with the newest version of Publisher, and managed to select a frame, and create a Text style. It looks like the new Text style is a copy of this frame's Text style. I am trying to grab it and put it onto another frame, but nothing happens.
-
Is it possible to set the Top Align, Center Vertically, Bottom Align and Justify Vertically options in a Text Style?
-
4 hours ago, walt.farrell said:
Yes, Publisher ships with French dictionaries, including a hyphenation dictionary.
You can have any number of languages within the same document. The spelling language used for any string of text is controlled by the Language setting in the Character Panel, or by the Spelling setting in the Language section of the Text Style applied to the text. The hyphenation for any string of text is controlled by the Hyphenation setting in the Paragraph Panel, or by the Hyphenation setting in the Language section of the Text Style applied to the text.
OK, but is there a way to have 2 languages applied to the same style, when the same text contains a phrase in English and another phrase in French, for example?
-
Thanks! I didn't notice it was already here. 2 other questions: Is the French dictionary available yet, and is there a way to activate both French and English dictionary at the same time for the same document?
-
Is there a way to set Hyphenation settings in another language than english, so that the words are cut at the right places?
-
Is there a way to have the TOC refresh automatically when pages are added to the book, by the way?
-
Thank you for your reply! The TOC being at the end of the book, it was only a matter of checking the "Include entries before TOC" section.
-
It seems I have trouble creating a Table of Contents. I am following the video, but I can't manage do to it. I have created text styles for the titles set to appear in the Table of Contents, and applied it to the titles. To create a Table of Contents, I click a text frame, then use the command Insert Table of Contents. It opens a tab in which I can check the styles of the titles I want to appear, but even when I check the right entries and update, the result is always "No table of contents entries found". Is there something else to do?
-
Strangely, it seems to work. At first, I tried to type "Page" in the same text field, but I had the same problem as with "10": All the letters were in the same place. Then, I created another text frame entirely, and it works, either with "Page" or with only the page number. I don't know where that bug came from.
-
3 minutes ago, Old Bruce said:
No problems here on Mac. Are you Mac or Windows? Is this on a master page or are you placing them on each page? What font and paragraph settings do you have (Left Centre Right, space before after, text offsets, etc)? Any offsets in the text frame? Snap to grid on off? Same with baseline grid? Text wrap applied to anything?
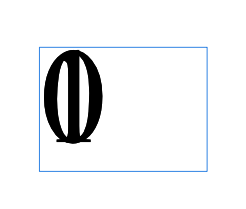
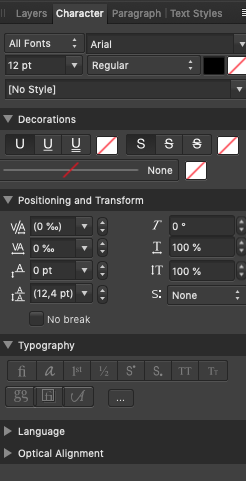
I am using a Mac. I put the page numbers on a master page, and everything is working fine for each page until page 10. Here is a screenshot of Page 10's number. The font is Arial Regular 12pt. The Paragraph Setting is Left Align, with no space before or after the text. I included two more screenshots with the settings, but I left everything as it were. No text wrap applied.
-
Inserting Page Numbers works well until Page 9. Then, when a number is composed of 2 digits, the 2 digits are written in the same place, whatever the size of the frame, which gives for some strange page numbering. Is this a bug or are there options to change this?
-
A little slow, but it works. I was able to open Affinity Publisher while the update was being installed, without any error message, though. I force-quit it, so I don't know what the result would have been.
-
I am trying to use as less files as possible for comic projects using the same pages (digital/print editions, reprints, trade paperbacks, revised editions, etc.), and I think one of the ways to do this would be to have the option of grouping Page thumbnails into folders, and having a check box beside each page and folder. This way, we could just check the pages to export in a project before exporting it to PDF for example. Would it be possible to have such an option in Affinity Publisher?
-
Wow! That's great! I can see where this is going, and it was unexpected even though I'm now used to open Designer documents in Photo and vice-versa. Now, instead of trying to import images I worked on in Photo, I am trying to find a way to create a book with the whole layered images. Now, it's only a test, since the resulting 20+-page Publisher file size will be too big, but I am going to try it anyway, just to see what kind of workflow I could create. Now is there a simple way to take several layered Affinity Photo images and put it into Publisher as pages? So far, the only way I found is to copy and paste all the layers of a Photo into each page, but it's like creating a duplicate of each Photo file. It does work, but it's not very practical. Also, is there a way to just link the Photo and Designer files to the corresponding Publisher pages, which would mean having for example a Photo file with all its editable layers in a Publisher page, editing it, then opening it in Photo and editing it again, etc. all the while avoiding to duplicate the Photo files, and keeping the Publisher file size as low as possible?
-
Ah, I finally understood what you meant, sorry about it. Everything is working as long as we adapt to Publisher's logic, actually. I will have to erase the image frame in the Master, and add frames directly in the pages. Having a way to have a frame content change in every page would have been great, but I can wait for a new version:)
Just another question: Is there a way to add a fill layer, or better yet, a background color to a master page or a page? For now, I am adding a rectangle in the background, but its dimension doesn't change when I change the page format.
-
It seems likes a good idea, but I still have problems placing the images as I did the first time. Whatever the page I am choosing, Master or Page, it seems the Place tool is only created images in a new frame at its original resolution. Is there a way to force the Place tool to display a preview when I hover over a frame, then place the image inside the frame using the frames horizontal or vertical dimensions to adapt to the frame?
-
Yes, having the Master selected was only a mistake (one easy to make, since you have to double-click a page thumbnail to select the correpsonding page). What I need is to have a Master page with an Image Frame in it, and to change the content in the associated pages. Creating Comics would be a lot faster this way.
Hiding items in a page doesn't seem too practical. I'm pretty sure I would make a lot of mistakes this way, without understanding immediately where it's coming from. It there's no way around this, better not to create master pages in this case. Placing guides on a Master Page seems more practical, if it's the only way to do this, but as we're still in Beta, maybe Serif can find a way to allow us to create image frames on a master page and change the content only on the corresponding pages.
Not sure where to add the following comment, since it has to do with all the tutorials instead of only the Affinity Publisher ones, but here goes: Adding RSS to Affinity Spotlight was a great idea that saved me a lot of time. What would save me even more time would be to add RSS to the tutorials too. This way, I would know immediately when a new tutorial is available. The only other way to stay up to date is to connect to the tutorials page every day, and I am loosing enough time as it is on my computer these days. I believe having every news in my RSS reader is part of the solution, so it would be great to have RSS in all the relevant pages of the Affinity site, especially tutorials pages.
-
I don't know if this would qualify as a bug, but I have a technical problem with the placing of multiple images. Here is how I do it when I try to create the pages of the latest issue of my comic book series: I create a single page master with an image frame on each page. The image frame is taking the whole of the page, minus the margins. Then, I click the place Tool and select all the images at once. The first time I hover the place tool over a frame, there's a preview of the image with a size adapted to the frame, which is great. So I click the frame, and the first image is placed inside it. Then I realize that I actually selected the Master instead of the first page… and the troubles begin. The same image has been placed on all the even pages, so I Undo, and everything is back to normal. But the first image has now disappeared from the Place Images list. It seems there's no way to have it back in the list, nor to cancel anymore. No matter, let's begin with page 2 then. Logically (in my mind, at least), if Page 2's image is the next selected image in the Place Images list, the process would be the same. Not anymore. Now, there's no more image preview when I'm hovering the cursor over the image frame. And when I click the frame, the place tool create a new image frame with the image at full size in it. Same thing with all the other images. Is there something I didn't understand about the process?
Plus: Is there a way to select for example 20 pages at once in the Pages Tab, then select 20 images with the Place tool, click an image frame on the first page, and have all 20 images placed at the same format (adapted to the frame's size, in my case), in all 20 pages ?
Also: To select a Master or a Page, you have to double-click it. It would be a lot simpler to select it with a simple click, and to not have the Master and the Page selected at once in the pane.
-
Still no way to save Interface Layouts? I just updated Affinity Designer & Photo to versions 1.6, and both my custom interfaces are gone, replaced by the default ones. Saving Interface Layouts would help, at least in this instance.
-
Hi Glyphs,
You can already do this in Affinity apps. If you are in Photo go to menu File ▸ Edit in Designer... and vice versa to switch the document between apps.
Great! Believe it or not, I totally forgot that there already was a command for this:) I'll rephrase what I wrote then: Is it possible to have the Edit in Designer and Edit in Photo commands as Persona buttons? It would be even faster to switch between Apps this way.


Text Styles Settings
in Feedback for Affinity Publisher V1 on Desktop
Posted
I meant "Text styles", but you seem to have answered the question. I know how to create Group Styles, and I did group a few styles by mistakes. The thing is I don't really know how I did it (beside creating a group style based on an existing text style), nor the logic of it. Is there a way to create a group style so that all my customized text styles are in it? Can I do this for character styles and paragraphs styles separately? Is there a way to create subgroups inside a group?