

David in Яuislip
-
Posts
1,404 -
Joined
-
Last visited
Posts posted by David in Яuislip
-
-
I don't use Designer but this can be done in Photo
Images grouped then Live Perspective layer, nothing rasterised
-
The scabby lines highlighted by the red were attacked with rectangular marquees and Edit/Inpaint. Then cut the lot out with a pen rather than raster deleting. There's a path in the attached file. It's a bit brutal and may not be anatomically correct but given the %upscaling......
-
There is no universal answer
Using Publisher I think your easiest approach would be to construct a page sized to suit the highest target resolution especially for photo's, export to pdf and tell your readers to use a reflowable reader such as Adobe PDF Reader and its Liquid Mode. It's very good although it mullahs the layout a bit and images tend to get resized so experimentation will be required.
On small devices like 'phones people will have their own requirements for eg font size, it's impossible to get the same appearance on every device
Otherwise write it in html making sure it's responsive or use LibreWriter and export as epub -
My previous gradient map was sloppy as the stop points between the regions didn't coincide so I fixed that

Now this below shows both of them over a sort of spectrum gradient. Exporting the exact gradient I got 8 colors rather than 6 so at great risk to my sanity I scanned across the bands and the figures show the results. The bands with 2 numbers have 1px wide strips spoiling the effect, only forensic scientists and nutters will notice, normal people are immune. As lacerto notes, a posterise layer is needed and it is all very tedious
Colours counted thus:
magick Greys-6exact.png -format '%k' info:
'8'
magick Greys-6exactPosterised.png -format '%k' info:
'6'Happy friday!
-
You can export slices at canvas size with the slice in its proper position by
Export as psd then use imagemagick
magick input.psd output%d.png -
Photo method for files containing only one pixel layer
Open the file
Delete pixel layer
Make a square from top left to somewhere, use the transform panel with aspect ratio locked and type sw/3<enter> in the width box
Run attached macro
With gradient tool select bitmap
Move the gradient thingy from top left to document centre
Adjust right handle until it touches spread on the right
Use Export personaHowever, as it's for online I would get the browser to do the work
You may be able to use css clip-path, you can certainly create svg images with different clipping paths linked to a common file
e.g. for images 900x900, instead of ten files you would serve one 2700x2700 saving nine server calls
Affinity can't do it but Inkscape can")
-
If you can demonstrate that the Photo correction is different for the same lens used on a full frame body and a crop body then carry on trying to modify the profiles to cope with both. I think that it would be a pain to select the right profile during development but then I'm not doing it.
If you are serious about lens correction I recommend a trial of PhotoLab. I use it with Viewpoint, it's easy and produces superb results. If I only had Affinity Photo for raw development I would go back to shooting rgb files from the camera
Hopefully a Serif expert will be along soon
I have nothing further to add, good luck -
2 minutes ago, walt.farrell said:
I'm curious why you're sharing it as a .psd rather than an Affinity format such as .afphoto.
Gotta think of the forum server space
8,533 GradMap.afphoto
4,618 GradMap.psd -
Try a gradient map, a little fussy to create but you get to choose where the tone splits are rather than rely on posterise which I've never had much luck with. The gradient map is in the psd as they can't be exported, at least I don't know how to
-
Your previous raw for the EF 28mm shows conflicts in the exiftool report:
Cropped Image Width : 3960
Cropped Image Height : 2640Focal Length : 28.0 mm (35 mm equivalent: 27.2 mm) -- my note: 27.2/28=0.971
Scale Factor To 35 mm Equivalent: 1.0Sensor Width : 3960
Sensor Height : 2640
Sensor Left Border : 0
Sensor Top Border : 0
Sensor Right Border : 3959
Sensor Bottom Border : 2639I suspect that it's being caused by using the crop mode, you could ask on the exiftool forum or use Canon's raw developer and see what that shows
You could experiment by changing the lens xml to
<camera>
<maker>Canon</maker>
<model>Canon EOS 5D Mark III</model>
<mount>Canon EF</mount>
<cropfactor>0.971</cropfactor>
</camera>
<lens>
<maker>Canon</maker>
<model>Canon EF 28mm f/1.8 USM</model>
<mount>Canon EF</mount>
<cropfactor>0.971</cropfactor>
etc
</lens>but I think you'd be wasting your time and this would screw results using the same lens in full frame mode
35 mm equivalent is only stated as a convenience, I doubt that any software uses it so whether it's right or wrong doesn't matter
As it's a full frame lens on a full frame body I'd use a crop factor of 1 and ignore metadata -
I watched the video but still don't understand what you need to achieve. The video discussed document resize, canvas resize, sharpening and allsorts
If you can state where you are starting from
are all images the same size, if so what size
source colour profileand where you need to go
destination dimensions
destination colour profile
output for print or screen?then maybe someone can help. Did you try my suggestion above using a New Batch Job, if so what problem did it cause? It may be useful if you export your macro from the macro panel and post it here.
Generally after a resize an image will need sharpening. If you use a New Batch Job to resize then you cannot apply a sharpening macro during that process, you will need a second New Batch Job on the resized images to apply final sharpening using a macro. For reasons best known to the programmers any macros applied to the images are run before the resizing
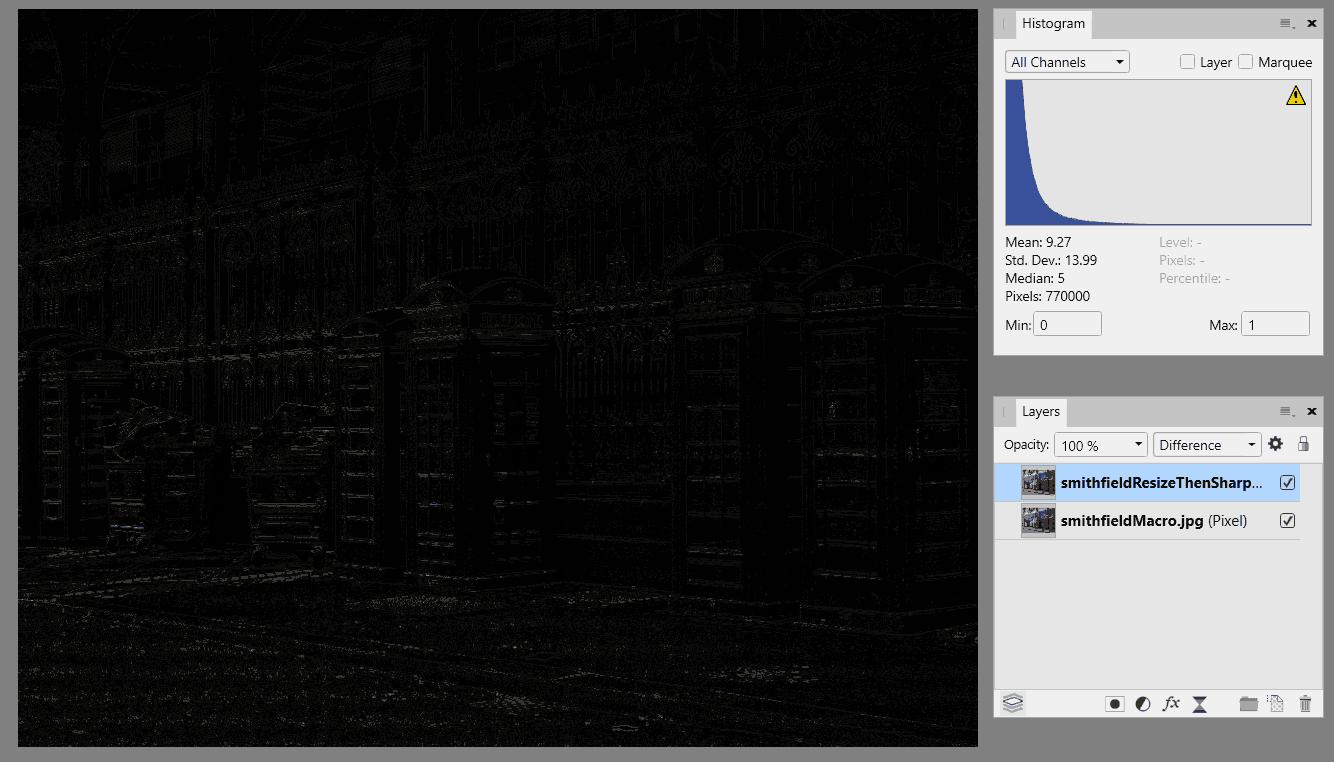
The images below were done two ways
i) resize manually and apply a sharpening macro
ii) New Batch Job applying the same sharpening macro and resizing to the same size
Stacking these two outputs and using Difference Blend mode on the top shows that they are very differentPhoto macros are pretty limited in what they can do and can be frustrating, they are not like Photoshop actions and usually imagemagick is a better solution
-
Open the file in a text editor and delete the first line
<?xml version='1.0' encoding='ascii'?>
or you can change ascii to UTF-8
-
22 minutes ago, j3rry said:
I have my macro overworked but without the option " maintain ratio " it will not work
I don't understand your meaning so I guessed
22 minutes ago, j3rry said:So I gave up ....
I certainly understand that concerning macros
If you need to do this job on various different sized images that are to be resized to 2160 high then I would record the macro to
flatten
convert format/ ICC profile
duplicatebut use it in a New Batch Job where you can specify either height or width with the A box ticked
-
-
-
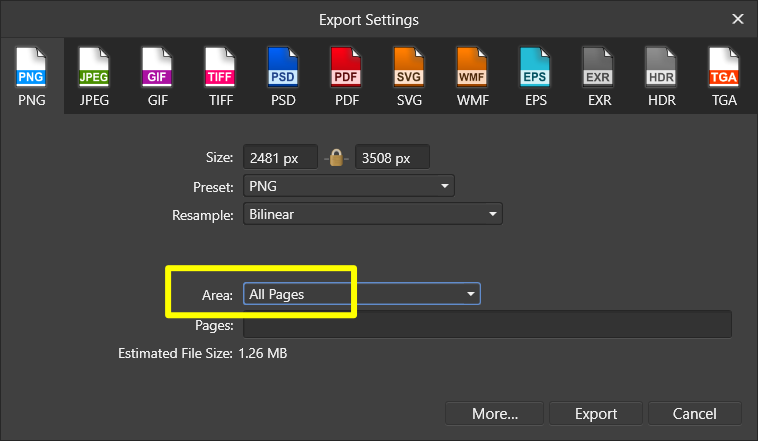
Make sure All Pages is selected in the Export dialog
Here I have a file PhotoWords.afpub which has 3 pagesAfter export 3 files are shown
dir /b PhotoWords*.png
PhotoWords_1.png
PhotoWords_2.png
PhotoWords_3.pngCannot help with the font problem
-
Affinity csv import doesn't allow sep=; at the top. I tried it earlier to test here but it assumes there's another record
name;date of birth
"John Doe, xyz";"15. September 2015"
should've worked, as it doesn't I would check the encoding, if it's not UTF-8 then convert it, if it is then I give up
Tsv might be an alternative but I've never got that to work -
String fields with commas must be enclosed within quotes.
LibreCalc does this automatically but there are many flavours of csv, it should look like this in a text editorname,date of birth
"John Doe, xyz",15. September 2015
"Bill Smith, abc",29. November 1963 -
3 hours ago, blackstone said:
Ist das möglich?
Ja natürlich
You can create a customised list style
Look at what I've done in the attached file, check the style under Bullets and numbering
To use it, click with the Art text tool, type a space, assign the style
Then click again, type space and the next number will appear
If you want the units columns to align then you'll need more styles but that's probably a bit fussy -
-
My use of Latin was limited to quod erat demonstrandum and I don't use that much these days
Accipio auctoritatem tuam - fidem Google -
My previous experience with hyphenation dictionaries in the user area is that they have no effect
The program comes with hyph_la.dic as Mike notes
It's the only file in C:\Program Files\Affinity\Publisher\Resources\Dictionaries\laI have added la.dic, la.aff & hyph_la.dic to C:\ProgramData\Affinity\Common\1.0\Dictionaries\la\
I created a new style based on Body but with the Language and Hyphenation set to LatinAs standard the word suspiramus hyphenates thus:
su-
suspi-
suspira-
suspiramus
After adding sus5p5iram5us to user hyph_la.dic it now does this:
sus-
susp-
suspiram-
suspiramusQuid mirum
But apart from that is it correct to hyphenate Latin at all?
The language was pretty dead by about 700 AD and Gutenberg didn't print his Bible until 1455 -
I create a circle and duplicate it
To the bottom circle I add art text
Same for the top circle
Now I can only select the top text unless I turn that layer visibility offIf I change the order of the text layers then I can select either one with both layers visible, no need to keep changing the layer order
Same behaviour in V1 Photo and Publisher -
4 hours ago, JohnnyV said:
Mac Photos app
I think that this is displaying the embedded preview, you'll have your work cut out getting this result from the raw


Develop Persona, Quality for CR3 RAWs (noise, details)
in V2 Bugs found on Windows
Posted
As a famous bloke once said, "If Photo were the only raw processor available I'd go back to shooting rgb files from the camera"
Oh wait a minute, that was me
Here's an alternative approach not using "Canons secret IP of its own lenses."
All defaults, no effort from me
Can't upload jpgs today so it's zipped
069A2634.zip