GaryLearnTech
-
Posts
298 -
Joined
-
Last visited
Everything posted by GaryLearnTech
-
Hi Kate Another +1 for the RSS feeds! I have enormous respect for Affinity, but am a little surprised that the decision not to implement RSS feeds was even considered, never mind actually allowed. It's still a basic core technology that underpins large parts of the web – including these forums! Pretty please?
-
 > If so, what can software(s) can produce, handle/stitch, create Spherical (360) Panos?? A whole bunch of years ago now - back when I was still seriously interested in "proper photography" - I had AutopanoGiga from Kolor for some very fancy pano stitching. The company is still active (having joined GoPro in 2015), so you might want to check out their offerings. From a very brief glance, their software has evolved considerably from when I was an enthusiastic user. (Checking my last installed version, I see it was dated 2011. This was around about the time they were coming out with video stitching and not just still images.) I presume there alternatives out there but, if nothing else, consider this a starting point. Hope it helps…
 -
Nothing whatsoever to do with Serif's Affinity's products really, but I came across the following resource thanks to my interest in using Reallusion's CrazyTalk Animator app. It might be the sort of thing you're looking for? http://vectorcharacters.net
-
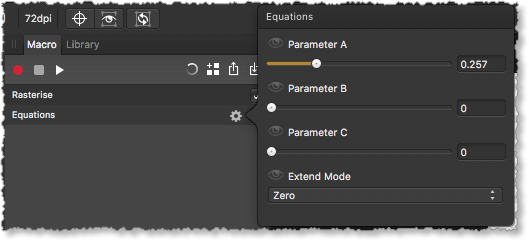
Hi John You don't say what values you're using for parameters A, B and C when you run this manually, but when I import your macro, I find A=0.257 and B=C=0.000 – see the screenshot below. That means that your equation is trying to divide two of your inner bracket terms by C=0 which, mathematically speaking, is just wrong. It should throw an error. I'm not sure exactly how AP is managing this error, but the result is that it seems your your equation is being evaluated to "y=y". The moment you change C to anything non-zero, and then re-apply your macro, the targeted layer is distorted. So it seems the problem is perhaps in the recording of the macro, that it's somehow capturing A, but leaving B and C set to zero. I've just done a quick test and it did seem to capture each of the three parameters, so I can't offer an explanation for your recording problem.

-
Sorry Bryan, I had hoped to be able to put you on the right path. This should be simple. While I am somewhat familiar with Windows, I'm primarily a Mac user. I wonder if there's a slight Windows quirk affecting your workflow? In the absence of any other suggestions yet, I've one last suggestion that would be easy for you to try. (1) Open and develop your Canon RAW file. (2) Before trying to export it as a JPEG, Save it as a native Affinity Photo document. (Save it to a different location that the source directory of your RAW file.) (3) Then, after you have established your master file, then try to Export the JPEG version… If that doesn't work, hopefully someone else might come forward with a suggestion that'll work for you.
-
I'm not sure offhand why you're getting the File Not Found error, but you're not doing what you think you’re doing. Save As will save your image as an Affinity Photo file – a bit like Photoshop saves native .PSD files. To output your developed image as JPEG, you need to select the Export… menu command, not Save As. You'll get a bunch of different format options along the top of the Export dialog box (PNG, JPEG, GIF, etc), so select JPEG and proceed from there…
-
Maybe not quite a perfect solution for your problem, but here's what I have 'trained' myself to do… Start with the keyboard shortcut cmd-0 (View > Zoom to Fit) NB that's a zero, not the upper case 'oh'. Commonly followed by, in my instance, cmd-1 (View > 100%) - though one of the other zoom options might suit you better, depending on pixel dimensions and DPI. I use the Magic trackPad - I don't much like the Magic Mouse - and I use this pair of shortcuts not because I'm chasing the image around the screen like you are, but because I'm maybe finished editing while zoomed into one area and I want to reset my view before moving to the next area. I use this frequently and am happy with it until Affinity can perfect their psychic interface…
-
> bottom: click this icon to place a sampler and readout the color under the sampler. > BE AWARE! - the sampler will be placed at the top left corner of the document - > you can then drag the sampler to the desired location on the image. > The top left corner is where every new sampler is created, unlike PS where the sampler gets placed on the location you click. @kirkt There's a small trick here you might be missing. Instead of clicking on the colour sampler icon to have the sampler appear at the top left, the tool has another option. Drag-and-drop the sampler onto the image. You'll be given a small loupe tool which can aid your initial positioning (although I sometimes find it actually gets in the road and makes the task fiddly). Release the mouse button when you have the sampler in position. The sampler's position can then be fine-tuned in the normal way by dragging (or by going back and drag-and-dropping from the Info panel again if you find the loupe tool useful).
-
Hi owenr. I enquired about a month ago if this feature existed but, after trying it, wasn't really satisfied with the Develop Persona response for my use, which is the old "scan all the old family photos from 40-60 years ago and stick them up on a web gallery for sharing" project. On Sunday evening (remarkable timing, eh?), while following another topic, I came across a post about the Blend Options and dug in a bit. I had a lightbulb moment when I realised I could do what you have illustrated here. What I did though, to warrant this me-too post, is I came up with a macro (attached below) which generates the same layer grouping you have done in your sample file. The only serious problem with it is that I can't currently set two different colours. Both layers were recorded with 0/255/0 green and I have to manually set the second to, for example, 255/0/0 red. The other slight difference from your solution is that I set my Blend Options parameters to show shadow clipping in the range 0-1% and highlight clipping in 99-100%. I hadn't realised that it would accept values with decimal places and simply used integer values. However, since my images are 8-bit/channel, that threshold corresponds to the top or bottom (1/100)*255=2.55 levels - and I think can happily live with that for my current project. (I can see how you'd want better granularity with 16-bit/channel images.) Hopefully my sample macro will allow anyone to recreate their own version with different threshold values, if you like the convenience of a macro and other values suit you better. I haven't bothered with the 1.6 beta, but I hope it will allow improved parameter capturing when producing macros. Fingers crossed! SHOW Highlights & Shadows 1%.afmacro
-
Handy keyboard shortcuts to access channel controls for Levels or Curves adjustment layers? Ooh, yes please!! Please! PLEASE! I wouldn't complain if they weren't set initially (cmd-1, cmd-2 and cmd-3 are already set by default to View 100%, 200% and 400%, as far as I can see) but having the option apply my own choice of modifiers would be great. And if we could get that, being able to control the display of the corresponding Histogram channels in a similar manner (by adding, say, the Opt modifier to whatever a user chose for the adjustment layers) would be the icing on the cake!
-
no TEXT icon
GaryLearnTech replied to chuckg5's topic in Pre-V2 Archive of Affinity on Desktop Questions (macOS and Windows)
When you're in View > Customise Tools… mode, your tools display will change to something like the screenshot below. (On my Mac, I've deliberately made my window very small for this - yours will look slightly different, but the left hand region should be similar.) The Number Of Columns setting is in the lower left corner, as highlighted: After setting your new view, click the Close button that is located to the right of the columns pop-up menu. Cheers, Gary
-
Record a macro with your USM and save it to the library. Then run a batch job, applying the macro to your chosen images. See these two short videos for more details… 1 Macros 2 Batch Processing with Macros
-
Hi SigsCreations - I saw your request and recalled seeing this first video recently - it should give you a basic answer for bitmapped patterns. When searching it out, I came across the second one which looks like it might be useful too. 1) Affinity Photo - Seamless Textures 2) Affinity Photo - Clone Sources: Texture Creation Cheers, Gary
-
Hi MBd - I know that one, but thanks anyway. (My last version of Photoshop was CS3 (from 2007, wow!), which finally gave up the ghost something like three or so years ago. I suspect the Levels trick was old even when CS3 came out.) I agree, it's a really, really useful trick – and I share your frustration that it's missing from Curves.
-
Hi jhoy Great, thanks very much. I hadn't thought to look there. I've not picked up a serious camera in a long time, so the total time I've spent in the Develop Persona up until now is vanishingly small. Also, the majority of the images I'll be working with over the coming weeks will be produced from my scanner – not even a camera. Pity there are no keyboard shortcuts or even just the ability to record the required clicks in a macro but, apart from that, it looks as if it's what I was looking for. Right - onwards and upwards!
-
No idea if this will work or not, but I noticed it earlier - and it'll cost you nothing to try… Preferences > Miscellaneous > Reset Fonts Worth a shot, especially since you've described having used the font with Affinity Designer projects in the past…
-
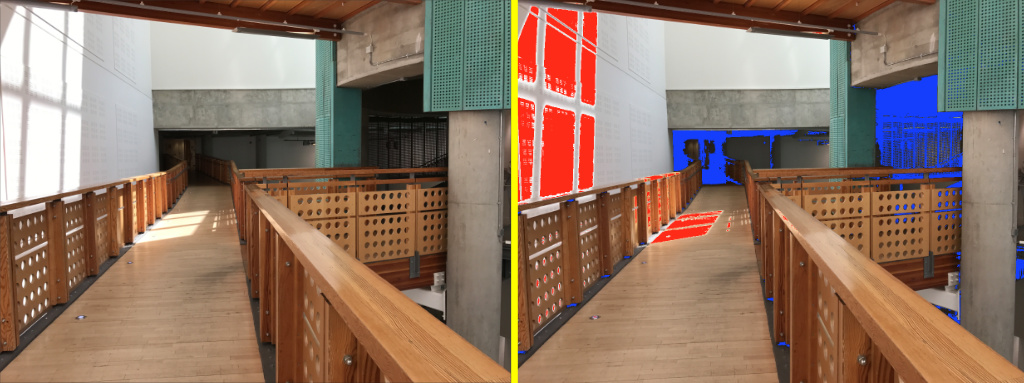
Hello All. Long time lurker, now trying to get a bit more serious with the current production version of Affinity Photo on my Mac. Apple's Aperture has a "Show hot and cold areas in your photos" viewing mode. It's a convenient way to highlight areas at the extremes of exposure, allowing you to pull back adjustments just enough, for example. Is there a similar viewing mode available in Affinity Photo? I've had a look and I don't think there is anything close to this - but I'd love to be proven wrong! Here's a quick with/without example. On the right, the red indicates areas which are blown out and the blue shows areas of near total darkness. Cheers, Gary