paaljoachim
-
Posts
27 -
Joined
-
Last visited
Everything posted by paaljoachim
-
 There are so many concerns and reasons why something does or does not happen. Heck. We got it in 2.1 and that makes me happy! :)
 -
YESS!!! Awesome! Finally! Thank you for posting @Kevin Teljeur and letting us know about this!
-
This issue has come up in the regular Affinity Photo as well as in the beta. I am on OSX version 12.6.3. I open a large image for instance jpg (size does not mater but I have an image that is 5154pxx3436px). Go to Export. Click into the first Size box. All the numbers and px is marked. Sometimes this happens. I begin pressing numbers on the keyboard and only the first number is seen and the rest of the numbers are not added to the Size box. Other times it acts just as it should. I will need to come back here and give a more to the point description of what I notice. The difficult part is that I have yet to understand why clicking into the first size box that sometimes when I press the keyboard that the numbers are added and other times these are not added into the size box.
-
I appologize for butting into this thread.... What about adding a feature to rotate the canvas/document by numbers giving a higher flexible way to rotate? I find the rotate by scroll wheel confusing as I have it happened a few times without wanting to do so. As currently we just have rotate 90 anti and clockwise. Having more flexibilty through the Document menu above or below the current rotate 90 would be helpful.
-
Retesting Using beta version 2.1.0 (1781) Jpg file on the desktop OSX. Affinity Photo open. Dragged image onto the Photo icon in the dock. Renamed image on the desktop. Dragged the renamed file onto the Photo icon in the dock. It opened in Affinity Photo with no problem. Renamed the jpg on the desktop another time. Dragged that onto the Photo icon in the doc. Image was also added to Photo. The bug has been fixed! Thank you! This thread can be closed.
-
Hey I noticed this bug in the latest beta as well as in the regular version of Affinity Photo. Environment: OSX: 12.6.3 Affinity Photo standard version: 2.0.4 Beta version: 1769 The bug: Open Affinity Photo. Drag and drop an image file png or jpg onto the Affinity Photo icon in the dock. Notice the image show up in the program. On the desktop in OSX rename the same image file already added to Photo. Drag and drop the renamed image file onto Affinity Photo icon in the dock. Notice the OSX beach ball. I had to force quit the program. I right clicked Photo in the dock and selected Force quit. If needed I can always create a video.
-
Testing version 2.0 of Affinity Photo. "Holding down the spacebar should move the marque." This feature has not yet been added. I will just assume that it has been overlooked and that we need a staff person to add it to the list to add it to the next 2.x version.
-
I am using OSX 11.6.1. Affinity Photo version: 1.10.4 I had a similar weirdness as well. Mine had a huge blank square be created when I was drawing a rectangle with the rectangle tool. I tested... I went into Preferences -> Performance and turned on the Hardware acceleration: Enable Metal compute acceleration. Restarted the app and now the Rectangle tool works again as it should. I also turned it off again and restarted and the Rectangle tool still looks to be working fine. There seems to be an initial hickup that did some weirdness. It looks better now. I will report back again if it shows up again.
-
Hi Bruce Ahhh yes. Thanks for sharing. One can create a marque selection area and move the cursor inside the marque and move the selection around.
-
The way I usually create a screenshot on the Mac is like so: 1. Hold down shift+cmd+4 2. Drag the cursor around the area where I want to take a screenshot. 3. Let go of above shortcuts. While the left mouse button is pressed I hold down the spacebar to move the marque/selection. I let go of the spacebar to adjust the size of the marque/selection. In Affinity Photo (perhaps also the other software from Affinity...) The process of creating a marque section. 1. I click the Marque tool. 2. With the cursor and left mouse button held down. Drag out a marque selection area. 3. There is no step 3. It would be nice to be able to hold down the spacebar to move the marque selection around. The option to create a marque selection to make a screenshot on the Mac is better then creating a marque selection in Affinity Photo.
-
What is good about our discussions here is that it can add onto the internal discussions Affinity has with their testers. From what your saying I believe that your saying that one could remove the left sidebar area as well as the top header sections. Then have the header sections starting with Most Recent, then All "Web" Templates, below that All "Print" Templates, then below that All "Photo" Templates etc. It would make for a very long page which one would need to scroll through. Another approach would be to have the tabs in the top with each section. Click for instance Web. Then have it show up as your showing in your wireframe. With most recent in the top and the rest seen below.
-
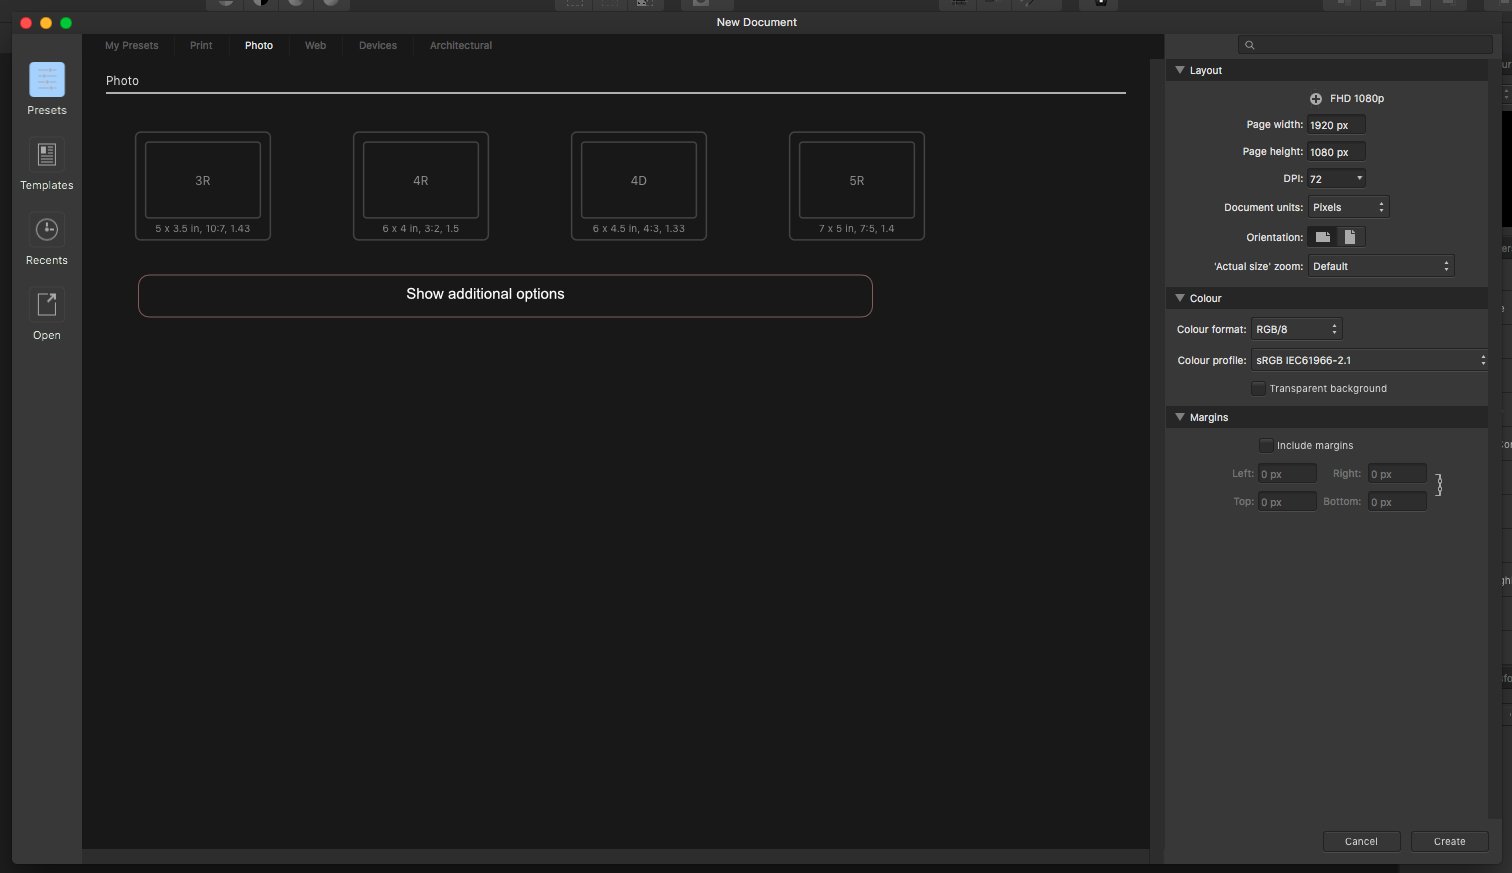
The only thing I would like to change about the beta My Documents is having the 4 most recent in the top of each section (section = My Presets, Print, Photo, Web, Devices and Architectural as can be seen in the wireframe I posted in the initial post). The user clicks to expand for additional options. Do please go into more detail of what you would like to see. As the more details you give the easier it can be to visualize it. I might also create a wireframe out of it.
-
@fde101 @KipV My thought is that the 4 options that are seen in each section are the ones that are most used (recently used) options. If the user needs to use something the user has not used before/recently then he/she can click the "Show additional options" accordion to see the rest of the options for the specific section. Then click one of the options. The next time the user opens the New Document screen and goes to the specific section one of the 4 options would be the one she/he used the last time. This way each section would show 4 initial visible options and the rest one can easily click "Show additional options" to see. The 4 showing the recently used or if none of the options have been used before show the most likely used option. This way one will always have the recently used options showing in the top of each section. One would not be distracted by all the other options present. As there are so many to choose from one can easily get distracted and loose focus. I hope that makes it more clear @fde101
-
Content Aware Fill
paaljoachim replied to Cecil's topic in Feedback for Affinity Photo V1 on Desktop
Transparent pixels after a crop is something I have never really understood why happens. (Photoshop CS6 has the same problem. I have not yet noticed it in Affinity Photo.) It really should not happen in the first place, and should have an auto fill of closest pixels to fill in the gap that can happen. -
duplicate document
paaljoachim replied to Eric5's topic in Feedback for Affinity Photo V1 on Desktop
The other day as I was working in Photo I missed having a simple way to duplicate the document. Duplicating document menu option is a feature I would also would like to see added. Btw I am a brand new user and noticed a lot of things when I made a wireframe a few days ago. Specific methods I am used to from Photoshop that I tried in Photo. I will go through again and add a few more treads in regards to some of the stumbling blocks I met. -
I made a thread about this as well (before I noticed this thread)! It sure would be very helpful to have this featured included. It is very helpful to be able to as one creates a shape/marque/etc to hold down the spacebar to move the in progress selection around.
-
Then it is about time this little but important usability feature is added to Affinity Photo as well as Affinity Designer and Publisher.
-
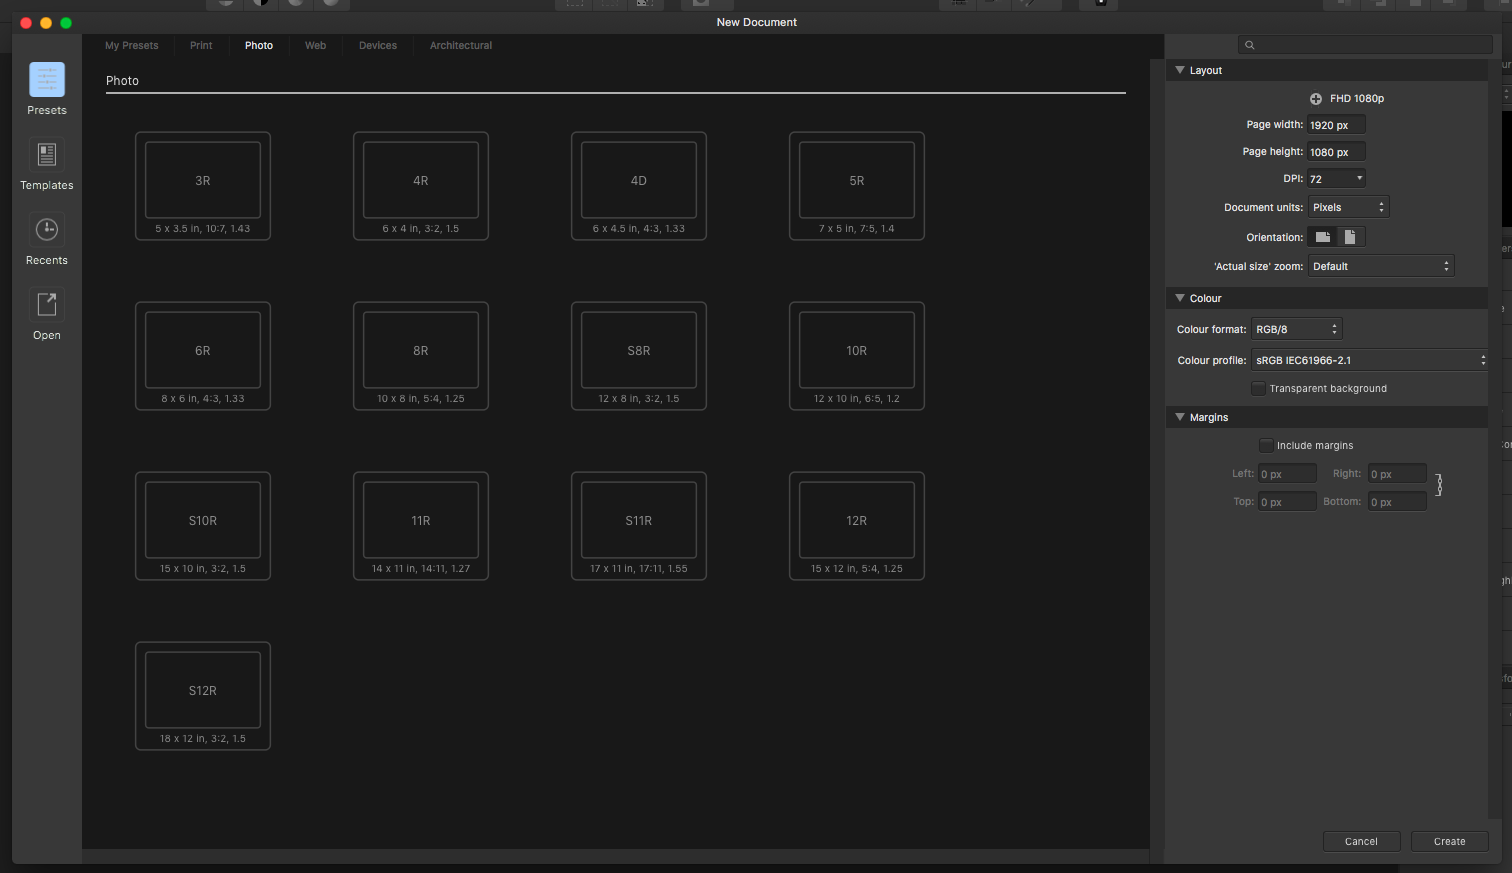
Hi Here is a comparison. Version 1.7.3 - New Document screen. Version 1.8 - New Document screen. In the old version: options are hidden in drop downs. In the new version: all options for a specific category are seen. I would suggest something in between the old and the new. As showing 13 options in Photo, 16 options in Web etc can be a bit overwhelming What about doing something similar to the below. Show the most used (or what you think are the most used presets for each category). Then have the top 4 options change for each category based on what the user over time uses. Having something like I am showing above will make it easier selecting a preset to go with. Seeing 4 options in comparison to 13, 16 or more is a lot easier on the brain. Kinda like going into an ice cream bar. Giving the option of 4 flavors compared to 16. If one does not want any of the 4 flavors one just moves over to the next area to see additional flavors. Most might go with the 4 and some will want to check the additional options.

-
Thank you for you help again Dan! @Dan C Have a great day!
-
Thanks for the feedback haakoo! Any layer that is dragged to a create new pixel layer/group/etc should automatically duplicate itself.
-
Hi It would be helpful to be able to drag an existing layer to either group or pixel layer to automatically duplicate a layer. + an additional feature would be to hold down alt and then drag a layer in the layer panel to create a duplicate. Similar to selecting a shape and holding down alt to create a duplicate shape directly on the canvas. Btw Holding down Alt when a shape is selected on the canvas should show a duplicate symbol to show that something is about to be duplicated. Existing methods for duplicating layer Right click layer and select Duplicate or Top menu: Layer -> Duplicate. Ps Ops. Sorry about that. @Dan C Hey Dan this thread has to do with Photo but might just as well have to do with all of them. I noticed I posted in Affinity Designer. This was feedback in relation to Affinity Photo. Please move it to the correct location. Thank you..:)
-
Rectangular marque. Begin drawing eks elliptical marque. Hold down space to move the marque to another position. Space bar changes the size of the shape and does not move the shape. Holding down the spacebar should move the marque. Click eks Rectangle tool. Start to draw the size of the shape and hold down space bar to move the shape. One is able to move the shape by holding down the spacebar. Conclusion any tool that draws a shape Rectangle tool, Marque Tool or anything else. As one begins to create the shape holding down the space bar should move the shape around, so one has better control over where one begins. This means the short cuts (keyboard command) for the Rectangle tool should should also be reflected in other tools. As it would keep a nice consistency in regards to similar methods/techniques. NB! 1. One begins to draw out a shape and notices one wants to readjust the starting point. 2. One then holds down the space bar to align the starting point. (moves the shape one is drawing out) 3. One then continues to draw out the shape. Having a way to adjust the starting point by holding down the space bar is a technique I have used a lot in Photoshop as it helps me to realign where the shape begins.
-
Thanks Mike! @mikew Here is a thread I found: For anyone who comes across the thread: There are no PDF's available for any Affinity Work Book. Serif has chosen not to create PDF digital books.
- 3 replies
-
- 1
-

-
- work books
- tutorials
- (and 2 more)
-
Hi I am wondering if it is possible to purchase PDF version of the various Affinity Work Books? (I did a search here in the forum and did not find any mention of it.) I ask as it would be nice to have the pdf open on one screen while going through the material in the Affinity software on the other screen. Thank you!
-
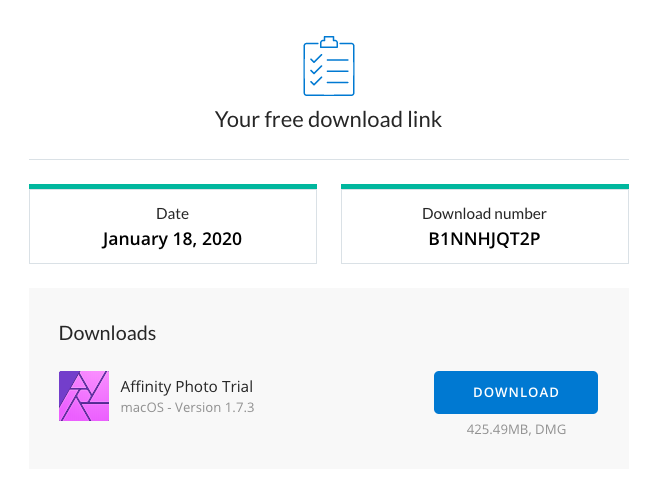
This is an old topic that I will revisit. This is what the download page looks like after having signed in. What is missing from the above is a tooltip or an accordion or something to give more information about what kind of trial this is. Is it a 30 day trial or 10 day trial? Does it start from the moment one has downloaded the trial? Are there save restrictions? One needs to know what the restrictions to the trial is. This is the information I would have liked to seen as I was going to download the trial software. "This is a 10 day trial which starts from the moment you have opened the software. There are no save restrictions and behaves just like the regular program." Here is my first wireframe creation (not just modifying colors in a photo) in Affinity Photo. Fairly basic. Based on various methods I am used to from Photoshop I am seeing some nuances that I will post about in another thread. Bottom line is: Please inform people what kind of trial is being downloaded. ps I like easter eggs in games here is one for the trial. When the timer goes to 0 days left. Have an option to add another 10 days when the user is ready to continue. This way if the user has downloaded and barely tested and forgot about it and ran out of the 10 days they get a second chance to test it out. As it can be easy to download software and test it out for a few moments, get busy and forget about it. Suddenly after a month one might say "Oooo the trial, man I forgot about it." As the user opens the trial they will see the big 0 days left, and below it the option to start the 2nd 10 day trial of the same software. Only this time the user takes the time to go through it. This time it can also mention: "This is the 2nd time and final round of testing. If you like the software you will at the end of the trial get a purchase link. Making it easier for you to purchase and get a license you can insert into the version you are running right now. Have fun." ps2. @Dan C Can you please move this if I again wrote in the wrong place? Thanks. Have a great weekend! Paal Joachim