Mbrinman
-
Posts
14 -
Joined
-
Last visited
-
 Mbrinman reacted to a post in a topic:
Designer 2 (2.5.5) - Export Persona Auto Slicing For Artboards Not Reliable (jumps values)
Mbrinman reacted to a post in a topic:
Designer 2 (2.5.5) - Export Persona Auto Slicing For Artboards Not Reliable (jumps values)
-
Thanks for the response Hangman. So, if I want to ensure that any art I create (boxes drawn, lines drawn, etc.) always use x and y values that are whole integer values, and that they snap in the same manner, what settings should I use? I thought that if I put the "User Interface -> Decimal Places for Unit Types -> Pixels" to 0, then it would force those values to whole integer values, but from what you describe, it seems that this just HIDES what the true value is. Is that correct?
-
Mbrinman reacted to a post in a topic:
Designer 2 (2.5.5) - Export Persona Auto Slicing For Artboards Not Reliable (jumps values)
-
Here are the videos directly (no external link) If you watch without audio, hopefully you can still see what the issue is (probably better than me trying to explain without the benefit of the video to demonstrate) 45569bcb-c99d-4b0e-aafd-0b2c7d80846c.webm e6e2df1a-34ac-49d4-b37c-c306e11d5ec4.webm
-
What Application are you using? Designer Are you using the latest release version? Yes Can you reproduce it? Yes Does it happen for a new document? No If not can you upload a document that shows the problem? Yes (attached) If you cannot provide a sample document then please give an accurate description of the problem for example it should include most of the following: I have provided the document where this is happening, and I've also created two screen recordings with audio: 1 - https://jam.dev/c/9058d630-cee1-4704-88d0-043e9af6e171 2 - https://jam.dev/c/582f56ec-f1d5-48f7-a196-816b255ffa2f New Alpine Peaks Consulting Full Color Logos_apn-apc-apa-apc.afdesign
-
Carajp reacted to a post in a topic:
Right-Click context menu improvement
-
Mbrinman reacted to a post in a topic:
Ruler (Measurement) tool in Affinity Photo !
-
Mbrinman reacted to a post in a topic:
Ruler (Measurement) tool in Affinity Photo !
-
Mbrinman reacted to a post in a topic:
Ruler (Measurement) tool in Affinity Photo !
-
Mbrinman reacted to a post in a topic:
Feature request: The outer shadow on its own layer
-
It's just such an intuitive method of editing existing text. I'm not one for doing things a certain way just because that's how Adobe has done it, but this convention makes a lot of sense and would be a very welcome and helpful improvement to Affinity Photo.
-
Gear maker reacted to a post in a topic:
Drop Shadow?
-
walt.farrell reacted to a post in a topic:
Drop Shadow?
-
Old Bruce reacted to a post in a topic:
Drop Shadow?
-
Drop Shadow?
Mbrinman replied to Cailean's topic in Pre-V2 Archive of Desktop Questions (macOS and Windows)
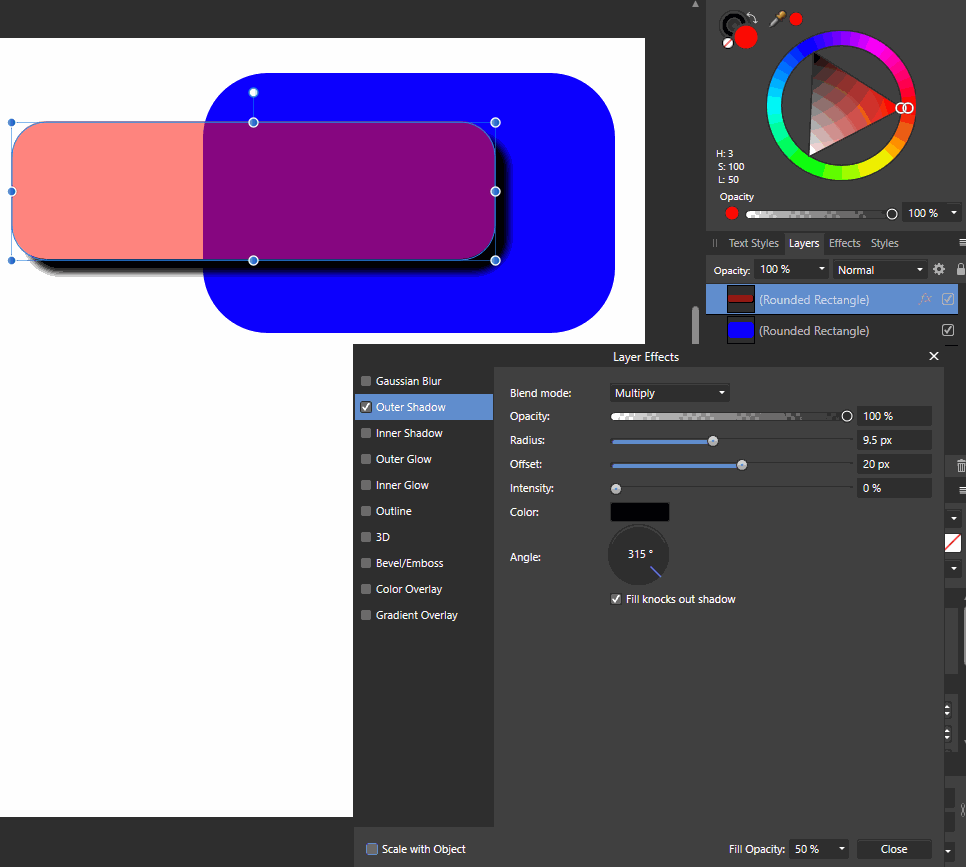
Okay, I discovered how this currently works. This could use some improvement by the programmers. When you apply a layer effect, then the opacity of the object needs to be controlled via the Fill Opacity option within the layer effects panel. So, be sure to set the transparency of the object itself to 100% under the "Color" tab if you want to apply any effects to that object. Watch the attached GIF to see how it works.
-
Drop Shadow?
Mbrinman replied to Cailean's topic in Pre-V2 Archive of Desktop Questions (macOS and Windows)
Well, that was my point. Can't I choose for the object to be transparent, and then if I want the outer shadow to only affect the edges of the object, I can check "Fill knocks out shadow" and it would block the underlying shadow from being mixed with the transparent pixels of the object? Or am I misunderstanding the purpose of "Fill knocks out shadow"? -
Drop Shadow?
Mbrinman replied to Cailean's topic in Pre-V2 Archive of Desktop Questions (macOS and Windows)
This probably isn't the right place to post this, but I wanted to share. On Windows 10, I see this same behavior in Affinity Designer, or Affinity Photo. For the "Outline" I would expect it to actually outline the object and not be applied to the entire object. But maybe this is just a bug for the Windows version of this program?
-
Drop Shadow?
Mbrinman replied to Cailean's topic in Pre-V2 Archive of Desktop Questions (macOS and Windows)
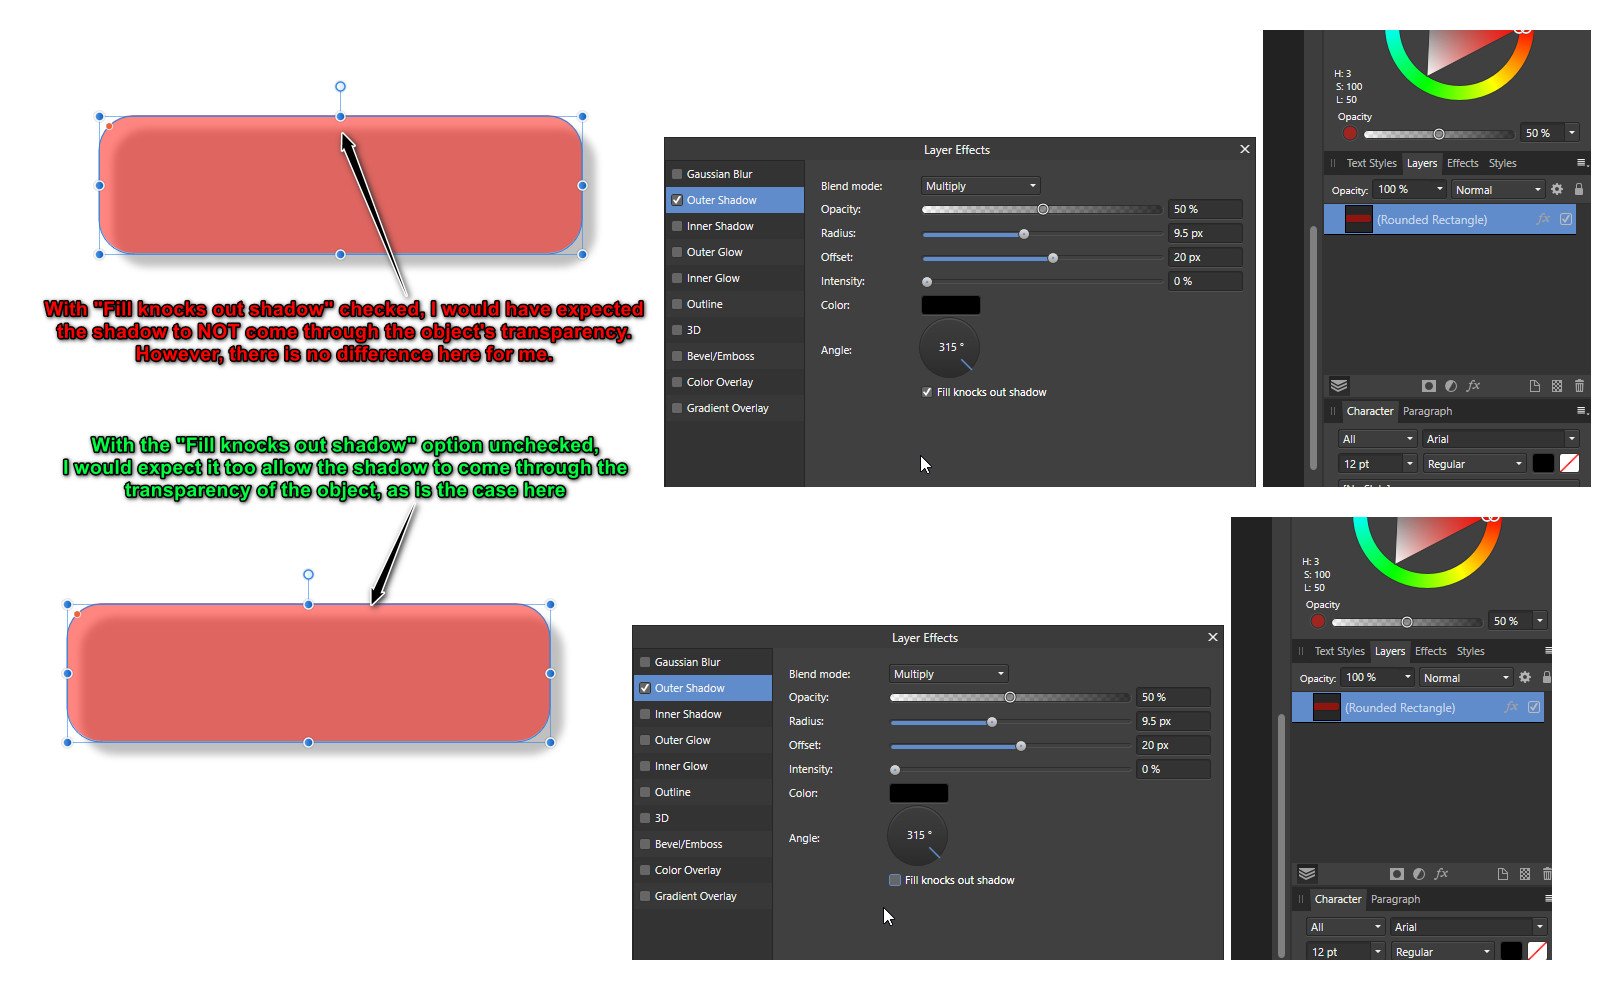
Hey Walt, what OS are you using? When I uncheck the "Fill knocks out shadow" option, I see no changes as I would expect to. My understanding is that it's supposed to prevent the outer shadow from being seen that is UNDERNEATH the object it has been applied to. See the attached image to see what I mean about it not making any difference.
-
Mbrinman reacted to a post in a topic:
Merge menu
-
Styles applied to paintbrush - unexpected behavior
Mbrinman replied to Mbrinman's topic in V1 Bugs found on Windows
Thanks Chris, good to know. But what about the "Bloodpool" style? It doesn't even have red in it at all when applied to a brush. -
Styles applied to paintbrush - unexpected behavior
Mbrinman replied to Mbrinman's topic in V1 Bugs found on Windows
Forgot to check "notify me of replies" - Couldn't find a way to enable other than posting a response to myself here. -
Is this expected behavior, or is this a bug?
-
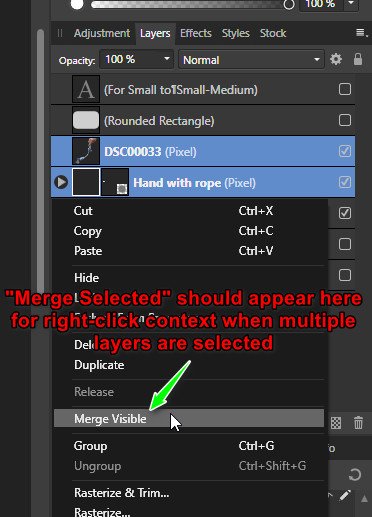
When multiple layers are selected, and then you right-click any of those selected layers, the option to "Merge Selected" should be available in that context menu. (in ADDITION to the "merge visible" that is already there. Not in place of it. I just realized my image looks like I'm suggesting to replace, which I'm not. I just want it added as an additional option)
-
@MEB - Any insights on my question I posted above?
-
I'm also coming to Affinity photo from years of experience with photoshop. From photoshop, I've gotten used to seeing the thumbnail generated within the context of the image it was copied from. Please see the screen capture below to see what I mean: https://www.screencast.com/t/ydeWPTD9zR Is there a way to change the default behavior in Affinity photo so that the thumbnails are generated like they are in Photoshop?