
AllAppsUser
-
Posts
364 -
Joined
-
Last visited
Everything posted by AllAppsUser
-
Hello @KelRao. Is this in Designer? Answer: I suspect it's NOT rounding-up. I'm also not aware of any setting for this (or for the number of decimal places available) in the preferences. - - - - - - - - - - - - - Is it rounding-up? Have I reproduced what you've done below, near enough? I drew a rectangle randomly In the Transform Studio > tapped Width Input 1.75" It rounded down (This might be because I'm in Designer - does Photo round-up?) - It showed 1.7". Now, question is: is my rectangle 1.75" as input, or 1.7" as indicated? There's no way to tell 👎 (that I know of). So (snapping on), I began drawing another rectangle snapped to one side of the first one. As I drew the new rectangle so it snapped to the other side of the first one, I got a reading of 1.75". Therefore the rectangle IS 1.75" as input. (And what a right royal pain in the proverbial carry-on for getting precise size info). The transform studio with only one decimal point is not confidence inspiring is it @KelRao, especially when dealing with inches? - - - - - - - - - - - - - - A long press with "Get Info" alongside Paste etc., would be a great solution, no? There's two issues here: Easy, quick access to info about a canvas/artboard, or selected object, and… Precision. With canvases I have to choose Document > Resize to see what size a custom canvas is (you get 3 decimal points there). With objects, the Navigation Studio does a fairly good job, but one decimal is not precise enough, especially when needing to work in inches. Topic below for info (2 yrs old), there maybe others I've not found.
-
Combining multiple shapes Boolean
AllAppsUser replied to PlayingCards's topic in Pre-V2 Archive of iPad Questions
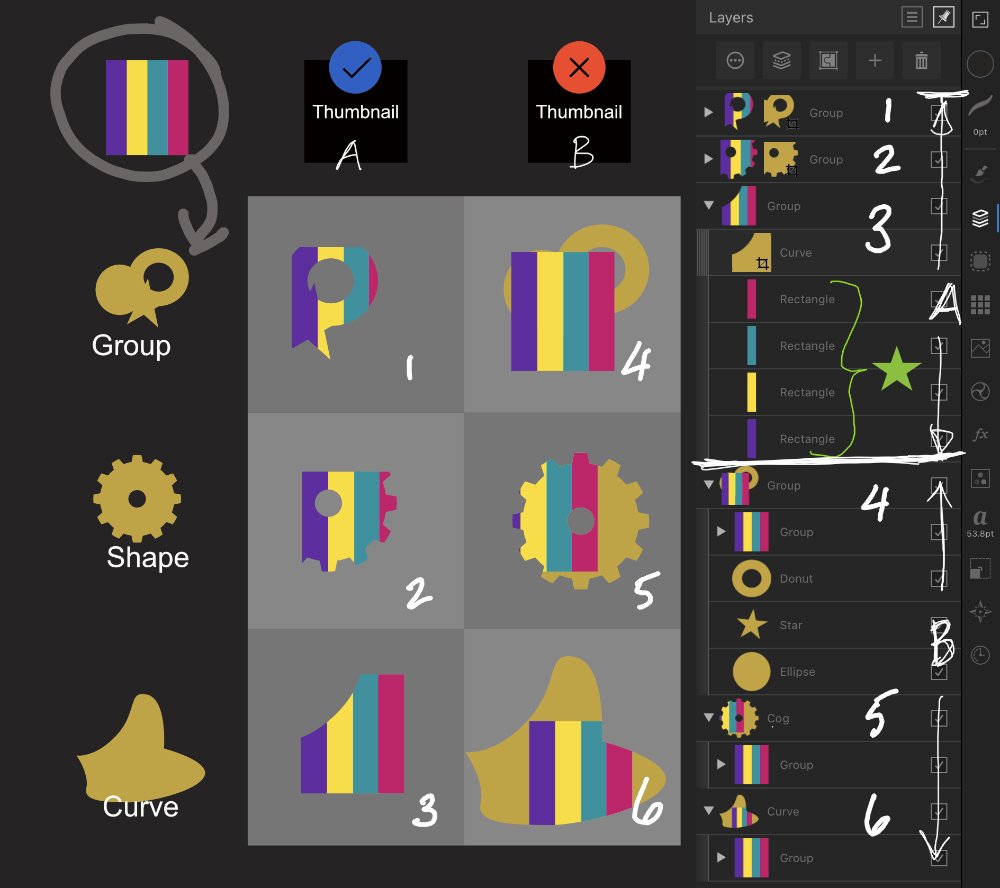
I thought about posting that very thing @DM1, strangely. It's a great graphic, and while it'll help others, it wasn't the thing confusing me. I've used masks & clipping paths for.. a long time, so feel I may understand a thing or two about them. My problem was understanding the behaviour resulting from dragging over a Group vs a Shape vs a Curve + onto the thumbnail vs not. That's 6 combinations / levers to pull - it felt a bit mind boggling. I've done a quick matrix (below). Column A = Dragging the silhouette (Group, Shape and Curve) over the thumbnail of the stripey box (a group btw). Always produces a mask. Thing to note: the stripey square ends up ungrouped. (Green ⭐ with the result opened shows this clearly). This irritates the heck out of me as I'm inevitably dragging groups into the silhouette. I don't understand the logic of breaking up the group here, but hey, it's what it does. Another note: it changes the name of the layer to 'Group'. I'm in the habit of naming my layers, so having the name wiped is also unhelpful. The advantage of masking is clear in box 1... a set of shapes (objects) overlaid will act as one silhouette. No need to Boolean (Add, subtract, convert to curves etc.,). It's powerful and I'm sure for the vast majority of people, this is the route they'll find the most useful. Column B = Dragging the stripey block instead, and NOT over the thumbnail. Creates either a bigger group, or a clipping path (It's more consistent than I feared which is good. Now I've methodically investigated the nuances of shape vs curve vs... and to thumb or not, etc.,, it's all less boggling.) Thing to note: you'll probably have to Boolean shapes, because your silhouette needs to be a single object or curve. This is how I work all the time so it's a natural part of my workflow. Another note: if you're not entirely familiar - box 4... is a group - no masking or clipping occurs. The stripey box has simply become part of the group. It hasn't broken up after being dragged, but sits logically among the other members of the group. Advantage: the silhouette (clipping path / curve) still plays a role visually, retaining its background fill and stroke. This is why it's good to think of it as pasting things inside another shape/curve. To edit the curve, just select the containing layer (showing the whole shape) and work with it as you would with any shape or curve. I think I've even Boolean'd after pasting inside and the app coped admirably (Which hasn't been the case with other apps). I'm sure you can see the creative possibilities. So 1, 2 & 3 = Masked layer; 4 = bigger group; 5 & 6 = Clipped layer ("clipping path" / "pasted inside"). There's no right or wrong about which method to use here. Given @PlayingCards had Boolean'd their circle and rectangle into one curve (as far as I could tell) it seemed logical to me to suggest pasting inside. It matters not, which method though. I prefer working with clipping paths myself, because I'm usually working with complex curves where a collection of shapes just don't cut-it, and I dislike the way creating a mask messes with groups and layer names. That's just my preference, clipping paths suits the way I happen to work. Doesn't mean I'm doing anything better than, or the right way where other's are doing it the wrong way. Nope, not the case at all. I hope I've set out something helpful to others reading this.
-
Combining multiple shapes Boolean
AllAppsUser replied to PlayingCards's topic in Pre-V2 Archive of iPad Questions
Hum... OK. No wonder it's "unpredictable" for me, there's a whole set of nuances I'm confused by here. I'll have to spend time playing in order to get my head around it. Thanks @Alfred. Of course the OP could still achieve what they want by Pasting inside. That's correct advice. (I've edited my comment above to recognize this and hopefully not confuse anyone else following this thread seeking answers.) -
Combining multiple shapes Boolean
AllAppsUser replied to PlayingCards's topic in Pre-V2 Archive of iPad Questions
Ah.. there's the nuance one doesn't have to know, or worry about, when using menus. I hadn't absorbed that there's two drop zones on the layer representation in the studio. Now I've had this nuance highlighted... it'll be a different story. So newbies: the really clear instruction is: "drop on the thumbnail on the layer"., not just 'on the layer'... to paste inside. << Edited: see below -
Combining multiple shapes Boolean
AllAppsUser replied to PlayingCards's topic in Pre-V2 Archive of iPad Questions
Wot they said 😁😁. It's the same as wot I said, but mine uses the menus to achieve it instead. I've found dragging something over another layer does not always behave as expected. Doing it via the menu IS 100% predictable however. And it's easy to edit the contents (the stripes) after pasting inside via menus (or dragging) - simply select the layer that's created under the layer with the mask (rectangle with a circular top) on it. -
Combining multiple shapes Boolean
AllAppsUser replied to PlayingCards's topic in Pre-V2 Archive of iPad Questions
Hello. Would pasting all the stripes (as a group perhaps) inside the rounded bullet shape not work for you here? -
Pencil Tool Anchor Points?
AllAppsUser replied to Bowzer's topic in Pre-V2 Archive of iPad Questions
First off: You use the word ‘pencil’ twice, and the word ‘pen’ three times in your question. It confused me. Only the Pencil that I know of, automatically creates nodes (anchor points). So I’m assuming the title to this thread is correct and we’re talking pencil tool, not pen tool. Try adding a stabiliser (pencil tool context menu - bottom centre of the screen) such as rope - this will remove some of the wobbles you’re drawing, that lead to nodes being added. The longer the Length setting, the smoother your curves should be (and therefore the less nodes should be created). Hope this helps. -
best way to get crisp text on small images?
AllAppsUser replied to jackjohnbrown's topic in Pre-V2 Archive of iPad Questions
Play with the export settings under Resample. As you say, at that size, you're basically choosing the least pixellated image out of a set of pixellated images. Also, be sure not to make judgements based on a zoomed-in image. Best way is to view it in a browser at the size it will be seen. -
Can't find the command for the placeholder text
AllAppsUser replied to PaRunk's topic in Pre-V2 Archive of iPad Questions
I suspected you did. There are many who don't understand the distinction though. I write my answers with the fact others may land here in mind. Trying to accomplish two things - help the person asking the question + provide general information that I feel it's important to understand for others. After posting, I wondered about Assets instead of Symbols. It's the better approach of the two I suspect (I've not used the Assets panel so much, so am not confident about advising on its use.) Glad you've come up with a way of working. There often is a way with a bit of creativity. -
Can't find the command for the placeholder text
AllAppsUser replied to PaRunk's topic in Pre-V2 Archive of iPad Questions
A quick search on the internet for "filler text", "dummy text" or "lorem ipsum" will give you text you can copy and paste easily. Bookmark a good site and you're sorted, no need for a separate file if that bothers you. You can also paste the text into a Text Frame and then save that as a Symbol if you find that more useful than a separate file. Bare in mind that Designer is technically illustration, not long-form text layout software. Once Publisher is available for the iPad then that'll be even clearer. -
Without investigating your pdf on my desktop, I can’t be sure what I’m seeing. It looks like there’s a stray element, or two, in there you’re unaware of. If your canvas is set to transparent, then there shouldn’t be a background at all. No special export settings needed. I suggest: Select all the items that make up the artwork ... ** You might find there’s a border that shouldn’t be there, and the mystery will be solved at this point So look carefully at all the borders that appear - do they make sense? If they do.... Then: export > pdf > area (setting) > whole document.. choose "selection without background" Export Hope this helps you solve the mystery
-
FOR INFO. For anyone else visiting this thread on the same mission. Be clear whether the layer you're trying to work with IS a raster layer. It's not obvious. If it's not a raster layer, then CMD-J will duplicate the whole layer regardless of a marquee active. I had an image on a layer and assumed it would be a raster layer... nope. When I used CMD-J, the whole layer duplicated despite a marquee (soildier ants) in place. I discovered the nuance by accident when I tried to use the stamp, and the Assistant rasterised the layer...
-
Switch between Designer and Photo?
AllAppsUser replied to PaRunk's topic in Pre-V2 Archive of iPad Questions
Am I right assuming you’ve explored the capabilities of the Pixel (Photo) Persona within Designer? I’ve searched this forum and nothing obvious has popped up. This post talks about long press, but I’m not sure it’s what you’re after? I’ve not made a comprehensive search. You have? -
AffinityDesigner antialiasing fails on iPad
AllAppsUser replied to Bradly's topic in Pre-V2 Archive of iPad Questions
So the two important things are: Physical size and resolution (Forgive me, if this comes across as a bit off-key. I'm trying to be really clear, so you can be confident you don't need to worry, and your image is fine). We're discussing two very different views of the same image: Your image posted here (very top) = physical size: just over 8" x 10" (roughly measured on my laptop screen). So at 1080 x 1350px it's presenting a 135 dpi image.That's... >> LOW resolution. You will see pixellation Instagram's call out = physical size 3.5" x 4.5". That means Instagram is presenting the 1080 x 1350px starting from 300dpi. >> HIGH resolution. So the image you've posted above, therefore, will appear perfectly smooth on Instagram. >>>> Shrink the browser window width down to roughly 3.5" and you'll see it in action. (dpi? "Dot per inch" and it is important for screen as well as print). - - - - - - - - - - If the pixel by pixel count is the same + your export settings are exactly the same (ie sampling + compression method) on both iPad and PC. Then there's only one conclusion.... ....you're making judgements based on two very different ways of viewing the image (as I've just explained above).... ... except it's not Instagram vs Affinity forum.... ....it's iPad screen vs PC screen + iPad image viewing app vs PC image viewing app + size of window vs size of window..... that's a lot of moving parts! "100%" is a highly subjective thing in digital images. In fact, there's no such thing as 100% .....you always have to state "..at 300dpi", for example. Hope this resolves it for you. -
1) Check out what was downloaded. Was there an svg file in the bundle ? There often is with Vectoreazy. Open the svg if there. 2) Otherwise export the ai file as a pdf (check settings for rasterising and remove), or svg Note: not all vector features are supported by svg format - though it’s improving. However, you’ll have a lot of cleaning up to do anyway, regardless. Always is with these free vectors.
-
Is this not the Contour Tool ? I may have misunderstood what you're describing.
-
I've not waded through this whole topic so forgive me if this has already been explained. This is the steps I use for a simple 'perspective' style distort. It can involve as many shapes as you like so long as they're all curves. It preserves the vectors. It takes a bit of pondering and clarity about what you want to end up with before you start (plus an understanding of perspective)... You may need to get to your objective via several distort steps too. - - - - - - - - - - (In iPad Designer) To obtain a 'simple' perspective style distort: Make a copy of object(s)/group "in-case" Select all paths involved (has to be paths, so convert to curves as necessary) Using Node Tool, drag select all nodes to be scaled (the choice of nodes - be sure you understand perspective and what you're trying to end up with) Set Bounding Box Transform to on - context menu. Add constraining finger gestures (to scale around centre)** / or tap the scale around centre thing in the context menu / or highlight centre 'anchor' in transform studio. Scale (Optionally - Drag left/right/up/down depending on perspective required... or miss out step 5!) **Step 5: I always use the finger gestures, so the actual nuts and bolts of the other two approaches may be inaccurate. - - - - - - - - - - I assume this can be done in Designer Desktop too. I'll check and correct this if it's not possible. I'll be very surprised. This covers most of the distorts I need .. most of the time. ___________________ Apps aimed at professionals As a 'professional' I want all the shortcuts I can get. More power to my elbow the better. I'm distorting like this several times in every illustration/diagram I do pretty much. A distort tool could reduce the six (plus) steps to two (select curve/object/group > distort) and multiplied over several operations, that adds up when you've deadlines to meet. 'Productivity' is at least as important as 'creativity' - and at times, it's more important in a professional's working life.
- 317 replies
-
- 2
-

-
- mac
- free transform tool
- (and 5 more)
-
ipad description of all tools
AllAppsUser replied to cezi's topic in Pre-V2 Archive of iPad Questions
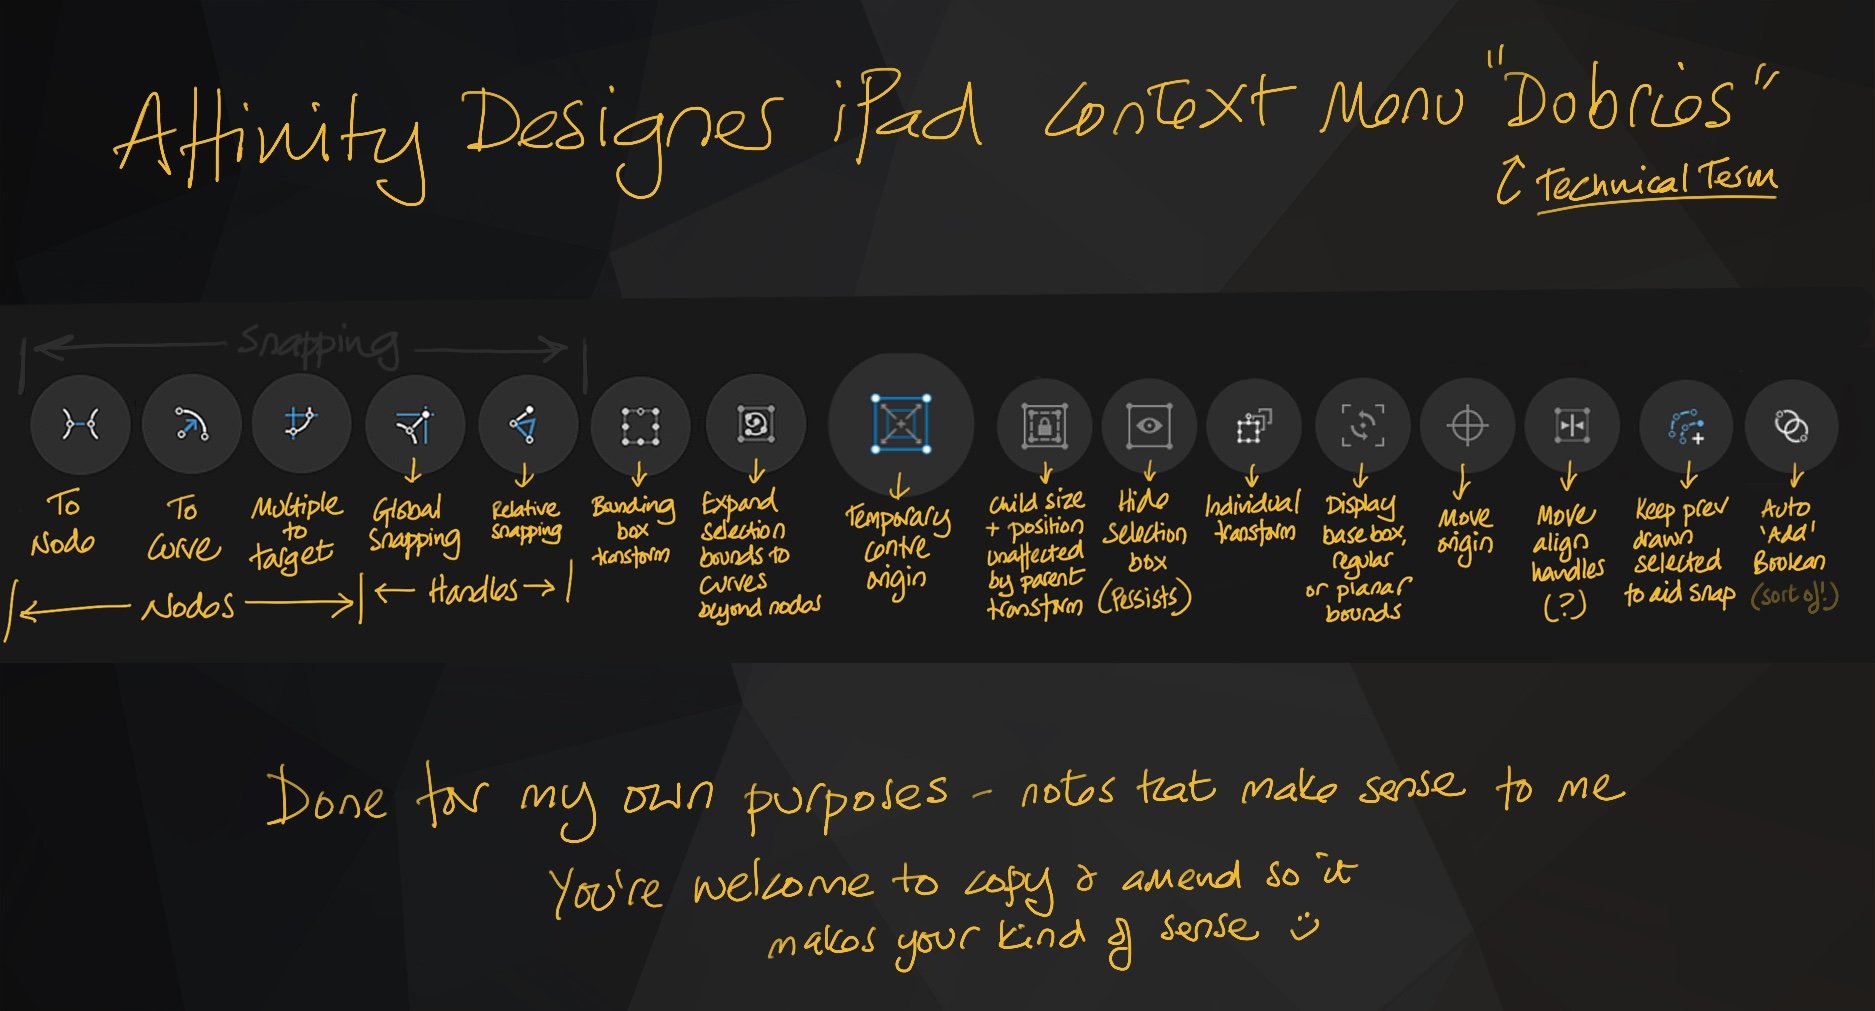
I did this for myself, quickly, as a memory aid after looking them all up. *** It's not a complete list*** only the one's I struggled to remember. As the ever helpful @Alfred has said, they're explained fully in the app, Help accessible via the "?" on the Home screen. Then under each tool. > > > The first 5 roundals (left) are all concerned with snapping (The grey label above them doesn't show up very well on some screens) (The image size is because I added it to my profile header in this forum - as good a place to store it as any.) Suggestion to Serif - include a "Context menu icons" page in the app Help devoted to these. Collecting them together into one easy reference. -
Issue with adding Unsplash stock images
AllAppsUser replied to Renceslaw101's topic in Pre-V2 Archive of iPad Questions
I can reproduce the same behaviour. I can also observe my router from where I work: it flashes for a second and then nothing, as though the download request is not passed, or (I suspect more likely) denied. I suggest you download unsplash via their website. - - - - - - - - When I saw this had been added to the apps, I thought: "that'll be prone to issues, only needs the 3rd party to change something" so I don't bother using it. I go direct to the sites. I also find it odd that you drag from a tiny square preview... how can you judge it's a picture you actually want? If I was one of these third parties, I'd see this as likely to lead to a spike in downloads. I'm wondering if Affinity has been detected and blocked as a spammy download bot by unsplash. -
A business that doesn’t match its marketing to its "targeted development" is never going to be a winner in competitive markets.
- 317 replies
-
- 1
-
-
- mac
- free transform tool
- (and 5 more)
-
I know this thread is perhaps done now but to clarify something. Check out the title bar for serif.com. Note the word "professional". Now the "professional" creative IS Adobe’s market. I also remember seeing an article before any affinity app was released (not been able to find it) that clearly stated the apps were a challenge to the Adobe suite. The article was a press release written by Serif. I’m certain about this, because it’s what put these apps on my radar and I’ve followed their development ever since because of it. Therefore the clunky stuff has to be on their list for developing, unless they’ve lowered their sights, or don’t really mean (or understand) "professional".
- 317 replies
-
- 1
-

-
- mac
- free transform tool
- (and 5 more)
-
Sonic the Hedgehog spikes with pen tool
AllAppsUser replied to Jon1968's topic in Pre-V2 Archive of iPad Questions
Hum, the video is so speeded up that I don't think it's showing exactly what he does. So even slowing it down, it doesn't fully describe what's happening. There are frames missing, yes? Missing as a result of the speeded up production. (I often find these kinds of videos frustrating for this exact reason). I'm not aware of any other way of achieving the points and curves, configured in that way, without the finger gesture you identify.... it's what it's for afterall. I work almost exclusively with the pen tool in Designer iPad, btw. I've also used pen tools extensively before Affinity Designer came into being.- 1 reply
-
- 1
-
-
Images Squished Immediately After Placing
AllAppsUser replied to Cat Murdock's topic in Pre-V2 Archive of iPad Questions
Are these all the same format? ie: jpeg? Does it do it for all formats? -
Pencil vs Full Keybaord How does it work?
AllAppsUser replied to gionaguidi's topic in iPad Questions
The behaviour of the app here is really irritating (to me). It's not possible to use scribble (unless someone knows better) in the text frame itself. Therefore, I don't understand the point of not being able to access the full keyboard when the pen has been involved in placing the text frame. The only method I've found that allows me to switch from the small keyboard UI to the full keyboard is this: With the text still selected and the Pencil UI showing Knock the app into the background (off screen) Then call it back to the foreground again (I've found this activates the full keyboard) Irritating to say the least. If anyone else knows otherwise, I'll be happy to be corrected and discover there's a better way. -------------------------- The Pencil is still a relatively new feature tbh, but at some point someone will understand that humans don't "only use the pen" vs "only use the full keyboard", but they switch from one ot the other and back again. Serif are interfacing with iOS here, so I suspect the answer is: it is what it is until Apple move it forward. -
Document size and artboards
AllAppsUser replied to Xathepset's topic in Pre-V2 Archive of iPad Questions
So does the preferences setting under Interface > Background Grey Level not apply when using artboards @Alfred? Sorry if I've misunderstood what you're asking for @Xathepset .