jaybray
-
Posts
12 -
Joined
-
Last visited
-
 jaybray reacted to a post in a topic:
Data merge images with different sizes
jaybray reacted to a post in a topic:
Data merge images with different sizes
-
 Is it possible to data merge images that have different dimensions? My uses case is I need to create a page that display an email screenshot and some basic info about that email. The text fields are no issue. The email screenshots are all the same width, but have different height values. Each page has one screenshot. When I perform the merge, all the images get pulled in as expected, but the software can't seem to compensate for the different heights so some images are cutoff or not fully within the bounds of the image frame. "Size Frame To Content" works, but doesn't seem to auto adjust across pages. I've made a master page 600px wide, and made the height extra long to ensure all messages fit. I have multiple ways to go back in and remove the empty spaces later.
-
I am experiencing the same issue. I'm on macOS 12.5 and the latest version of AD. I think every time I open AD now the app crashes when I attempt any sort of export via the Export Persona. The normal export (File » Export) seems t work fine. I really love AD so I won't quit using it over this, but it's been happening for several months now and is truly annoying.
-
Ok, now I understand. Thank you.
-
Affinity Designer (desktop): 1.10.5 macOS: 12.4 When I open the Layer Effects panel and select Outline, it seems as if I'm missing options for manipulating the Outline effect. Referencing YT videos, I seem to be missing the X/Y Scale and Offset. I'm attempting to add an outline to text and then offset the outline like the example I've included. I need the text to remain editable though as I have to make multiple variants. I'm working on the assumption the X/Y Offset would let me do that?
-
Canvas Size/Cropping Macro
jaybray replied to jaybray's topic in Pre-V2 Archive of Desktop Questions (macOS and Windows)
Whoa @carl123 — this is slick. This appears to be working. I'll need to spend some time analyzing how you did this. I really appreciate your time and assistance. ⭐⭐⭐⭐⭐ for you. -
jaybray reacted to a post in a topic:
Canvas Size/Cropping Macro
-
Canvas Size/Cropping Macro
jaybray replied to jaybray's topic in Pre-V2 Archive of Desktop Questions (macOS and Windows)
Ok, thanks. I have access to Photoshop which offers the functionality I need on this. I just prefer using Affinity products whenever possible. -
I have a series of screenshots I need to crop. Each image has the same width (1984 px), but the height varies from screenshot to screenshot. I need to remove 687 px from the left and right sides (1374 px in total) resulting in an image that is 600 px wide. I don't need to remove anything from the top or bottom. Using the Crop Tool or Resize Canvas, I can achieve my desired results easily if I manually Crop/Resize each image individually. However, I'd prefer to set up a macro to do this more quickly. I cannot figure out how to build a macro that removes the needed amount from the left and right while ignoring the height differences with each image. Thanks in advance for any ideas.
-
 Alfred reacted to a post in a topic:
Can I turn this into a brush?
Alfred reacted to a post in a topic:
Can I turn this into a brush?
-
StuartRc reacted to a post in a topic:
Can I turn this into a brush?
-
Can I turn this into a brush?
jaybray replied to jaybray's topic in Pre-V2 Archive of Desktop Questions (macOS and Windows)
Thanks @StuartRc I figured out a similar solution. I know you know how this works, but I'll type it out in case it benefits others. I converted each symbol to an individual PNG. Then I stuck with the standard image brush and created it using the first symbol. From there I double clicked on the new brush to open the Brush Editing panel. I went to the Texture tab and added all remaining shapes in the Brush Nozzle area. Then it was just a matter of experimenting in the Dynamics panel till I got to the scattered look I need. Thanks for the help everyone! The rest of my client project will be a breeze now. -
jaybray reacted to a post in a topic:
Can I turn this into a brush?
-
Alfred reacted to a post in a topic:
Can I turn this into a brush?
-
firstdefence reacted to a post in a topic:
Can I turn this into a brush?
-
jaybray reacted to a post in a topic:
Can I turn this into a brush?
-
Can I turn this into a brush?
jaybray replied to jaybray's topic in Pre-V2 Archive of Desktop Questions (macOS and Windows)
Cool, thanks! That makes sense. I didn't exactly understand how that Texture panel worked, but now this gives me more ideas to try. Thanks for building that quick brush. I think I'm headed in the right direction now. Have a good one! -
Can I turn this into a brush?
jaybray replied to jaybray's topic in Pre-V2 Archive of Desktop Questions (macOS and Windows)
An image brush. Since I need to keep those exact blue/green/yellow colors, I was thinking that was the best choice, but I'm probably wrong and happy to try something else. Thx! -
jaybray changed their profile photo
-
Can I turn this into a brush?
jaybray replied to jaybray's topic in Pre-V2 Archive of Desktop Questions (macOS and Windows)
Thanks Alfred! I thought that would do the trick as well, but I'm not getting the expected results. I'm attaching the PNG file I used to create my brush. I think this needs to be set up differently. Using this to create the initial brush doesn't get me to that scattered look no matter how far I push the scatter/rotation settings.
-
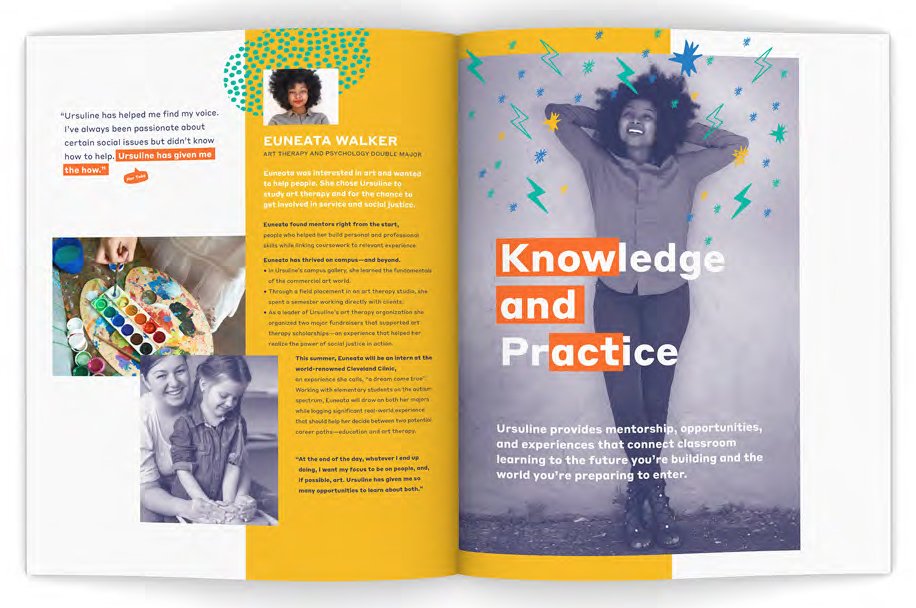
Hello Affinity community, I am brand new to both Photo and Designer. I have an effect I will need to apply to several photos in the near future. It seems as if this should probably be achievable via a custom brush, but I'm having trouble figuring out the best way to configure the initial set up. Note the right side panel that has the stars/bolts/arrows surrounding the female subject. I am trying to turn those elements into a scatter brush so when I need to apply them to a photo I can just wipe the mouse across the image a couple times and have all the elements present. I've been playing with the brush settings in a custom image brush, but I can't get that scattered look which means I'm probably configuring the brush incorrectly in the first place. I do have the individual shapes in vector form, and I'll need them to be the blue/green/yellow colors seen below. Any advice would be appreciated. Thanks!