Ash
-
Posts
759 -
Joined
-
Last visited
Everything posted by Ash
-
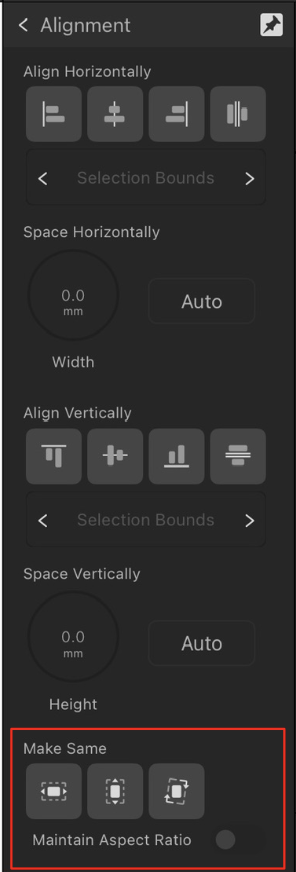
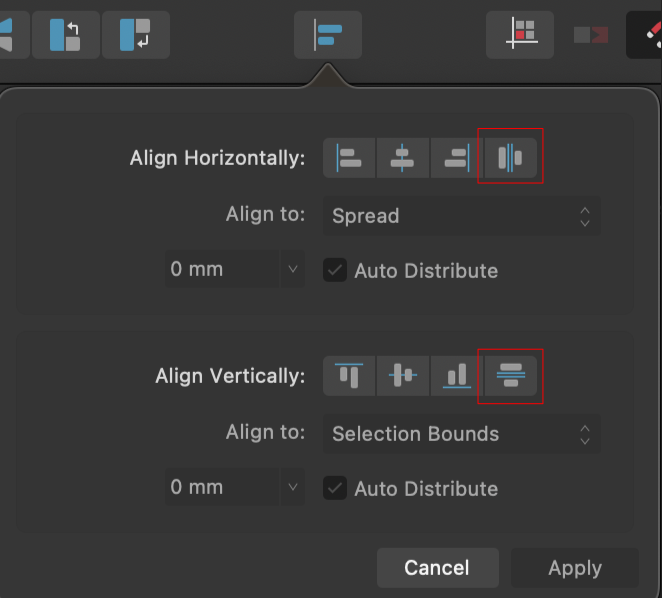
 Apps: All Platforms: Windows, macOS and iPad Within alignment options you will see three new options to make all items in your current selection adopt the same width, height or rotation. By default this will transform all objects to match the first item selected, or alternatively if a key object has been nominated (alt-click) it will use that as the source. Additionally you can choose to maintain the aspect ratio of the objects being resized. On desktop this is available via the alignment dropdown: And on iPad via the alignment options panel which you can get to via the transform panel:
-
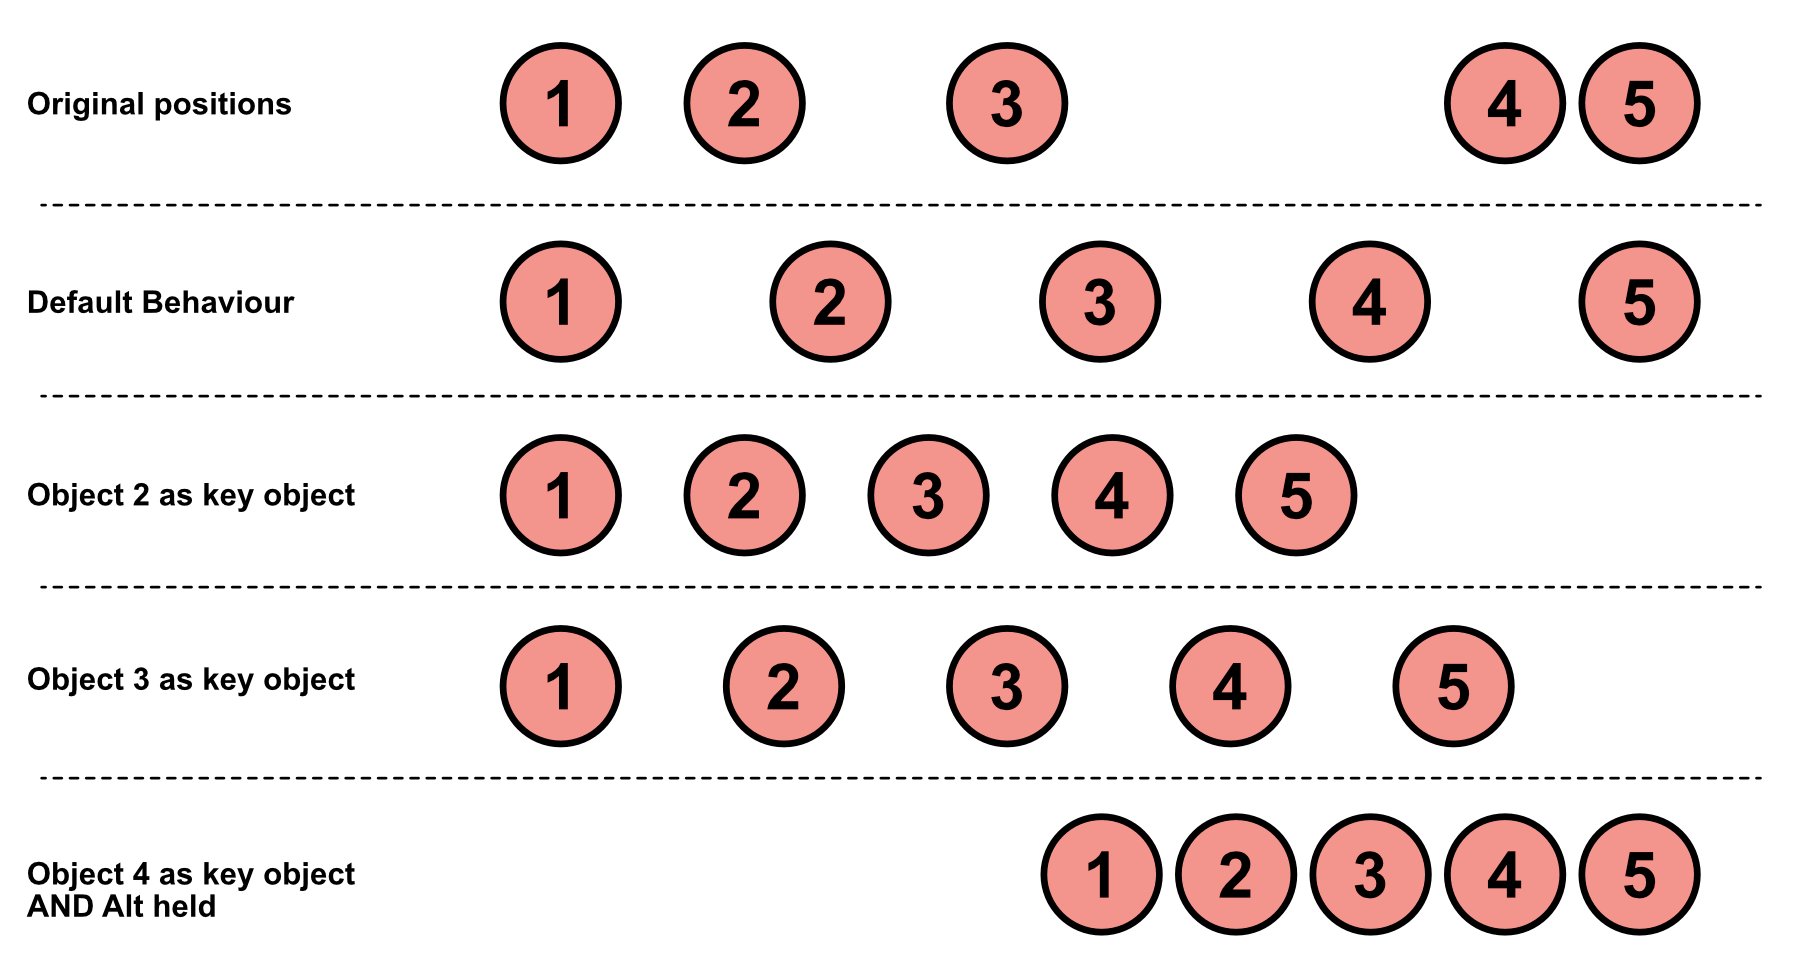
Apps: All Platforms: Windows, macOS and iPad Using even space distribution on a multiple selection will now behave differently if you have a key object nominated. This relates to either the space horizontally or space vertically options available in the alignment drop down (or Alignment Options available from the Transform panel on iPad): The previous behaviour was always to space the objects in your selection with (in the case of horizontal spacing) the furthest left item and furthest right item remaining in the same position, and all other items in your selection spaced evenly between them. This is still the default behaviour. However, the new functionality is that if you additionally specify a key object in your selection (alt-click an object) the behaviour changes to mean the furthest left object and the key object will not change position, and the other items are spaced evenly between them. This is particularly useful as you may quite often have the first two objects in your selection at the correct spacing and you want to space all other objects the same distance. Now you can nominate the second object as the key object and achieve this. Additionally if you Alt-click the spacing button the distribution will be calculated between the furthest right object and the key object. Below shows the different results: All the above showing results for horizontal spacing, but the same applies to vertical spacing when working top to bottom.
-
Apps: All Platforms: Windows, macOS and iPad While transforming any object with the move tool (whether resizing, rotating, skewing or moving) you can now hold space to temporarily toggle Lock Children on or off (to achieve the opposite behaviour of what you currently have set in the context toolbar).
-
Apps: All Platforms: Windows, macOS and iPad We have now added the ability to lock all insertion targets (Behind, On Top and Inside) in all apps. This is activated by holding Alt when pressing either of those buttons in the toolbar. This is particularly useful for those who like working from top to bottom in the layer stack, meaning you can now lock Insert Behind on so all new objects you create are inserted below the current selection. The insertion target buttons are available in the top toolbar on Windows and macOS: And can be found in the edit menu on iPad as shown below. On iPad you can lock these either by holding Alt when you tap on the appropriate option (from command controller or attached keyboard), or alternatively by long pressing on the button.
-
Apps: Photo and Designer Platforms: All In Export Persona Filename is now available as a token variable for building either folder paths or exported filenames of your slices. This is available with two options: Document Name = the name of the document without the file extension Document Filename = the name of the document including the file extension For example if you had a document called "Social Ads.afdesign" which contained artboards named "Version 1", "Version 2", etc. you could now specify your path to be Document name like below: And this will automatically create a folder called "Social Ads" with your slices being exported within it: Social Ads/Version 1.png Social Ads/Version 2.png etc. You can also use these tokens as part of your exported file names, e.g. if you set up as below... That would result in your exported files being named: Social Ads (Version 1).png Social Ads (Version 2).png etc. Additional note Worth a reminder when testing these feature you can copy and paste export set ups from one slice to another slice using the copy / paste buttons towards the top of the panel. You can also create your own export set up presets from the burger menu in the slices panel.
-
Apps: All Platforms: macOS, Windows and iPad When in move tool double clicking a vector object takes you into node tool. It has been suggested that a double click on an object while in node tool should do the reverse and take you back into move tool (you could previously double click on the canvas / not over an object to return to move tool but this both loses your selection as well as not being possible if you are zoomed in). This has now been implemented in 2.4.
-
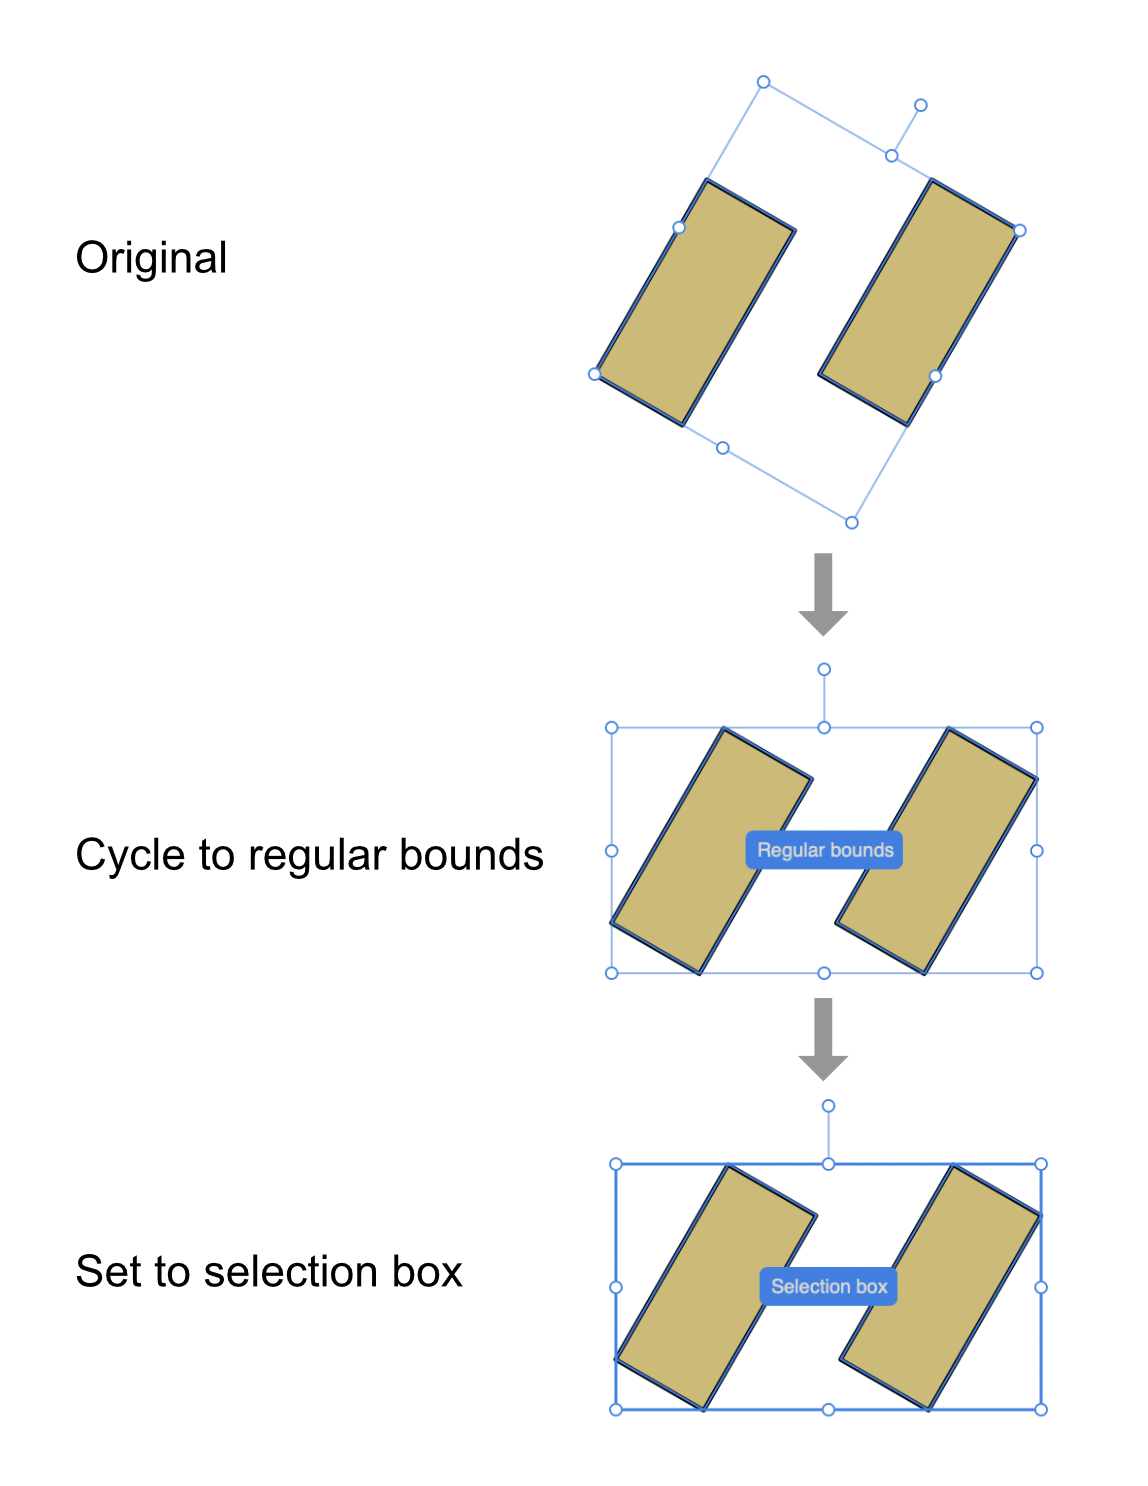
Apps: All Platforms: macOS, Windows and iPad Previously when you cycled your selection box this was only a temporary operation. You can now make this permanent... From the select menu there are two options: - Cycle selection box (this was the existing option) - Set selection box (the new option) Also note the shortcut for these - [Full Stop] to cycle and [CMD + Full Stop] to set on macOS and iPad or [Ctrl + Full Stop] to set on Windows. The new feature is that after cycling to the selection box you want you can now permanently set that for your current selection by using the Set Selection Box command. In the example below, I have two shapes which are rotated by the same amount. Therefore when they are selected by default the selection box is oriented to match the shape's rotation. Now if I want to permanently make those shapes have a selection box which is oriented to my page I can cycle to regular bounds and then Set Selection Box, which will now make that persist every time I select those items in future. A couple of other notes on this feature: As well as cycling to the base box and regular bounds of an object, if you have a grid set which has a different rotation to your page (or, are working on an isometric plane for example) you will additionally get the option to cycle and set the selection box to be aligned with the the current planar bounds of the selection. If you have a multiple selection which includes objects rotated by different amounts, if you wish to set your selection box for all objects in your selection to match the orientation of one of them you can set the one you want to match to be your key object. Then when you cycle your selection box the "base box" option will match that object's rotation.
-
Hi All, I’m pleased to say that we will be pushing 2.3 live to retail this morning. The beta versions were updated yesterday to the same build (2.3.0.2165) as detailed in Patrick’s post here. This means the beta versions are in effect exactly the same as the retail versions we will push so you can keep them installed if you wish. As always it’s been a pleasure working with you all on this release and cannot thank you enough for all the bug reports and other feedback you have given. I mentioned at the start of this beta we are working towards a shorter cadence between updates to help us release improvements and bug fixes sooner - and I hope you agree this has worked very well. With that in mind we will be starting 2.4 beta very shortly (hopefully in just a couple of weeks). Looking forward to seeing you all on here for that! Thanks again, Ash
- 37 replies
-
- 49
-

-

-
Hi All, We have just pushed another update to the 2.3 beta (2.3.0.2165) which is considered a potential release candidate and should be available to you on auto update shortly. The list of fixes included in this build are listed in Patrick's post here. Thanks, Ash
-
Move data entry improvements
Ash replied to Ash's topic in [ARCHIVE] 2.4, 2.3, 2.2 & 2.1 Features and Improvements
@Tim,c don't see why not! -
Move data entry improvements
Ash replied to Ash's topic in [ARCHIVE] 2.4, 2.3, 2.2 & 2.1 Features and Improvements
I think on Tim's screen recording it's not showing the move data entry dialog where he's controlling the scale and rotation of the duplicates. See screenshot below. Create circle Set dash pattern to be 0-2-0-0-0-0 in stroke panel Set balanced dash pattern to on Set "scale with object" to on Hit return to bring up move data dialog Set scale to e.g. 90% Set rotation to e.g. 4 degrees Set duplicates to e.g. 30
-
Hi All, We have just pushed another update to the 2.3 beta (2.3.0.2157) which is considered a possible release candidate and should be available to you on auto update shortly. The list of fixes included in this build are listed in Patrick's post here. Thanks, Ash
-
Hi All, Another update to the 2.3 beta has just been pushed and should be available to you now via auto-update. Various fixes are included in this which are listed here. Thanks, Ash
-
Improvement Area Tool
Ash replied to joe_l's topic in Feedback for the Affinity V2 Suite of Products
You can hold cmd to select different objects in the area tool. Shift + cmd will add additional objects to your current selection. -
Move data entry improvements
Ash replied to Ash's topic in [ARCHIVE] 2.4, 2.3, 2.2 & 2.1 Features and Improvements
Actually wonder if this should in fact be a transform panel thing and that if you have "transform objects separately" checked and type in an absolute value into the transform panel (e.g H=100px) then all the objects in your selection should adopt that height rather than it working proportionally based on the key object size? Also we'll get round to adding a "Size to Same" function at some point! -
Hi All, An update to the 2.3 beta has just been pushed, and should be available to you now / shortly on auto update. Fix list for this build is available here. Thanks, Ash
-
You actually have two options in pen tool. The default behaviour is that when you start a new curve any existing selection is lost. Alternatively you can "Preserve selection when creating new curves" which will keep everything selected as you create new curves with the tool (e.g. after you draw something in pen and hit esc / double click on last node drawn / close the curve and then start drawing another curve the first curve remains selected). This is useful to be able to edit properties of all drawn curves in that session at once, or go back to edit the position of any nodes drawn on a previous curve (e.g. by pressing cmd to switch to node tool). Additionally there is another option of "Add new curve to selected curves object" which will add additional curves you create to the same object (i.e. will appear as a single object in your layers panel rather than multiple objects being created for each curve). This is more efficient in than to draw the curves separately with and then use Geometry -> Merge Curves which achieves the same thing.
-
Yes, absolutely - apologies that was in fact one of the intentions when implementing this but wasn't in the first beta build. It will be like this in the beta update next week.
-
Move data entry improvements
Ash replied to Ash's topic in [ARCHIVE] 2.4, 2.3, 2.2 & 2.1 Features and Improvements
Yes, you can only initialise the function while using certain tools (Move, Shapes, Artboard, Frame) The thing with node tool is that we do intend to offer a similar option specific to the node tool, i.e. so if you have a node(s) selected in node tool you can hit enter to then move those selected by a specific distance. It will be slightly different as the duplication options for example will not be relevant in this case. -
Move data entry improvements
Ash replied to Ash's topic in [ARCHIVE] 2.4, 2.3, 2.2 & 2.1 Features and Improvements
Yes, that's on our radar as a possible feature in future... -
Hi All, Thanks for these comments. I think for this release we are just focused on making sure the pixel grid works as expected. Discussion around wording / function of snapping options is something we'd have to come back to another time if we feel it important. I think the main thing is that our intention is the pixel grid is purely a visual cue / help, when editing images in Affinity Photo when you are zoomed into areas which have little colour variance so you can easily see where the pixels are - but of course also has some use cases when working in Designer and Publisher which is why we have included the option in those apps too. It was not designed to be a grid which is snappable, as we have have existing options for that (whether or not they need improving is separate to this feature), and also fundamentally that pixel snapping is something you should be able to do without having the pixel grid turned on.
-
Auto changes with your light / dark UI preference. So yes if you are on light UI then Auto and Light will look the same. However, if you set to light background then when you switch to Dark UI your asset panel background will remain light.
-
To be honest we were little unsure whether to add "snap to pixel grid" as an additional entity in snapping manager as it felt it was effectively achieving the same thing "force pixel alignment"? The intended behaviour is that "Snap to grid" option in snapping is purely to snap to your normal grid (so shouldn't snap to pixel grid whether or not that is on), and "force pixel alignment" should snap to pixels (again whether or not your pixel grid is turned on).
-
Assets not visible in dark mode
Ash replied to lgoodwin's topic in Affinity on Desktop Questions (macOS and Windows)
Hi All, We have now added options in the asset panel to change the background colour to be light, dark or checkerboard. This is in the 2.3 beta which has just been made available today... -
Hi, Thanks for this feedback. We have now added a check box in the pencil tool context toolbar to choose if you want to keep the curve you have just drawn selected or not. This is available to try now in the 2.3 beta...