firstdefence
-
Posts
11,711 -
Joined
-
Last visited
Everything posted by firstdefence
-
 Once you have made your curve and clicked on the selection option, you can go to Select > Feather... and move the slider to reduce the hardness of the edge, if you are creating a precise selection maybe feathering isn't going to be the best option but if you are going to use feathering I'd suggest you make a larger selection than you actually need so that the selection you make can blend in without harsh lines.
 -
You're welcome.
-
Halo around sun during HDR merge
firstdefence replied to MKBastler's topic in Desktop Questions (macOS and Windows)
@Guillermo Espertino I think what @Bololoco means by 30-40 f-stops is an accumulated dynamic range, the human eyes "dynamic range" is roughly 20-24 f-stops; ain't nature amazing, with some exceptional people being able to exceed that range. Stacking can get around the digital camera's limited dynamic range but at the end of the day creating images with a dynamic range that exceeds our visual capabilities is a bit of a space waster. Take MP3's, most audiophiles will tell you the removal of data beyond the range of most humans hearing is detrimental to the nuances of the music and that an MP3 and a FLAC file sound very different, this may be technically accurate but is also subjective depending on the listener, I have poor hearing so a flac file is wasted on me. The same can be said of images, even with a dynamic range our eyes cannot see, if told, most would see the greater dynamic range image as better. https://www.cambridgeincolour.com/tutorials/dynamic-range.htm -
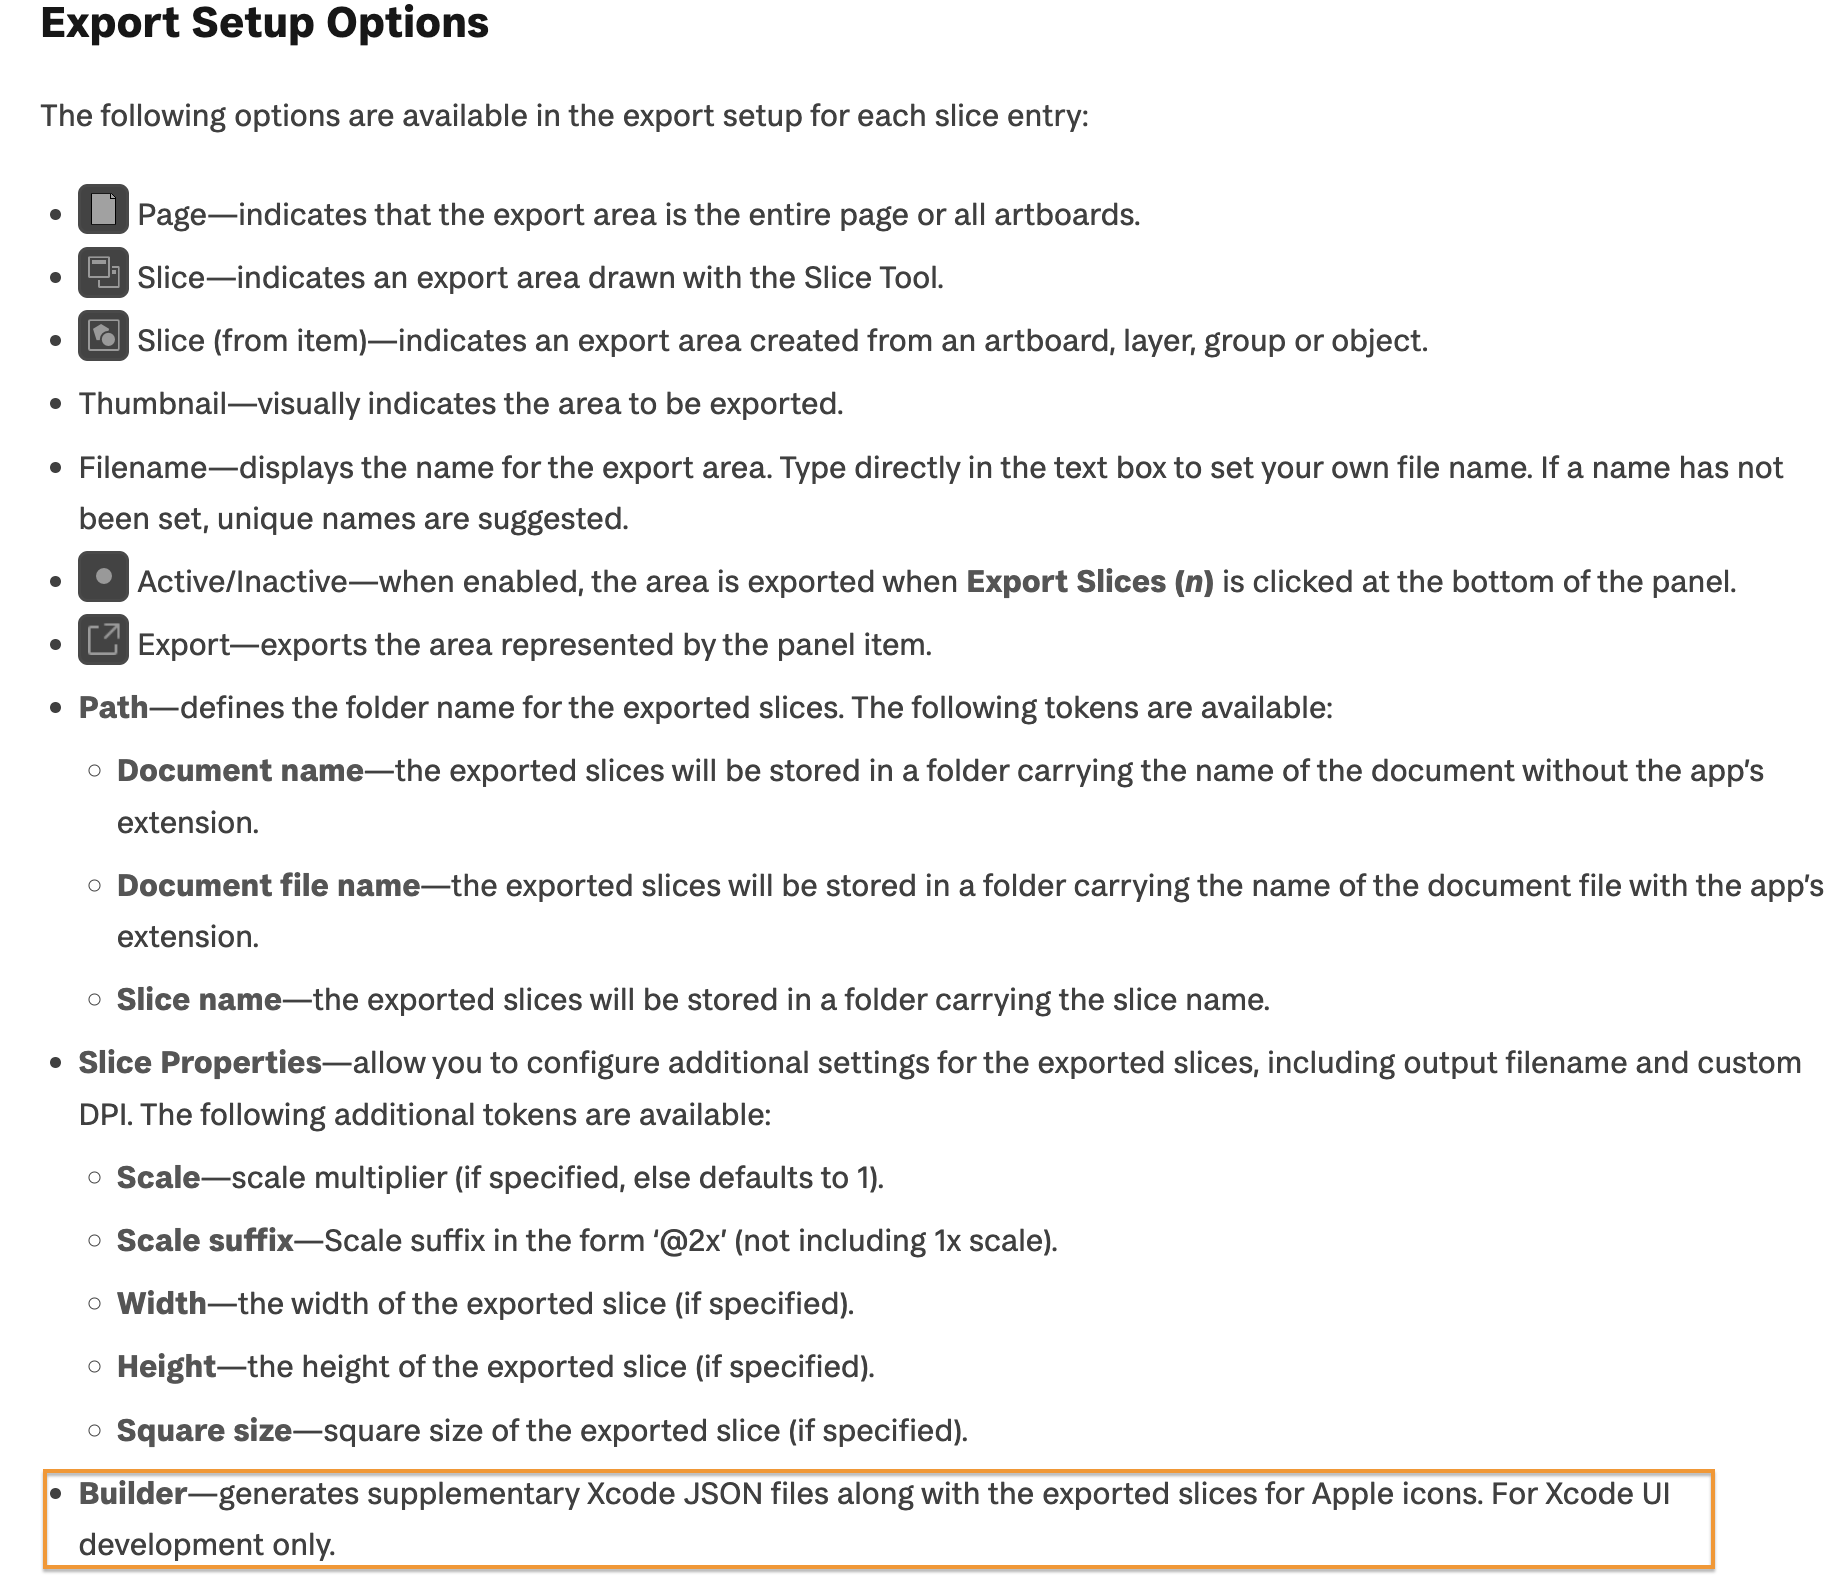
As for SVG (for export) I'd suggest this is a baseline export setting, a generic SVG if you will. Ultimately you can create your own export presets to suit your export needs using the options given for SVG export.
-
https://affinity.help/designer2/English.lproj/pages/ExportPersona/slicesPanel.html

-
affinity designer Vector Illustrations
firstdefence replied to TY Graphics LLC's topic in Share your work
Makes me wonder why your avatar is wearing glasses lol! -
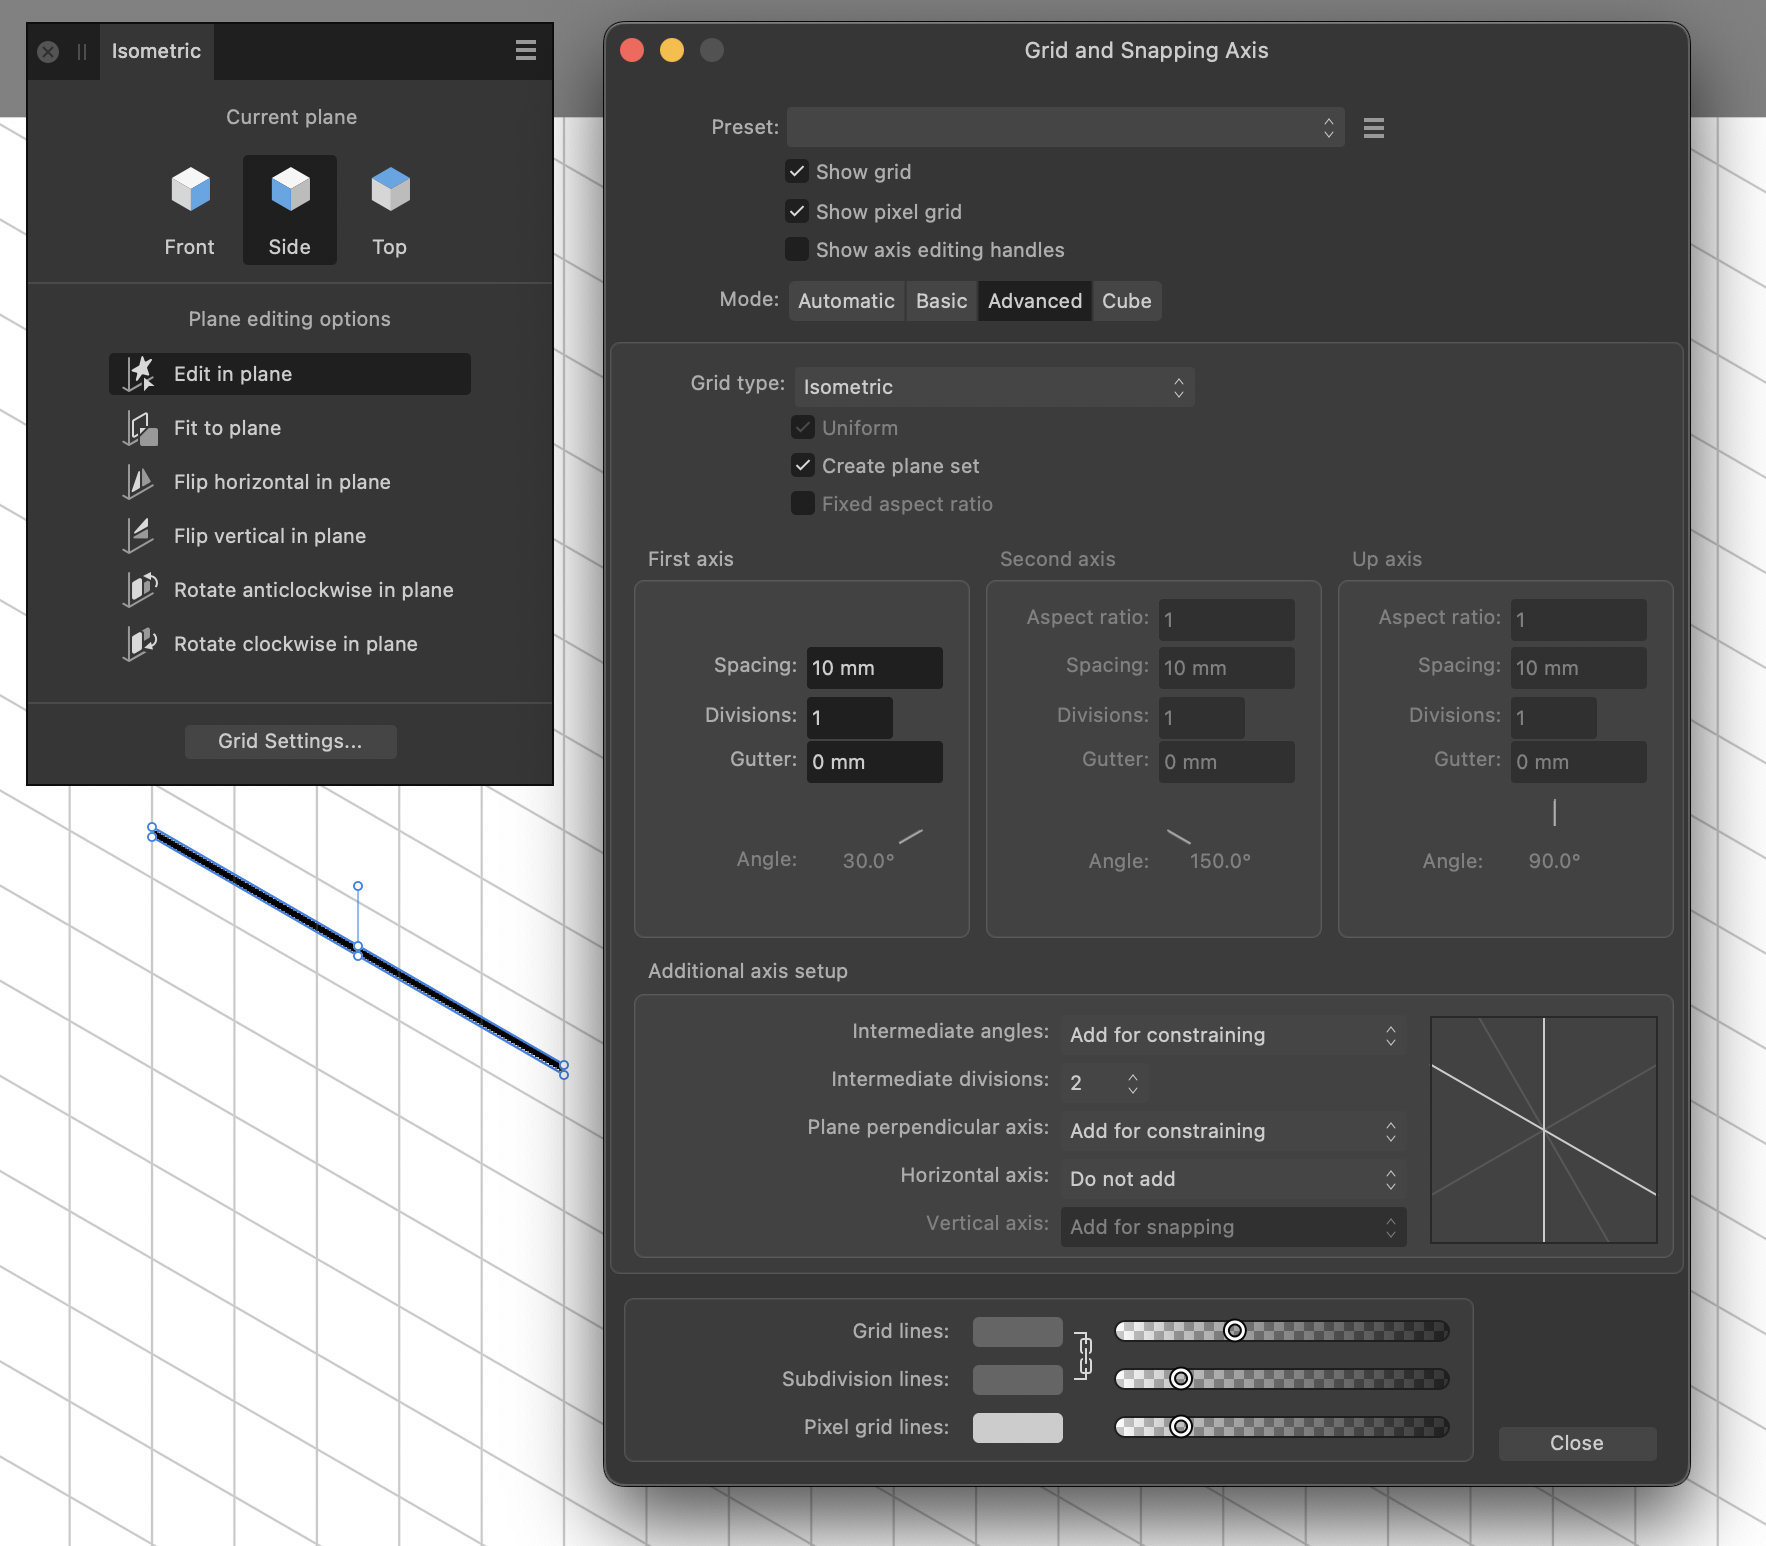
Try this out... In Pixel Persona, draw a raster brush line in the horizontal plane by clicking once then moving the cursor over to the right, holding the shift key and clicking again, you should have a straight levelled raster brush stroke. Now go back into Draw Persona. Select the Move Tool. Select the brushstrokes layer or click on the brushstroke in the workspace. With the isometric panel visible, click on one of the planes, front, side or top. Now click on the Fit to plane option below in the isometric panel, the brushstroke will snap to the plane selected. Tedious I know but this is what @Old Bruce was getting at. Another option is to note the angles the grid lines are set at, so in the case of isometric that will be 30º for top right to bottom left, 150º for top left to bottom right and 90º for vertical. As long as you start with a horizontal line you can rotate the brushstroke using the transform panels R: entry box using those three degree options.
-
No Idea to create the logo
firstdefence replied to HerbTHEberT's topic in Desktop Questions (macOS and Windows)
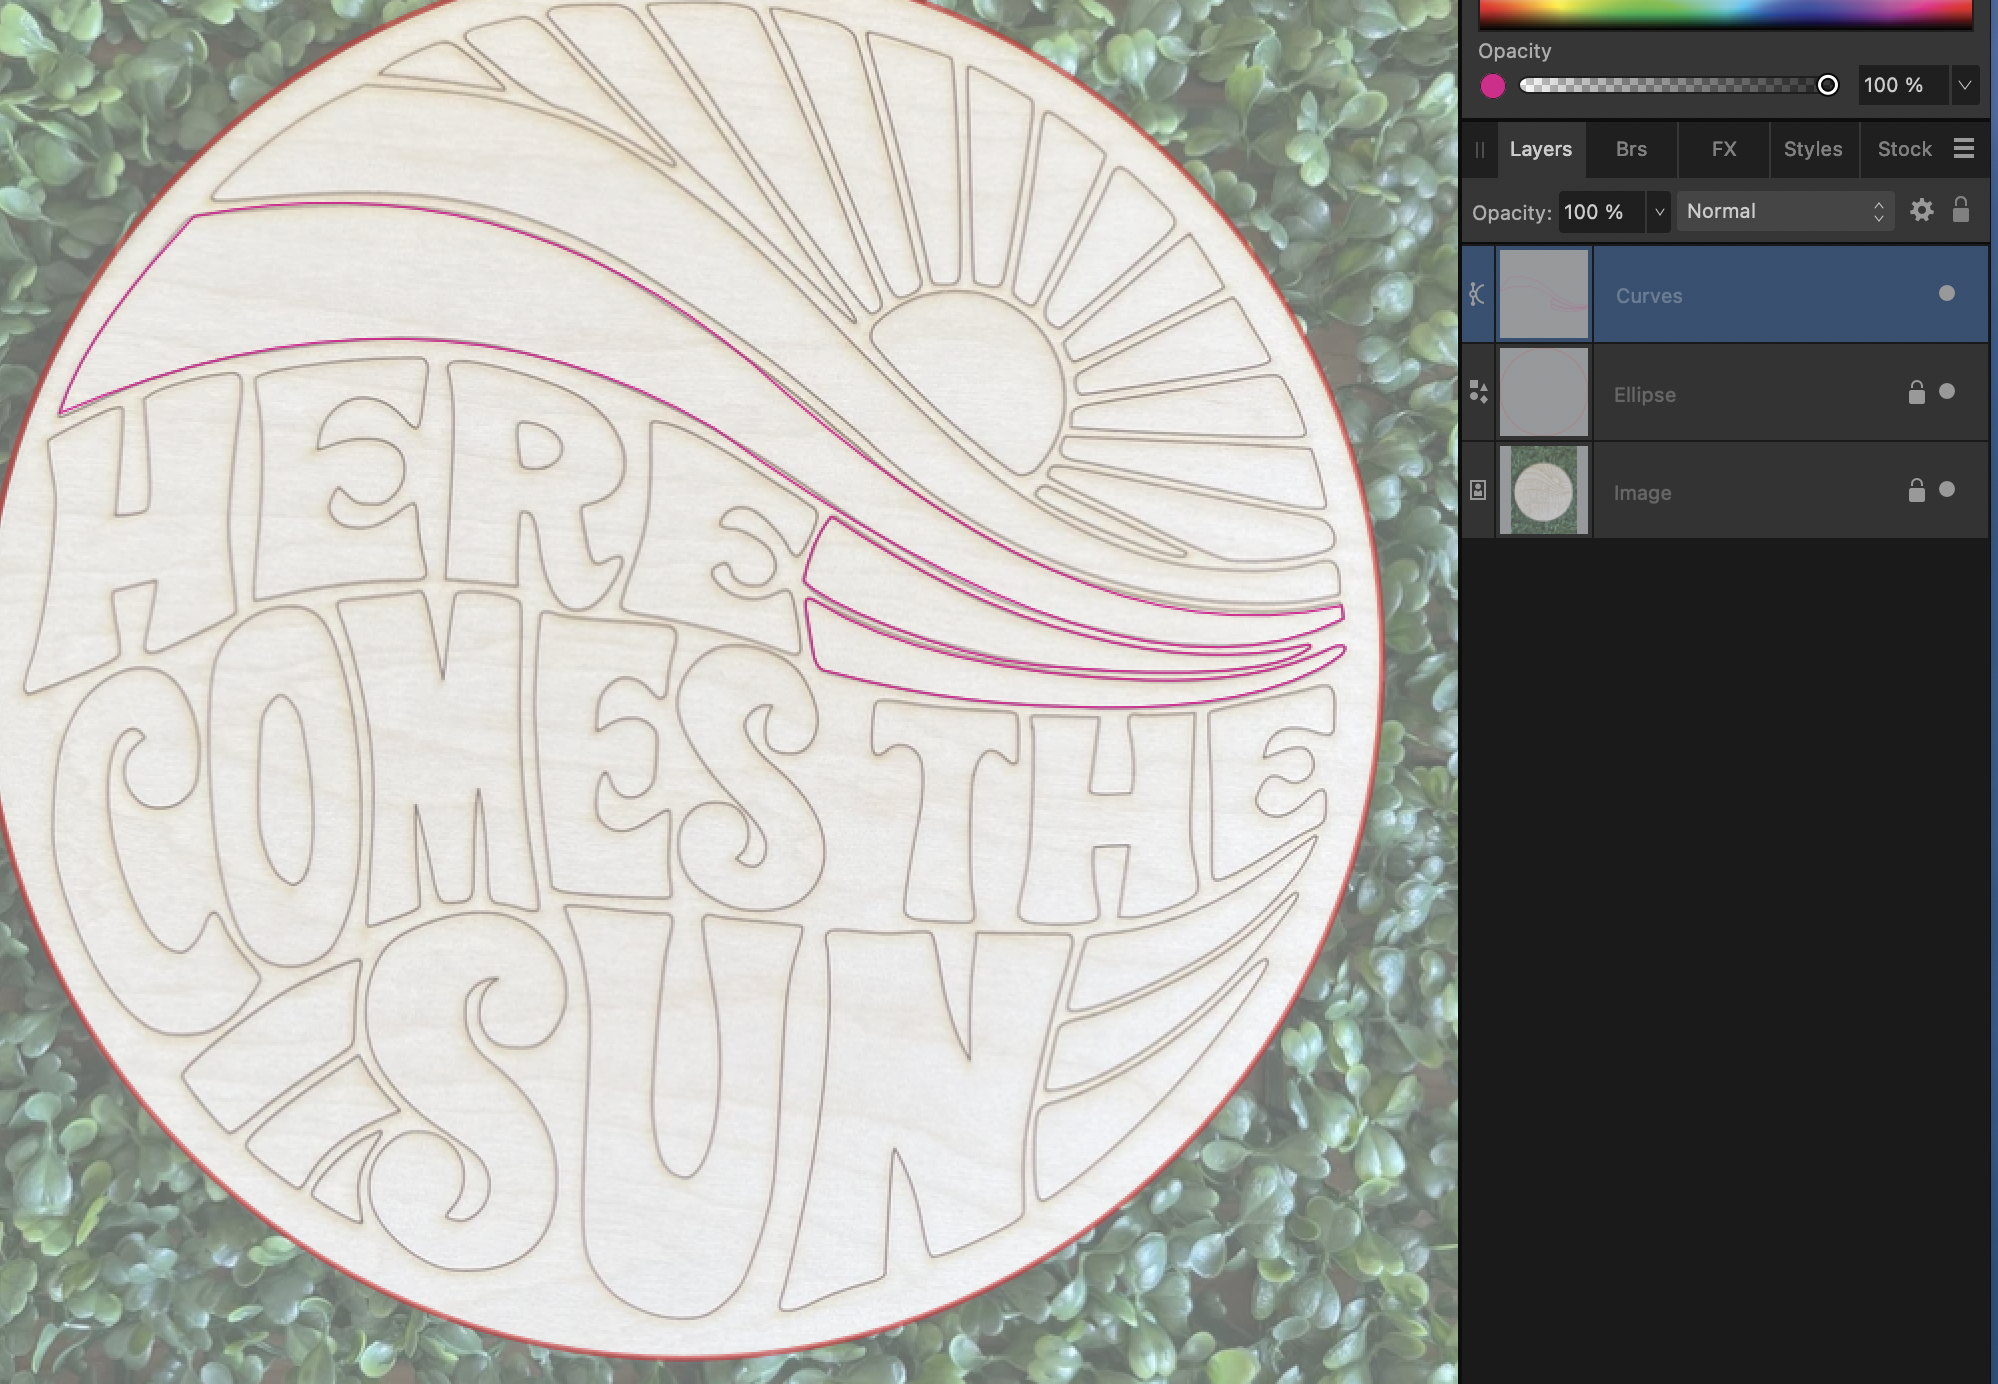
You can still use the cog tool or draw a slim rectangle to create the sun rays but theres no getting away from the micro editing, i.e. rounding corners etc, You'll notice the sun shine isn't particularly uniform and the problem is that graphic was probably hand drawn, digitally, which gives it it's charm. You also have to consider, how the cutter/engraver will follow the paths/curves you create. -
Make a selection with some feathering of the edges, maybe 25% feathering, of the neck area in the original photo, copy/paste that selection into the AI photo and if needed align it
-
How to make a call to action button?
firstdefence replied to G H PRABHU's topic in Desktop Questions (macOS and Windows)
I think they are referring to a website button that has different states, such as hover, hover click, click, double click and the button looks slightly different with each state. But if they want to do the same and integrate it into Affinity, then the answer is, you can't. -
No Idea to create the logo
firstdefence replied to HerbTHEberT's topic in Desktop Questions (macOS and Windows)
Why not copy paste the image into affinity and then use the pen tool to trace over the shapes. So, start by drawing a circle for the outer edge, next use the pen and node tool to draw and manipulate the curves.
-
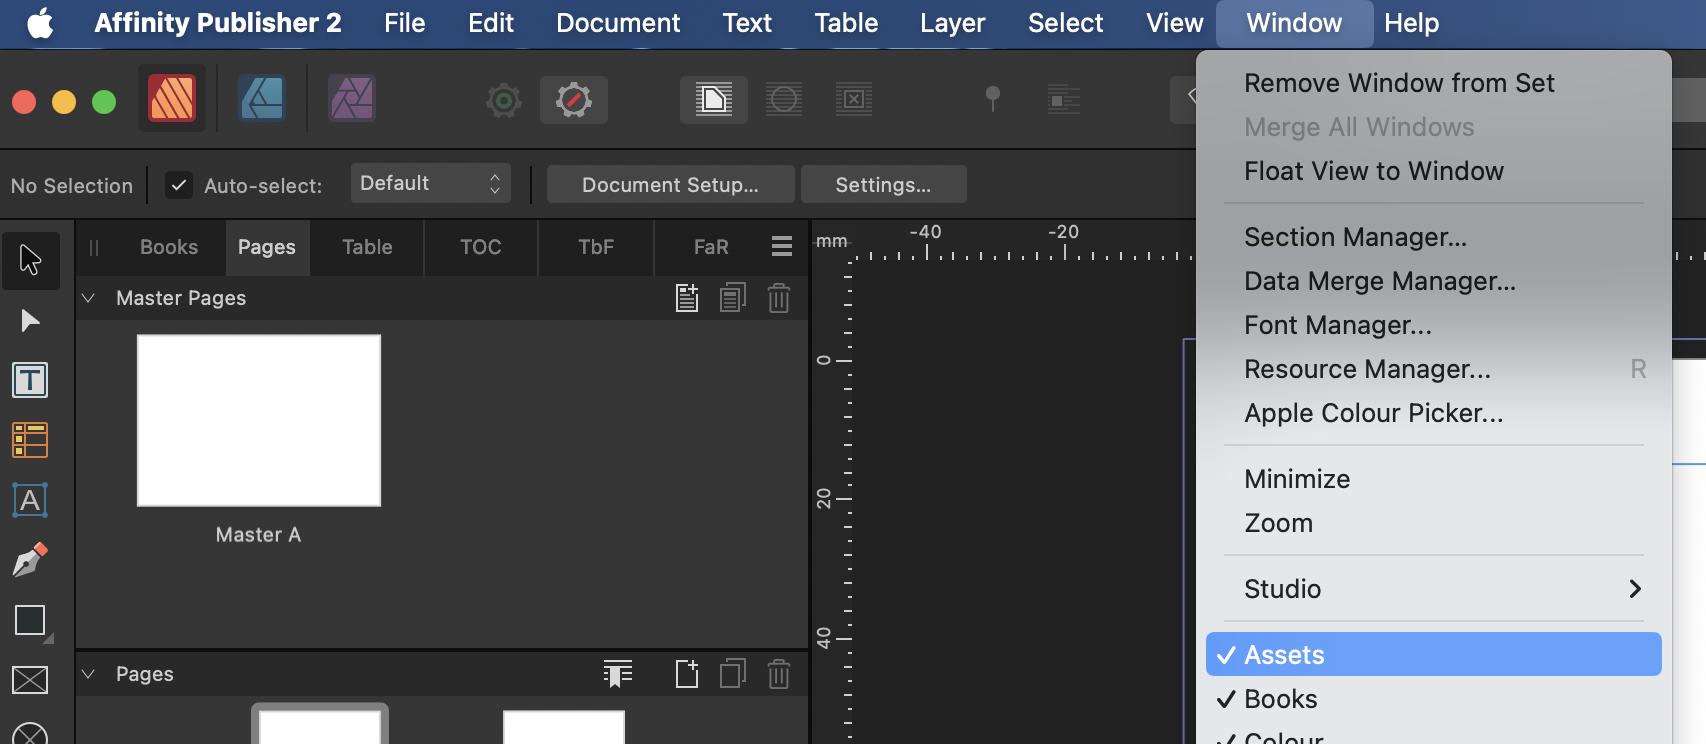
There is an assets panel in every Affinity app, if you wish to have multiple layers in one asset, group them. https://affinity.help/publisher2/English.lproj/pages/Panels/assetsPanel.html
-
A few minutes with the patch tool.
-
Have a play with the mesh warp as well. scrap that try the patch tool instead seems to give better results.
-
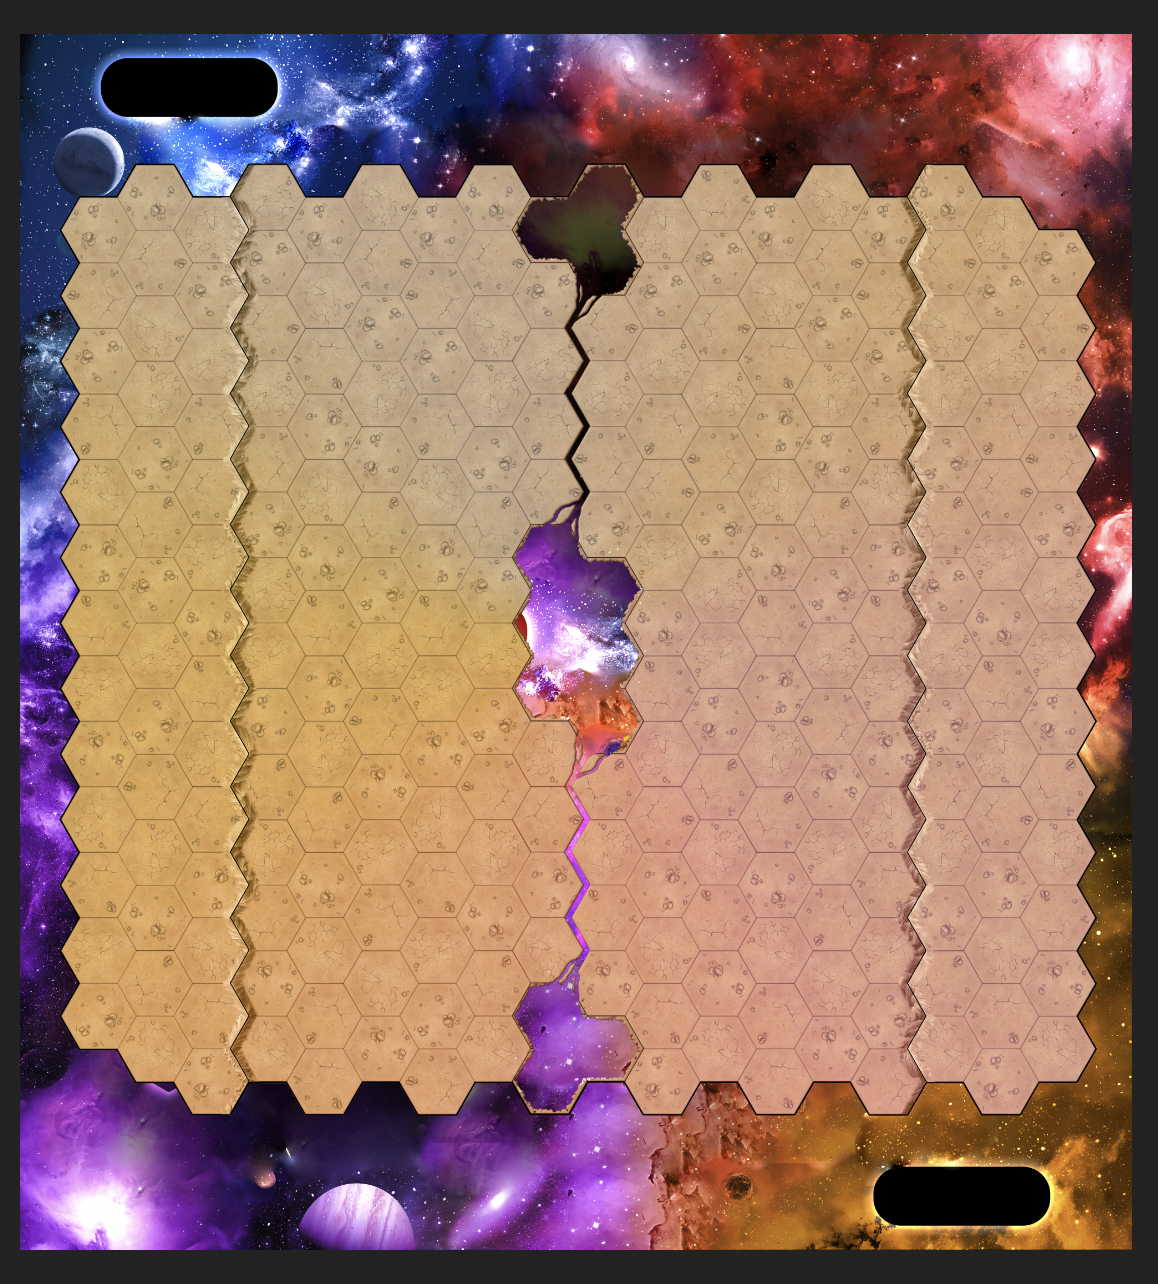
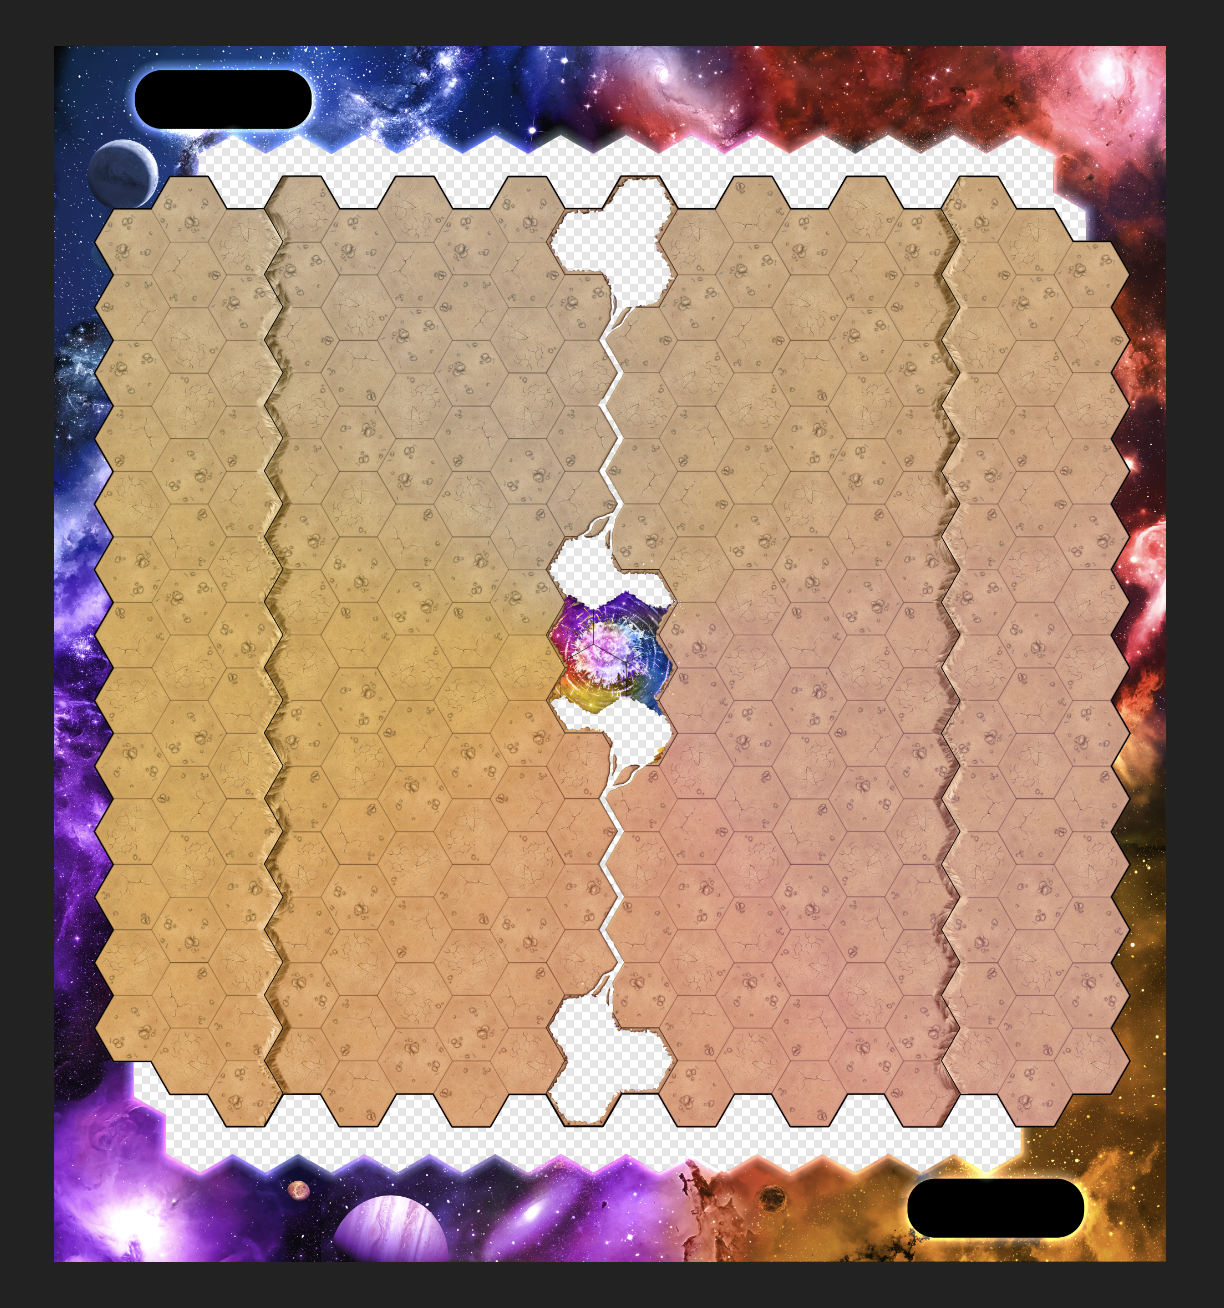
Here is the document I made... I have saved the selection as a spare channel so it can be loaded in again. it's 322.5mb but the board size is very large so... New board separated hexagons.afphoto
-
The problem is you don't have enough of the background image, you can cut and paste the hexagons to a new layer but you still have the problem of a background that is only viewable around the edges. I'm surprised they didn't save the layered version, that's a bit odd. So if you selected all of the hexagons, cut and pasted them to a new layer and then rotated them, this is how it would look.
-
Don't suppose you have the file that can be uploaded here do you or is the actual image the one we are looking at? Just to clarify, this image is all one and in a flattened state, i.e. a single image layer? Ps. this is from a game I assume?
-
Nice bit of info @Old Bruce
-
Photo doesn't have vector brushes, only raster brushes.
-
Ah no the vector brushes, the raster brushes will not snap to the grid.
-
On mac, setting the grid to isometric and holding shift down will constrain to the grid.
-
Find Center Of Line
firstdefence replied to ASUNDER's topic in Desktop Questions (macOS and Windows)
On mac this can be achieved using Control + Drag. Holding shift as well keeps the handle steady, so Control + Shift + Drag. -
Find Center Of Line
firstdefence replied to ASUNDER's topic in Desktop Questions (macOS and Windows)
Terminology is quite important when asking questions, so you have to get creative lol! A balanced arc is probably a better term for what you want, as opposed to say, a semi-circlular arc. I'm not renowned for my math skills, so I generally use either CAD apps, and or online math calcs like: https://www.omnicalculator.com/math/perimeter for semi circular arcs and focused measurements. Because Affinity have used the term curve instead of path like photoshop did, when you talk about a curved curve it gets a bit messy, whereas a curved path is less ambiguous. Also, curves can be straight or angular adding to a confusing terminology when posting so you have to be more specific when talking about curves. I know most affinity are used to the term curve to describe a path (I come from photoshop experience) but to describe a straight curve is a bit weird. -
Hi @thomaso Yes, that was the idea.
-
Could you upload the afdesign/afphoto or afpub file? Have you tried placing a white rectangle behind the graphics with the gray edge?