GeoffM33
-
Posts
61 -
Joined
-
Last visited
Everything posted by GeoffM33
-
This issue may be covered elsewhere but I've not found it yet. I make a PDF from Publisher or Designer with trims and bleed etc, and place it into a Publisher document so I can plan it up for printing. It comes in but the printers' marks are hidden. They seem to be there (double click the placed file for the "edit" function and there they are, same as in Designer) but I cannot get them to show. Place a PDF into Designer and you get the whole thing - trims etc, but not in Publisher; it's masked to the page box. I figured out how to get required pages to show in a multi-page file, but you need to dupe the import and choose the page needed afterwards. Better would be options somewhere in the import stage so you can choose trims, bleed, pages etc - or maybe an Affinity version of that function. Is this a bug or a not-yet-implemented item? I'm enjoying the app so far!
-
Request: collapsible panels
GeoffM33 replied to postmadesign's topic in Feedback for Affinity Publisher V1 on Desktop
I've tried Eluengo's idea for setting up the studio panels and it works OK for a work-round for now, BUT what I am getting is when I click on a tab to access the panel, the whole palette expands to more than a third of my screen and won't go back with clicking. I have to manually drag it back to size. Have I done something weird or is this a bug? -
Yes. I am of similar background and experience. By way of a try-out, I have just done a little 24pp A5 with lots of photos, but found that the app is fairly stable, without any of the glitches mentioned; maybe latest patches have fixed things. However, my booklet came out at 1.77GB even with all pix linked. This does need fixing. Having said that, Affinity Designer also produces some massive files, so that needs looking into as well.
-
Step and Repeat
GeoffM33 replied to Steveporter's topic in Feedback for Affinity Publisher V1 on Desktop
P.S. I refer to the step & repeat topic rather than more complex functions. (I'm still not sure how these forums work and how replies relate to previous messages.) -
Step and Repeat
GeoffM33 replied to Steveporter's topic in Feedback for Affinity Publisher V1 on Desktop
Yes, this is essential. Especially with the 'grid' function as in InDesign. -
Stroke and rules styles
GeoffM33 replied to GeoffM33's topic in Feedback for Affinity Publisher V1 on Desktop
Sorry. The "Nope" was in reply to an earlier post from Typo998. Still looks like PC and Mac are different tho'. -
Stroke and rules styles
GeoffM33 replied to GeoffM33's topic in Feedback for Affinity Publisher V1 on Desktop
Nope. Works fine both ways for me. I notice it looks like MickRose is on a PC. I'm on a Mac. Is that the difference? I would expect them to work the same. On my Mac it doesn't report the object as (Shape Text), just the first few words of the content. Something for the devs? -
Stroke and rules styles
GeoffM33 replied to GeoffM33's topic in Feedback for Affinity Publisher V1 on Desktop
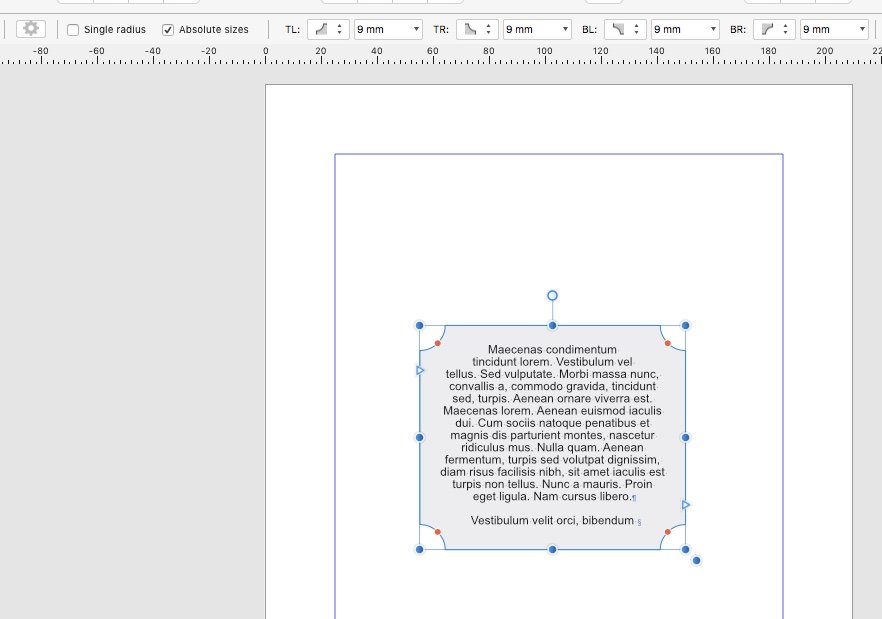
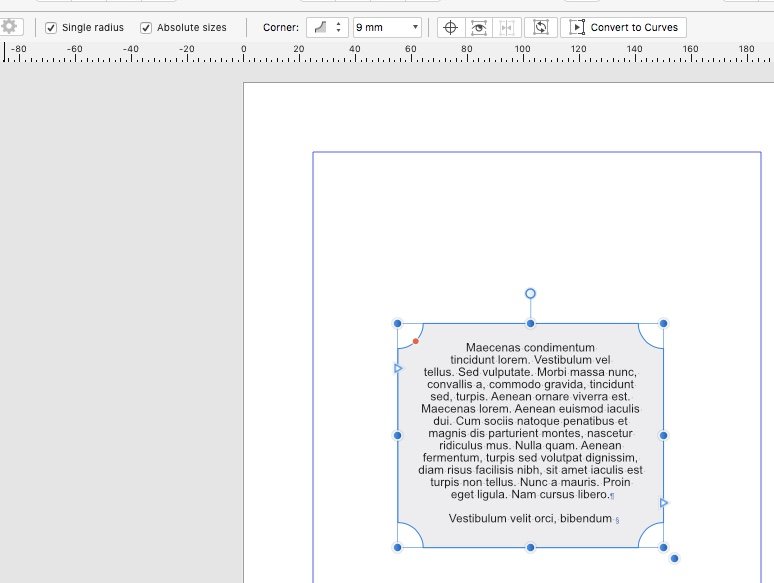
I've just experimented with this question. Yes, we are correct that it is not yet possible to give a text frame curved/indented/cutout etc corners, if it starts as a text frame. BUT if you make a rectangle and give it corner styles, single radius or separate radii, it can then be converted into a text frame. To reveal all the corner controls with the frame selected, choose the node tool, and the controls you need now appear in the context tool-bar. This works either for 4 separate corners/radii or single radius mode. Absolute values can be used too. And you can change the corner style. You can also set a text indent in the text frame dialogue box to get the text to sit nicely in the frame. Job done!
-
Stroke and rules styles
GeoffM33 replied to GeoffM33's topic in Feedback for Affinity Publisher V1 on Desktop
No, nor me so far. I've been doing an experimental booklet to test the software, and I've come up with a work-around: Either put two different rules next to each other (and maybe group them if you like), or stack two rules on top of each other, make them different weights, biggest underneath, and colour them differently. This last will work better with frames and boxes: make the frame, give it a wide stroke, give it a fill if you like, duplicate it so it's bang on top, give the copy a finer rule and colour the rule differently (e.g. the page colour, say) and take the fill off. -
Stroke and rules styles
GeoffM33 replied to GeoffM33's topic in Feedback for Affinity Publisher V1 on Desktop
Ah ha! It was frame strokes and borders I was looking for, but your post prompted me to look at a similar drop-down in the contextual tool-bar or the text frame dialogue. Query solved! -
Stroke and rules styles
GeoffM33 replied to GeoffM33's topic in Feedback for Affinity Publisher V1 on Desktop
Further to the stroke/fill topic, I am trying out strokes and fills on text frames. 1. Select a text frame with the move tool and use the stroke and/or fill palettes to apply a stroke and/or fill and it applies the result to the text, even though the frame, not the text is selected! Not what I'd expected. This I would only expect to happen when text is high-lighted with the text tool, which it does. 2. O.K. so you have to use the text frame dialogue to do this, but it doesn't yet give the options for stroke alignment or join styles. 3. Maybe I've been using InDesign too long and expect the same behaviours here. I guess you can't copy Adobe practices too closely. -
I have not found it yet, but is there/could there be an option to choose a stroke style like double rules thin/thick etc (see InDesign or Quark [remember that?]). This would be useful when designing traditional looking documents. You can fake it by using multiple objects, but that's messy. It doesn't exist in Affinity Designer, but it would be of little use there in an illustration app.
-
Worked seamlessly. Looks good so far. Running Mac OS High Sierra 10.13.6.
-
Text styles short cuts
GeoffM33 replied to GeoffM33's topic in Feedback for Affinity Publisher V1 on Desktop
Excellent! It also works if you select the text box with the move tool and right click "Apply style_1 and next styles". We don't yet have text box and picture box styles, but a styled text box can be stored in the Assets pane, but it doesn't work as well as your suggestion. -
Text styles short cuts
GeoffM33 replied to GeoffM33's topic in Feedback for Affinity Publisher V1 on Desktop
If you have a long document, like a brochure or manual, say, it will probably have several levels of information in it. And these will repeat page after page, chapter after chapter. To manually mouse/click each of these as you go through the document styling it up would take ages. You've probably imported it from a client's Word file so it won't look the way you want it. So, you establish your styles on the first page or two, and give each one a keyboard short-cut. It might go: Chapter heading, main heading, sub heading, text stand-first, body text, bullet point and so on. Place your text cursor in the first heading, hit the command for its style and it will be applied to that paragraph. If the document is mostly in long linked text chains you can use keyboard navigation to move to the next heading, or paragraph and hit the command for the style you want (yes, you do have to memorise the shortcuts but there shouldn't be too many) then move to the next and so on. This way you can style a long document very quickly just with the keyboard and with very little mouse work. However, I have not found a keyboard command to jump between paragraphs. Maybe a custom command needs to be made. It would be good if there was a ready-made cursor command for this in the default set. Is this what you meant? -
Text styles short cuts
GeoffM33 replied to GeoffM33's topic in Feedback for Affinity Publisher V1 on Desktop
Doh! There it was, staring me right in the face. Lesson learnt! Time for computing's last resort - read the flippin' manual... -
How about keyboard shortcuts which you can allocate to paragraph and character styles? That way you can rattle through a long copy document and style it up without constant mousing. InDesign and Quark had this from early on.
-
I suggest the ability to import tabbed text and/or spreadsheet files so you can select and click a "convert to table" button (say) to avoid manually populating an empty table. You could then style the result in the usual way. GM33
-
Thanks for your comments and work-flow tips. I will continue with Nik on this basis and watch this topic for other info.
-
Hi, I have just installed the NIK Collection of Plug-ins. What are the advantages of using these as compared with the built-in Affinity Photo tools? Especially the de-noising and sharpening tools - are they "better" or just presented differently? Do they work in a different way? What can they do that Affinity can't? Cheers. GM33
-
Hi MEB, Thanks. That has solved the problem. I would never have guessed that answer. Geoff
-
I have just noticed that when I open a Nikon NEF file from my D5600 into Affinity Photo the extreme edges are lost. OK so I shouldn't frame things so tight but it it still a nuisance. The preview I see in Nikon ViewNXi shows all of what I remember taking but when opened in AFP directly or via ViewNXi about 30 or 40 pixels are cropped off the edges. See attached screen grabs. Any ideas? Thanks. AFP_grab.tiff VNXi_grab.tiff