

Max P
-
Posts
113 -
Joined
-
Last visited
Posts posted by Max P
-
-
I think it's unhealthy to include a DAM in affinity! Past experience with LR6 and difficulties to evolve., update in time
Seriff, a small company, already has to deal with its multi-OS suite.
As far as I'm concerned, this company should concentrate on optimising the code for native functions and their updates.I don't want any additional 'glue' NO DAM
There's enough of that, as a standalone application, and some nice ones at that.
-
More easy for me
16 bit for the precision
1 Make a provisional B&W version
2 Use the pen tool to select the area on the forehead roughly to start and use a dynamic Gaussian blur for a smooth transition edge
3 Use the dropper to select the right grey value and fill this area
4 Delete the B&W version
5 Now switch the curve layer to divide mode (around 15 40% opacity )
Adapt the gray component if necessary with the color wheel and perhaps the color with the peripheral circle a little green ?..6 With the node retouch the limit on the area.
7 Review all dynamic parameters
to retouch another area in this way, you need to make a copy of the initial layer and repeat this process
-
Hi,
For this, I use DxO viewPoint , You can try 30 days
-
Hi,
sometimes there is objectively a bug
I have the same problem since a while after an update, the plugin list disappeared, and impossible to reconfigure it?
I just retried this morning with gmic all the proposed solutions
(like defining another folder, possibly on another disk with the right access permissions)
It's repetitive if you look at the history of the different forums, in some cases certain configurations sometimes not all the time.
Nothing! On APhoto V1
-
It's to old solution
A photo have now the divide mode. use it
Try this
- Fill layer whith dominant color, use the color picker
- mode divide
- play with opacity
Okay ,
this solution uses the entire surface of the layer It may be wise to select an specific area,
- use the Pen tools or an ellipse (no need for great precision) to select the area where you want to correct the color castand here fill with the dominant color. (adapt with gaussian blur fx and with node )
- for the gray /white component fill with a neutral grey gray divide mode ( color mode adjusting saturation )
The advantage of a vectorial object is that you can always adjust the color in situ.
adjust witn opacity at each step
-
Hi smadell
I just tested your macros good job, cartoon effect but not only
In the latest version of windows on the welcome image, we have a splash popup window, to give the password an interesting blurred version with color cast mapping.
I was wondering how to generate this, attempt to use in color correction, just an instinctive reactionYour macros are perfectly usable and adjustable for this:
On a landscape image, in hard light* mode and in neutral position 50% I obtained results which seem interesting in the spirit of Hwb.
*or other light modes
Yesss!
Thank you
-
Bonjour Piou
Oui logique on assemble X calques en un seul calque
Si tu veux tout de même , garder l'opportunité de re intervenir juste avant cette fusion
tu dupliques en un groupe et ce nouveau groupe que tu fusionnes en faisant clique droit tramer
Yes, it is logical to merge X layers into a single layer
If you want to keep the opportunity to intervene just before this merging duplicate in a group and this new group,
you merge by right clicking on it rasterize
-
I just tried with Krita, l*a*b* (32 bit) L100 seems to be a special case where the terminals a* and b* on the left side have the same colour.
I just learned something, this day
Pauls NotMyFault you were right, sorry for my previous postMerry Christmas to you
-
Yes
yes you are right, it's a bug some day ago, in Affinity Photo, I saw the same incoherence, very surprised.
From memory it seems to me that it was correct, some time ago
-
Painting Wash Lavis is the equivalent key word water color wash
I seem to have misunderstood your previous comment
for this one
Understand , but not convinced me

Well I see that the tone rises also I will leave this thread
thanks to all
because I have made a lot of progress thanks to this thread
-
Okay
I understand Lavis
one method for this dilute a color before using it use only one color
that will be diluted to obtain different intensities of color
We have a differential of appreciation in the term FILL, and an unsaidFor me
Fill Layers when Need to add a layer that is completely filled with a solid color, gradient or pattern
Go on youtubeplay with opacity colour overlay
I retained also that we could use semi-transparent colors on AFFINITY SWATCHES pantone Xxx
easy
Last video Colour overlay AFFINITY solid color
-
Smee Again i see your post , thank , if i understand you correctly
For the Fill layer ( or Curve or vectoriel shape )
it is possible to use
the Color>
- Grayscale slider more precise than color wheel
- Or better for me Lab L 50 A 0 B0, and move L plus or minus
- HSL also
To color layer use these sliders with the appropriate mode, eventually add a mask to circumscribe the effect on the right area
No problem for a gradient
I don't know if it does the job, I have no PS
-
On 3/9/2021 at 3:13 PM, loukash said:
I haven't found any explanation – as in: a mathematical formula – online yet. Everybody knows that the "Special 8" are there, "can" do this'n'that and they love it, but nobody tells you how exactly it works.But since it's all really just math:
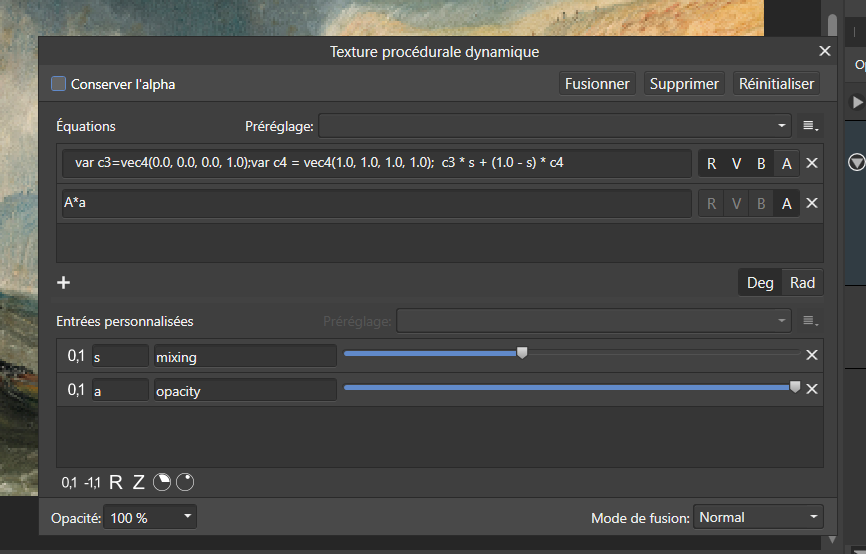
How about adjusting it in APh with a Procedural Texture live filter? Has anybody tried that?
I'm no mathematician whatosever, so this is way beyond my expertize. But I noticed that @NotMyFault has recently experimented with Procedural Textures and seems to understand how it all works.Yees
We can use procedural texture for this
using vec4() for vector with 4 parameters
here vec4(Rx,Gx,Bx, Opacity)
Rx,Gx,Bx, Opacity, are define in [0.0, 1.0 ] For me no sens using 8 bit (Fill Layer is 8 bit!)
First Step we define
vec4 c1 = vec4(0.0, 0.0, 0.0, 1.0); //Black
vec4 c2 = vec4(1.0, 0.0, 0.0, 1.0); //Red
vec4 c3 = vec4(1.0, 1.0, 0.0, 1.0); //Yellow
vec4 c4 = vec4(0.0, 0.0, 1.0, 1.0); //Blue
vec4 c6 = vec4(1.0, 1.0, 1.0, 1.0); //white
we want an interpolation slider between White and Black
var c1=vec4(0.0, 0.0, 0.0, 1.0);var c6 = vec4(1.0, 1.0, 1.0, 1.0); c6 * s + (1.0 - s) * c1
var for variable
c4 * s + (1.0 - s) * c1 // classic use for mixing or use lerp()
And Yess, Pixel layer can gives same result, and with 16 bit!,
32 bit is possible but my pc is limited 16 giga Ram , I5 and and I am not convinced that it is better
Rename each layer very important here, Otherwise photo can get lost in cyber space
=>
between Black and Blue
var c1=vec4(0.0, 0.0, 0.0, 1.0); var c4 = vec4(0.0, 0.0, 1.0, 1.0); c4 * s + (1.0 - s) * c1
between Black and Red
var c1=vec4(0.0, 0.0, 0.0, 1.0);var c2 = vec4(1.0, 0.0, 0.0, 1.0); c2 * s + (1.0 - s) * c1
Info and explain
https://thebookofshaders.com/06/
https://www.codeproject.com/Articles/492355/Domain-Coloring-Method-on-GPU
https://fr.mathworks.com/matlabcentral/fileexchange/25773-domain-coloring
- NotMyFault and loukash
-
 2
2
-
Hi
This reminds me of a colorcast mentioned on this forum about DX0 pureraw.
In the meantime,
I had read on a Darktable FAQ that this kind of problem (pink or blue color) was induced by screens which are not all able to translate fine variations of range in the highlights and that each software had its own way to deal with this limit
From memory Aurélien Pierre advised to limit the range about 230On your histogram we can see that the high limit is largely exceeded, which should not be too hard to correct
In Develop basic
Reduce the exposure a little
Decrease the brightness
Play with Shadows and Hightlight
Interactively
First try
to get close to the limit without exceeding it and conclude the interaction with the 2 softs with your screen
And tell us, please -
If I understand your request correctly a solution i use
Above the layer that received the gradient
Put a fill layer with a deep black New Fill Layer
group it in erase modemodulate with opacity of the fill layer AND the opacity of erase group
The gradient doesn't move, it is just + or - Transparent
I use for mixing with sweet modulation (also for modulate luminance on grey layer, with local brush)
-
Hi
I'm just trying with the Dng
view the dng found in the link ( the pink area corresponds to an overexposure, as an indication ).
Okay, I have DXO photo lab 4.3.1, minor coorection on the raw sony A1, no Pureraw .
you should report this fact on the DXO forum and support
-
Hi
good start
my suggestion
Return to develop personna ,
Play witf clarity => We quickly have a blue vertical bar, never touch the right limit, it is the abyss
you must go reduce exposition about -0.462.
In this special case reducing the brightness and high light is not enough , normally its enough
Okay now go clarity 22% + or -
Developp
Duplicate background put it in soft light reduce opacity about 60%
That's allSorry for my english, it's the principe, with pratice, it' will be good.
-
I totally agree with you, I spent some time just yesterday on this topic.
But it's not so usual for Seriff to listen to the evolutions requested by the users, however...
-
If you insert a vectorial shape as a child of a pixel layer. And you select it only, and blurring, it will be the edges that will be progressive but it will not be a vectorial shape anymore, (switch to pixel ) any more , but still selectable with a rectangle shape (layer + child).
But not feather vector shape edges saveable as a style
-
Hi,
Also
Since the last update,
With raw (NEF), we see losses of quality loss of sharpness, and tonality, if we compare with other viewer, as FSV, the decrease is noticeable
If I go in editions preferences surprise! my GEFORCE 960 M card is not selectable anymore!
By default, I have just the card, Intel by default, I can select WARP, but no more GEFORCE 960 M
Win10, the open cl disabled, 16 g ram, -
Hi surajrv6,
Put a pixel layer on the top, put it in erase mode
paint on the edge witl a brush about 22 % opacity, (you can adjust with %)
Also you have with level or curve, alpha option
-
+1
illustrating this, RAL 3020 to Pantone, CMYK, RGB, Hex, HSL, HSV, HSB, JSON
yes, the absence of If as a condition statement requires code contortions, poorly readable result
-
-
Hi Paul_Hol
Click Studio> view> Layer ... Channel . and more..
On the right take the bar you have on the right and pull it to the left direction


Why won't Serif listen to customer needs and create a Lightroom alternative for us?
in Feedback for the Affinity V2 Suite of Products
Posted
A very interesting thread
Maybe see here
okay this is a standalone application, which seems to be able to collect data from